
How to Climb from Ancient to Divine as Pos 5 Hard Support in Dota 2 (2026 Guide)

Playing Pos 5 hard support at Ancient bracket is simultaneously the most thankless and most impactful role in Dota 2. Nobody notices when you place the ward that prevents a gank. Nobody appreciates the stack that accelerates your carry’s item timing by 2 minutes. Nobody credits the perfectly timed Glimmer Cape that saves your mid from certain death. But those plays win games — and at the Ancient-to-Divine boundary, they’re the difference between stagnation and climbing.
The hard truth about climbing as Pos 5: It’s slower than climbing as a core, but it’s absolutely possible — and in some ways, it’s more consistent. The reason is that Pos 5 impact is cumulative and compound. Every good ward, every successful pull, every well-timed save adds a small percentage to your team’s win probability. Over hundreds of games, those percentages stack up into a significant win rate edge.
This guide is for Ancient Pos 5 players who are doing “all the right things” but still can’t break through to Divine. We’re going beyond the basics — advanced lane manipulation, pull timings, ward placement theory, save prioritization, and the macro understanding that separates Ancient 5 from Divine 1 supports.
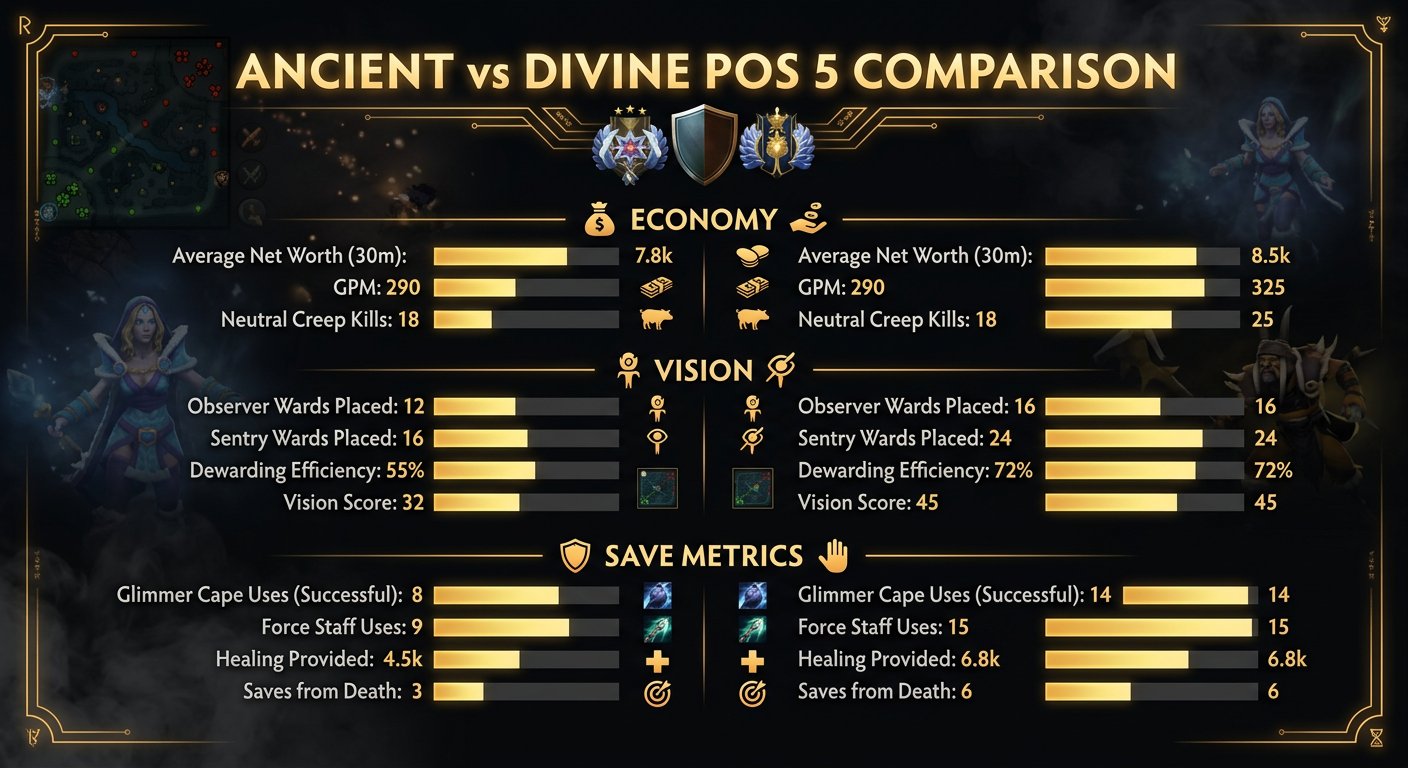
The Ancient vs. Divine Pos 5 Gap
Lane Management Sophistication
Ancient Pos 5 players know how to pull. They pull the small camp at :15/:45, they stack-pull sometimes, and they harass the enemy offlaner when they can. But their lane management is largely on autopilot — they follow the same pattern regardless of the game state.
Divine Pos 5 players manage the lane dynamically. They read the lane equilibrium every 10 seconds and adjust. If the wave is pushing, they pull — but they choose WHICH pull based on the situation (small camp pull to deny a wave Stack pull to fully reset Hard camp pull for more gold). If the wave is in a good position, they DON’T pull — they harass the offlaner instead. If the carry is doing fine alone, they leave to stack or secure a rune, then return. Every action is a conscious decision, not a habit.
Save Prioritization
The most impactful skill difference between Ancient and Divine Pos 5 players is save prioritization. Ancient supports use their save abilities (Glimmer, Force Staff, heals) on whoever is closest or whoever is dying first. Divine supports use saves on the hero whose survival most impacts the fight outcome — which is almost always the Pos 1 carry or the Pos 2 mid, not the Pos 3 who jumped in and got caught.
This sounds obvious, but in the chaos of a teamfight, the instinct is to save whoever is screaming the loudest (usually the offlaner who initiated). Training yourself to hold your save for the RIGHT target — even if it means your offlaner dies — is one of the hardest and most impactful habits to develop.
Economy Optimization
Ancient Pos 5 players are perpetually poor. They buy wards, sentries, dust, smoke — and then have nothing left for items. They’re level 10 at minute 20 while everyone else is level 15. They feel irrelevant because they ARE irrelevant — no items, no levels, no impact.
Divine Pos 5 players maintain a functional economy while still buying everything the team needs. How They optimize their XP and gold sources: pulling for gold (each pull gives 100-150 gold), stacking for gold (assist gold when your carry clears the stack), taking last hits when the carry isn’t in lane, collecting bounty runes, and farming dangerous lane creeps during dead time. A Divine Pos 5 at minute 20 has Glimmer Cape, Force Staff components, and is level 13 — a completely different player than the Ancient Pos 5 with Brown Boots and a Magic Stick.
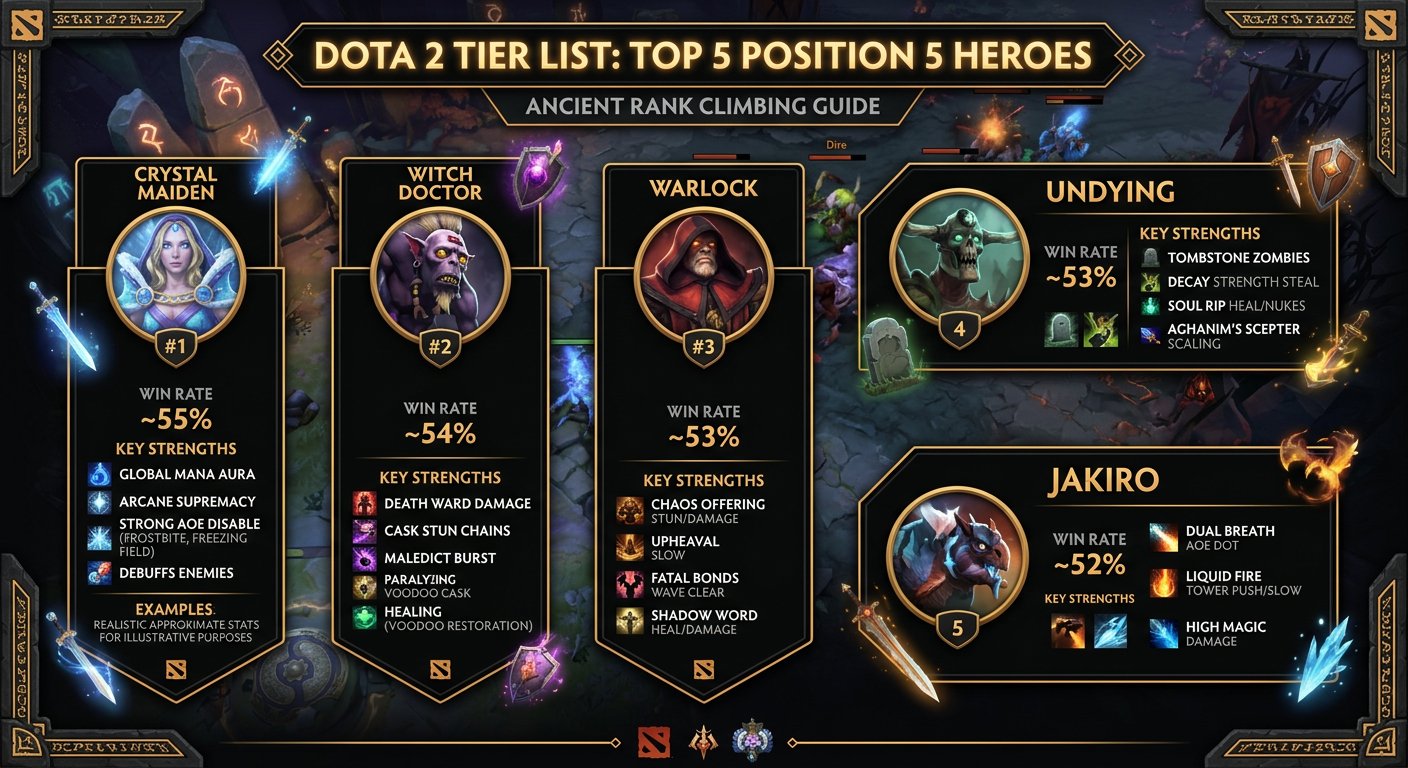
Top 5 Heroes to Climb from Ancient to Divine as Pos 5
1. Witch Doctor
Witch Doctor is the perfect climbing Pos 5 because he provides everything the role demands at Ancient bracket: lane presence, healing, stun, and a teamfight ultimate that can single-handedly win fights when positioned correctly.
Why WD climbs at Ancient:
- Paralyzing Cask bounces are devastating in Ancient-level teamfights where enemies group up
- Maledict is the highest-damage non-ultimate ability in the game against tanky heroes — Ancient players don’t respect its damage
- Voodoo Restoration provides sustain during pushes and sieges without requiring items
- Death Ward deals physical damage that scales with attack speed, remaining relevant throughout the game
- The hero is mechanically simple, letting you focus on macro decisions
The WD laning pattern: Max Maledict by level 5 for maximum kill threat. At Ancient level, offlaners underestimate Maledict’s damage — a Cask Maledict right-click combo at level 3-4 deals 400+ damage and forces the enemy offlaner to retreat or die. This kill threat zones the offlaner completely, giving your carry free farm.
Death Ward positioning: The #1 WD mistake at Ancient is channeling Death Ward from an exposed position. Always channel from behind trees, on high ground, or behind your frontline. If the enemy can see you, they can stun you. If they can’t, Death Ward deals 3,000+ damage over its full duration — that’s enough to kill any hero in the game.
Glimmer Cape synergy: Glimmer Cape + Death Ward is one of the strongest combos in Ancient bracket. Channel Death Ward, then Glimmer yourself. At Ancient level, enemies often don’t carry detection, so your invisible Death Ward channels for 5+ seconds uninterrupted.
2. Dazzle
Dazzle is the ultimate save support and the Pos 5 who makes your carry unkillable. Shallow Grave is the most powerful single-target save in the game, and at Ancient level, enemies consistently waste abilities on Graved targets.
Why Dazzle works:
- Shallow Grave prevents death for 5 seconds — enough time for your carry to kill the enemy or escape
- Shadow Wave provides healing AND damage simultaneously (the damage bounces to enemies near healed targets)
- Bad Juju (passive ultimate) reduces cooldowns and applies armor reduction — your abilities get spammier as the game goes on
- Poison Touch is one of the strongest level 1 harass tools in the game
- The hero is difficult to dive against, making your carry’s lane extremely safe
Shallow Grave timing: The most important skill for Dazzle players is Grave timing. Too early = the enemy waits out the duration and kills your target after. Too late = they’re already dead. The ideal timing is when your ally drops below 25% HP and the enemy is committed to the kill. This takes practice but becomes instinctive.
Lane dominance with Poison Touch: Poison Touch at level 1 deals enormous damage over time and slows. Use it on the enemy offlaner every time they approach the creep wave. Combined with right clicks, it forces them out of lane within 2-3 applications. By level 3, your Poison Touch + Shadow Wave + right-click combo threatens to kill most offlaners.
3. Warlock
Warlock is the teamfight Pos 5 who provides a won teamfight button every 3 minutes. Chaotic Offering (Golem) stuns in an AoE and creates a massive summon that Ancient teams consistently fail to deal with.
Why Warlock climbs:
- Fatal Bonds amplifies all damage dealt to bonded enemies by 18% — this is absurdly powerful in teamfights
- Shadow Word provides strong laning sustain for your carry or harassment on the enemy
- Upheaval is a massive AoE slow that zones enemies during pushes and fights
- Chaotic Offering stuns, summons, and provides building damage — it’s a push tool AND a fight tool
- At Ancient level, enemies don’t focus the Golem, so it deals thousands of damage over its lifetime
Fatal Bonds in teamfights: Cast Fatal Bonds BEFORE the fight starts or as soon as it begins. Bond as many enemies as possible (ideally 4-5). Every point of damage your team deals is amplified by 18% across all bonded targets. This means a single Sonic Wave that hits 3 bonded enemies effectively deals 54% more total damage. Ancient players rarely understand how Fatal Bonds works and don’t spread out to avoid it.
Golem usage: Drop the Golem on the enemy backline (supports and mid), not the frontline. The stun catches squishy targets, and the Golem’s attacks deal massive damage to heroes without armor. After summoning, use Upheaval to keep enemies in the Golem’s range.
4. Crystal Maiden
Crystal Maiden provides something no other Pos 5 can match: global mana regeneration for your entire team through Arcane Aura. This passive ability alone is worth picking CM, as it enables mana-hungry cores to spam abilities and farm faster.
Why CM climbs:
- Arcane Aura provides global mana regen that benefits every hero on your team from minute 0
- Crystal Nova is a strong AoE slow and nuke for lane harass and teamfight contribution
- Frostbite provides a root that holds enemies in place for 3 seconds (1.5 on creeps) — reliable setup for ganks
- Freezing Field (ultimate) is one of the highest-damage AoE ultimates in the game when channeled fully
- CM can farm jungle camps with Frostbite, generating income that most Pos 5 heroes can’t
Frostbite jungle farming: This is a critical technique for CM Pos 5 that Ancient players underutilize. Frostbite instantly deals 300 damage to creeps and holds them for 1.5 seconds. Between waves and pulls, use Frostbite on large jungle creeps for guaranteed gold. By minute 15, this technique provides an extra 500-700 gold — enough for a significant portion of your first utility item.
Freezing Field usage: Don’t use Freezing Field from the front. At Ancient level, it’s almost always interrupted immediately. Instead, wait until the enemy commits their stuns on your frontline, then walk in from the side/behind and channel. BKB on CM is a legitimate purchase at higher brackets — a full Freezing Field with BKB deals 4,000+ magic damage in the AoE.
5. Jakiro
Jakiro is the lane bully Pos 5 who transitions into a pushing powerhouse. Dual Breath and Liquid Fire make laning a nightmare for enemy offlaners, and Macropyre provides huge AoE damage in teamfights and pushes.
Why Jakiro works:
- Liquid Fire is a free harassment tool (no mana cost) that reduces attack speed AND damages towers
- Dual Breath is a long-range nuke that slows and damages in a line — excellent for trading
- Ice Path is a line stun with massive range that catches multiple enemies in teamfights
- Macropyre creates a 1400-unit line of fire that zones entire teams during pushes and Roshan fights
- The hero takes towers faster than any other support due to Liquid Fire damage on buildings
Lane harassment pattern: Auto-attack the offlaner with Liquid Fire every time it’s off cooldown (4 seconds). This deals damage, reduces their attack speed (limiting their ability to last-hit), and costs you zero mana. Between Liquid Fires, use Dual Breath when the offlaner moves into range. This constant harassment forces the offlaner out of lane or kills them.
Macropyre placement: Place Macropyre perpendicular to the enemy’s retreat path, not parallel. If the enemy is running north, place Macropyre east-west so they have to walk through the entire length. This maximizes damage. During tower pushes, place it in front of the tower to zone defenders away while your team hits the building.
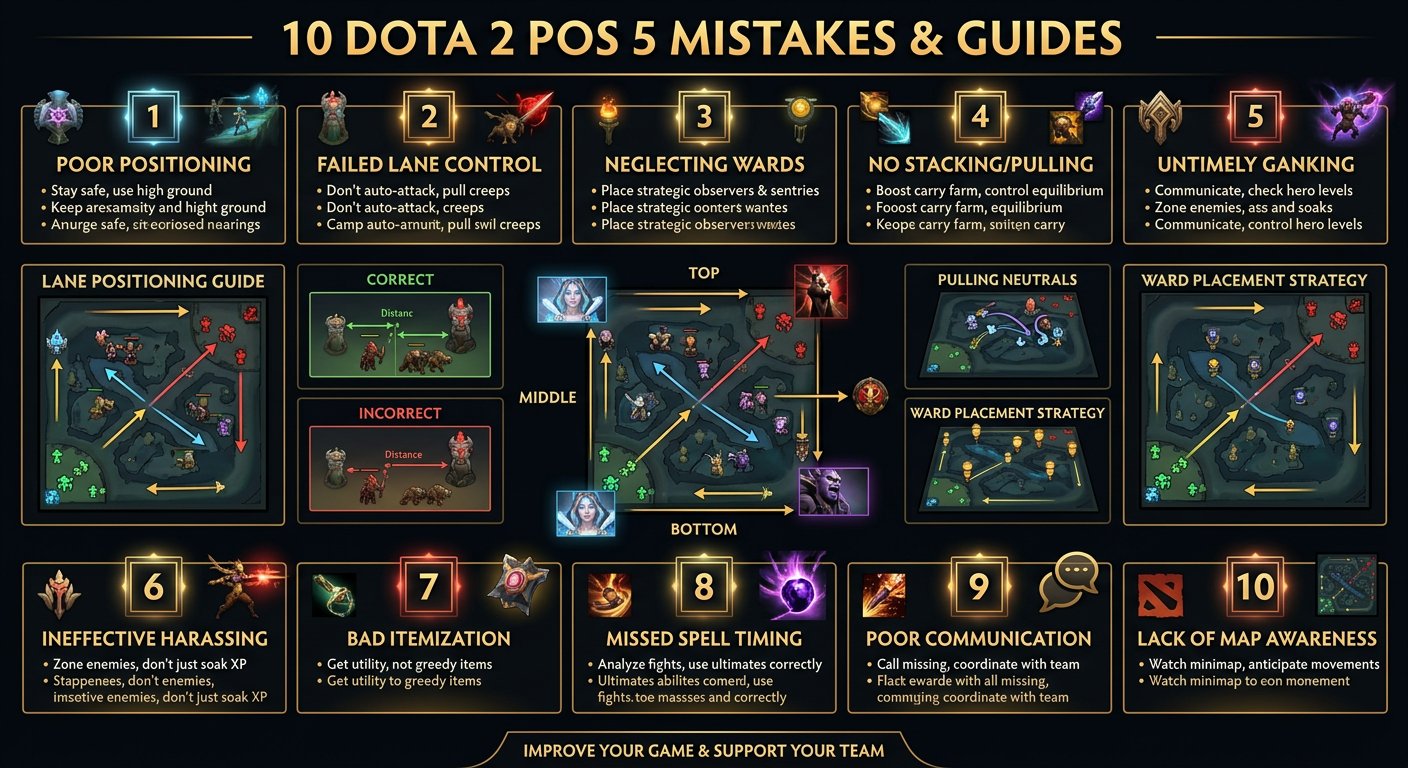
10 Critical Mistakes Ancient Pos 5 Players Make
Mistake #1: Not Pulling Correctly
Ancient Pos 5 players pull the small camp and don’t stack-pull, resulting in a half-dead creep wave that pushes the lane toward the enemy tower. This is worse than not pulling at all — it gives the enemy offlaner free XP from the remnants and pushes the lane to a dangerous position for your carry.
The fix: If you pull the small camp, you MUST connect it (pull through) to the medium camp to ensure the full wave dies. Pull the small camp at :15/:45, then at :23/:53 pull the medium camp to connect. If you can’t connect, stack the small camp first (pull at :53 to stack, then pull the double-stacked camp at :15 of the next minute — the double stack kills the full wave). Master this technique and your carry will have an extra 1-2 levels by minute 10.
Mistake #2: Standing in Lane Doing Nothing
The most common Ancient Pos 5 mistake: standing behind the carry in lane, soaking XP, not harassing, not pulling, not doing anything productive. This is the worst possible use of your time — you’re sharing XP with your carry while providing zero value.
The fix: Every second in lane should have a purpose. You’re either: (A) harassing the enemy offlaner, (B) zoning them away from the creep wave, (C) pulling a camp, (D) stacking a camp, or (E) checking rune. If you can’t do any of these, LEAVE THE LANE. Go stack ancients, ward, or secure a bounty rune. Leaving creates more value than standing around.
Mistake #3: Buying the Wrong Items
Ancient Pos 5 players follow a cookie-cutter build: Arcane Boots Aether Lens Aghanim’s Scepter. This build sounds reasonable but it ignores what the team actually needs. If your team is dying to magic burst, you need Glimmer Cape, not Aether Lens. If your team can’t escape ganks, you need Force Staff, not Aghanim’s.
The fix: Your first utility item should be determined by the game, not by a guide. Ask yourself: “What killed my teammates in the last fight” and build the item that prevents that. Common first items and when to build them:
- Glimmer Cape: Enemy has magic burst damage (Lion, Lina, Skywrath, Zeus)
- Force Staff: Enemy has gap-closers or terrain-based initiators (Clockwerk, Slark, Riki)
- Spirit Vessel: Enemy has healing/regen (Alchemist, Huskar, Morphling, Necrophos)
- Solar Crest: Your carry is physical damage-focused and the enemy has armor
- Lotus Orb: Enemy has single-target disables they need to cast (Doom, Lion Hex, Batrider)
Mistake #4: Dying First in Teamfights
Ancient Pos 5 players position too aggressively in fights and die before using their key abilities. A Pos 5 who dies in the first 3 seconds of a fight has provided zero value — no saves, no heals, no stuns.
The fix: Position 1500-2000 units behind your frontline. Your job is NOT to deal damage or initiate (usually) — your job is to keep your cores alive and use your abilities at the right moment. Stay alive for the first 5 seconds of the fight, use your saves on the right targets, and THEN move forward to use offensive abilities. A Pos 5 who survives the full teamfight is worth more than any other hero on the team because they’ve used their abilities 2-3 times.
Mistake #5: Over-Warding Defensively
Ancient supports place most of their wards defensively — in their own jungle, at their tier 2 towers, near their base. This provides information about incoming threats but doesn’t help your team make aggressive plays. Divine supports balance offensive and defensive wards based on the game state.
The fix: As a rule of thumb, at least 50% of your wards should be offensive (in the enemy’s side of the map). Offensive wards provide information about the enemy’s movements, farm patterns, and Roshan attempts. They enable your team to take fights on favorable terms. If your team is winning, 70% of wards should be offensive. If losing, 70% should be defensive. Adjust dynamically.
Mistake #6: Not Securing Bounty Runes
Bounty runes spawn every 3 minutes and provide significant gold to you and your team. Ancient Pos 5 players frequently miss bounty runes because they’re occupied with other tasks or simply forget. Over a 40-minute game, missing bounty runes costs you 500-800 gold — that’s a significant portion of an item.
The fix: Set a mental timer for every 3-minute mark (0:00, 3:00, 6:00, etc.). 30 seconds before bounty runes spawn, start moving toward the nearest bounty rune. Coordinate with your team — you take the safe bounties, your cores take the contested ones. This habit alone provides enough gold to fund your ward purchases plus item components.
Mistake #7: Not Using Dust/Sentries Against Invis Heroes
Ancient Pos 5 players sometimes fail to buy or use detection against invisible heroes. They’ll complain about Riki or Bounty Hunter without buying a single sentry or dust. Invisibility is a tax on the enemy team — but only if you pay the detection cost.
The fix: If the enemy has ANY invisibility (hero or Shadow Blade), carry dust at all times after minute 10. Place sentries at key locations where invis heroes gank (your jungle entrances, mid lane, rune spots). Detection is the single highest-ROI purchase in the game against invis heroes — 100 gold for a sentry that reveals a 1,500-gold Shadow Blade hero is a massive economy advantage.
Mistake #8: Ignoring Lane Equilibrium
Ancient Pos 5 players sometimes accidentally mess up the lane equilibrium by auto-attacking creeps, pulling at the wrong time, or not pulling at all. This pushes the wave to a bad position for the carry and gives the offlaner free XP.
The fix: Watch the creep wave constantly. If it’s pushing toward the enemy: pull the small camp (stack first if possible). If it’s in a good position (near your tower): don’t pull, just harass. If it’s under your tower: help your carry last-hit under tower and let the wave push out naturally. The lane equilibrium is your responsibility — your carry is focused on last-hitting, not wave management.
Mistake #9: Not Adapting to the Enemy’s Lane
Ancient supports play the same lane pattern regardless of the enemy’s strategy. If the enemy is running an aggressive dual offlane, you play the same. If the enemy is running a solo offlaner with a roaming Pos 4, you play the same. No adaptation.
The fix: Read the enemy’s lane strategy and adapt. If the enemy has a solo offlaner: zone them aggressively so your carry can free-farm. If the enemy has an aggressive dual lane: play defensively, prioritize pulls for gold, and call for help if needed. If the enemy’s Pos 4 is roaming: alert your mid and offlane, and play more cautiously in case they return. Adaptation is the hallmark of Divine-level support play.
Mistake #10: Tilting About Being Pos 5
Let’s be honest — some Ancient players who queue Pos 5 don’t actually want to play support. They resent buying wards, they hate having less farm, and they passively resist the role by building carry items or farming jungle when they should be supporting. This attitude guarantees losses.
The fix: Embrace the role or don’t play it. Pos 5 is the foundation that makes everything else work. When you place a ward that gives your team information, you’ve contributed to every kill that information enables. When you save your carry with Glimmer Cape, you’ve contributed to every kill they make for the next 60 seconds. Your impact is multiplied through your team — it’s not less than a carry’s impact, it’s just different. Own the role and your win rate will reflect it.
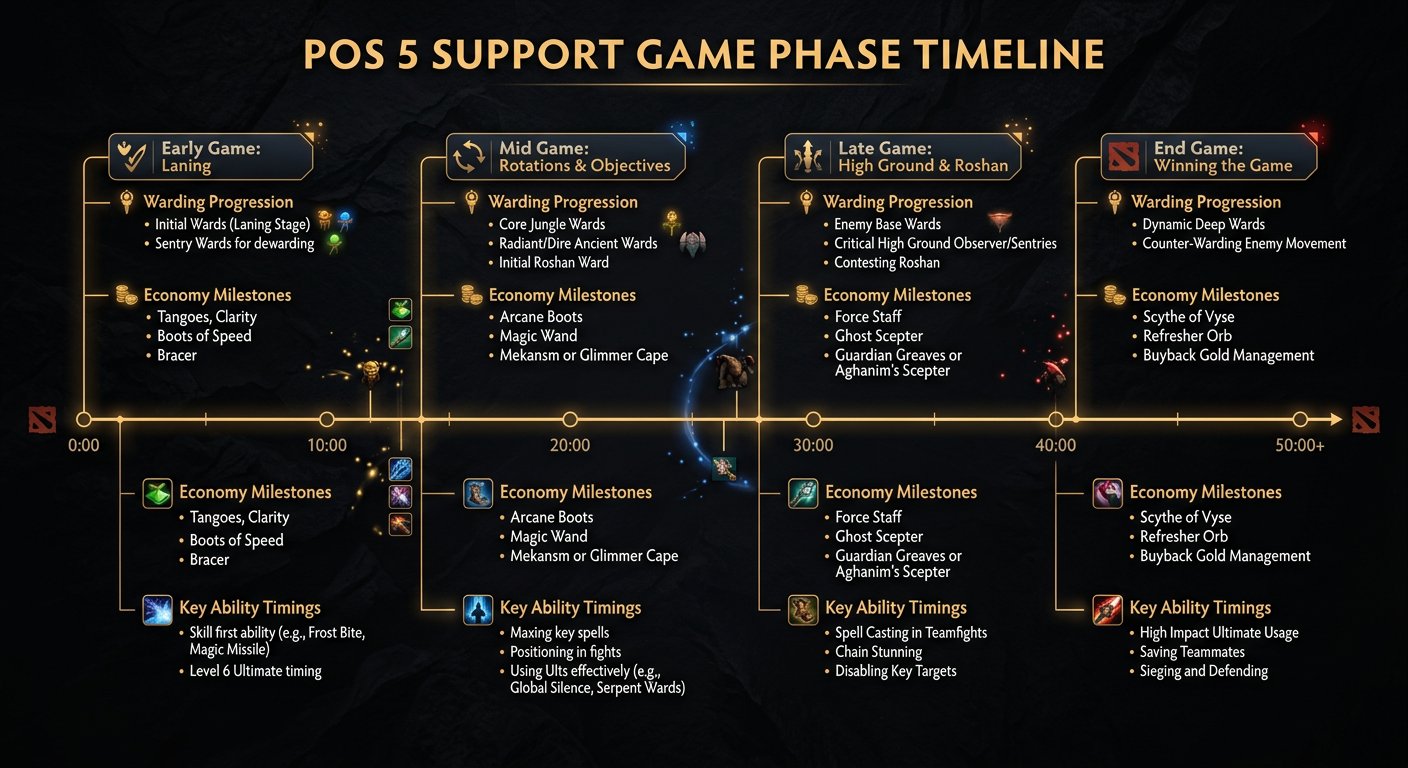
Phase-by-Phase Guide: Playing Pos 5 from Ancient to Divine
Pre-Game: Draft Intelligence
Your Pos 5 pick is usually early in the draft (first or second pick), so you won’t have much information about the enemy team. Pick heroes that are versatile and difficult to punish:
Safe first picks: Jakiro (strong in any lane), Witch Doctor (kill threat + sustain), Crystal Maiden (global aura always valuable), Shadow Shaman (push + lockdown). These heroes work in almost any lineup and don’t have hard counters.
Later picks (when you see the enemy draft): Dazzle (against burst-heavy lineups — Shallow Grave counters single-target assassins), Warlock (against teamfight-heavy enemies — Fatal Bonds punishes grouping), Oracle (against DoT-heavy lineups — Purifying Flames + Fate’s Edict counter sustained damage).
Team composition awareness: If your team lacks disable, pick a support with reliable stun (Shadow Shaman, Witch Doctor, Lion). If your team lacks save, pick Dazzle, Oracle, or Omniknight. If your team lacks push, pick Shadow Shaman, Jakiro, or Warlock. Fill the gap that your team’s draft creates.
Laning Phase (0:00 – 10:00)
Minutes 0-2: Establish lane control. The first two minutes set the tone for the entire lane. Your priorities: (1) Secure the ranged creep for your carry (deny the enemy offlaner’s ranged creep if possible). (2) Harass the enemy offlaner whenever they approach the wave. (3) Don’t auto-attack creeps — let your carry control the equilibrium.
Trading pattern: At Ancient level, effective trading is what separates great laners from mediocre ones. The key is to trade when you have an advantage: (1) Hit the enemy when they’re going for a last-hit (they can’t hit you back while animation-locked). (2) Use the “creep aggro trick” — right-click the enemy hero, then immediately move — to draw their creeps to you without committing to a trade. (3) Use your spell harass from max range to avoid taking creep aggro.
Minutes 2-5: Pull timing. The lane will naturally push if you’re harassing correctly (your creeps aren’t fighting enemy creeps because you’re drawing aggro). When the wave pushes, pull the small camp at :15/:45 with stack-pull. Time your pulls around the lane state, not the clock.
Minutes 5-8: Transition assessment. By minute 5, assess: (1) Is your carry winning the lane and farming well Consider leaving to stack or help other lanes. (2) Is the lane even Stay and continue supporting. (3) Is the lane lost Stay to prevent your carry from dying, or call for a lane swap with the offlaner.
Minutes 8-10: Economy management. By minute 8, you should have Boots, Magic Stick, and be working toward your first utility item. If you don’t have these, you’re either dying too much (fix your positioning) or not generating enough gold (pull more, secure bounty runes).
Early Mid-Game (10:00 – 20:00)
This is the most complex phase for Pos 5 players because your responsibilities multiply: vision control, smoke coordination, save usage in fights, and economy management all happen simultaneously.
Vision roadmap: At minute 10, place observers that protect your carry’s farming area and reveal enemy rotation paths. At minute 15, shift wards toward the areas around objectives you want to take (towers, Roshan). At minute 20, most wards should be offensive — you should be playing on the enemy’s side of the map if possible.
Smoke coordination: As the Pos 5, you’re often the smoke buyer and coordinator. Buy a smoke at minute 10 and ping your offlaner or mid to join. The ideal smoke target is the enemy’s most isolated core — usually the carry farming their jungle. Even if the smoke doesn’t result in a kill, the information gathered (where the enemy is, what items they have) is valuable.
Saving abilities: Once your first utility item is complete (Glimmer, Force Staff), your save ability becomes your most important teamfight tool. Hold it for the right target — usually your carry. Don’t panic-cast it on the first teammate who takes damage. Wait until someone is genuinely in danger of dying, then save them.
Late Mid-Game (20:00 – 30:00)
Roshan preparation: Before Roshan attempts, place a ward near the pit entrance and a sentry to deward enemy vision. Carry Dust if the enemy has invis heroes. Your job during Roshan is to stand at the entrance and watch for enemy approaches — not to hit Roshan (your damage is negligible).
High-ground support: When pushing high ground, the Pos 5 stays in the back. Your job is to keep the carry alive through their initiation, heal/save when they’re focused, and use your abilities to disable or zone enemy defenders. If you die before the carry uses their BKB, you’ve failed your primary job.
Buyback awareness: After minute 25, start tracking your team’s buyback gold. If your carry is spending all their gold on items without saving for buyback, gently remind them (ping their gold or use chat wheel). As Pos 5, your buyback is less critical but still valuable in close games.
Late Game (30:00+)
In the late game, the Pos 5’s value skyrockets because save abilities and utility items become proportionally more impactful. A Glimmer Cape on your carry during a late-game fight can save 15,000 net worth from dying. A Force Staff that pushes your carry out of a stun chain enables them to BKB and turn the fight.
Item progression: By this stage, you should have 2-3 utility items. Common late-game Pos 5 inventories: Arcane Boots (or Tranquils), Glimmer Cape, Force Staff, Ghost Scepter/Aeon Disk, and wards/dust/smoke. If you’re ahead on gold, consider Lotus Orb, Holy Locket, or Refresher Shard for double ultimate impact.
Death management: In late-game teamfights, accept that you might die — but die AFTER using all your abilities and items. The Pos 5 who casts 3 spells, uses Glimmer on the carry, pops Force Staff on the mid, and then dies has won the fight for their team. The Pos 5 who gets caught first and uses nothing has lost it.
Dealing with Difficult Teammates as Pos 5
When Your Carry Doesn’t Farm Well
You’ve created the perfect lane — the offlaner is zoned, the pulls are clean, the equilibrium is perfect. And your carry still misses last hits. This is frustrating but common at Ancient level.
The solution: Accept it and adapt. If your carry can’t convert a won lane into farm, maximize the other things you can control: stack camps (the carry can farm stacks even with poor CSing), secure bounty runes, and maintain vision. After the laning phase, focus on enabling your mid or offlaner instead — the carry will catch up through passive jungle farming even if they’re inefficient.
When Nobody Protects You
Enemy Slark or Riki is hunting you specifically, and your team doesn’t help. You die every time you try to ward, and nobody peels for you in fights.
The solution: Adapt your warding pattern — place wards near your team, not deep in enemy territory. Ward DURING fights when the enemy is distracted, not during quiet farm phases when you’re the only target. Buy Ghost Scepter as a priority item if you’re being hunted by physical damage heroes. And in fights, stand BEHIND your carry so the assassin has to go through them to reach you.
When Your Team Flames You for “No Wards”
You’ve placed 15 wards this game. They keep getting dewarded. Your team dies in unwarded areas and says “gg no wards.” This is the most frustrating experience for support players.
The solution: Don’t engage with the flames. Focus on improving your ward placement — if your wards are being dewarded, you’re placing them in predictable spots. Try placing wards in unusual locations (inside tree lines, on lower ground behind trees, in unpopular spots that still provide the necessary vision). If your team walks into unwarded areas and dies, that’s their map awareness problem, not your ward problem.
When Your Team Won’t Take Objectives After Fights
You win a teamfight, 3 enemies are dead, and your team… goes back to farming. Nobody pushes the tower, nobody takes Roshan, nobody capitalizes on the advantage.
The solution: Ping the objective immediately after the fight. Walk toward it yourself — start hitting the tower or walk into Roshan pit. Your team is more likely to follow a teammate who’s already there than one who’s pinging from across the map. As the Pos 5, you might not do much damage, but your presence signals intent.
Realistic Timeline: Ancient to Divine as Pos 5
Let’s be direct: Pos 5 is the slowest climbing role in Dota 2. Your individual impact per game is lower than a core’s, which means your win rate edge is smaller, which means more games are required to climb the same MMR. But it IS possible, and many players have done it.
- At 52% win rate: 300-400 games (5-7 months at 2-3 games per day)
- At 54% win rate: 150-250 games (3-4 months)
- At 56%+ win rate: 100-150 games (2-3 months)
Notice the win rates are slightly lower than core roles — that’s normal for Pos 5. A 54% win rate as Pos 5 is equivalent to a 56% win rate as Pos 1 in terms of skill differential, because the Pos 5’s impact is more diffuse.
The plateau: Pos 5 players often plateau around Ancient 3-4. This is where enemy supports start matching your skill level, and your advantage in vision and lane management shrinks. If you’re stuck here, focus on teamfight save prioritization — it’s the highest-impact skill at this MMR and the hardest for opponents to match.
Accelerating the climb: Professional coaching is particularly valuable for Pos 5 players because support mistakes are subtle and hard to self-identify. A Divine or Immortal support coach can watch your replays and point out dozens of small errors that collectively cost you win rate. It’s the most efficient way to improve as a support player.
Frequently Asked Questions
It’s absolutely possible. Many Divine and Immortal players achieved their rank playing exclusively Pos 5. The climb is slower than core roles, but it’s more consistent — your win rate edge compounds over time. If you enjoy support play, don’t switch to core just because you think it’s “easier to climb.” Playing a role you enjoy at a high level beats playing a role you hate at a mediocre level.
Observer wards are free, so always place them. Sentries and dust should be purchased as needed — don’t stockpile 4 sentries you’re not using, but always have at least 1 sentry and 1 dust available. Your item progression should not stall completely — if you have no utility items by minute 20, you’re over-buying consumables or dying too much. Balance is key: wards + sentries + dust + steady progress toward your first utility item.
Joining fights. A fight without you present loses your team 4v5. A fight without your ward just means your team has less information. If you have to choose between placing a ward and joining a fight that’s about to happen, JOIN THE FIGHT. You can ward after the fight ends.
Almost always yes. Your death as Pos 5 is worth approximately 200-300 gold to the enemy. Your carry’s death is worth 400-600 gold plus 30+ seconds of farming time. The math heavily favors trading your life for your carry’s survival. The only exception is if your death leads to a chain of additional deaths (e.g., you die in a position where the enemy can also kill your carry).
Leave to stack when: (1) your carry is safe (the offlaner is zoned or has left the lane), (2) there’s no kill threat that requires your presence, and (3) the stack timing aligns with a natural lane break (you pull at :45, the wave resets, you stack ancients at :53). Don’t leave to stack if the lane is contested — your presence is worth more than a stacked camp.
If you’re Ancient 5 and consistently performing at a high level but your win rate reflects teammate variance rather than your own skill, an MMR boost can move you to a bracket where your support skills are better utilized. At Divine level, cores are better at capitalizing on your vision and saves, which makes your support impact more visible. Combined with coaching, this can be a powerful approach to reaching and maintaining Divine rank.
Final Thoughts: The Pos 5 Path to Divine
Climbing from Ancient to Divine as a Pos 5 hard support is the ultimate test of game understanding. It requires you to master lane management, vision warfare, save prioritization, economy optimization, and team coordination — all while playing the least-resourced role on the team. It’s hard. It’s frustrating. And it’s deeply rewarding when it works.
Focus on three core improvements: (1) Master your pulling and lane equilibrium management — this is the foundation of carry enabling. (2) Build items that solve your team’s problems, not generic builds — reactive itemization is the mark of a Divine support. (3) Position correctly in teamfights — stay alive, save the right targets, and use your abilities at the optimal moment.
The Ancient-to-Divine climb as Pos 5 is a marathon, not a sprint. Every game you play with intention — watching replays, identifying mistakes, practicing specific techniques — brings you closer to that Divine star. The support players who reach Divine aren’t more talented than those who stay Ancient; they’re more disciplined, more adaptive, and more willing to learn.
Ready to reach Divine TeamSmurf’s coaching service specializes in support gameplay, pairing you with Divine and Immortal supports who understand the nuances of climbing from Ancient bracket. For a faster route, our MMR boosting service provides safe, efficient rank advancement. Whatever path you choose, your Divine rank is achievable — start today.
Ready to Climb Start Your Journey Today
Team Smurf offers professional coaching with Divine and Immortal players, plus safe, reliable MMR boosting to help you reach your target rank.
Written by Team Smurf’s Immortal-rank analysts — Rankings last verified February 2026


