Best Mid Heroes to Dominate and Climb MMR in Dota 2 (2026 Tier List)

Mid lane is the highest-impact role in Dota 2. Your mid player gets solo XP, solo gold, controls the two most important rune spawns, and is expected to make plays across the entire map from minute 6 onward. A dominant mid wins games. A losing mid creates a hole that’s incredibly difficult for the rest of the team to fill.
If you want to climb MMR, mid is the most direct path — and picking the right hero for mid is half the battle. The wrong hero gets countered, loses lane, and spends 30 minutes trying to catch up. The right hero wins lane, takes map control, and snowballs into an unstoppable force.
This guide covers 15+ mid heroes in exhaustive detail. For each hero, you’ll get: tier ranking, why they’re strong for climbing, detailed laning tips, power spike timings, complete itemization paths, matchup analysis, and specific advice on when to pick (and when to avoid) each hero.
This is the deep-dive companion to our complete hero tier list for all roles. If you main mid, this is your playbook.
Want to see what professional players pick when climbing mid? TeamSmurf’s boosters use many of these heroes to achieve 80-90%+ win rates.
Table of Contents
- Mid Lane Tier Overview
- S Tier Mid Heroes
- A Tier Mid Heroes
- B Tier Mid Heroes
- Matchup Matrix
- Mid Lane Fundamentals
- Power Spike Timing Guide
- When to Pick Each Hero
- FAQ
Mid Lane Tier Overview
| Tier | Heroes |
|---|---|
| S Tier | Huskar, Templar Assassin, Zeus, Void Spirit |
| A Tier | Invoker, Storm Spirit, Ember Spirit, Shadow Fiend, Kunkka, Puck |
| B Tier | Lina, Queen of Pain, Viper, Sniper, Tinker, Death Prophet, Arc Warden |
S Tier Mid Heroes — The Best of the Best
Huskar — The Pubstomp King
Win rate: ~55% (all brackets) | Best brackets: Herald through Ancient
Huskar is the most feared mid hero in ranked matchmaking below Divine. His unique mechanic — getting stronger as his HP gets lower — creates a hero that plays unlike anything else in Dota. When other heroes run, Huskar fights harder.
Why Huskar Dominates Mid
- Burning Spears stack damage over time — in lane, 3-4 Burning Spear hits deal more damage than most heroes’ nukes.
- Berserker’s Blood gives massive attack speed and magic resistance as HP drops. At 20% HP, Huskar attacks like a machine gun and takes almost no magic damage.
- Inner Fire provides AoE disarm + knockback, making him impossible to man-fight.
- Life Break (ultimate) jumps on a target, deals massive percentage-based damage, and slows. Combined with Armlet, it’s a death sentence for most heroes.
Laning Tips
- Start with Burning Spears. Orb-walk (manually cast Burning Spears) to harass the enemy mid without drawing creep aggro.
- Control the lane equilibrium. Push the wave slightly to secure ranged creep denies. Your Burning Spears let you last-hit and deny simultaneously.
- Trade aggressively. Most mids cannot trade with Huskar because Berserker’s Blood gives you magic resistance. They deal less damage to you than you deal to them.
- Grab runes. Huskar at level 3-4 with a regen rune or DD rune can solo-kill the enemy mid.
- Target: complete Armlet by 10-12 minutes.
Power Spike Timings
| Timing | Item/Level | What to Do |
|---|---|---|
| Level 6 | Life Break | Start looking for kills on enemy mid or rotate to side lanes |
| 10-12 min | Armlet | Kill Roshan immediately. Aegis + Armlet = unstoppable |
| 16-20 min | Armlet + BKB | Force highground or take all outer towers |
| 25-30 min | Satanic/Halberd | Peak power. End the game before BKB duration shrinks |
Itemization Path
Core build: Armlet of Mordiggian → Black King Bar → Heaven’s Halberd → Satanic → Assault Cuirass
Situational items:
- Aghanim’s Scepter — Life Break becomes a low-cooldown nuke. Great for picking off enemies.
- Silver Edge — When you need break against Spectre, Bristleback, or Phantom Assassin.
- Sange and Yasha — Alternative to Halberd when you don’t need the disarm.
Counters and When NOT to Pick Huskar
Hard counters:
- Ancient Apparition — Ice Blast prevents healing. This single ability shuts down Huskar’s entire kit.
- Axe — Culling Blade ignores Huskar’s low-HP advantage. Counter Helix triggers constantly as Huskar attacks fast.
- Ursa — Fury Swipes ignore armor, Enrage gives status resistance, and Ursa out-mans Huskar.
- Timbersaw — Pure damage ignores magic resistance. Timber destroys Huskar in lane and teamfights.
Do not pick Huskar when: The enemy has 2+ of his hard counters, the enemy team is heavy physical damage, or the game is likely to go 40+ minutes (Huskar falls off).
Templar Assassin — The Lane Dominator
Win rate: ~53% | Best brackets: All brackets
TA is the complete mid hero package: she wins lane, farms fast, takes early Roshan, and snowballs into a game-ending force. Her skill floor is moderate but her effectiveness is consistently high across all brackets.
Why TA Dominates Mid
- Refraction provides damage block instances AND bonus attack damage. In lane, you take no damage while dealing extra damage on every last hit.
- Meld provides -armor strike + invisible positioning — a single Meld + attack removes massive armor and deals burst damage.
- Psi Blades cause spill damage behind the target. This lets TA harass through creeps and farm stacked camps instantaneously.
- Psionic Trap provides slow + vision. Place them on rune spots, Roshan, and gank paths for insane map control.
Laning Tips
- Use Refraction for every last-hit. The bonus damage ensures you out-CS virtually any mid hero.
- Harass with Psi Blades. Position so your attack on a creep spills onto the enemy mid. This is TA’s signature move.
- Deny aggressively. With Refraction damage, your denies are guaranteed — you hit harder than the creeps.
- Stack ancients. Attack a creep aligned with the ancient camp, and Psi Blades will spill into the camp, pulling them. Stack at X:55.
- Rush Desolator. TA’s #1 priority is completing Desolator as fast as possible (12-15 minutes).
Power Spike Timings
| Timing | Item/Level | What to Do |
|---|---|---|
| Level 6 | Psionic Trap | Place traps on both rune spots and enemy jungle |
| 12-15 min | Desolator | Start ganking with Blink (or roaming). Deso melts heroes. |
| 15-18 min | Deso + Blink | Kill Roshan. Aegis + Deso + Blink = push high ground. |
| 20-25 min | BKB | Force teamfights. TA’s damage peaks here with BKB protection. |
Itemization Path
Core build: Desolator → Blink Dagger → Black King Bar → Daedalus → Swift Blink
Alternative builds:
- Dragon Lance → Aghs — Extends Psi Blade range. Excellent for safe damage output in teamfights.
- Orchid rush — Against Storm Spirit, Puck, or other escape heroes. Silence + burst = kill.
Counters and When NOT to Pick TA
Hard counters:
- Viper — Poison Attack burns through Refraction charges. TA cannot lane vs Viper.
- Venomancer — DoT ticks remove Refraction charges one at a time.
- Huskar — Burning Spears do the same thing. Constant DoT destroys TA in lane.
- Jakiro — Dual Breath + Liquid Fire remove Refraction and punish TA’s low HP pool.
Do not pick TA when: The enemy has heavy DoT (damage over time) heroes, the enemy mid is a DoT-based counter, or your team lacks frontline (TA needs someone to initiate before she Blinks in).
Zeus — The Global Damage Machine
Win rate: ~54% | Best brackets: All brackets
Zeus offers something no other mid hero can: guaranteed damage on every enemy hero on the map, at any time. Thundergod’s Wrath hits all 5 enemies regardless of where they are. This global pressure changes how the entire enemy team plays.
Why Zeus Dominates Mid
- Arc Lightning — Spammable nuke for last-hitting and harass. Compensates for Zeus’s terrible base attack damage.
- Lightning Bolt — High burst damage + ministun + TRUE SIGHT. Reveals invisible heroes and wards.
- Heavenly Jump — Mobility tool that also deals damage and slows.
- Thundergod’s Wrath — Global nuke hitting ALL enemy heroes. Used to finish off low-HP enemies anywhere on the map, scout the entire enemy team, and deal chip damage before fights.
Laning Tips
- Last-hit with Arc Lightning. Zeus has one of the worst base attack animations and damage. Use Arc Lightning for every creep you’d otherwise miss.
- Harass with Arc Lightning + Lightning Bolt. Arc Lightning bounces to the enemy mid if they stand near creeps. Follow up with Bolt for burst trades.
- Manage mana carefully. Zeus is extremely mana-hungry. Buy Clarities, take Intelligence items, and control runes.
- Don’t try to right-click trade. Zeus loses every right-click battle. Keep distance and use spells.
- Use Thundergod’s Wrath to secure kills in other lanes. Always check the minimap for low-HP enemies.
Power Spike Timings
| Timing | Item/Level | What to Do |
|---|---|---|
| Level 6 | Thundergod’s Wrath | Scan for low-HP enemies across the map. Secure kills. |
| 12-15 min | Arcane + Aether Lens | Cast range increase makes Lightning Bolt unreachable. Spam from distance. |
| 20-25 min | Aghanim’s Scepter | Nimbus provides a second global nuke on a short cooldown. |
| 30-35 min | Refresher Orb | Double Thundergod’s + Double Nimbus = global team wipe potential. |
Itemization Path
Core build: Arcane Boots → Aether Lens → Aghanim’s Scepter → Refresher Orb → Octarine Core
Situational:
- Eul’s Scepter — Against high burst or for setup (Eul’s into Bolt is guaranteed).
- BKB — When enemy team dives you in fights.
- Bloodstone — For mana sustain in extended games.
Counters and When NOT to Pick Zeus
Hard counters:
- Anti-Mage — Mana Break destroys Zeus, and Spell Shield resists magic damage.
- Nyx Assassin — Mana Burn does massive damage to Zeus’s huge mana pool. Spiked Carapace reflects Lightning Bolt.
- Huskar — Berserker’s Blood’s magic resistance makes Zeus’s damage negligible.
- Pipe of Insight — Enemy team building Pipe significantly reduces Zeus’s teamfight impact.
Void Spirit — The Elusive Playmaker
Win rate: ~52% | Best brackets: Legend through Immortal
Void Spirit combines burst damage, mobility, and survivability into one of the most well-rounded mid heroes in Dota 2. With three movement abilities, he’s nearly impossible to pin down, and his burst combo deletes squishy targets instantly.
Why Void Spirit Dominates Mid
- Aether Remnant — Places a sentry that pulls and damages enemies who walk through it. Excellent for lane control and zoning.
- Dissimilate — Short-range teleport with damage. Combines with other abilities for burst combos.
- Resonant Pulse — AoE damage + physical damage shield. Makes trading in lane highly favorable.
- Astral Step — Two-charge dash that deals damage and applies a slow/void mark. The primary mobility and burst tool.
Laning Tips
- Use Resonant Pulse to last-hit and harass simultaneously. The shield absorbs right-click damage from the enemy mid.
- Place Aether Remnant in the creep path. Enemies walking through it take damage and are briefly held.
- Trade aggressively at level 3. Pulse + Remnant + Dissimilate is a powerful combo that most mids can’t match.
- Control runes. Void Spirit’s mobility makes him one of the best rune-securing mids in the game.
Power Spike Timings
| Timing | Item/Level | What to Do |
|---|---|---|
| Level 6 | Astral Step | Gank side lanes. Astral Step + combo = instant kill on any support. |
| 10-14 min | Orchid Malevolence | Silence + full combo = guaranteed solo kill on any hero. |
| 18-22 min | Orchid + Aghs/BKB | Peak burst timing. Look for pickoffs and force teamfights. |
| 30+ min | Hex/Bloodthorn | Transition into team utility with lockdown. |
Itemization Path
Core build: Orchid Malevolence → Aghanim’s Scepter → Black King Bar → Bloodthorn → Hex
Alternative: Witch Blade → Eul’s → Aghs for a more defensive/utility build.
A Tier Mid Heroes — Excellent Picks
Invoker
Win rate: ~50% (skill-dependent) | Best brackets: Ancient through Immortal
Invoker has 10 abilities, making him the most complex and versatile hero in Dota 2. In skilled hands, he can play as a teamfight controller, a burst assassin, a split pusher, or a right-click carry depending on the build. His Quas-Wex build provides early aggression while Quas-Exort provides farming speed and late-game scaling.
Key laning tips:
- Quas-Exort: Focus on last-hitting with Forge Spirits and Alacrity. Your lane dominance comes from CS superiority, not kills.
- Quas-Wex: Harass with Cold Snap + right-clicks. Look for EMP + Tornado combo at level 5-6.
- Always have Ghost Walk (Quas-Wex) available as an escape.
Core build (QE): Hand of Midas → Aghanim’s Scepter → Blink → Refresher
Core build (QW): Urn → Spirit Vessel → Aghanim’s → Refresher
When to pick: When your team needs versatility, when the game is likely to go late, when you’re confident in your mechanical skill.
Storm Spirit
Win rate: ~51% | Best brackets: Legend through Immortal
Storm is the ultimate snowball mid. Ball Lightning gives him infinite range on engagements — he can literally fly from his base to the enemy base to kill someone. Once ahead with Orchid + mana items, he picks off enemy heroes one at a time until the game ends.
Key laning tips:
- Level 1-5 is weak. Focus on getting every last-hit with Overload procs.
- Static Remnant + Overload for wave clear. Stack camps with Remnant.
- Don’t use Ball Lightning aggressively until you have sufficient mana pool (Kaya/Orchid).
- Power runes are huge for Storm. Contest every rune spawn.
Core build: Power Treads → Kaya → Orchid → BKB → Bloodthorn → Hex
When to pick: Against squishy enemy lineups without instant disable chains. Storm thrives against heroes that can’t lock him down instantly.
When NOT to pick: Against Silencer, Doom, or lineups with 3+ stuns that can chain-disable you.
Ember Spirit
Win rate: ~51% | Best brackets: Legend through Immortal
Ember’s Fire Remnants make him one of the safest heroes in Dota. He can farm aggressively, split push dangerous lanes, and always escape back to a remnant if ganked. His teamfight damage scales incredibly well with items.
Key laning tips:
- Flame Guard provides magic damage immunity — use it to absorb enemy nukes while trading.
- Searing Chains in combination with Flame Guard deals massive early damage.
- Sleight of Fist has invulnerability frames — use it to dodge spells.
- Keep a Remnant behind you at all times for escape.
Core build (magical): Maelstrom → Aghanim’s → Shiva’s Guard → Refresher
Core build (physical): Battle Fury → Daedalus → BKB → Rapier
When to pick: When you need a safe mid that can split push and fight. Against lineups that can’t break through Flame Guard easily.
Shadow Fiend
Win rate: ~51% | Best brackets: Archon through Immortal
SF is the “pure skill” mid. With no escape ability, SF lives and dies by positioning and Raze accuracy. But when played well, his farming speed, lane dominance through Raze spam, and Requiem burst make him devastating.
Key laning tips:
- Necromastery souls = damage. Losing lane as SF means losing souls, which means losing harder. Prioritize denies.
- Triple Raze (close + medium + long range) is your kill combo. Practice the ranges.
- SF has zero escape. Ward defensively and be aware of enemy support rotations at all times.
- Stack and clear camps with Razes for accelerated farming.
Core build: Power Treads → Eul’s → BKB → Daedalus → Butterfly → Satanic
When to pick: When you need a tempo mid that farms fast and fights with Requiem. Avoid when enemy has strong ganking supports.
Kunkka
Win rate: ~52% | Best brackets: All brackets
Kunkka is a lane-winning mid with incredible burst potential. Tidebringer cleave deals full damage in a huge AoE, X Marks the Spot provides a guaranteed setup for Torrent + Ghostship, and the rum buff from Ghostship reduces incoming damage for your team.
Key laning tips:
- Tidebringer is your laning tool. Last-hit a creep and the cleave damages the enemy mid behind it.
- Deny your own ranged creep when Tidebringer is off cooldown to deny XP while trading damage.
- X Marks yourself → TP to base → heal/buy → get X’d back. Free fountain trip.
- X + Torrent + Ghostship is guaranteed if you time it correctly.
Core build: Phase Boots → Armlet → Daedalus → BKB → Assault Cuirass
When to pick: Against melee mids or short-range heroes who can’t avoid Tidebringer cleave. Great team synergy with AoE setups.
Puck
Win rate: ~51% | Best brackets: Ancient through Immortal
Puck is the ultimate control mid. Illusory Orb + Phase Shift makes Puck nearly unkillable. Dream Coil provides massive teamfight control. Waning Rift silences. Puck doesn’t burst as hard as other mids but controls fights better than anyone.
Key laning tips:
- Illusory Orb is your escape, farm tool, and harass. Use it to hit both waves and the enemy mid.
- Phase Shift dodges EVERYTHING — practice timing it against projectile stuns and nukes.
- Waning Rift after a Phase Shift for guaranteed silence.
- Puck is weak against heavy right-click lanes. Play safe against DPS-heavy mids.
Core build: Witch Blade → Blink → Aghanim’s → Linken’s → Octarine
When to pick: When your team needs initiation and control. Against heroes that rely on channeling or require mobility to function (Puck’s Coil punishes movement).
B Tier Mid Heroes — Solid Choices
Lina
Win rate: ~52% | Best brackets: All brackets
Lina provides massive burst damage with Dragon Slave + Light Strike Array + Laguna Blade. She’s versatile — can build magic damage (Aghs) or right-click (Daedalus). Fiery Soul stacks give her insane attack speed for tower pushing. The Eul’s + LSA combo is a guaranteed setup.
Core build: Eul’s → Aghanim’s → BKB → Hex → Refresher
When to pick: When you need burst and flexibility. Avoid against high magic resistance lineups.
Queen of Pain
Win rate: ~51% | Best brackets: Archon through Divine
QoP is a tempo mid who peaks in the mid game. Blink gives her unmatched mobility for a mid hero, Scream + Sonic Wave provide AoE burst, and Shadow Strike handles lane harass. She falls off late game but dominates from minutes 10-30.
Core build: Orchid → BKB → Aghanim’s → Hex → Refresher
When to pick: When the game will be decided before 35 minutes. Against squishy lineups.
Viper
Win rate: ~53% | Best brackets: Herald through Legend
Viper is the ultimate lane bully. Poison Attack makes him win virtually every 1v1 mid matchup. Corrosive Skin punishes enemies who trade with him. Nethertoxin breaks passives. He’s simple, effective, and oppressive in lane — but falls off sharply after 25 minutes.
Core build: Dragon Lance → Aghanim’s → BKB → Hurricane Pike
When to pick: When you need to shut down the enemy mid specifically. Counter-pick against TA, SF, and other right-click mids.
Sniper
Win rate: ~52% | Best brackets: Herald through Archon
Sniper’s extreme attack range lets him contribute to fights without being in danger. Headshot procs slow and interrupt, Shrapnel provides zoning and vision, and Assassinate finishes fleeing enemies. He’s a pubstomper in lower brackets where opponents don’t know how to close distance.
Core build: Dragon Lance → Maelstrom → Pike → Daedalus → BKB
When to pick: When your team has strong frontline to protect you. Avoid against gap-closing heroes (Storm, PA, Clockwerk).
Tinker
Win rate: ~49% | Best brackets: Ancient through Immortal
Tinker’s Rearm refreshes all his items and abilities infinitely. With Blink + Hex + Dagon, he can delete heroes from across the map and instantly escape. March of the Machines provides incredible AoE farming and highground defense. Extremely high skill ceiling but punishing if you make mistakes.
Core build: Boots of Travel → Blink → Aghanim’s → Hex → Dagon 5
When to pick: When you need infinite highground defense or the enemy team lacks catch. Avoid against Spirit Breaker, Clockwerk, and other global/long-range initiation heroes.
Death Prophet
Win rate: ~52% | Best brackets: All brackets
DP is a mid-game siege machine. Exorcism spirits deal massive physical damage to both heroes and buildings, making her the fastest tower-taker among mid heroes. Spirit Siphon provides sustain, Crypt Swarm clears waves, and Silence shuts down casters.
Core build: Eul’s → BKB → Shiva’s Guard → Refresher → Octarine Core
When to pick: When your team needs push. When the game plan is “take every tower and end before 35 minutes.”
Arc Warden
Win rate: ~50% | Best brackets: Divine through Immortal
Arc Warden’s Tempest Double creates a clone with full items and abilities. At max items, you’re essentially two heroes. The farming speed is unparalleled, split push pressure is immense, and the late-game power is theoretically infinite. However, the skill floor is extremely high.
Core build: Hand of Midas → Maelstrom → Gleipnir → Hex → Bloodthorn → Skadi
When to pick: When you’re confident in micro-management and the game will go 40+ minutes. Avoid if the enemy team has strong early aggression.
Matchup Matrix — Who Beats Who
Understanding mid matchups is crucial for climbing. Here’s a simplified matrix showing how the most common mid matchups play out:
| Hero | Strong Against | Weak Against | Even Matchups |
|---|---|---|---|
| Huskar | Zeus, Lina, QoP, Storm, Invoker | Timbersaw, Ursa, Axe, AA | Kunkka, TA |
| TA | SF, Invoker (QE), Storm, Sniper | Viper, Huskar, Venomancer, Batrider | Zeus, Kunkka, Puck |
| Zeus | Melee mids (early), Invis heroes | Huskar, AM, Nyx, Storm | TA, Invoker, Lina |
| Void Spirit | SF, Sniper, Invoker, Lina | Silencer, OD, Puck | Storm, Ember, Zeus |
| Storm | Sniper, Invoker (QE), Zeus | Silencer, AM, Doom, Puck | Ember, Void Spirit, TA |
| SF | Melee mids, Invoker (QW) | TA, QoP, Puck, Viper | Lina, Kunkka, Zeus |
| Viper | TA, SF, Huskar, DK | Storm, Zeus (outranged), QoP | Kunkka, Invoker |
| Kunkka | Melee mids, SF, Invoker (QE) | Puck, Storm (mobile heroes) | Huskar, TA, Zeus |
| Puck | Storm, SF, Kunkka, Invoker | Viper, Huskar (can’t burst) | TA, Zeus, Void Spirit |
How to use this matrix:
- If you see the enemy mid early in the draft, pick a hero that’s Strong Against them.
- If you’re picking early, choose heroes with few Weak Against entries (Zeus, Kunkka, and TA are safe blind picks).
- If you’re last-picking, counter-pick aggressively. A counter-picked mid can win a game from the draft screen.
Mid Lane Fundamentals
Regardless of hero choice, these fundamentals separate good mid players from great ones:
Creep Aggro Manipulation
Right-clicking an enemy hero within 500 range of creeps draws their aggro to you. Use this to:
- Pull the enemy ranged creep toward you for safe last-hitting.
- Reposition the wave to your advantage (under your tower for safety, or pushed for rune control).
- Fake aggro draws (draw aggro then walk back) to displace enemy creep positioning.
High Ground Advantage
Dota 2’s mid lane has a high ground on each side. Attacking uphill gives a 25% miss chance. Use this by:
- Trading right-clicks when you’re on the high ground.
- Retreating to high ground when the enemy is aggressive.
- Using abilities (which don’t miss) when you’re on the low ground.
Rune Control
Power runes spawn every 2 minutes at one of two river locations. Bounty runes spawn every 3 minutes. Controlling runes is essential for mid because:
- Power runes (DD, Haste, Invis, Regen, Arcane, etc.) can win lanes or enable ganks.
- Bounty runes provide gold and XP.
- Denying runes from the enemy mid removes their power-up opportunities.
When to Rotate
Mid players should look for rotations when:
- You hit a power spike (level 6, key item completed).
- You secure a power rune (Haste or Invis especially).
- Your lane is pushed and you have 30+ seconds before the next wave arrives.
- A side lane is being dived by the enemy — TP to counter-gank.
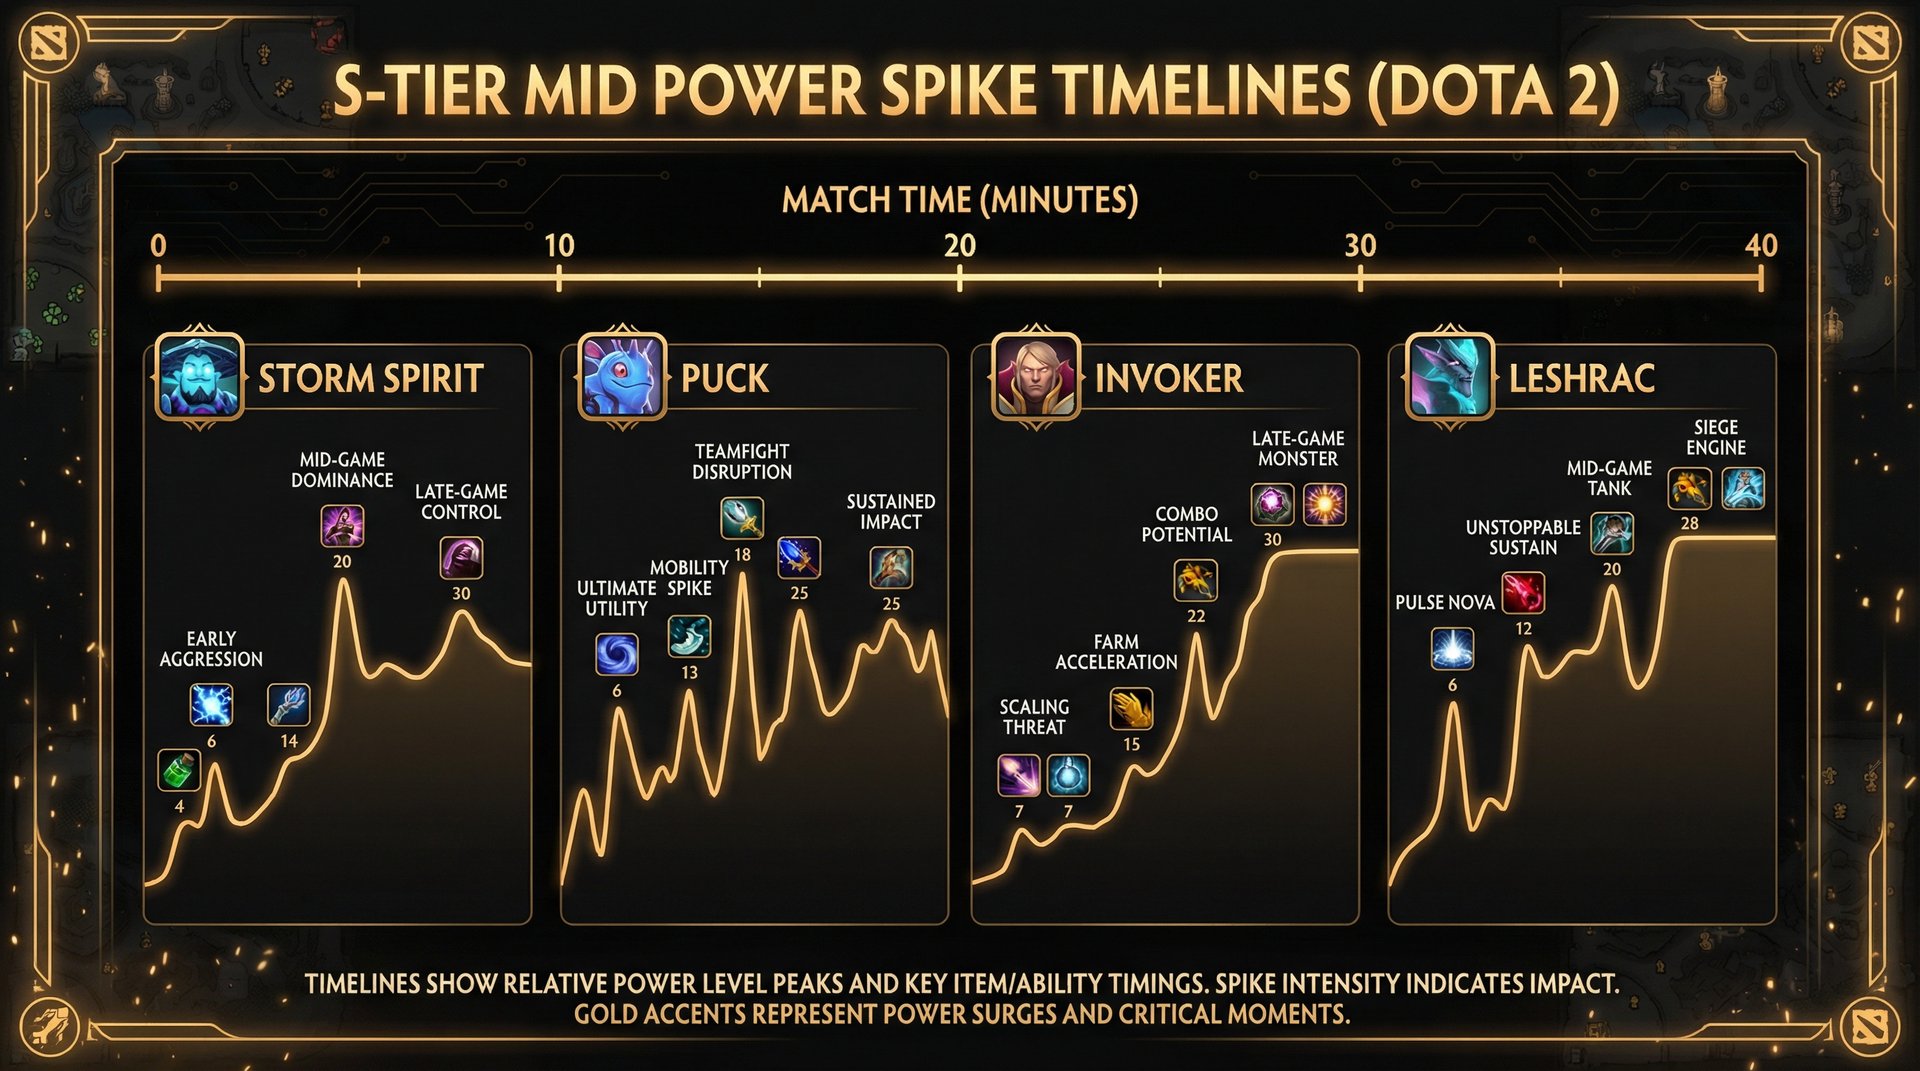
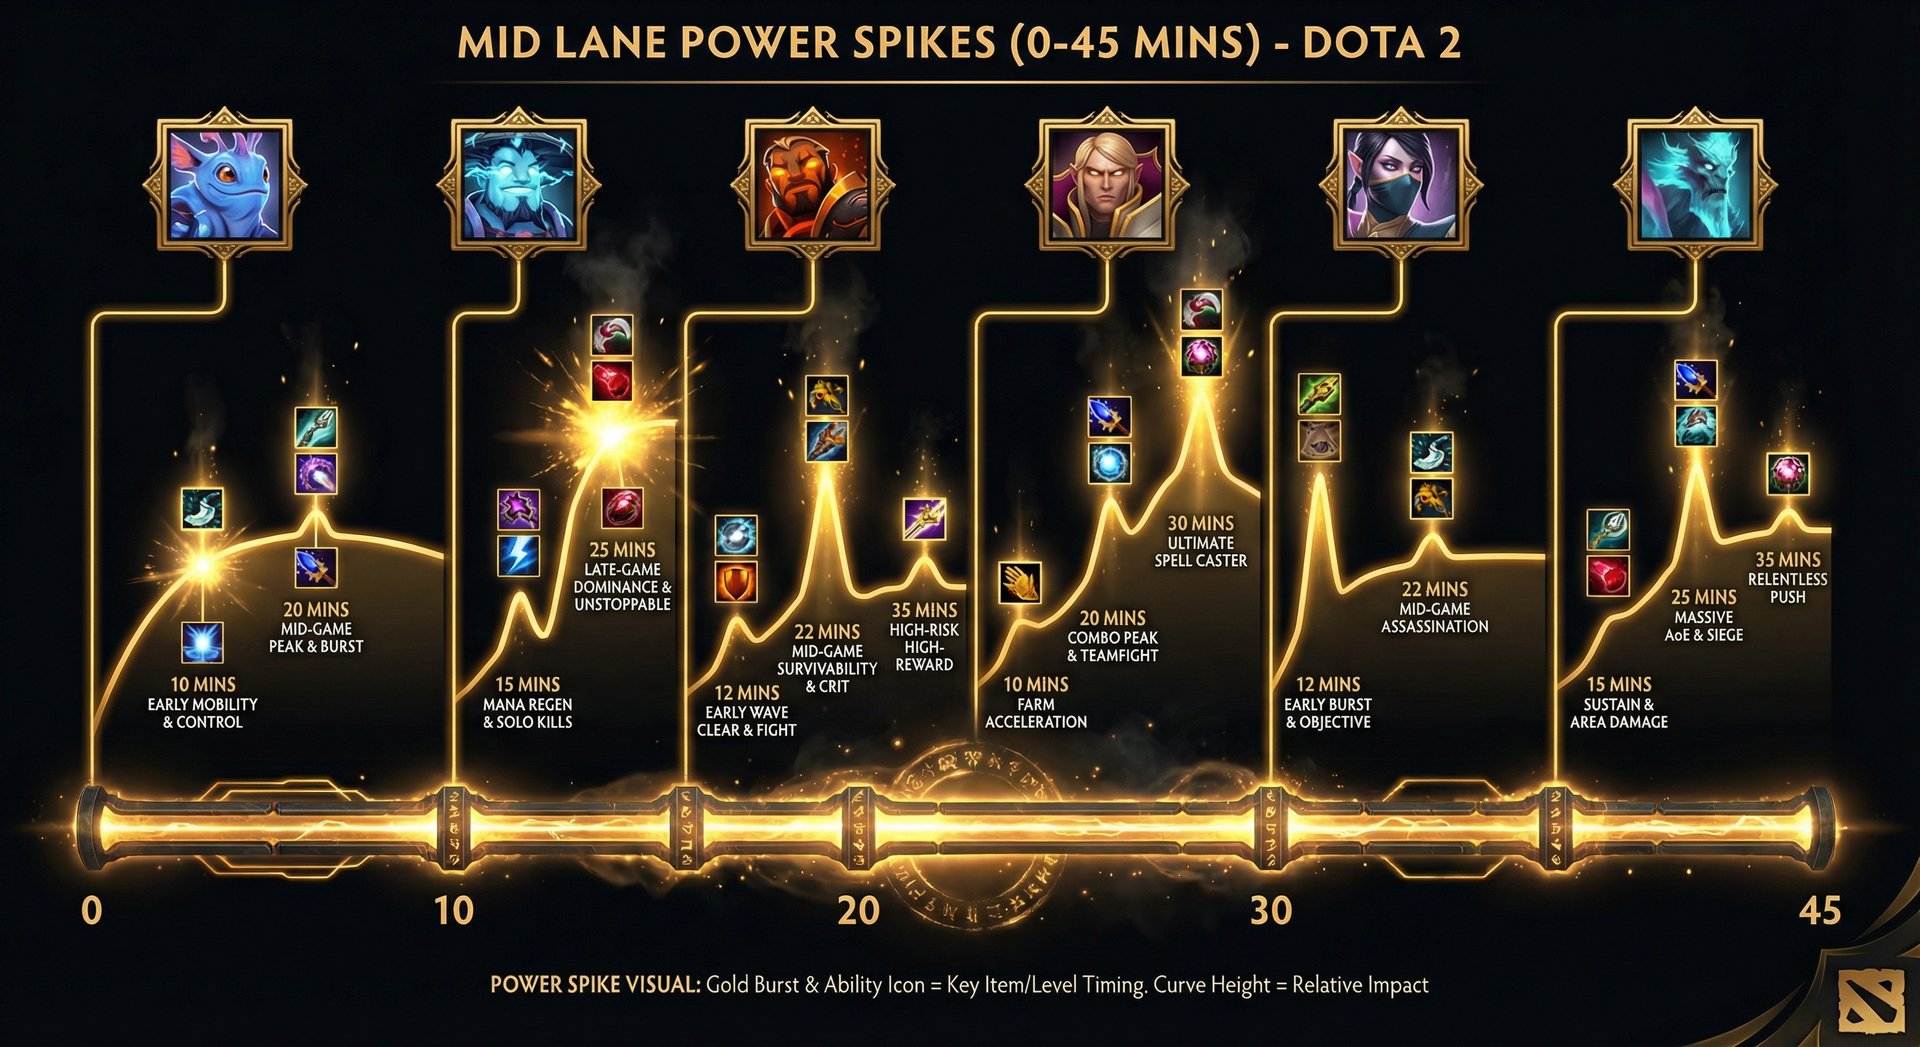
Power Spike Timing Guide — All Heroes
| Hero | Level 6 Spike | First Item Spike | Peak Timing | Falls Off At |
|---|---|---|---|---|
| Huskar | Strong | Armlet (10 min) | 15-25 min | 35+ min |
| TA | Moderate | Desolator (14 min) | 15-30 min | 40+ min |
| Zeus | Very Strong | Aghs (22 min) | 25-40 min | Never (scales) |
| Void Spirit | Strong | Orchid (13 min) | 13-28 min | 35+ min |
| Invoker (QE) | Moderate | Midas + Aghs (22 min) | 30-50 min | Never |
| Storm | Strong | Orchid (16 min) | 16-30 min | 40+ min |
| Ember | Moderate | Maelstrom (12 min) | 20-35 min | 45+ min |
| SF | Strong (Requiem) | Eul’s (12 min) | 15-30 min | 45+ min |
| Kunkka | Strong | Armlet (10 min) | 10-25 min | 35+ min |
| Puck | Strong | Witch Blade (10 min) | 10-30 min | 40+ min |
| Lina | Strong | Eul’s (12 min) | 15-30 min | Never (scales) |
| QoP | Strong | Orchid (14 min) | 10-28 min | 35+ min |
| Viper | Strong | Dragon Lance (10 min) | 8-20 min | 25+ min |
| Sniper | Weak | Dragon Lance (11 min) | 25-40 min | Never (scales) |
| Tinker | Strong | BoTs + Blink (18 min) | 20-40 min | Never (scales) |
| DP | Very Strong | Eul’s + BKB (18 min) | 15-30 min | 35+ min |
How to use this: If you’re playing a hero that “falls off,” you MUST force objectives during your peak timing. Don’t afk farm — take towers, Roshan, and highground before the enemy team outscales you.
When to Pick Each Hero — Draft Decision Flowchart
Use this guide to choose the right mid hero based on the draft context:
Blind Pick (First/Second Pick Mid)
Best heroes to pick without seeing the enemy mid:
- Zeus — Relevant regardless of matchup. Few hard counters in lane.
- TA — Wins most matchups, hard counters are niche picks.
- Kunkka — Versatile and hard to counter. Tidebringer works against anyone.
- Puck — Phase Shift makes Puck safe in any matchup. Always useful.
Counter-Pick (Last Pick Mid)
When you can see the enemy mid, counter-pick aggressively:
- Enemy picked TA: → Pick Viper, Huskar, or Venomancer
- Enemy picked SF: → Pick TA, QoP, or Puck
- Enemy picked Storm: → Pick Puck, Silencer, or Doom
- Enemy picked Huskar: → Pick Timbersaw, Axe, or Ursa
- Enemy picked Zeus: → Pick Storm, Huskar, or Anti-Mage
- Enemy picked Invoker: → Pick Storm, Void Spirit, or TA
Team Composition Considerations
| Your Team Needs | Pick These Mids |
|---|---|
| Physical damage | TA, SF, Kunkka, Sniper |
| Magic damage | Zeus, Lina, Storm, Tinker |
| Initiation/Control | Puck, Void Spirit, Kunkka |
| Late-game scaling | Invoker, Arc Warden, Sniper, Zeus |
| Early aggression/push | Huskar, DP, Viper, TA |
| Split push | Tinker, Ember, Arc Warden |
Frequently Asked Questions (FAQ)
Ready to Climb? Start Your Boost Today
Team Smurf is the #1 rated Dota 2 boosting service in 2026. Immortal-rank boosters, maximum safety, competitive pricing, 24/7 support.
Conclusion
Mid lane is where games are won and lost in Dota 2. Choosing the right hero for the matchup, understanding your power spikes, and executing your game plan efficiently are the three pillars of a dominant mid player.
Use this tier list as your starting point: pick 2-3 heroes from S or A tier, learn their matchups inside and out, and spam them in ranked. Focus on laning mechanics, rune control, and knowing exactly when your hero is strongest. Time your aggression to your power spikes, push objectives after kills, and end games before the enemy can recover.
For comprehensive improvement, consider professional coaching focused on mid lane — a coach can review your replays and identify specific laning habits, rotation timings, and decision-making patterns that are holding you back. And if you need to reach a higher bracket to start facing better competition (which accelerates improvement), TeamSmurf’s boost service can get you there.
Master the mid lane, and the MMR will follow. Good luck out there.
Written by Team Smurf’s Immortal-rank analysts — Rankings last verified February 2026


