
Best Dota 2 Heroes to Climb MMR in 2026 | TeamSmurf

You can study the MMR system inside and out, you can understand the rank distribution perfectly, and you can nail your calibration — but at the end of the day, you still need to pick heroes that win games.
Not every hero is created equal for climbing. Some heroes are incredible in professional play but terrible for solo queue. Others have mediocre win rates at Immortal but absolutely dominate in Guardian through Legend. The best climbing heroes share a common trait: they let you impose your will on the game regardless of what your teammates do.
This guide breaks down the best heroes for every position in 2026 — organized into S, A, and B tiers, with 3-5 heroes per tier per role. For each hero, you’ll get: why they’re effective for climbing, which brackets they excel in, core item builds, and essential playstyle tips. That’s 75+ hero analyses covering all 5 positions.
Looking for even more detail on mid lane specifically Check our dedicated Best Mid Heroes tier list.
And if you want to skip the grind entirely, TeamSmurf’s MMR boost service uses many of these exact heroes to achieve 80-90%+ win rates on client accounts.
Table of Contents
- How We Built This Tier List
- Position 1 (Safe Lane Carry) Tier List
- Position 2 (Mid Lane) Tier List
- Position 3 (Off Lane) Tier List
- Position 4 (Soft Support) Tier List
- Position 5 (Hard Support) Tier List
- Bracket-Specific Recommendations
- Universal Climbing Tips
- FAQ
How We Built This Tier List
This tier list is based on:
- Win rate data from Dotabuff and OpenDota across all brackets
- Pick rate and ban rate — high ban rates indicate heroes that opponents fear
- Solo queue independence — heroes that can win without relying on team coordination
- Skill floor vs. skill ceiling — easier heroes ranked higher for lower brackets
- Professional booster preferences — what our TeamSmurf boosters actually pick when climbing accounts
Tier Definitions
| Tier | Meaning |
|---|---|
| S Tier | Best-in-class for climbing. Pick these whenever possible. High win rate, high impact, strong across brackets. |
| A Tier | Excellent climbing heroes. Slightly more situational or higher skill floor than S tier, but still top picks. |
| B Tier | Good climbing heroes. Solid choices that work well in the right matchups or brackets but have more limitations. |
Position 1 (Safe Lane Carry) — Tier List
S Tier
Faceless Void
Why he’s S tier: Chronosphere is the single most game-deciding ability in Dota 2. A good Chrono can win a teamfight 1v5 regardless of how the rest of the game has gone. Void also farms efficiently, has excellent survivability with Time Walk, and scales into a late-game monster.
Best brackets: All brackets (Herald through Immortal)
Core item build: Mask of Madness → Maelstrom → BKB → Daedalus/Butterfly. Alternative: Battle Fury into late-game items for farming-focused games.
Playstyle tips:
- Farm aggressively for the first 20 minutes. Chrono’s power spike comes with 2-3 items.
- Always carry a TP scroll — cross-map Chronos on ganked teammates swing games.
- In lower brackets, enemies group frequently. Punish with multi-hero Chronos.
- Don’t Chrono just to kill one support. Wait for high-value targets.
Phantom Assassin
Why she’s S tier: PA’s burst damage is oppressive once she gets Desolator + BKB. She’s simple to execute, punishes teams that don’t build MKB, and her Blur gives incredible survivability. In lower brackets, opponents rarely counter her evasion, making her even stronger.
Best brackets: Herald through Ancient (effectiveness decreases in Divine+ where enemies counter-build)
Core item build: Desolator → BKB → Basher → Abyssal Blade. Optional: Battle Fury first if the lane went well and you want to accelerate.
Playstyle tips:
- Focus the enemy supports first — your burst one-shots them.
- BKB timing is your biggest power spike. Fight immediately when it’s complete.
- Use Phantom Strike to close gaps, not as a laning tool.
- Smoke ganks in the mid-game are incredibly effective — PA is one of the best smoke gankers in the game.
Juggernaut
Why he’s S tier: The safest carry in Dota. Blade Fury gives magic immunity from level 1, Healing Ward keeps him and teammates alive, and Omnislash is devastating at all stages. He can fight early, farm mid-game, and carry late. Extremely versatile and hard to completely shut down.
Best brackets: All brackets
Core item build: Battle Fury OR Maelstrom → Sange and Yasha → Basher → Butterfly/Skadi. Alternative: Diffusal into Manta for specific matchups.
Playstyle tips:
- Use Blade Fury for laning aggression — it deals massive damage early and you’re magic immune during it.
- Don’t waste Omnislash on full-health heroes. Use it when enemies are at 50-60% HP for guaranteed kills.
- Healing Ward is undervalued — use it after teamfights to push and after Roshan for sustain.
- Juggernaut can fight at ANY point in the game. Don’t be afraid to join early skirmishes.
A Tier
Wraith King
Why he’s A tier: The simplest carry in Dota — one active ability and a free second life. Reincarnation is a massive advantage in lower brackets where enemies waste cooldowns killing you twice. Vampiric Spirit + Skeleton army gives him excellent farming speed.
Best brackets: Herald through Legend (simplicity becomes a limitation at higher brackets)
Core item build: Radiance OR Armlet → Blink Dagger → Desolator → Assault Cuirass. Alternative: Blade Mail rush against aggressive enemies.
Playstyle tips:
- Always have mana for Reincarnation. Mana management is your biggest skill test.
- Blink + stun is your fight initiation. Don’t walk in — blink and stun the priority target.
- Use skeletons to push lanes you’re not in. They give permanent map pressure.
- In lower brackets, enemies often commit everything to killing you once — the reincarnation then wins the fight.
Luna
Why she’s A tier: Luna farms faster than almost any other carry. Moon Glaives clear waves and camps at incredible speed, allowing her to hit item timings 3-5 minutes earlier than other carries. Eclipse is devastating in early teamfights, and her late-game damage output is enormous.
Best brackets: All brackets (requires basic farming patterns)
Core item build: Mask of Madness → Dragon Lance → Manta Style → Butterfly → Satanic.
Playstyle tips:
- Prioritize farming speed. Stack camps with teammates, clear them with Glaives.
- Eclipse is strongest at levels 6-12. Look for fights during this window.
- Luna is squishy — positioning in teamfights is everything. Stay behind your frontline.
- Push towers aggressively. Lunar Blessing aura benefits your entire team and creep wave.
Lifestealer
Why he’s A tier: Built-in BKB (Rage), lifesteal sustain, and percentage-based damage (Feast) that melts tanky enemies. Infest provides escape and initiation. Strong in the current meta against STR-heavy offlane lineups.
Best brackets: Archon through Immortal
Core item build: Armlet → Desolator → Basher → Assault Cuirass. Alternative: Radiance into tanky build.
Playstyle tips:
- Rage + TP is an almost guaranteed escape. Use it to survive ganks.
- Target high-HP heroes in fights — Feast does percentage damage, so you melt tanks.
- Infest into an initiating ally (Centaur, Slardar, Spirit Breaker) for devastating combo initiations.
- Don’t AFK farm for 30 minutes. Lifestealer is one of the strongest fighting carries from minute 15 onward.
Chaos Knight
Why he’s A tier: CK’s Phantasm creates an army that can delete any hero in the game in under 2 seconds. Reality Rift pulls targets into his illusion swarm, and Chaos Strike provides massive crit damage. Utterly terrifying when ahead.
Best brackets: Herald through Ancient
Core item build: Armlet → Blink → Heart of Tarrasque → Assault Cuirass.
Playstyle tips:
- Phantasm is your teamfight. Without ult, you’re a mediocre hero. Time fights around its cooldown.
- Armlet toggle on illusions deals devastating damage. Master the Armlet + Phantasm combo.
- Reality Rift positioning matters — it pulls the enemy INTO your illusions.
- CK hates AoE. Avoid picking into Earthshaker, Sven, or other cleave/AoE heroes.
B Tier
Spectre
Why she’s B tier: Spectre is the hardest-scaling carry in Dota 2 — she literally gets stronger as the game goes longer. Haunt gives her global presence, and Desolate + Dispersion make her terrifyingly hard to kill and damage in late game. However, she has a weak laning phase and needs time to come online.
Best brackets: Legend through Immortal (lower brackets lack the game sense to enable her)
Core item build: Blade Mail → Radiance → Manta → Heart/Butterfly.
Terrorblade
Why he’s B tier: TB has the highest base armor and AGI gain in the game. Metamorphosis makes him a ranged powerhouse, Sunder gives incredible survivability, and his illusions push lanes and farm faster than almost any hero. Requires good micro and game sense.
Best brackets: Ancient through Immortal
Core item build: Dragon Lance → Manta → Skadi → Butterfly → Satanic.
Ursa
Why he’s B tier: Ursa kills Roshan faster than any hero in the game, gives himself a free BKB-like effect with Enrage, and melts any hero in 1v1 with Fury Swipes. Extremely strong in early-mid game fights. Falls off if the game goes super late.
Best brackets: All brackets
Core item build: Phase Boots → Diffusal Blade → BKB → Abyssal Blade → Satanic.
Position 2 (Mid Lane) — Tier List
For a much more detailed analysis of mid heroes including matchup matrices and laning tips, see our dedicated Best Mid Heroes 2026 Guide.
S Tier
Huskar
Why he’s S tier: Huskar is the ultimate pubstomper. His Berserker’s Blood gives insane attack speed and magic resistance at low HP, Inner Fire provides AoE disarm, and Burning Spears deal massive damage over time. Life Break + Armlet timing creates a hero that can solo-kill almost anyone from minute 10 onward.
Best brackets: Herald through Ancient (countered more effectively at Divine+)
Core item build: Armlet → BKB → Halberd → Satanic → Assault Cuirass.
Playstyle tips:
- Huskar wants to be at low HP. This is counter-intuitive but critical — you’re stronger at 30% HP than 100%.
- Armlet toggle is your most important mechanical skill. Practice it.
- Take Roshan as soon as you have Armlet. Early Aegis is your biggest power spike.
- Avoid picking into heavy physical damage or pure damage (Axe, Timbersaw, Ursa).
Templar Assassin
Why she’s S tier: TA dominates mid lane, farms incredibly fast with Psi Blades, takes early Roshan, and snowballs with Desolator. Refraction gives her survivability and bonus damage. Psionic Traps provide map control. She’s a complete package.
Best brackets: All brackets
Core item build: Desolator → Blink → BKB → Daedalus. Alternative: Dragon Lance → Aghs for Psi Blade range build.
Playstyle tips:
- Win the lane through Refraction trades — you take no damage while dealing bonus damage.
- Stack ancients with Psi Blades (attack a creep aligned with the ancient camp). Insane farming acceleration.
- Roshan timing with Desolator + Blink = massive mid-game spike. Go Rosh immediately.
- Place Psionic Traps on rune spots, Roshan, and common gank paths.
Zeus
Why he’s S tier: Zeus has the highest magic damage output in the game. Arc Lightning clears waves, Lightning Bolt provides long-range burst + true sight, and Thundergod’s Wrath hits EVERY enemy hero globally. He dominates from behind, wins from ahead, and always contributes to fights.
Best brackets: All brackets
Core item build: Arcane Boots → Aether Lens → Aghanim’s Scepter → Refresher Orb → Octarine Core.
Playstyle tips:
- Use Arc Lightning to last-hit — Zeus has terrible base attack damage but Arc Lightning hits hard early.
- Thundergod’s Wrath to finish low-HP enemies globally. Check the minimap constantly.
- Lightning Bolt provides true sight — use it to deward and detect invisible heroes.
- You’re squishy. Position behind your team in every fight. Your range lets you contribute without being in danger.
A Tier
Invoker
Why he’s A tier: Invoker is the most versatile hero in Dota 2 with 10 unique spells. He can control fights, deal massive AoE damage, push, split push, and even right-click in the late game. The skill ceiling is virtually unlimited.
Best brackets: Ancient through Immortal (requires mechanical proficiency)
Core item build (Quas-Wex): Urn → Spirit Vessel → Aghanim’s Scepter → Refresher. Quas-Exort: Hand of Midas → Aghanim’s → Blink → Refresher.
Storm Spirit
Why he’s A tier: Ball Lightning gives infinite mobility, making Storm one of the best pickoff heroes in the game. He can zip across the entire map to catch key targets, escape ganks, and apply constant pressure. When ahead, he’s nearly impossible to stop.
Best brackets: Legend through Immortal
Core item build: Power Treads → Kaya → Orchid → BKB → Bloodthorn → Hex.
Ember Spirit
Why he’s A tier: Ember’s Remnants give unparalleled mobility and escape. He can split push safely, jump into fights, and escape instantly. Flame Guard provides magic damage immunity, and Sleight of Fist allows safe damage output. Strong in both magic and physical builds.
Best brackets: Legend through Immortal
Core item build (magic): Maelstrom → Aghs → Shiva’s Guard → Refresher. Physical: Battle Fury → Daedalus → BKB.
Shadow Fiend
Why he’s A tier: SF is the ultimate “outplay mid.” He wins lanes through last-hitting superiority (Necromastery souls), deals massive damage with Razes, and has one of the strongest level 6 power spikes with Requiem. Fast farmer who takes objectives quickly.
Best brackets: Archon through Immortal
Core item build: Power Treads → Eul’s Scepter → BKB → Daedalus → Butterfly. Alternative: Dragon Lance → Hurricane Pike for right-click build.
B Tier
Lina
Best brackets: All brackets. Core build: Eul’s → Aghs → BKB → Hex. Strong burst damage, works as both mid and support flex pick.
Queen of Pain
Best brackets: Archon through Divine. Core build: Orchid → BKB → Aghs → Hex. Excellent mobility, strong tempo mid.
Viper
Best brackets: Herald through Legend. Core build: Dragon Lance → Aghs → BKB. Lane dominator, simple to execute, falls off late.
Position 3 (Off Lane) — Tier List
S Tier
Axe
Why he’s S tier: Blink + Berserker’s Call forces enemies to attack you, Counter Helix deals pure spin damage, and Culling Blade executes heroes below a threshold (no saves possible). He punishes carries who group together and provides incredible initiation.
Best brackets: All brackets
Core item build: Vanguard → Blink Dagger → Blade Mail → BKB → Overwhelming Blink.
Playstyle tips:
- In lane, cut the enemy creep wave between their tier 1 and tier 2 towers. This is the fastest way to win the offlane.
- Blink + Call is your fight contribution. Practice the timing — you need to Call 2-3 heroes, not just one.
- Culling Blade’s kill threshold ignores all effects — Shallow Grave, False Promise, everything. Use it to counter save heroes.
- Force fights before the enemy carry gets BKB. BKB makes them immune to Call.
Beastmaster
Why he’s S tier: Hawks provide unmatched vision, Boar slows enemies constantly, Wild Axes deal huge damage, and Primal Roar is an unblockable single-target stun. He pushes towers faster than any other offlaner and provides incredible teamfight control.
Best brackets: All brackets
Core item build: Helm of the Overlord → Aghanim’s Scepter → Refresher Orb → Assault Cuirass.
Playstyle tips:
- Use Hawks aggressively — scout enemy jungle, track rotations, and deward.
- Helm of the Overlord dominated creeps + Boar + summons = insane push pressure.
- Primal Roar the enemy carry or mid in every teamfight. It pierces BKB.
- Stack and clear camps with Wild Axes for farming acceleration.
Tidehunter
Why he’s S tier: Ravage is the most reliable teamfight ultimate in Dota 2. Kraken Shell removes debuffs, Anchor Smash reduces enemy damage, and Gush provides armor reduction. Almost impossible to have a bad game as Tide — even from behind, one good Ravage can win the game.
Best brackets: All brackets (especially lower brackets where teamfighting is chaotic)
Core item build: Arcane Boots → Blink Dagger → Refresher Orb → Shiva’s Guard.
Playstyle tips:
- Blink + Ravage is your combo. Get Blink as fast as possible (aim for 14-16 minutes).
- Refresher Ravage = double Ravage = game-ending teamfight.
- In lane, use Anchor Smash to reduce enemy carry’s damage, making trades heavily in your favor.
- Don’t waste Ravage on 1-2 heroes unless it secures a critical kill. Wait for grouped enemies.
A Tier
Centaur Warrunner
Why he’s A tier: Centaur is tanky, initiates fights with Hoof Stomp + Double Edge, and Stampede provides team-wide haste + damage reduction. Return punishes enemies who hit him. Simple, effective, and almost impossible to shut down completely.
Best brackets: All brackets
Core item build: Hood of Defiance → Blink → Aghs → Heart of Tarrasque.
Underlord
Why he’s A tier: Atrophy Aura reduces enemy damage while granting bonus to Underlord, Firestorm + Pit of Malice dominate the lane, and Fiend’s Gate provides global team mobility. He’s a brick wall that makes the enemy carry’s life miserable.
Best brackets: Herald through Ancient
Core item build: Mekansm → Guardian Greaves → Pipe → Crimson Guard → Assault Cuirass.
Mars
Why he’s A tier: Arena of Blood is one of the best teamfight ultimates in the game — it traps enemies inside, blocks projectiles, and stuns. Spear of Mars pins heroes to trees/walls for 2.4 second stuns. Bulwark blocks frontal damage. High-impact initiator.
Best brackets: Archon through Immortal
Core item build: Phase Boots → Blink → BKB → Desolator → Refresher.
Slardar
Why he’s A tier: Corrosive Haze provides -20 armor AND true sight (countering all invis heroes). Sprint gives mobility, Bash provides lockdown, and Slithereen Crush is an AoE stun. He’s a simple, effective frontliner that amplifies your team’s physical damage.
Best brackets: All brackets
Core item build: Blink → BKB → Aghanim’s Scepter → Assault Cuirass.
B Tier
Bristleback
Best brackets: Herald through Legend. Core build: Vanguard → Hood → Aghs → Heart. Unkillable from behind, grinds enemies down with Quill Spray stacks.
Timbersaw
Best brackets: All brackets. Core build: Bloodstone → Aghs → Shiva’s → Lotus Orb. Destroys STR heroes, insane laning presence.
Dragon Knight
Best brackets: Herald through Ancient. Core build: Blink → BKB → Assault Cuirass → Daedalus. Simple, tanky, strong push with Dragon Form.
Position 4 (Soft Support) — Tier List
S Tier
Spirit Breaker
Why he’s S tier: Charge of Darkness is a global-range ganking ability. You can gank any lane from anywhere on the map. Bash through Greater Bash provides stuns, and Nether Strike is a guaranteed gap-close stun. In lower brackets, enemies simply don’t react to charges, making SB a killing machine.
Best brackets: All brackets (especially Herald through Legend where map awareness is low)
Core item build: Urn of Shadows → Spirit Vessel → Aghanim’s Scepter → BKB → Assault Cuirass.
Playstyle tips:
- Charge the enemy mid at level 2 for a nearly guaranteed kill with your mid’s help.
- Always charge from fog — visible charges are easily dodged.
- Aghs makes Charge AoE, turning you into a teamfight monster.
- Use Bulldoze (if available) for status resistance during charges to avoid being stopped.
Hoodwink
Why she’s S tier: Incredible range on all abilities, Bushwhack provides reliable stun, Acorn Shot deals strong damage, Scurry gives tree-walking for escape/positioning, and Sharpshooter is a long-range nuke. She’s safe, deals damage, and controls fights without putting herself at risk.
Best brackets: All brackets
Core item build: Arcane Boots → Medallion → Solar Crest → Gleipnir → Aghanim’s Scepter.
Earth Spirit
Why he’s S tier: If you can play him, Earth Spirit is the most impactful support in the game. Rolling Boulder for initiation, Boulder Smash for stuns, Magnetize for massive AoE damage. His skill ceiling is astronomical, and a good Earth Spirit player can solo-carry from pos 4.
Best brackets: Ancient through Immortal (high skill floor)
Core item build: Urn → Spirit Vessel → BKB → Aghanim’s → Refresher.
A Tier
Mirana
Why she’s A tier: Sacred Arrow provides up to 5-second stun, Leap gives mobility, Starstorm deals damage, and Moonlight Shadow turns your entire team invisible. Versatile, strong at all stages, and scales well with items.
Best brackets: All brackets
Core item build: Arcane Boots → Eul’s → Aghs → Ethereal Blade.
Rubick
Why he’s A tier: Spell Steal turns the enemy’s best ability against them. The better the enemy draft, the better Rubick becomes. Telekinesis provides reliable lift/stun, and Fade Bolt reduces damage. High skill ceiling with infinite outplay potential.
Best brackets: Legend through Immortal
Core item build: Arcane → Aether Lens → Blink → Aghanim’s.
Clockwerk
Why he’s A tier: Hookshot provides long-range initiation, Power Cogs traps enemies (or yourself with a target for 1v1), Battery Assault prevents channeling. He disrupts the enemy team’s positioning and isolates key targets. Rocket Flare gives global scouting.
Best brackets: All brackets
Core item build: Urn → Blade Mail → Aghanim’s → BKB.
Tusk
Why he’s A tier: Snowball provides save + initiation, Ice Shards traps enemies, Walrus PUNCH crits for massive damage. Tag Team amplifies your team’s damage. Strong ganker, strong saver, strong in all phases of the game.
Best brackets: All brackets
Core item build: Phase Boots → Blink → Desolator → Aghs.
B Tier
Pudge
Best brackets: All brackets (most picked hero in Dota history). Core build: Tranquils → Blink → Aghs → BKB. Hook + Dismember = guaranteed kill. Simple but high-impact.
Sand King
Best brackets: All brackets. Core build: Arcane → Blink → Aghs → Refresher. Epicenter + Burrowstrike = devastating AoE combo.
Nyx Assassin
Best brackets: Archon through Immortal. Core build: Arcane → Aghs → Blink → Ethereal. Vendetta ganks, Mana Burn counters INT heroes, Spiked Carapace reflects stuns.
Position 5 (Hard Support) — Tier List
S Tier
Warlock
Why he’s S tier: Fatal Bonds links enemies so damage to one hurts them all. Shadow Word heals allies or damages enemies. Upheaval massively slows. And Chaotic Offering summons a golem that stuns in AoE. In lower brackets, enemies group constantly — Fatal Bonds + Chaotic Offering in a group fight can do 2,000+ total damage across all targets.
Best brackets: Herald through Ancient
Core item build: Arcane Boots → Glimmer Cape → Aghanim’s → Refresher Orb.
Playstyle tips:
- Fatal Bonds FIRST, then Chaotic Offering. The order matters — bonds spread the stun damage.
- Shadow Word your carry in lane for sustain. It’s a massive heal over time.
- Aghs + Refresher = two golems, two Fatal Bonds, two Upheavals. Game-ending combo.
- Upheaval is channeled — position safely before using it.
Jakiro
Why he’s S tier: Dual Breath slows and damages, Ice Path is a long-range line stun, Liquid Fire reduces attack speed and pushes towers, and Macropyre deals massive AoE damage. He does everything — push, fight, control, damage. And he’s simple to play.
Best brackets: All brackets
Core item build: Arcane Boots → Eul’s Scepter → Aghanim’s → Refresher.
Playstyle tips:
- Ice Path is your most important ability. Practice the timing — it has a 0.5s delay before the stun.
- Use Liquid Fire on towers constantly. Jakiro pushes towers faster than any other support.
- Macropyre in chokepoints (Roshan pit, high ground, narrow paths) for maximum damage.
- Eul’s into Ice Path is a guaranteed combo — Eul’s the target, place Ice Path under them.
Shadow Shaman
Why he’s S tier: Hex + Shackles = 7+ seconds of hard disable on a single target. Mass Serpent Ward melts towers and traps heroes. SS is the best tower-pushing support in the game, and his catch/disable is unmatched.
Best brackets: All brackets (especially lower brackets where push wins games)
Core item build: Arcane Boots → Aether Lens → Blink → Aghanim’s Scepter → Refresher.
Playstyle tips:
- After a teamfight win, IMMEDIATELY use wards on a tower. Push push push.
- Blink + Hex gives instant disable — use it to catch mobile heroes.
- Shackles is channeled. Don’t use it if you’ll be interrupted.
- Ward traps (placing wards around an enemy) = instant kill on anyone without mobility.
A Tier
Dazzle
Why he’s A tier: Shallow Grave prevents any ally from dying for 5 seconds — this single ability can swing entire teamfights. Poison Touch provides lane harassment, Shadow Wave heals and damages, and Bad Juju reduces cooldowns and armor.
Best brackets: All brackets
Core item build: Arcane Boots → Glimmer Cape → Solar Crest → Aghanim’s → Guardian Greaves.
Treant Protector
Why he’s A tier: Living Armor heals any ally globally (or towers!). Nature’s Grasp roots enemies in a line. Leech Seed provides healing and damage. Overgrowth is a massive AoE root. And his base damage is the highest in the game at level 1, making him a lane bully.
Best brackets: All brackets
Core item build: Tranquil Boots → Meteor Hammer → Aghanim’s → Refresher.
Witch Doctor
Why he’s A tier: Paralyzing Cask bounces between enemies for repeated stuns. Maledict deals scaling damage based on HP lost. Death Ward channels massive physical damage. In lower brackets, enemies often ignore Death Ward, letting it deal catastrophic damage.
Best brackets: Herald through Ancient
Core item build: Arcane Boots → Glimmer Cape → BKB → Aghanim’s.
Oracle
Why he’s A tier: False Promise provides a 7-second window where the target cannot die and is continuously purged. Fortune’s End purges enemies. Fate’s Edict provides 100% magic damage immunity. Incredible save potential and outplay opportunity.
Best brackets: Legend through Immortal (requires game sense)
Core item build: Arcane → Aether Lens → Glimmer → Aghs → Eul’s.
B Tier
Crystal Maiden
Best brackets: All brackets. Core build: Tranquils → Glimmer → BKB → Aghs. Arcane Aura sustains team mana, Freezing Field is devastating if you can channel it.
Ogre Magi
Best brackets: Herald through Legend. Core build: Arcane → Aghs → Octarine. Tanky, simple, Multicast provides hilarious burst damage.
Vengeful Spirit
Best brackets: All brackets. Core build: Arcane → Medallion → Solar Crest → Aghs. Swap saves allies, Vengeance Aura buffs team damage.
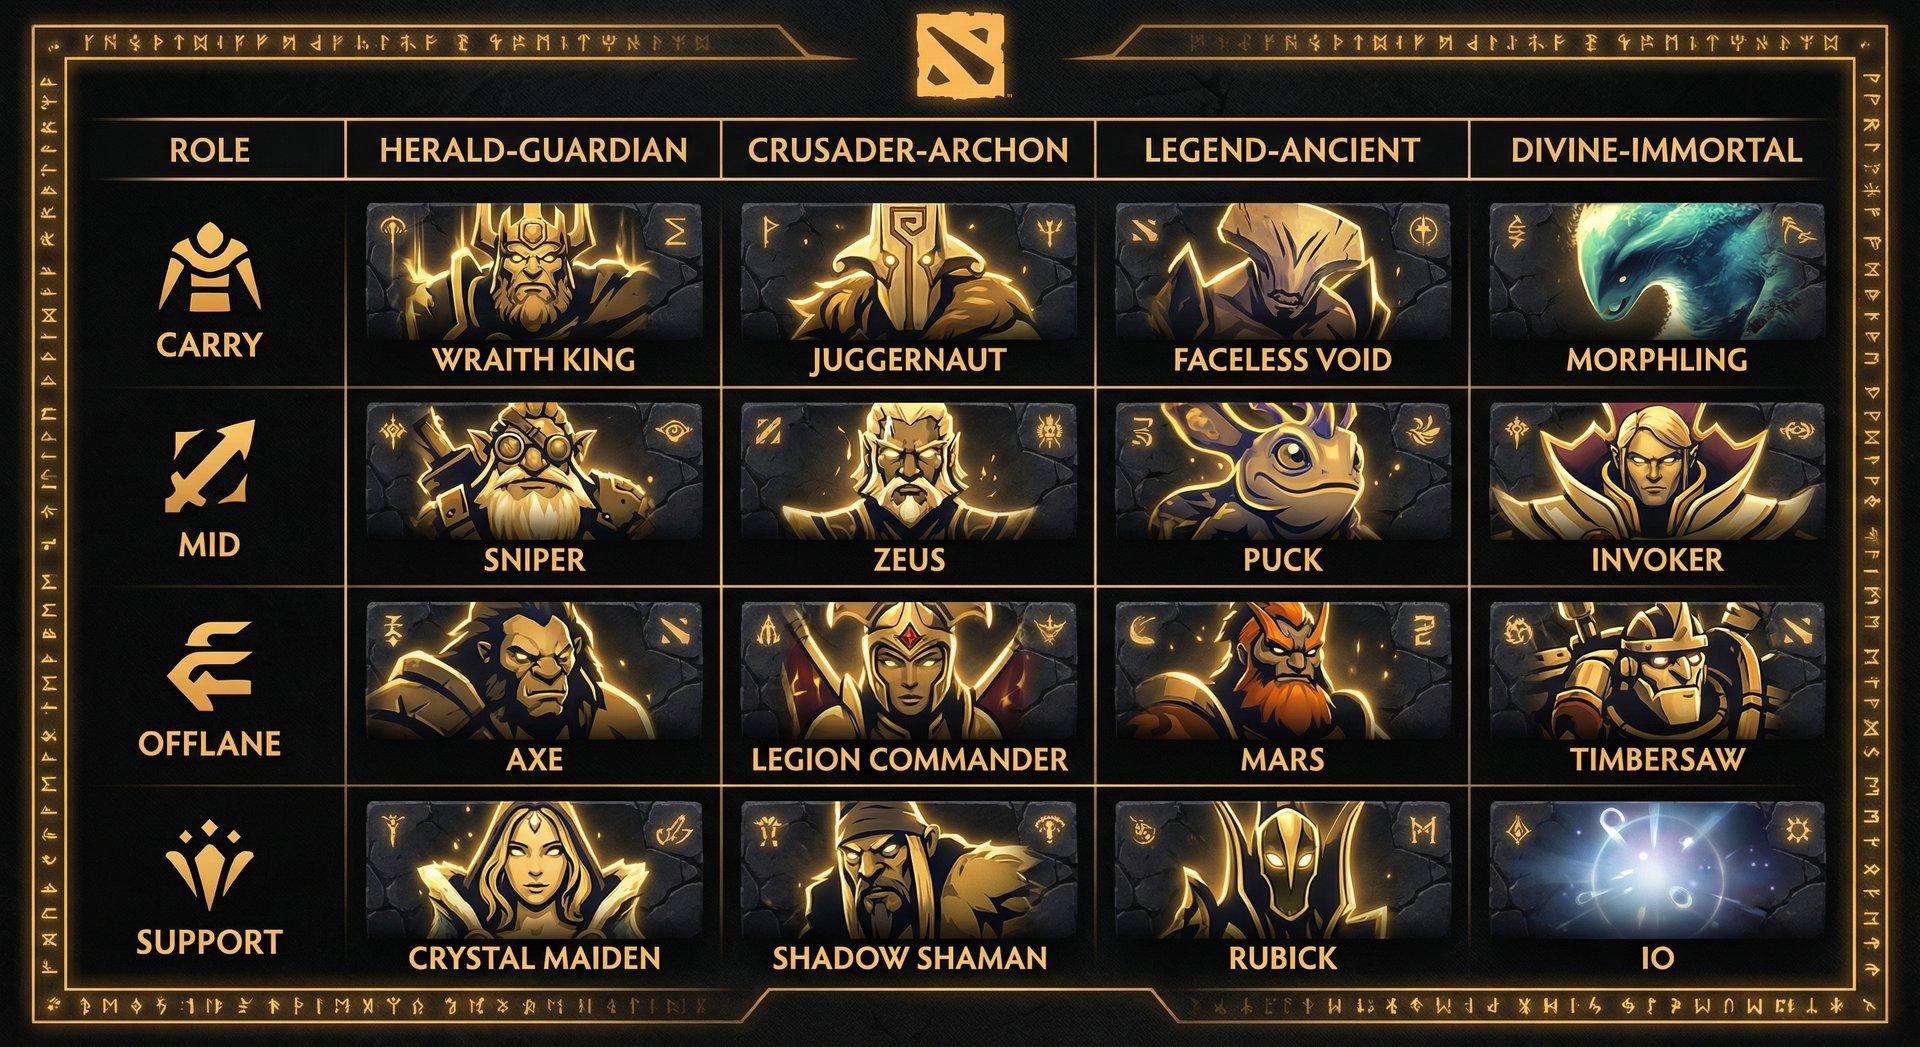
Bracket-Specific Recommendations
Different brackets have different metas. Here’s what works best at each level:
Herald — Guardian (0-1,540 MMR)
| Role | Top 3 Picks | Why |
|---|---|---|
| Pos 1 | Wraith King, PA, Juggernaut | Simple execution, snowball potential, forgiving kits |
| Pos 2 | Huskar, Zeus, Viper | Lane dominators, simple gameplans |
| Pos 3 | Axe, Bristleback, Underlord | Tanky, hard to kill, team utility |
| Pos 4 | Spirit Breaker, Pudge, Ogre Magi | Straightforward ganking, tanky |
| Pos 5 | Warlock, Shadow Shaman, Ogre Magi | Impactful ultimates, simple gameplay |
Crusader — Archon (1,540-3,080 MMR)
| Role | Top 3 Picks | Why |
|---|---|---|
| Pos 1 | PA, Juggernaut, Faceless Void | Strong teamfight impact, good farming patterns |
| Pos 2 | Huskar, TA, Zeus | Snowball mid heroes, can dominate game tempo |
| Pos 3 | Axe, Tidehunter, Centaur | Reliable initiation, teamfight presence |
| Pos 4 | Spirit Breaker, Hoodwink, Clockwerk | Ganking + teamfight utility |
| Pos 5 | Jakiro, Shadow Shaman, Witch Doctor | Push + fight capabilities |
Legend — Ancient (3,080-4,620 MMR)
| Role | Top 3 Picks | Why |
|---|---|---|
| Pos 1 | Faceless Void, Luna, Lifestealer | Scaling carries with fight contribution |
| Pos 2 | TA, Storm Spirit, Invoker | Outplay potential, game-carrying ability |
| Pos 3 | Beastmaster, Mars, Slardar | Vision, catch, and fight control |
| Pos 4 | Earth Spirit, Rubick, Tusk | High-skill playmakers |
| Pos 5 | Dazzle, Jakiro, Oracle | Save + utility + teamfight |
Divine — Immortal (4,620+ MMR)
| Role | Top 3 Picks | Why |
|---|---|---|
| Pos 1 | Faceless Void, Terrorblade, Spectre | Late-game monsters with outplay potential |
| Pos 2 | Invoker, Storm, Ember | Highest skill ceiling mids |
| Pos 3 | Beastmaster, Mars, Axe | Initiation and aura |
| Pos 4 | Earth Spirit, Rubick, Tusk | Maximum playmaking |
| Pos 5 | Oracle, Dazzle, Treant | Save-heavy, high game-sense picks |
Universal Climbing Tips
- Spam 2-3 heroes. Hero mastery is the #1 predictor of win rate. Don’t play 50 different heroes — master a small pool.
- Focus on one role. With role queue, your role-specific MMR is what matters. Specialize.
- Win your lane. Laning phase has the highest correlation with match outcome. Prioritize lane dominance.
- Push objectives. Kills don’t win games — buildings do. Take towers after every successful fight.
- Maintain behavior score. 10,000 behavior score = better teammates = higher win rate.
- Review losses. Watch one replay per session and identify your biggest mistake. Fix it.
- Don’t play tilted. After 2 consecutive losses, take a 30-minute break minimum.
- Get coached. A professional coach can identify blind spots you can’t see yourself.
Frequently Asked Questions (FAQ)
Ready to Climb Start Your Boost Today
Team Smurf is the #1 rated Dota 2 boosting service in 2026. Immortal-rank boosters, maximum safety, competitive pricing, 24/7 support.
Conclusion
Climbing MMR in Dota 2 comes down to playing the right heroes, at the right time, in the right way. This tier list gives you the “right heroes” part — the rest comes from practice, game sense, and mental fortitude.
Pick your role. Pick 2-3 heroes from S or A tier. Spam them. Review your losses. Stay positive. And if you ever want to accelerate the process, TeamSmurf offers boosting, coaching, and calibration services to help you reach your goals faster.
Good luck, and see you in higher brackets.
Written by Team Smurf’s Immortal-rank analysts — Rankings last verified February 2026


