How to Climb from Archon to Legend as Pos 5 Hard Support in Dota 2 (2026 Guide)

Let’s get the uncomfortable truth out of the way: if you’re stuck in Archon as a pos 5 hard support, it’s not because “supports can’t carry games.” It’s because you’re not playing the role correctly. The pos 5 hard support is the foundation of every winning Dota 2 team, and the difference between an Archon pos 5 and a Legend pos 5 is the difference between a house built on sand and one built on concrete.
Position 5 is the most selfless role in Dota 2. You buy all the consumables. You sacrifice your farm for your carry. You die so your cores can live. And in Archon, you do all of this while your carry misses last hits, your mid feeds, and everyone blames you for “not warding” when you’ve placed 15 wards and they’ve been dewarded within 2 minutes.
But here’s what Archon pos 5 players don’t realize: your role has more impact on game outcomes than you think. A pos 5 who wins their carry’s lane, maintains vision control, and makes critical saves in team fights directly determines whether the game is a win or a loss. This guide will show you how to maximize that impact and climb from Archon to Legend, even when your cores seem determined to lose.
Table of Contents
- Understanding the Archon Pos 5 vs. the Legend Pos 5
- Top 5 Heroes to Climb from Archon to Legend as Pos 5
- The 10 Most Common Mistakes Archon Pos 5 Players Make
- Phase-by-Phase Guide for Archon Pos 5 Players
- Dealing With the “Archon Teammate” Problem
- Your Realistic Timeline: Archon to Legend
- Frequently Asked Questions
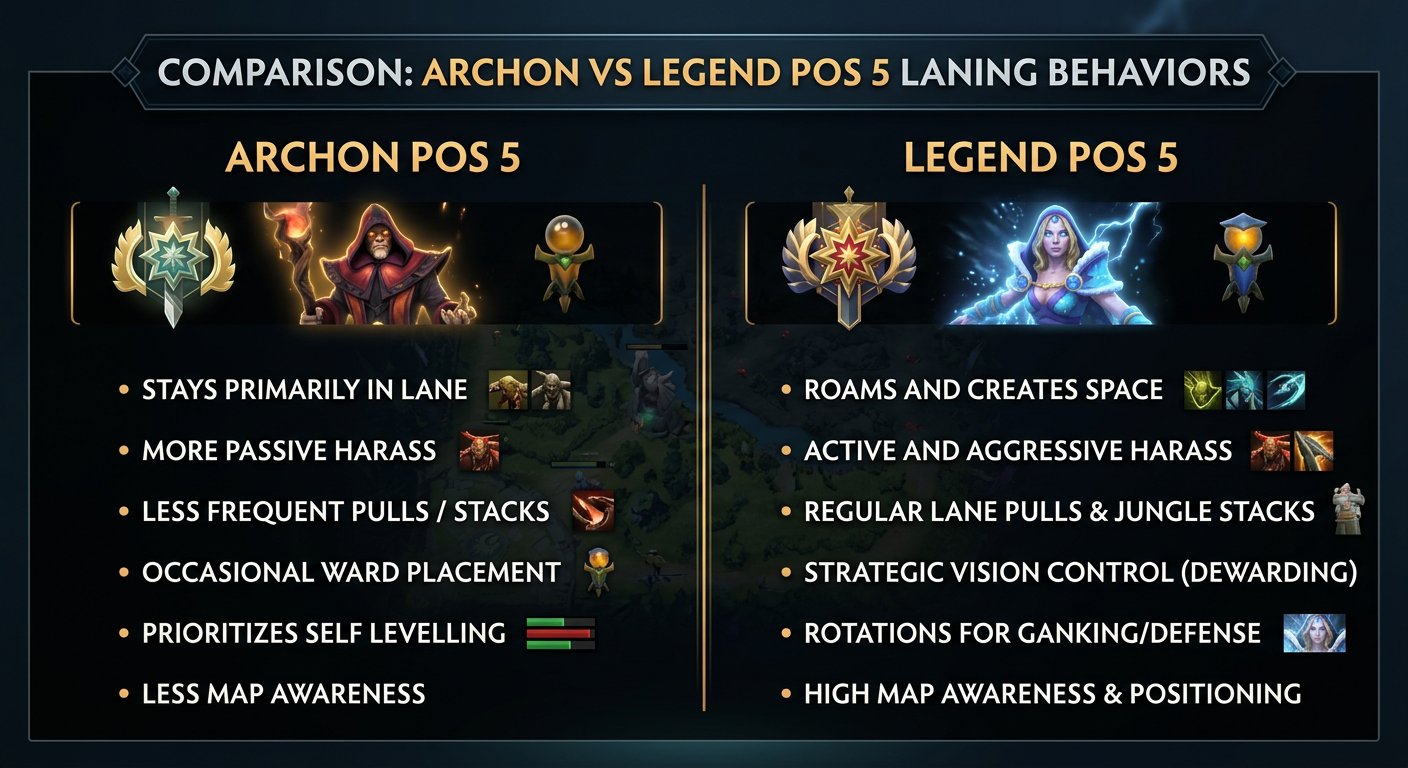
Understanding the Archon Pos 5 vs. the Legend Pos 5
The Laning Gap
The most significant difference between Archon and Legend pos 5 players is laning execution. The safe lane is the carry’s domain, and the pos 5’s job is to create the best possible environment for the carry to farm. This means zoning the enemy offlaner, controlling creep equilibrium, pulling camps, and securing kills when opportunities arise.
Archon pos 5 players do some of these things, but rarely all of them. They’ll stand behind the carry and occasionally throw a spell, but they don’t actively zone the offlaner. They’ll pull the small camp once and then forget about it for the rest of the laning phase. They’ll miss opportunities for kills because they’re too passive or too far from the action.
Legend pos 5 players view the lane as a chess game. They position themselves between the carry and the offlaner, constantly threatening the offlaner with right-click harass and spell casts. They pull at the exact right timing to reset the creep wave. They stack the pull camp to ensure a full pull, denying the entire wave. They read the enemy’s aggression patterns and counter them. Every action in the first 10 minutes is deliberate and purposeful.
The Sacrifice Mentality
Archon pos 5 players say they’re selfless, but their actions tell a different story. They compete with their carry for last hits “accidentally.” They use nukes to kill creeps instead of harassing. They buy items for themselves before buying wards and sentries for the team. They save their TP scrolls instead of using them to save a dying teammate.
Legend pos 5 players embody true selflessness. They have zero last hits at 10 minutes because they gave every one to their carry. They walk around with brown boots and a Magic Stick at 15 minutes because they spent all their gold on wards, sentries, dust, and smoke. They TP across the map to save a dying mid even though it means they die in the process. They understand that their success is measured by their TEAM’S performance, not their own.
The Game Sense Gap
Position 5 requires the best game sense of any role because you have the least room for error. With minimal gold and levels, every decision you make must be correct–you can’t outplay mistakes with items you don’t have. Archon pos 5 players make decisions based on habit. Legend pos 5 players make decisions based on information.
A Legend pos 5 tracks enemy cooldowns, notes which heroes have TP scrolls available, watches for smoke plays by checking the enemy’s Smoke stock, and positions themselves where they can be most useful–not where it’s most comfortable. This information-based decision-making is what separates bracket-average supports from bracket-climbing supports.
Top 5 Heroes to Climb from Archon to Legend as Pos 5
1. Crystal Maiden
Why she’s perfect for climbing: Crystal Maiden is the definitive pos 5 hero. Arcane Aura gives your entire team global mana regeneration–which in Archon, where players spam abilities without mana management, is invaluable. Crystal Nova provides AoE slow and damage for team fights and ganks. Frostbite is a reliable root that locks down targets for 3 seconds. And Freezing Field, while risky to channel, deals catastrophic AoE damage in team fights. Most importantly, her skills require no farm to be effective–a level 15 Crystal Maiden with brown boots is still useful.
Item build: Boots → Magic Stick → Tranquil Boots → Glimmer Cape → Force Staff → Aeon Disk → Aghanim’s Shard.
How to play her in Archon: Start with Frostbite or Crystal Nova depending on your carry’s kill potential. In lane, harass the enemy offlaner with right-clicks and Crystal Nova whenever they step up. Position between your carry and the offlaner–you’re the bodyguard. At level 2, take Arcane Aura–the mana regen lets you and your carry spam abilities without worrying about mana. After the laning phase, your job is wards, saves, and positioning. In team fights, stay at the back and cast Crystal Nova and Frostbite on key targets. Only channel Freezing Field if you have BKB or if the enemy’s stuns are on cooldown–otherwise, you’ll be interrupted immediately. Glimmer Cape is your most important item; use it on yourself during Freezing Field or on your carry to save them from magic burst.
Key tip: Arcane Aura is one of the most underrated abilities in the game. At level 4, it gives your entire team 3 mana per second, globally. This means your mid can spam abilities without bottle, your offlaner never runs out of mana for stuns, and your carry always has mana for their escape ability. Max Aura by level 7 and your team’s sustain increases dramatically.
2. Warlock
Why he’s perfect for climbing: Warlock is the ultimate “win team fights from the backline” hero. Shadow Word is an incredibly strong heal/damage ability that sustains your carry in lane. Fatal Bonds spreads 25% of damage dealt to one bonded target to all other bonded targets–this amplifies your entire team’s damage output in fights. Upheaval is a massive AoE slow that Archon players walk into and can’t escape. And Chaotic Offering summons a Golem that stuns, deals damage, and provides a tank for pushing. Warlock requires zero mechanical skill and provides enormous team fight impact.
Item build: Boots → Magic Stick → Arcane Boots → Glimmer Cape → Aghanim’s Scepter (two Golems) → Refresher Orb → Guardian Greaves.
How to play him in Archon: In lane, Shadow Word your carry to sustain them, or Shadow Word the enemy offlaner to deal damage. Warlock’s lane presence is deceptively strong because Shadow Word heals for 360 HP at max level or deals 360 damage to enemies–an incredible amount for a basic ability. After lane, Warlock wants team fights. Fatal Bonds 3-5 enemies before the fight starts, cast Upheaval in choke points, and drop Chaotic Offering on the highest-value cluster of enemies. In Archon, teams group up in the worst ways–walking through a single chokepoint, standing on top of each other during pushes. Warlock punishes all of this. Aghanim’s Scepter is the dream item: two Golems means two stuns, two tanky summons pushing towers, and an absurd amount of chaos in team fights.
Key tip: Fatal Bonds before team fights, ALWAYS. If you Bond 4 enemies and your carry crits one of them for 800 damage, the other three bonded targets each take 200 damage for free. This passive damage amplification is insane and Archon players have no idea it’s happening–they just think “why am I taking damage” Bond first, fight second.
3. Jakiro
Why he’s perfect for climbing: Jakiro does everything a pos 5 wants: lane harass, push defense, tower damage, and team fight control. Dual Breath deals damage and slows in a line. Ice Path is an AoE stun that’s relatively easy to land. Liquid Fire reduces attack speed and deals damage to towers. And Macropyre is a massive AoE ultimate that zones enemies out of areas for 10+ seconds. Jakiro’s tower damage with Liquid Fire is incredible–you can pressure towers throughout the game, which forces the enemy to respond or lose buildings.
Item build: Boots → Arcane Boots → Eul’s Scepter → Aether Lens → Aghanim’s Shard → Force Staff → Aghanim’s Scepter.
How to play him in Archon: In lane, Jakiro is one of the strongest laners. Use Dual Breath to harass the offlaner while simultaneously hitting the enemy creeps (to push the lane for pulling). Liquid Fire the enemy offlaner on cooldown–the attack speed slow is devastating against melee offlaners who try to trade with your carry. Max Dual Breath and Liquid Fire first; Ice Path can be skilled at level 4 for the stun. After lane, Jakiro pushes towers with Liquid Fire and controls team fights with Ice Path + Macropyre. The Eul’s combo is essential: Eul’s the target → Ice Path where they’ll land → Macropyre underneath. This guarantees the stun and sets up massive damage. In Archon, this combo is basically a guaranteed kill on any squishy hero.
Key tip: Liquid Fire works on towers and doesn’t draw aggro. This means you can walk up to a tower, hit it with Liquid Fire, and deal 320 DPS for 5 seconds WITHOUT the tower attacking you. No other pos 5 can damage towers this efficiently. Use Liquid Fire on every tower you can reach–the chip damage adds up and eventually lets your team push towers without a full siege.
4. Shadow Shaman
Why he’s perfect for climbing: Shadow Shaman is the pos 5 who takes objectives. Mass Serpent Ward drops 10 serpent wards that deal massive damage to towers–you can delete a tower in one ultimate. Shackles is a 5-second channel disable that locks down any hero. Hex is an instant point-click disable that turns an enemy into a chicken. Ether Shock deals respectable nuke damage in a cone. Shadow Shaman’s disable chain (Hex → Shackles) is 8+ seconds of lockdown on a single target, which in Archon guarantees a kill every single time.
Item build: Boots → Arcane Boots → Aether Lens → Blink Dagger → Aghanim’s Scepter → Refresher Shard → Glimmer Cape.
How to play him in Archon: In lane, Shaman is aggressive. Use Ether Shock to harass the offlaner, and threaten Shackles + Hex kill combos at level 3. The 8-second lockdown chain at level 3 is enough for any carry to kill the target. After lane, Shadow Shaman’s primary job is tower pushing. After winning a fight or getting a pick-off, immediately drop Mass Serpent Ward on a tower. The wards will melt the tower in seconds, regardless of whether your team helps. This is Shadow Shaman’s superpower–he converts won fights into taken objectives without relying on teammates. In Archon, where teams waste won fights by going back to farming, Shadow Shaman ensures that every fight translates into tower damage.
Key tip: Place Mass Serpent Ward around the tower in a circle, not in a line. If you place them in a line, only 3-4 wards attack the tower. If you place them in a circle around the tower, all 10 attack simultaneously, maximizing damage. Also, wards can be used defensively–drop them in front of your barracks when the enemy pushes to create a damage barrier they have to walk through.
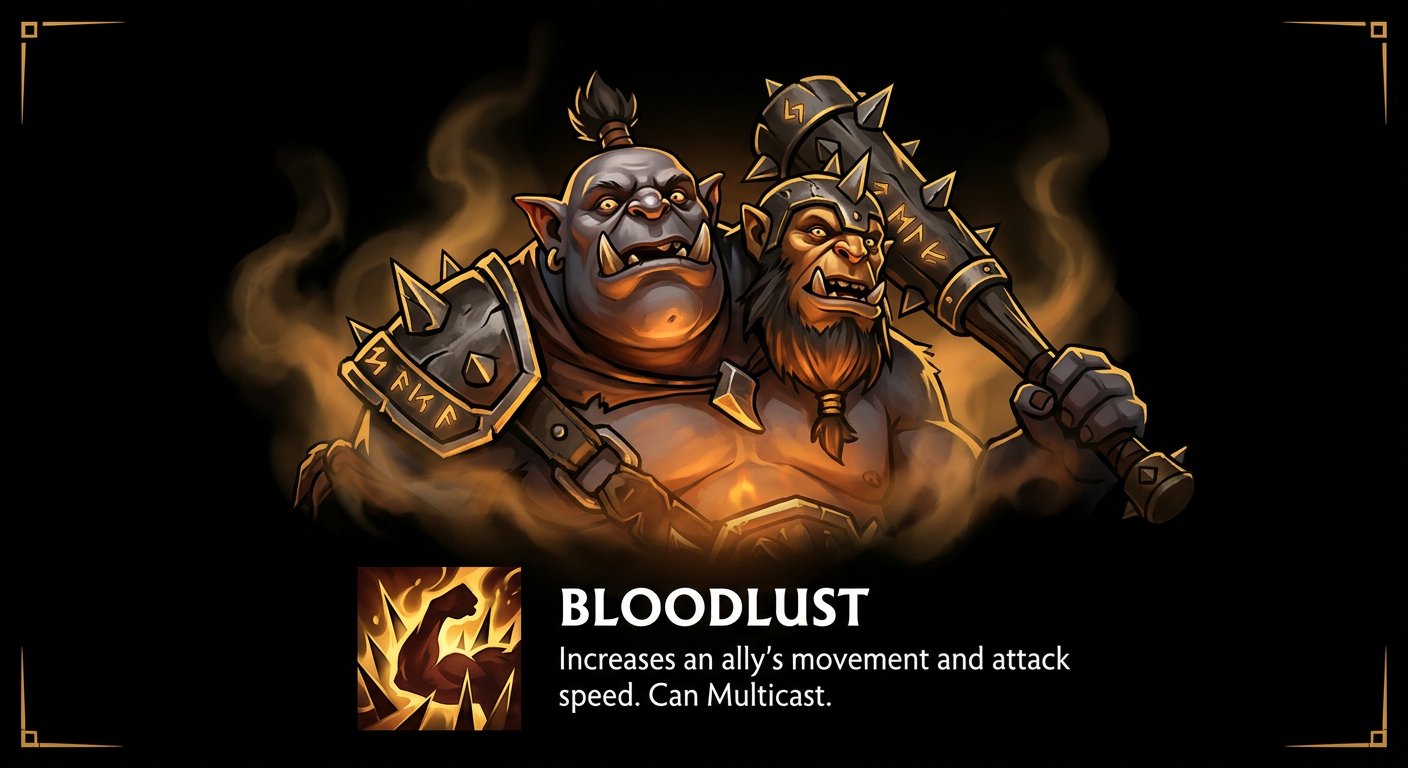
5. Ogre Magi
Why he’s perfect for climbing: Ogre Magi is the tankiest support in the game, which is incredibly valuable in Archon where supports die constantly. With 7 base armor and high HP, Ogre can trade hits with any offlaner and come out ahead. Fireblast is a reliable single-target stun. Ignite deals significant damage over time and slows. Bloodlust buffs your carry’s attack speed (and your own). And Multicast randomly multiplies your spell casts for massive burst damage. Ogre requires zero mechanical skill–just click your spells and let Multicast do the work.
Item build: Boots → Orb of Venom → Arcane Boots → Hand of Midas (if ahead) → Aether Lens → Force Staff → Aghanim’s Shard → Scythe of Vyse.
How to play him in Archon: Ogre Magi’s laning phase is his biggest strength. Walk at the enemy offlaner and right-click them. Your 7 armor and high HP pool means you win every trade against melee offlaners. Pop Ignite on them, walk up for right-clicks while they’re slowed, and Fireblast when your carry is ready to commit for the kill. Ogre should dominate the lane–if you’re not aggressively harassing, you’re wasting his strongest phase. After lane, Ogre transitions into a utility support. Bloodlust your carry every fight–the attack speed buff is enormous (30/40/50/60 attack speed). Use Fireblast and Ignite on priority targets, and rely on Multicast procs to randomly win fights. Hand of Midas is viable on Ogre if you get early kills and can afford it by 10-12 minutes–the Multicast can trigger on Midas for extra gold.
Key tip: Bloodlust your carry at ALL times, not just during fights. A Bloodlusted carry farms 20-30% faster due to the attack speed buff. Cast it on your carry whenever you’re near them, even when they’re just farming jungle. This is free GPM acceleration that costs you only mana (which Ogre has plenty of).
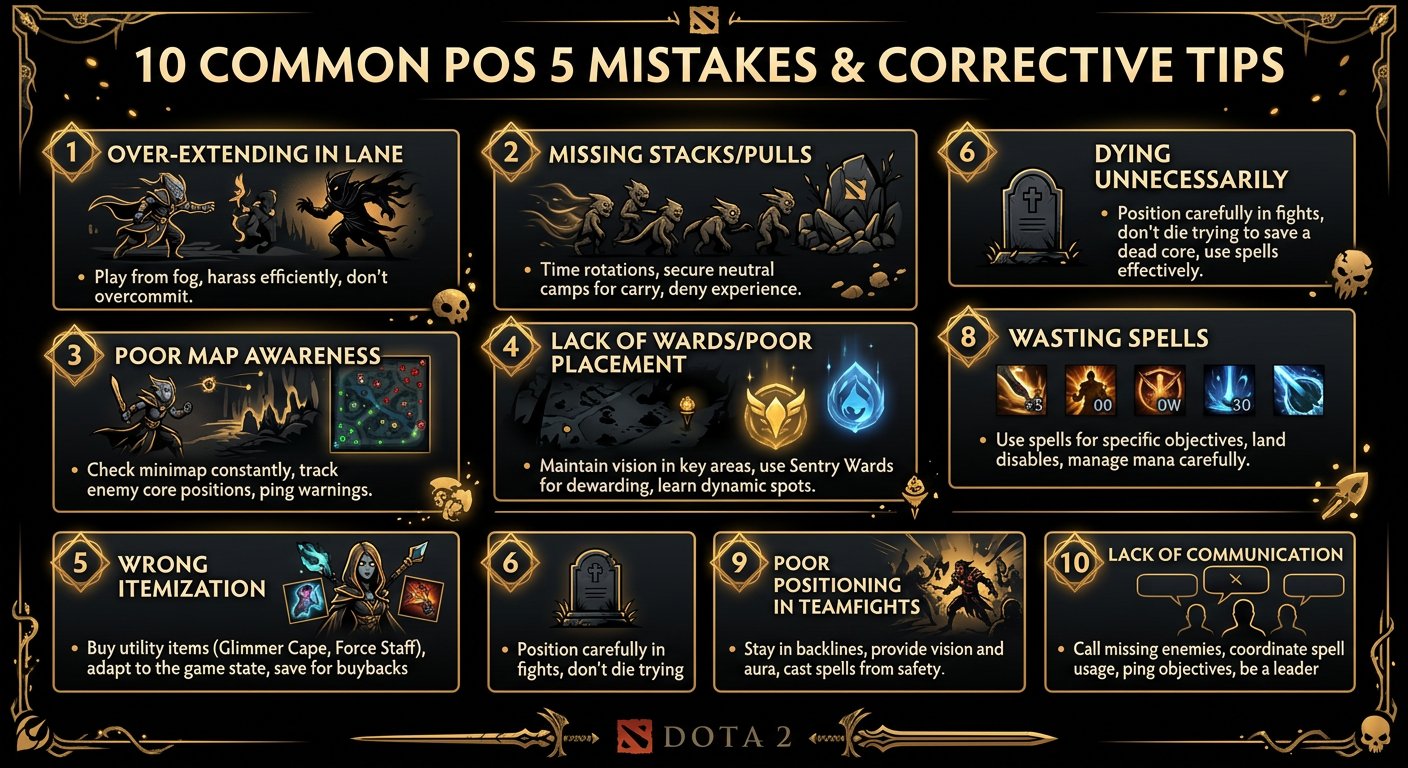
The 10 Most Common Mistakes Archon Pos 5 Players Make
Mistake #1: Not Zoning the Enemy Offlaner
The single most impactful thing a pos 5 can do in the first 5 minutes is zone the enemy offlaner. This means positioning yourself between the enemy offlaner and the creep wave, right-clicking them when they approach, and using spells to harass them. Archon pos 5 players stand behind their carry, do nothing, and let the offlaner contest every last hit.
The fix: From the first creep wave, position yourself aggressively. Stand next to or slightly ahead of the enemy creep wave. When the offlaner approaches, right-click them. Trade HP–you have regen items, they might not. If you can force the offlaner to stand 800+ units from the creep wave, they get no last hits and limited experience. Your carry gets free farm. This alone is worth 500+ gold advantage by 5 minutes.
Mistake #2: Bad Pulling
Archon pos 5 players either don’t pull at all, or they pull at the wrong time and push the lane into the enemy tower. Pulling should reset the creep equilibrium to keep the wave near your tower, where your carry is safest. A bad pull pushes a double wave into the enemy tower, giving the offlaner free experience and your carry dangerous positioning.
The fix: Pull the small camp when your creep wave is pushing toward the enemy tower. Stack the small camp first (at :53) and then pull the next wave through–this ensures the pulled creep camp actually kills your entire creep wave, denying the full wave of experience from the enemy. If you don’t stack, only 2-3 of your creeps die and the rest push to the enemy tower in a massive double wave. Also, learn to pull through–pull the small camp, then aggro the large camp to chain the pull, which also clears the large camp for extra gold.
Mistake #3: Stealing Experience and Last Hits
Archon pos 5 players soak experience from the lane when they shouldn’t be. If you’re standing next to your carry in lane and the offlaner is zoned, you’re splitting experience 50/50 for no reason. Your carry reaches level 6 at minute 8 instead of minute 6, which delays their power spike by two minutes.
The fix: If the lane is safe (offlaner is zoned, no gank threat), step away from the creep wave. Go stack a camp, pull, or ward. Let your carry soak solo experience. Only share experience when there’s a kill opportunity or when you need to be present to protect the carry from a gank. Your level matters less than your carry’s level in the first 10 minutes.
Mistake #4: Not Buying Enough Regen for the Carry
Archon pos 5 players buy their own items (boots, magic stick) before buying regen for their carry. Your carry is at 50% HP, has no Tangos or Salves, and is forced to either walk to base or stay in lane and die. Meanwhile, you have full HP and a completed Magic Wand.
The fix: Your carry’s HP is YOUR responsibility. Buy Tangos and share them. Buy Salves and use them on your carry. If your carry is low HP and you have regen gold, ferry out regen IMMEDIATELY. A 50-gold Tango that keeps your carry in lane for another 2 minutes is worth more than the Magic Stick component you were saving for.
Mistake #5: Warding Predictably
Archon pos 5 players ward the same cliff spots every game. The rune cliff ward, the safe lane cliff ward, the ancient cliff ward. These spots are the first places enemy supports check when dewarding. Your wards get destroyed within 2-3 minutes, and you’ve wasted 75 gold and 6 minutes of vision time.
The fix: Ward unpredictably. Place wards on the ground in unexpected spots–between trees, on ramps, in the middle of the jungle path. Ground wards are harder to find because they don’t have an obvious “ward spot” that enemies check. Also, vary your ward locations game to game. If you warded the left rune spot last game, ward the right side this game. Unpredictability is your greatest asset in the vision war.
Mistake #6: Not Carrying TP Scrolls
Archon pos 5 players run out of TP scrolls and don’t buy new ones. This means they can’t respond to ganks, can’t TP to save their mid, and can’t get to objectives quickly. A pos 5 without a TP scroll is a pos 5 who’s unavailable for 30+ seconds while they walk across the map.
The fix: ALWAYS carry 2 TP scrolls. One for immediate use, one as backup. TP scrolls cost 100 gold each–this is the cheapest and most impactful investment in the game. If your carry is getting ganked and you TP in for a save, you’ve prevented 300+ gold from feeding and potentially turned the fight into a double kill. Always have TP. Always.
Mistake #7: Dying With Your Carry
The enemy ganks your carry. Your carry is going to die no matter what. And you, the pos 5, walk in and die alongside them. Now the enemy team got two kills instead of one, and your lane is completely lost.
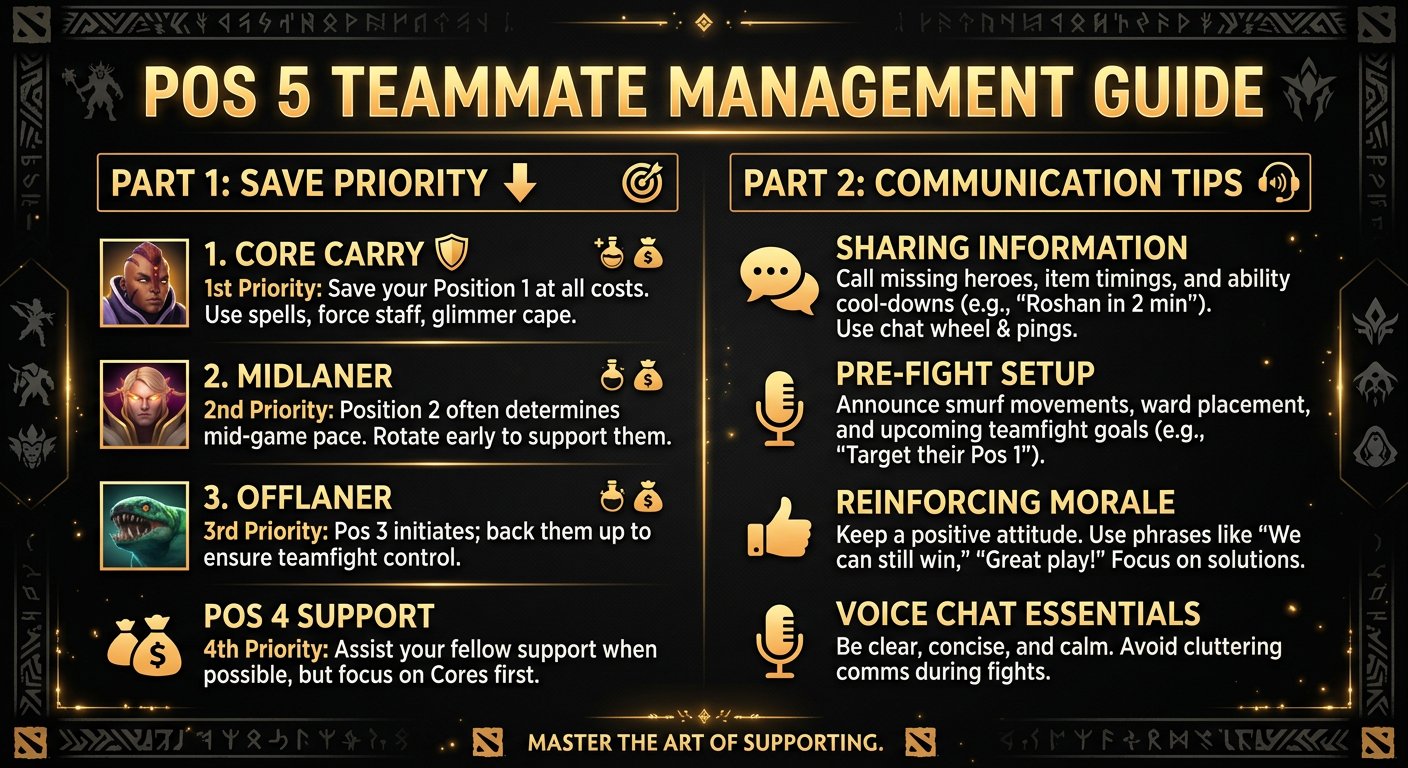
The fix: Assess the situation before committing. If your carry is going to die regardless of what you do, DO NOT die with them. Run away, survive, and continue to be useful on the map. Your life has value–you can ward, stack, and prepare for the carry to return to lane. The only exception is if your death will save the carry (body-blocking, using a stun to let them escape, tanking tower shots). Dying for nothing is the worst thing a pos 5 can do.
Mistake #8: Not Using Spells to Secure Kills
Archon pos 5 players are afraid to commit their spells aggressively. The enemy offlaner is at 30% HP, walking away slowly, and the pos 5 has a stun ready but doesn’t use it because “I might need it later.” That kill would have given your carry 200 gold and complete lane dominance, and you let it walk away.
The fix: When a kill is available, commit. Use your stun, your nuke, your slow–whatever it takes. The gold and experience from a kill are worth far more than “saving your mana for later.” After the kill, you can ferry mana regen from base or use a Clarity. Opportunities for kills in lane are limited–when they arise, take them aggressively.
Mistake #9: Disappearing After the Laning Phase
Many Archon pos 5 players have a good laning phase–they zone well, pull correctly, and secure kills. Then the laning phase ends and they become invisible. They stop warding, stop stacking, and wander the map aimlessly. Their impact drops to zero for 15 minutes while the game is decided by the other 9 players.
The fix: After the laning phase, your job changes but doesn’t end. You become the team’s vision provider, stack creator, and save specialist. Place wards every 3 minutes. Stack camps every minute. Carry TP scrolls for saves. Follow your most important core and protect them. You should NEVER have nothing to do as a pos 5–if you’re standing around, you’re doing it wrong.
Mistake #10: Building Wrong Items
Archon pos 5 players build Aghanim’s Scepter as their first item on Crystal Maiden. They save for Scythe of Vyse on a hero that needs Glimmer Cape. They buy damage items when their team needs saves. The result is a pos 5 with one expensive item that doesn’t address the actual game state, instead of two cheap items that solve real problems.
The fix: Your first two items should ALWAYS be defensive/utility items. Glimmer Cape if the enemy has magic burst (Zeus, Lina, Lion). Force Staff if the enemy has catch (Slark, Clockwerk, Spirit Breaker). Ghost Scepter if the enemy carry targets you (Phantom Assassin, Ursa). These items cost 1,500-2,700 gold and provide immediate, game-changing value. Luxury items like Aghanim’s and Scythe come later–if at all.
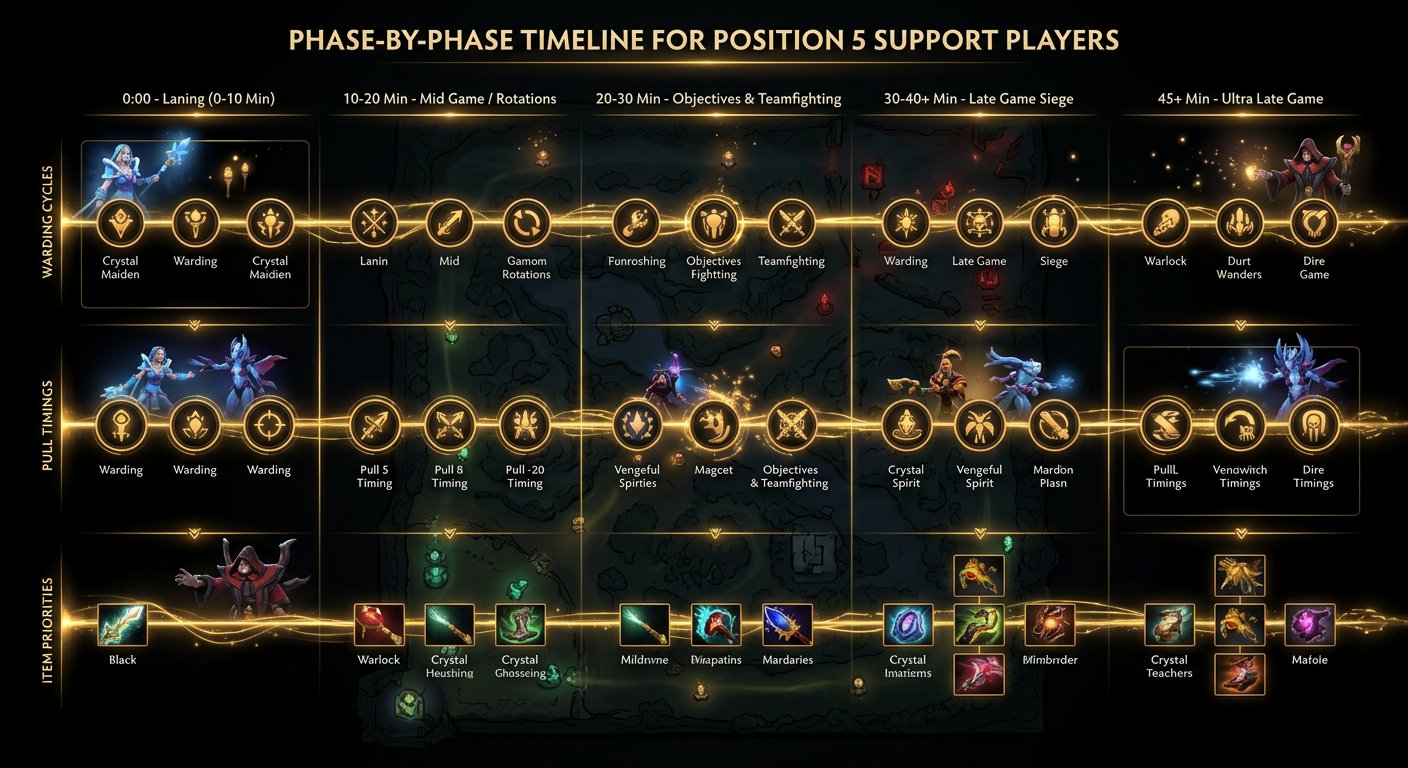
Phase-by-Phase Guide for Archon Pos 5 Players
Pre-Game and Item Choices (Before 0:00)
Goals: Buy correct starting items, place initial ward, share Tangos with mid.
- Starting items: 2x Observer Wards, 1x Sentry Ward, 2x Tangos (share 2 with mid), 1x Healing Salve (for your carry), 1x Clarity, 1x Blood Grenade or Smoke. This is the standard pos 5 starting build. Don’t deviate unless you have a specific reason.
- Initial ward placement: Place your first observer ward to protect your carry’s lane. The rune ward or the lane ward (watching the enemy’s approach path) are both solid choices. Don’t place both observers at 0:00–save one for 4-5 minutes when you have more information about where the enemy is ganking from.
- Share Tangos with mid: Immediately share 2 Tangos with your mid player. This saves them 100 gold and gives them sustain for the laning phase. It costs you nothing except two Tangos that you can rebuy.
Laning Phase (0:00 – 10:00)
Goals: Zone the enemy offlaner, secure 60+ CS for your carry, pull correctly, don’t die more than once.
- Minutes 0-3: Aggressive zoning. Stand between the enemy creeps and the enemy offlaner. Right-click them when they approach. Use your Level 1 spell aggressively–Fireblast the offlaner, Frostbite them, Crystal Nova their face. Make the lane unlivable. If they have a pos 4 with them, focus on the pos 4 first (they’re usually squishier) or trade with the offlaner while your carry free-farms behind you.
- Minutes 3-5: Pulling and stacking. By now, the lane might be pushing. Pull the small camp (stack it first at :53 if possible) to reset the creep equilibrium. If the lane is in a good position, continue zoning. If the enemy pos 4 left, your carry should be 1v1 against the offlaner–consider leaving to stack or ward.
- Minutes 5-7: First rotation window. If your carry is safe in lane (leading by 2+ levels, full HP, no gank threat), consider rotating mid for a gank. A single kill on the enemy mid at 6-7 minutes can snowball the game. If your carry isn’t safe, stay and protect them.
- Minutes 7-10: Transition preparation. The laning phase is ending. Place your second observer ward in a strategic location (enemy jungle if ahead, defensive jungle if behind). Stack camps for your carry or mid. Buy your first item component (usually Boots or Magic Stick).
Critical mindset: Your carry’s farm is your report card. If your carry has 60+ last hits at 10 minutes, you did your job. If they have 35, something went wrong–either your zoning was weak, your pulls were mistimed, or you left lane when you shouldn’t have.
Early Mid-Game (10:00 – 20:00)
Goals: Maintain vision, stack camps, build toward first item, don’t feed.
- Vision cycle: Replace wards every 6 minutes. Adjust placement based on game state–aggressive if ahead, defensive if behind. Always carry a Sentry Ward for dewarding. Check common ward spots when walking through an area.
- Camp stacking: Stack a jungle camp every minute if possible. Prioritize ancients (if your carry or mid can clear them) and large camps. Each stack is 150-300 gold that your core gets for free.
- Stay alive: You are worth gold to the enemy. Every death feeds them 200+ gold and gives them 30-60 seconds where your team has no support. Avoid walking alone in unwarded areas. Travel with teammates or through safe zones.
- Item progress: Your first item should be done by 15-20 minutes. Glimmer Cape or Force Staff, depending on what you need more. Don’t save for expensive items–get the cheap, impactful ones first.
Mid-Game (20:00 – 30:00)
Goals: Win team fights through saves and disables, control Roshan vision, build second item.
- Team fight role: You are the backline protector. Stay behind your carry, watch for enemy initiation, and be ready with saves. Glimmer Cape your carry when they get targeted. Force Staff them out of danger. Stun the enemy assassin who’s diving your backline. You are the last line of defense.
- Roshan awareness: Always have a ward near Roshan pit. Know the Roshan timer (roughly 8-11 minutes after the last kill). Ping your team when Roshan is up and help coordinate the attempt.
- Smoke coordination: Buy smokes and organize team movements. Smoke your carry and two teammates to sneak Roshan. Smoke for a pick-off on a farming enemy hero. Smokes are 50 gold and create game-winning opportunities.
- Second item: By 25-28 minutes, complete your second utility item. Force Staff + Glimmer Cape together is the dream–you can save your carry from almost anything.
Late Game (30:00+)
Goals: Win the vision war, make the game-saving play, don’t get caught.
- Vision is everything: Late-game vision wins games. The team with better wards makes better decisions, catches enemies out of position, and avoids bad fights. Place aggressive wards when pushing, defensive wards when defending. Deward obsessively–a late-game enemy ward can lead to a pick-off that ends the game.
- Stay alive for the big fight: Your saves (Glimmer, Force Staff) are critical in the late-game team fight. If you die before the fight, your carry has no protection. Position conservatively–stay 1,500+ units behind your frontline and ONLY move forward to cast spells or use items.
- Aeon Disk consideration: In late game, if the enemy has catch (Blink initiators, long-range stuns), consider Aeon Disk. It makes you invulnerable for 2.5 seconds when you drop below 70% HP, giving you time to Force Staff or Glimmer Cape yourself to safety. This item single-handedly prevents you from being instantly killed in late-game fights.
- Buyback coordination: In late game, your buyback matters more than you think. If your carry dies and buys back, they need you alive to protect them. Coordinate buyback timing with your carry–if they buy back, you should be alive and ready to support their defense.
Dealing With the “Archon Teammate” Problem
When Your Carry Can’t Last Hit
You’ve zoned the offlaner perfectly. The lane is in a great position. And your carry is missing 40% of last hits. This is painful but common in Archon.
- Don’t take the last hits yourself. Even if your carry is missing them, taking them yourself creates resentment and doesn’t solve the problem. The carry needs to practice, and they need the gold more than you do even if they’re inefficient.
- Optimize around them. If your carry is slow to farm, extend the laning phase by continuing to zone. Stack jungle camps so they can catch up. Create a longer time window for them to reach their item timings.
- Focus on what you CAN control. You can’t make your carry last-hit better. You CAN prevent ganks (warding), accelerate their farm (stacking), and protect them in fights (saves). Do these things and your carry will reach their timings, just later than ideal.
When Your Carry Plays Aggressively and Dies
Your carry dives the enemy tower at level 4, dies, and pings you for not following. This happens constantly in Archon.
- Don’t follow bad plays. If your carry dives a tower and you see it’s a bad play, DO NOT follow. Two deaths are worse than one. Back off, survive, and be useful.
- Ping “Back” before they commit. If you see your carry walking aggressively toward a bad fight, ping “Retreat” or “Back.” It won’t always work, but sometimes it prevents a death.
- Accept some deaths are unavoidable. You can’t save a carry who’s determined to die. Don’t blame yourself for deaths that were entirely their mistake. Focus on the plays where your intervention actually matters.
When Your Team Flames You for “Not Warding”
You’ve placed 12 wards in 20 minutes. The enemy has dewarded 8 of them. Your team dies in an unwarded area and types “0 wards gg.” This is the classic Archon support experience.
- Mute and continue. Arguing about ward count is pointless. Mute the flamer and keep playing your game.
- Ward smarter, not more. If your wards are getting dewarded, change your ward spots. Place ground wards in unusual locations. Ward when it’s safe (after fights, when enemies are visible). Quality over quantity.
- Ping your wards. When you place a ward, Alt-click it to announce it to your team. This shows them that vision exists and prevents the “no wards” complaint. It also helps them use the vision to make plays.
When Every Core Is Losing
All three lanes are losing. You’re the only one with a positive KDA. The game feels hopeless. What do you do
- Identify the recovery core. Which of your three cores has the best comeback potential The Anti-Mage who can flash-farm jungle The Zeus who scales with levels Focus your warding and stacking on enabling that hero’s recovery.
- Play for late game. Place deep defensive wards, stack camps, and buy time. Archon teams are TERRIBLE at closing games when ahead–they’ll throw their lead 50% of the time. Your job is to delay the game until that throw happens.
- Stay positive in chat. “We can win late” and “focus farm, we scale” are messages that prevent tilting. A team that believes they can win plays better than a team that’s already given up.
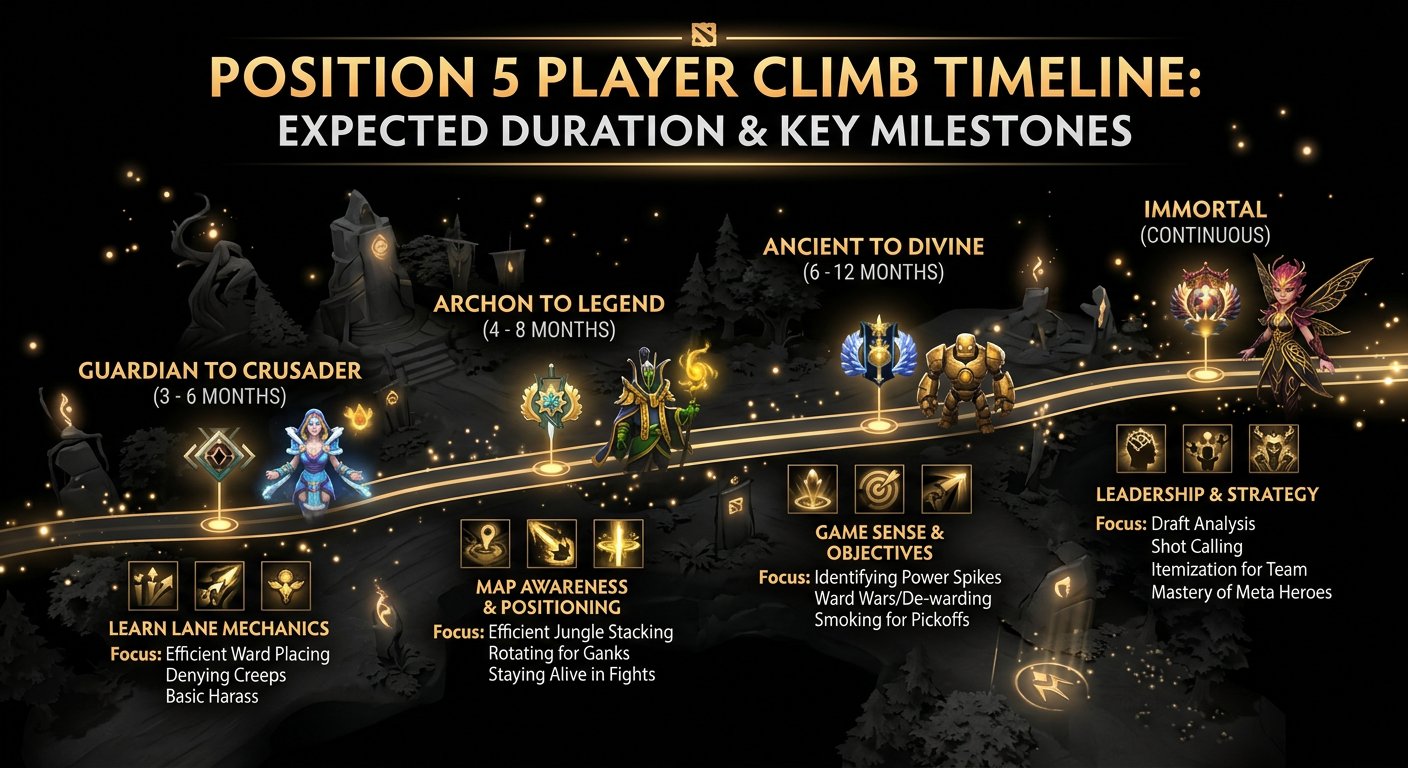
Your Realistic Timeline: Archon to Legend
Pos 5 Climbing Reality
Pos 5 is often called the “hardest role to climb with,” but this is a misconception. Pos 5 climbs slightly slower than mid or carry because your impact is less visible–you’re not getting kills, you’re enabling them. But your impact is no less real. A pos 5 who consistently wins lanes, maintains vision, and saves cores in fights WILL climb. It just takes more games to see the trend.
The Realistic Estimate
- Best case (60-65% win rate): 3-4 weeks. Achievable if you’re mastering a high-impact hero like Shadow Shaman or Warlock and actively making plays, not just passively supporting.
- Average case (55% win rate): 6-10 weeks. Standard progression. You’re winning more than losing, but team variance makes each game feel coin-flippy. It’s not–your 55% win rate is genuine improvement showing over time.
- Slow case (52% win rate): 4-6 months. The grind is real. Consider coaching from an Immortal pos 5 player who can review your laning, warding, and team fight positioning. Small adjustments from an expert can boost your win rate by 5-8%, which dramatically accelerates the climb.
Tips for Faster Climbing
- Master Shadow Shaman or Jakiro. These two heroes have the highest solo impact among pos 5 heroes because they can take towers independently. Even if your team doesn’t push after a won fight, YOU can push with Mass Serpent Ward or Liquid Fire.
- Track your carry’s CS at 10 minutes. After every game, check your carry’s CS at 10. If it’s above 55, you did your job in lane. If it’s below 40, figure out what went wrong–bad pulling, poor zoning, or was the lane simply unwinnable
- Count your deaths. As a pos 5, aim for fewer than 6 deaths per game. Every death has a cost. If you’re dying 10+ times, you’re positioning poorly, warding unsafely, or joining fights you shouldn’t be in.
- Review your ward placement. Watch your replays with ward vision enabled. Were your wards actually useful Did your team use the information they provided If not, you’re warding in spots that don’t matter.
If the climb feels impossible, TeamSmurf has solutions:
- MMR Boosting: Let our professionals push your account to Legend while you focus on improving your skills. The toughest stretch of the grind disappears, and you start playing at a higher bracket where supports are better appreciated.
- Dota 2 Coaching: Book a session with a 7,000+ MMR support main who will analyze your laning, warding patterns, and team fight positioning. Pos 5 coaching is the most impactful coaching in Dota because small improvements (better pulls, smarter wards, more efficient zoning) compound into massive win rate increases.
Frequently Asked Questions
Ready to Support Your Way to Legend Let’s Go
Position 5 hard support isn’t glamorous. You won’t top the damage charts. You won’t get the rampage clips. Your name won’t appear in the kill feed as often as your cores’.
Written by Team Smurf’s Immortal-rank analysts — Rankings last verified February 2026


