How to Climb from Herald to Guardian as Pos 4 Soft Support in Dota 2

Position 4 in Herald is the wild west of Dota 2. It’s the role where anything goes — Pudge hooks from trees, Spirit Breaker charges across the map, and Zeus launches lightning bolts from the offlane. It’s also the role where Herald players have the least understanding of what they should actually be doing.
The Position 4 soft support is supposed to be the playmaker. You roam, you gank, you set up kills, and you create space for your cores to farm. In Herald, Position 4 players either AFK in lane leeching XP, jungle from minute 1, or run around the map looking for kills while their offlaner gets destroyed in a 1v2.
If you want to climb from Herald to Guardian as a Position 4, you need to understand what the role actually demands and then execute it better than the other 9 players in your game expect. This guide is your complete playbook — from hero picks to item builds to the specific mistakes that keep you stuck.
Quick reality check: climbing as Position 4 is possible but frustrating. Your success depends heavily on your cores’ ability to convert the space you create into farm and objectives. In Herald, they often can’t. If you want guaranteed results instead of a coin flip, Team Smurf’s MMR boost takes the randomness out of the equation.
Table of Contents
What Separates Herald from Guardian as a Position 4
Herald Position 4 players and Guardian Position 4 players look like they’re playing different games. The role demands map awareness, timing, and decision-making that Herald players simply haven’t developed yet.
Here’s the gap:
- Lane presence: Guardian 4s actively zone the enemy carry, pull camps, and secure the lane for their offlaner. Herald 4s either stand behind the offlaner doing nothing, auto-attack the creep wave (ruining equilibrium), or leave the lane at level 1 to “roam” and accomplish nothing.
- Rotations: Guardian 4s rotate to mid for smoke ganks when they see a timing (enemy mid is pushed up, your mid has kill potential). Herald 4s walk down mid lane visible on the map and the enemy just backs off.
- Warding: Guardian 4s buy and place offensive wards that give their team information about enemy movements. Herald 4s either don’t buy wards at all or place them in default spots that provide minimal value.
- Item choices: Guardian 4s buy utility items — Urn, Force Staff, Glimmer Cape. Herald 4s buy Aghanim’s Scepter rush on Pudge and wonder why they have zero impact for 25 minutes.
- Fight contribution: Guardian 4s use their abilities at the right time in fights — stunning key targets, saving allies, disrupting the enemy carry. Herald 4s either die before casting anything or use everything on the enemy Position 5 while the carry kills their entire team.
The key insight for Position 4 climbing is this: you don’t need to “carry” the game. You need to make your cores’ lives easier. If your offlaner wins their lane because you zoned the enemy carry, and your mid gets a kill because you smoked and ganked, your cores will be stronger — and stronger cores win games.
Top 5 Heroes to Climb from Herald to Guardian as Position 4
1. Pudge
Pudge is the most picked hero in Dota 2 history, and in Herald, he’s incredibly effective despite (or because of) the chaos. Meat Hook is a game-changing ability that can pull enemies out of position, and in Herald, enemies are out of position constantly. Dismember is a 3-second disable that guarantees kills. And Flesh Heap makes you tankier with every kill, turning you into an unkillable monster by late-game.
Skill Build
- Level 1: Rot (W) — slow for lane trading and kill setups
- Level 2: Meat Hook (Q) — hook for kills
- Level 3: Meat Hook (Q)
- Level 4: Flesh Heap (E)
- Level 5: Meat Hook (Q)
- Level 6: Dismember (R)
- Max Meat Hook, then Rot, then Flesh Heap. Ult at 6/12/18.
Item Build
- Starting: Tango, Wind Lace, Orb of Venom, Clarity
- Early: Tranquil Boots, Magic Wand, Urn of Shadows
- Core: Blink Dagger (enables Blink into Dismember into Hook combo), then Aether Lens
- Mid-game: Aghanim’s Shard, Force Staff
- Late-game: Aghanim’s Scepter, Heart of Tarrasque, BKB
Playstyle
In lane, use Rot to slow the enemy carry while your offlaner hits them. Rot + right clicks from two heroes is enough to force regen or secure kills. Don’t throw random hooks from max range — walk up with Rot first, then hook when they try to run.
After the laning phase, Pudge becomes a roaming gank machine. Hide in trees, hook enemy heroes who are farming alone, and Dismember them while your team finishes the kill. In Herald, players farm with zero vision around them. You can hook the same carry over and over because they never adjust their positioning.
Blink Dagger changes Pudge’s game entirely. Blink on top of someone, Dismember, then Hook them toward your team. This combo is almost impossible to react to and guarantees kills. Herald players never expect a Blink Pudge.
Important: don’t AFK in trees for 2 minutes waiting for a hook. If you’re not finding hook opportunities within 15-20 seconds, go do something else — stack a camp, ward, push a lane. Time spent hiding is time wasted.
2. Spirit Breaker
Spirit Breaker is the ultimate Herald pubstomper for Position 4. Charge of Darkness is a global-range, targeted stun that lets you gank anyone on the map at any time. Nether Strike is another stun + burst damage. Greater Bash randomly stuns enemies you hit. The hero is a non-stop gank machine who makes the enemy team terrified to be alone anywhere on the map.
Skill Build
- Level 1: Charge of Darkness (Q) — gank tool
- Level 2: Bulldoze (W) — status resistance and movement speed
- Level 3: Greater Bash (E)
- Level 4: Greater Bash (E)
- Level 5: Greater Bash (E)
- Level 6: Nether Strike (R)
- Max Greater Bash, then Charge of Darkness, then Bulldoze. Ult at 6/12/18.
Item Build
- Starting: Orb of Venom, Tango, Wind Lace, Clarity
- Early: Phase Boots, Urn of Shadows, Magic Wand
- Core: Spirit Vessel, then Blade Mail or BKB
- Mid-game: Aghanim’s Scepter, Shadow Blade
- Late-game: Assault Cuirass, Heart of Tarrasque
Playstyle
Help your offlaner in lane for the first 2-3 minutes — trade hits, use your superior base damage and bash potential to bully the enemy carry. Then, look for Charge opportunities. Any time an enemy hero is alone and your Charge is off cooldown, use it. In Herald, someone is ALWAYS out of position.
The key to Spirit Breaker is constant pressure. Charge the enemy mid when they push the wave. Charge the enemy carry when their support leaves. Charge anyone farming jungle alone. Every successful Charge gives your team a kill or forces the enemy to play scared, which gives your cores space.
Spirit Vessel is a critical item on Spirit Breaker. It provides heal reduction against enemies and gives Charge extra damage. In Herald, many carries rely on lifesteal, and Vessel completely shuts that down.
Don’t be afraid to die on Spirit Breaker. If you Charge across the map, stun a hero, and die but your team gets the kill and a tower, it was worth it. Your death as a Position 4 costs the team far less than an enemy core’s death costs them.
3. Ogre Magi
Ogre Magi is the tankiest support in Herald, and his simplicity makes him incredibly effective. Fireblast is a reliable targeted stun. Ignite is a slow and damage-over-time that makes enemies miserable. Bloodlust speeds up your carry’s attack and movement speed. And Multicast randomly multiplies your spells for massive damage. You can’t miss your spells (they’re all targeted), you’re nearly impossible to kill, and you make your carry farm and fight faster.
Skill Build
- Level 1: Ignite (W) — harass and slow
- Level 2: Fireblast (Q) — stun
- Level 3: Ignite (W)
- Level 4: Bloodlust (E)
- Level 5: Ignite (W)
- Level 6: Multicast (R)
- Max Ignite, then Fireblast, then Bloodlust. Ult at 6/12/18.
Item Build
- Starting: Orb of Venom, Tango, Mango, Clarity
- Early: Arcane Boots, Magic Wand
- Core: Aether Lens, then Hand of Midas (if the game is going late) or Force Staff
- Mid-game: Aghanim’s Scepter (Unrefined Fireblast), Glimmer Cape
- Late-game: Scythe of Vyse, Octarine Core
Playstyle
In lane, Ogre is a nightmare for the enemy carry. You have the highest base armor and HP of any support, so you can trade hits aggressively. Walk at the enemy carry, hit them, use Ignite for the slow and damage, and they can’t trade back efficiently. Most Herald carries just run away when an Ogre walks at them.
Bloodlust is often overlooked but it’s incredibly impactful. Cast it on your offlaner for faster farming and fighting. Cast it on your carry whenever possible. Cast it on yourself before ganking. The attack speed and movement speed bonuses are significant and cost almost nothing.
In teamfights, your job is simple: stun the most dangerous enemy with Fireblast, Ignite the biggest cluster of enemies, and Bloodlust your carry. If Multicast procs, you deal absurd damage. Even if it doesn’t, your stun and slow are reliable contributions to every fight.
Ogre’s tankiness means you survive fights that would kill other supports. This is huge in Herald, where fights are messy and everyone takes damage. While the enemy supports die in 2 hits, you’re still alive, still stunning, still contributing.
4. Zeus (Position 4)
Zeus Position 4 is a greedy pick, but in Herald it works because the role barely matters — what matters is damage and impact. Zeus provides both in spades. Arc Lightning for lane harass, Lightning Bolt for burst and vision, and Thundergod’s Wrath for global damage in every fight. You don’t need items to be effective — your spells do the damage for you.
Skill Build
- Level 1: Arc Lightning (Q) — harass
- Level 2: Lightning Bolt (W) — burst
- Level 3: Arc Lightning (Q)
- Level 4: Lightning Bolt (W)
- Level 5: Arc Lightning (Q)
- Level 6: Thundergod’s Wrath (R)
- Max Arc Lightning, then Lightning Bolt, then Heavenly Jump. Ult at 6/12/18.
Item Build
- Starting: Tango, Clarity x3, Mantle of Intelligence, Observer Ward
- Early: Arcane Boots, Magic Wand, Null Talisman
- Core: Aether Lens, then Aghanim’s Scepter
- Mid-game: Refresher Orb (double ult), Eul’s Scepter
- Late-game: Octarine Core, Veil of Discord
Playstyle
In lane, spam Arc Lightning on the enemy carry. It costs minimal mana, deals decent damage, and bounces to nearby creeps (helping your offlaner push). Between Arc Lightning casts, right-click the carry. Your goal is to make the carry’s lane so miserable that they can’t farm.
Zeus 4’s power spike is level 6. The moment you have Thundergod’s Wrath, you’re contributing to every fight on the map. Mid lane fighting Press R from the offlane and deal 300+ damage to every enemy hero. Carry getting ganked Press R for the kill secure. It’s the most impactful level 6 in the game for a Position 4.
Lightning Bolt also provides True Sight, which is incredibly valuable in Herald where nobody buys detection. Invisible hero running away Bolt them. Enemy warded a spot Bolt the area to deward. It’s a free Gem of True Sight on a short cooldown.
The downside of Zeus 4 is that you’re squishy and provide zero save for your team. No stuns, no heals, no shields. If your team needs a save support, pick Ogre or someone else. But if your team needs raw damage and the enemy has a lot of squishy heroes, Zeus 4 can single-handedly win teamfights.
5. Bounty Hunter
Bounty Hunter is a Herald menace. Shadow Walk makes you invisible, Jinada gives you massive bonus damage hits, Shuriken Toss bounces between tracked enemies, and Track gives your entire team bonus gold on kills. You’re an invisible gold-generating machine who punishes Herald players’ complete lack of detection purchases.
Skill Build
- Level 1: Jinada (W) — bonus damage for trading
- Level 2: Shadow Walk (Q) — invisibility
- Level 3: Jinada (W)
- Level 4: Shuriken Toss (E)
- Level 5: Jinada (W)
- Level 6: Track (R)
- Max Jinada, then Shadow Walk, then Shuriken Toss. Ult at 6/12/18.
Item Build
- Starting: Orb of Venom, Tango, Mango, Clarity
- Early: Tranquil Boots, Urn of Shadows, Magic Wand
- Core: Spirit Vessel, then Solar Crest
- Mid-game: Guardian Greaves, Pipe of Insight
- Late-game: Assault Cuirass, Lotus Orb, Octarine Core
Playstyle
Bounty Hunter in lane harasses the enemy carry with Jinada hits — walk up, Jinada strike for huge damage, then back off. Shadow Walk lets you approach without being seen. In Herald, supports don’t buy Sentries, so you can freely walk into the enemy safe lane invisible, hit the carry for 150+ damage, and walk away.
After laning, Track is your main contribution. Track every enemy hero you see before a fight starts. Every kill on a Tracked hero gives bonus gold to you AND nearby allies. Over the course of a game, Track generates thousands of extra gold for your team. In Herald, this gold advantage is massive because the enemy team doesn’t track gold differentials — they just notice they keep losing fights.
Bounty Hunter also excels at scouting. Walk around the enemy jungle invisible, find heroes farming alone, ping your team, and collapse on them. You’re the eyes of your team. In a bracket where nobody buys wards, an invisible hero providing constant vision is incredibly valuable.
Build utility items, not damage. Solar Crest makes your carry hit harder and the enemy carry weaker. Guardian Greaves heals your team. These items have far more impact than selfish damage builds.
10 Specific Mistakes Herald Position 4 Players Make
1. AFK in Lane Leeching XP
The most common mistake. You stand behind your offlaner, contribute nothing, and soak half their XP. Your offlaner is now underleveled AND you’re underleveled because you’re sharing XP without contributing. Either actively zone the enemy carry (stand between them and the creeps, hit them) or leave the lane and do something productive — stack camps, rotate mid, ward.
2. Jungling from Minute 1
The opposite extreme. You abandon your offlaner at minute 0 and go jungle. Your offlaner is now in a 1v2 lane, can’t farm, can’t get XP, and falls behind permanently. Help your offlaner for the first 3-5 minutes, THEN start rotating once the lane is stable. Leaving at minute 0 is griefing.
3. Missing Easy Spells
Spirit Breaker’s Charge is targeted — you literally cannot miss it. Ogre’s Fireblast is targeted. Yet Herald Position 4 players manage to waste these abilities by using them at the wrong time or on the wrong target. Practice your spell usage: stun the enemy CARRY, not the Position 5. Charge the hero who is alone, not the one surrounded by 4 allies.
4. Not Buying Wards
In Herald, both supports often refuse to buy wards. As a Position 4, you should be buying Observer Wards regularly. Yes, it’s technically the Position 5’s job, but if they won’t do it, you must. Vision wins games. No vision means every gank is a surprise, every Roshan is uncontested, and every smoke gank succeeds. Spend the 75 gold.
5. Building Carry Items
You do not need Aghanim’s Scepter as your first item on Pudge. You do not need Shadow Blade on Spirit Breaker before Spirit Vessel. You do not need Dagon on Zeus. Your job is utility. Buy Urn into Vessel, Force Staff, Glimmer Cape, Pipe. These items save lives and win fights. Damage items on a Position 4 are a waste of gold because you’ll never out-damage your cores.
6. Charging/Hooking Without Vision
Spirit Breaker charges into fog and finds 5 enemy heroes. Pudge hooks from trees and pulls an Axe into his own team. These plays lose fights instantly. Always have vision of your target. Know who’s around them. If you’re charging blind, you’re gambling — and in Herald, the gamble usually goes badly.
7. Ignoring Your Offlaner’s Lane
Your offlaner is getting destroyed 1v2 while you’re trying to gank mid. Your mid doesn’t need you — they’re fine. Your offlaner is dying repeatedly because they have no support. Check your offlaner’s lane before rotating. If they’re struggling, stay and help. A winning offlane is more valuable than a failed mid gank.
8. Not Stacking Camps
Stacking jungle camps takes 5 seconds and doubles or triples the gold from that camp. Your cores can clear stacked camps for massive gold infusions. Herald Position 4 players never stack. Start stacking the camps near your mid or carry’s farming area at X:55 every minute. It’s free gold for your team.
9. Dying for No Reason
Every death has a cost — gold lost, time dead, XP given to enemies. Herald Position 4 players die constantly because they walk into bad positions, overextend for kills, or stay in fights too long. Ask yourself before every aggressive play: “If this goes wrong, do I die” If yes, and the potential reward isn’t worth it, don’t do it.
10. Not Carrying TP Scrolls
TP scrolls save teammates and respond to tower dives. When the enemy dives your carry under tower, a TP from you can turn the fight. When a tower is getting pushed, a TP lets you defend. Herald Position 4 players frequently have no TP scroll and can’t respond to anything happening across the map. Always carry one. Always.
Phase-by-Phase Guide: Laning, Mid-Game, Late-Game
Laning Phase (0:00 — 8:00)
Your first 8 minutes determine whether your offlaner wins or loses their lane, which cascades into whether your team has a strong frontliner for the mid-game.
Minutes 0-3: Lane with your offlaner
- Zone the enemy carry. Stand between them and the creep wave. When they walk up to last-hit, hit them. Use your spells (Ignite, Rot, Jinada) to make them lose HP.
- Don’t auto-attack the creep wave. You’ll push it toward the enemy tower and ruin your offlaner’s farm.
- Pull the enemy hard camp if the wave pushes. This denies the enemy carry a wave of gold and XP.
- If the lane is going well (your offlaner is farming freely), you can leave earlier. If the lane is contested, stay longer.
Minutes 3-5: Decide whether to stay or rotate
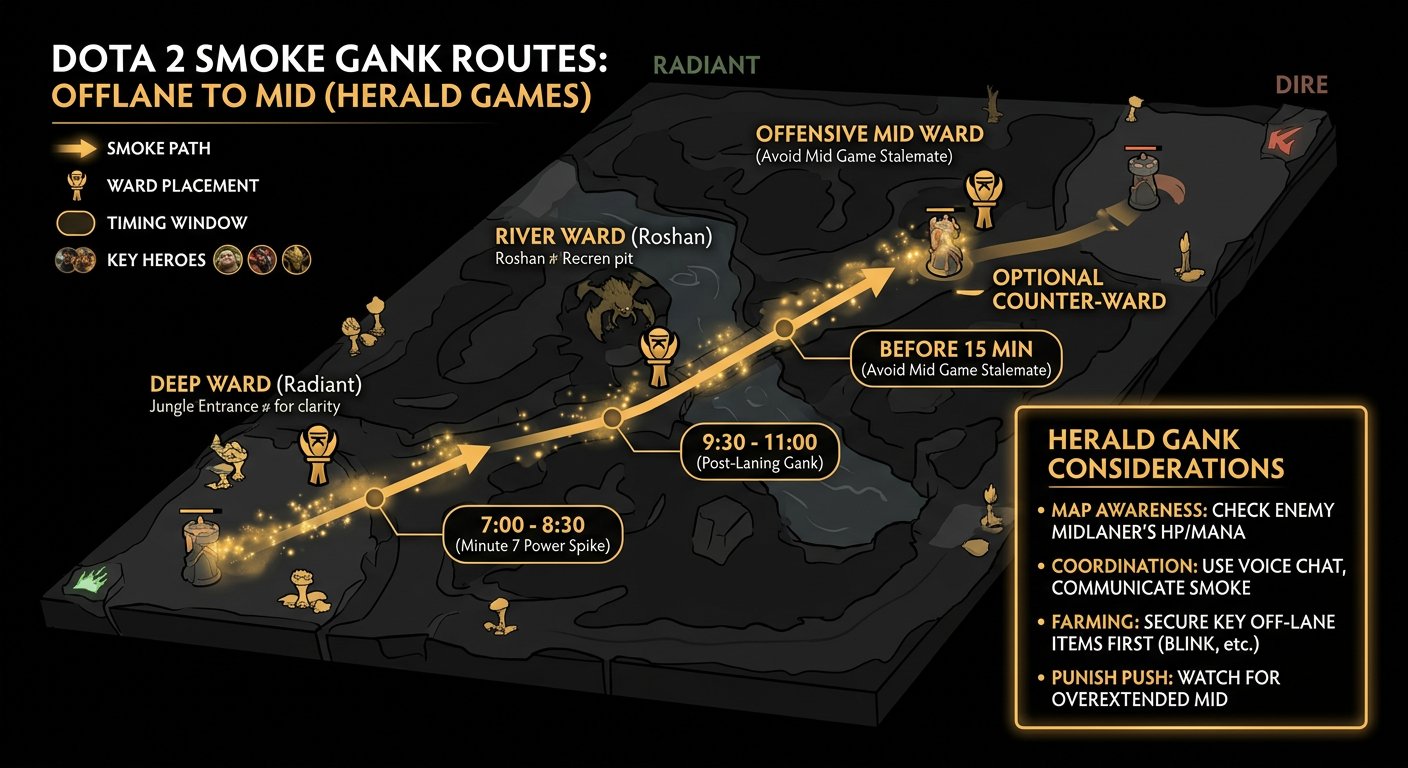
- If your offlaner is winning the lane, rotate mid for a smoke gank. Buy a Smoke, walk through the jungle (not through the river where wards are), and gank the enemy mid with your offlaner’s level advantage as backup.
- If your offlaner is struggling, stay and help. Your presence matters more than a risky rotation.
- If the lane is a stalemate, stack nearby camps for your cores. Productive use of time.
Minutes 5-8: Active roaming
- By now, you should be level 3-5 with your core spells. Look for kills across the map.
- Spirit Breaker: Charge the enemy mid or carry whenever they’re alone.
- Pudge: Smoke to mid, hide in trees, hook the enemy mid.
- Ogre: Walk to mid with Ignite + Fireblast for easy kills on overextended mids.
- Always carry a TP to respond to dives on your other lanes.
Mid-Game (8:00 — 25:00)
The mid-game is where Position 4 players have the most impact. Towers are falling, fights are happening, and your playmaking abilities are at their peak relative to the game state.
Your priorities
- Vision. Place aggressive wards on the enemy side of the map. Ward their jungle entries, their Roshan pit, and common farming spots. Vision controls the game — your team can gank enemies they can see and avoid enemies they know are coming.
- Smoke ganks. Smoke of Deceit costs 50 gold and makes your team invisible to wards. In Herald, NOBODY buys or uses smokes. If you buy one smoke, gather 2-3 teammates, and walk into the enemy jungle, you’ll find someone farming alone and kill them. Do this 2-3 times in the mid-game and you’ll create a massive gold lead.
- Teamfight participation. When fights happen, be there. Use your stuns, saves, and utility items on the right targets. Stun the enemy carry. Force Staff your ally away from danger. Use Spirit Vessel on the enemy that’s lifestealing. Your spell usage in fights is more impactful than your right-click damage.
- Objective support. When your team pushes towers, be there to provide vision, stuns, and saves. When your team does Roshan, be there to ward the pit entrance and watch for enemy approaches. Position 4 is the facilitator — you make objectives happen smoothly.
Itemization priority order
- Boots + Urn (always)
- Spirit Vessel (if enemies have healing)
- Force Staff (if enemies have heroes that jump your allies)
- Glimmer Cape (if enemies have heavy magic burst)
- Pipe/Crimson (if your offlaner isn’t building them)
Late-Game (25:00+)
Late-game Position 4 is about one thing: don’t get caught and use your spells at the right moment.
- Stay with your team. Solo warding in enemy territory at 35 minutes is how you get picked off and lose the game. Ward as a group or don’t ward at all.
- Save your cooldowns for key moments. Dismember on the enemy carry, not the support. Charge the backline, not the frontline. Your spells are limited — use them on high-value targets.
- Be the vision. Place wards before pushes. Deward before Roshan. Use abilities that provide vision (Lightning Bolt, Track) to scout safely.
- Buyback for defense. If you’re dead and the enemy is pushing high ground, buyback. Your stuns and saves might be the difference between losing barracks and defending successfully.
- Don’t farm. Late-game, every jungle camp and lane creep should go to your cores. Your job is to facilitate, not farm. If you’re taking CS from your carry at 35 minutes, you’re actively hurting your team.
The Teammate Problem: Why Herald Position 4 Games Feel Unwinnable
Position 4 might be the most frustrating role to climb with in Herald, because your impact is entirely dependent on your teammates’ ability to capitalize on what you create.
- You gank successfully, but your core doesn’t capitalize. You smoke mid, stun the enemy, your mid gets the kill… and then goes back to farming mid instead of pushing the tower. You created a 30-second window of free space, and it was wasted. This happens constantly in Herald.
- You ward the entire map, but nobody looks at the minimap. You’ve placed perfect wards that show 3 enemy heroes walking toward your carry. Your carry doesn’t look at the minimap and dies anyway. You’ve spent 225 gold on wards that provided zero value because your team doesn’t use the information.
- Your offlaner plays like a carry. You help them win the lane, they get a great start… and then they go jungle and farm for 20 minutes instead of pushing towers and teamfighting. Your lane dominance meant nothing because the offlaner didn’t do their job.
- Your carry has no farm despite free space. You’ve been roaming, ganking, creating pressure — the map is wide open for your carry to farm safely. But your carry has 100 CS at 20 minutes because they don’t know how to farm. All your playmaking was for nothing.
- Nobody follows your initiation. You charge in as Spirit Breaker, stun two heroes, your team is right there… and they hesitate. By the time they engage, the stun has worn off and the enemy turns on you. You die, your team loses the fight, and they blame you for “feeding.”
- Your Position 5 doesn’t exist. They picked a jungling hero, they’re farming, and you’re the only support on your team. Now you need to buy ALL the wards, ALL the detection, and still somehow find gold for your own items. You’re playing Position 5 and Position 4 simultaneously on a Position 4 budget.
The brutal truth about Position 4 in Herald is that you’re a force multiplier — but you need something to multiply. If your cores are 0, multiplying by any number still gives you 0. You can play the perfect game as a Position 4 and still lose because your cores didn’t do their part.
This is why climbing as Position 4 is one of the slowest climbs in Dota. Your individual impact is significant but indirect. You’re not the one killing towers, farming items, or dealing damage in fights. You’re enabling others to do those things, and in Herald, “others” are unreliable.
For many Position 4 players, the frustration of enabling bad cores is what pushes them toward MMR boosting. When an Immortal booster plays in Herald, they don’t need a Position 4 to create space — they create their own. They don’t need wards — they know where enemies are based on game sense alone. Your months of grinding as a support can be compressed into days.
Realistic Timeline: How Long Does It Take
Support roles are the slowest climb in Dota 2, and Position 4 is no exception. Your win rate as a climbing Position 4 in Herald will likely sit around 52-55%.
- 52% win rate: ~1,140 games — 12+ months at 3 games/day. Brutal and unrealistic for most players.
- 54% win rate: ~570 games — 6 months at 3 games/day.
- 56% win rate: ~380 games — 4 months at 3 games/day.
- 58% win rate (exceptional for Pos 4): ~285 games — 3 months at 3 games/day.
A 58% win rate as a Position 4 in Herald requires you to be significantly better than the bracket AND have enough hero picks that can carry fights semi-independently (Spirit Breaker, Zeus). Most improving Position 4 players sit around 53-55%, meaning 4-6 months of daily play to reach Guardian.
That’s a long time. That’s 400-600 games where you’re buying wards nobody looks at, stunning enemies your team ignores, and creating space your carry wastes. It’s no wonder that Position 4 players are some of the most common customers for boosting services.
If you want to accelerate the climb without boosting, coaching can help you identify the highest-impact changes to your play. Sometimes it’s one or two habits that, once fixed, bump your win rate from 53% to 57%. That single shift can cut months off your climb.
Frequently Asked Questions
Skip the Grind — Let Team Smurf’s Immortal Boosters Handle It
Playing Position 4 in Herald is like being a chef who cooks perfect meals for people who aren’t hungry. You set up ganks, provide vision, create space, and build utility items — and your team ignores all of it. The climb is real, the improvement is real, but the timeline is brutal: 4-6 months of daily games, many of which feel completely wasted.
Tired of Enabling Teammates Who Can’t Be Enabled
Team Smurf’s Immortal boosters don’t need good teammates — they ARE the good teammate. They’ll take your account from Herald to Guardian in days, playing at a level that makes Herald games trivial.
Written by Team Smurf’s Immortal-rank analysts — Last updated February 2026


