Understanding Dota 2 Economy: Gold, XP, Power Spikes & Net Worth Guide

Dota 2 is, at its core, an economy game. Every decision you make — from last hitting a creep to choosing whether to fight or farm, from buying a TP scroll to investing in a big item — is fundamentally an economic decision. Players who understand the economy of Dota 2 make better decisions, farm more efficiently, hit power spikes earlier, and climb MMR faster than those who play on instinct alone.
Yet the economy system in Dota 2 is remarkably complex. Gold comes from dozens of sources, each with different mechanics. Experience formulas determine power curves. Comeback mechanics can swing a game’s trajectory in a single fight. Bounty runes provide team-wide economic boosts. Kill gold and XP are calculated using formulas that depend on net worth differentials, kill streaks, and assist counts. Power spikes vary dramatically between hero archetypes.
This guide breaks down every element of Dota 2’s economy in exhaustive detail. Whether you’re a support trying to maximize your limited gold income or a carry optimizing your farming patterns for peak GPM, this is the definitive resource for understanding how money and experience work in Dota 2.
Table of Contents
All Sources of Gold in Dota 2
Gold in Dota 2 comes from two categories: reliable gold and unreliable gold. This distinction is critical because when you die, you lose unreliable gold but keep reliable gold. Understanding this system helps you make better decisions about when to fight, when to farm, and when to spend your gold.
Reliable vs. Unreliable Gold
| Reliable Gold Sources | Unreliable Gold Sources |
|---|---|
| Hero kills | Passive gold income |
| Bounty runes | Creep last hits |
| Tower kills (team gold) | Neutral creep kills |
| Roshan kill (team gold) | Building kills |
| Courier kills | Midas gold |
| Track/Greevil’s Greed bonus | All other sources |
Why this matters: When you die, you lose 30 × (your level) unreliable gold. If you have 2000 unreliable gold and die at level 15, you lose 450 gold. That’s almost the cost of a completed item component. To minimize death penalties, spend unreliable gold quickly (buy items, consumables, or components) and keep your gold balance low when you’re about to take risky fights.
Pro tip: If you’re about to die and have unreliable gold, quickly buy an item from the shop. You keep the item even if you die. Many experienced players bind their quickbuy key and tap it the moment they realize they’re dead — saving hundreds of gold per death.
Passive Gold
Every player in Dota 2 earns passive gold at a rate of approximately 100 gold per minute (the exact value fluctuates slightly with game updates). This passive income is unreliable gold and continues regardless of what you’re doing. Over a 40-minute game, passive gold alone provides approximately 4,000 gold — enough for significant item purchases.
Passive gold is particularly important for position 5 supports who may not have access to many farm sources. Understanding that passive gold provides a baseline income means supports should focus less on farming and more on impactful plays (warding, ganking, saving allies) that help their team win.
Lane Creeps
Lane creeps are the primary gold source for core heroes during the laning phase. Here are the gold values:
| Creep Type | Gold Bounty (Approx.) | Spawn Frequency |
|---|---|---|
| Melee Creep | 36-44 gold | Every 30 seconds, 3-4 per wave |
| Ranged Creep | 48-54 gold | Every 30 seconds, 1 per wave |
| Catapult (Siege) | 66-80 gold | Every 5 minutes |
A full creep wave (3 melee + 1 ranged) is worth approximately 150-180 gold. At 2 waves per minute, perfect last hitting provides approximately 300-360 gold per minute from lane creeps alone. In practice, most players achieve 60-80% last hit rates during laning, resulting in 180-290 gold per minute from lane creeps.
Deny mechanics: Denying creeps (last-hitting your own creeps to prevent the enemy from getting gold) now gives the denier a portion of the gold bounty and reduces the XP the enemy receives. Denies are worth approximately 20-25% of the creep’s gold value to the denier. This means aggressive denying not only reduces enemy income but increases yours — a double economic swing.
Neutral Creeps
Neutral creep camps are the backbone of carry farming once the laning phase ends. Camps come in three sizes:
| Camp Size | Gold Range | XP Range | Respawn Time |
|---|---|---|---|
| Small Camp | 60-90 gold | 80-100 XP | Every minute |
| Medium Camp | 90-150 gold | 120-180 XP | Every minute |
| Large Camp | 120-220 gold | 150-250 XP | Every minute |
| Ancient Camp | 200-350 gold | 200-350 XP | Every minute |
Neutral camps respawn every minute at :00 if the camp box is empty. Stacking — pulling creeps out of the camp box at :55 so a new set spawns — effectively doubles (or triples, with multiple stacks) the gold and XP available from a camp. A triple-stacked Ancient camp can be worth 600-1000+ gold, making it one of the most lucrative farming opportunities in the game.
Stack timing varies slightly by camp, but the general rule is to attack the camp between :53 and :55 and walk away from the camp box. Some camps require earlier pulls (Ancient camps at :53) due to the creeps’ slow movement speed. Mastering stack timings is a fundamental skill for supports who want to accelerate their carry’s farm. If you’re looking to improve specific skills like stacking efficiently, our coaching service covers these mechanics in detail.
Hero Kills
Killing enemy heroes provides reliable gold based on a formula that considers the killed hero’s level, net worth, and kill streak. We’ll cover kill gold formulas in detail in the Kill Gold and XP section, but the key point is: hero kills are one of the most lucrative gold sources in the game, especially when you kill heroes with high net worth or kill streaks.
Buildings
Building kills provide team-wide gold, making them extremely efficient for team economy:
| Building | Last Hit Gold | Team Gold (Each) | Total Team Gold |
|---|---|---|---|
| Tier 1 Tower | 120 | 120 | 720 |
| Tier 2 Tower | 200 | 200 | 1200 |
| Tier 3 Tower | 200 | 200 | 1200 |
| Tier 4 Tower | 200 | 200 | 1200 |
| Melee Barracks | 225 | 100 | 725 |
| Ranged Barracks | 150 | 100 | 650 |
A single Tier 1 tower kill gives your entire team 720 gold — roughly equivalent to 4 creep waves or 2 hero kills. This is why objective-based gameplay is so gold-efficient. For more on converting fights into tower kills, see our tower pushing strategy guide.
Roshan
Roshan provides 150 gold to each team member plus a variable gold bounty to the killer. More importantly, Roshan drops the Aegis of the Immortal (and Cheese on second kill, Aghanim’s Blessing/Refresher Shard on third). The Aegis enables aggressive plays that can lead to tower kills, making Roshan a crucial economic multiplier.
Courier Kills
Killing the enemy courier provides 30 gold to the killer plus a team-wide bounty. More importantly, killing the courier delays enemy item deliveries, which can swing the laning phase. If you kill the enemy mid’s courier carrying a Bottle, you’ve effectively set them back 30+ seconds of income.
The Experience System Explained
Experience (XP) determines your hero’s level, which unlocks ability points, increases base stats, and unlocks talents. Understanding how XP works is essential for hitting power spikes at optimal times and maintaining level advantages.
XP Sources and Values
| Source | XP Value | Notes |
|---|---|---|
| Melee Creep | 57 XP | Shared in range |
| Ranged Creep | 69 XP | Shared in range |
| Catapult | 88 XP | Shared in range |
| Small Neutral Camp | 80-100 XP | Solo XP only |
| Medium Neutral Camp | 120-180 XP | Solo XP only |
| Large Neutral Camp | 150-250 XP | Solo XP only |
| Ancient Camp | 200-350 XP | Solo XP only |
| Hero Kill | Variable | Based on killed hero’s level |
| Tome of Knowledge | 700 XP | Available at shop, limited stock |
| Outpost | Variable XP every 10 min | Team-wide XP |
XP Sharing Mechanics
One of the most important XP mechanics is XP sharing. When multiple heroes are within 1500 range of a dying enemy unit, the XP is split among them. This has massive implications:
- Solo lane XP is higher: A solo mid hero gets 100% of creep XP, while a dual lane splits XP 50/50. This is why mid laners typically out-level everyone else in the early game.
- Trilanes sacrifice support XP: In a trilane (3 heroes in one lane), each hero gets only 33% of creep XP. This is why trilanes fell out of meta — supports got too far behind in levels.
- Jungle stacking is XP-efficient: Stacked camps give full XP to the hero that farms them (no sharing), making them an excellent way to catch up in levels.
The XP sharing radius (1500 units) is important to know. If you’re a support standing near your carry while they last hit, you’re taking half their XP. Once the laning phase is won and your carry can farm safely solo, leave the lane and let them have full XP. Go stack camps, ward, or roam — activities that don’t split XP.
XP Required per Level
| Level | Total XP Required | XP for Next Level | Notable Unlock |
|---|---|---|---|
| 1 | 0 | 230 | Starting abilities |
| 2 | 230 | 370 | Second ability point |
| 3 | 600 | 480 | Third ability point |
| 4 | 1080 | 580 | Fourth ability point |
| 5 | 1660 | 600 | Fifth ability point |
| 6 | 2260 | 720 | ULTIMATE UNLOCK |
| 10 | 5900 | 1000 | First talent |
| 12 | 8200 | 1200 | Level 2 ultimate |
| 15 | 13200 | 1500 | Second talent |
| 18 | 19200 | 1800 | Level 3 ultimate |
| 20 | 22800 | 2000 | Third talent |
| 25 | 35200 | 2500 | Fourth talent |
| 30 | 52700 | 3500 | Max level |
Key observations:
- The XP gap between levels increases significantly as you level up. Going from 1 to 6 requires 2260 XP total, while going from 25 to 30 requires 17,500 XP.
- Level 6 (ultimate unlock), level 12 (level 2 ult), and level 18 (level 3 ult) are the most important power spikes for most heroes.
- Talent levels (10, 15, 20, 25) provide hero-specific bonuses that can dramatically change power curves.
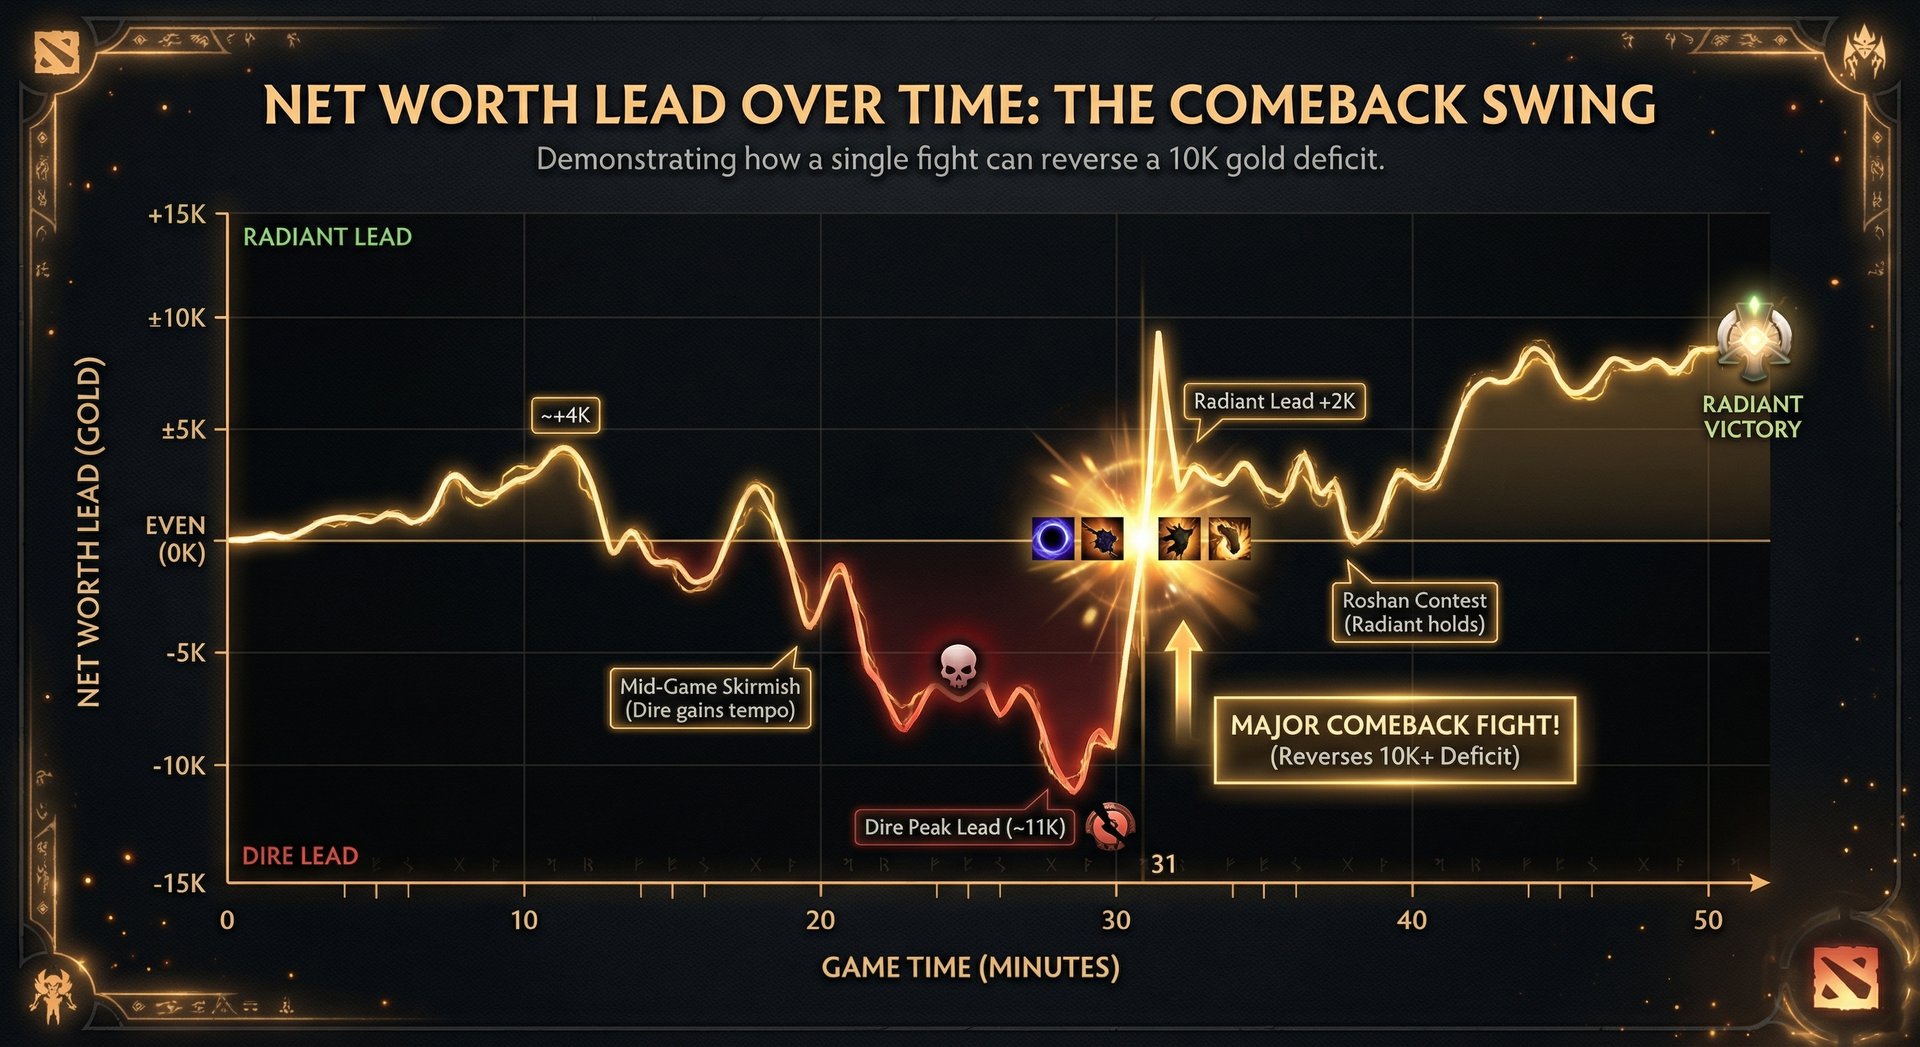
Comeback Mechanics: How Rubber Banding Works
Dota 2 has built-in comeback mechanics that give the losing team extra gold and XP when they kill heroes on the leading team. These mechanics exist to prevent snowballing from becoming unstoppable and to ensure that games remain competitive even after a rough laning phase. Understanding these mechanics is crucial for both the winning team (to avoid giving away comebacks) and the losing team (to exploit comeback potential).
How Comeback Gold Works
When a team that is behind in net worth kills a hero on the team that is ahead, the kill gold is multiplied by a comeback factor. The formula considers:
- Net worth difference: The greater the net worth gap between teams, the more comeback gold is awarded
- Killed hero’s net worth: Killing the enemy team’s richest hero provides more comeback gold than killing their poorest hero
- Kill streak: Heroes on killing streaks are worth more gold when killed
The exact formula is complex, but the practical effect is this: if your team is ahead by 10,000 net worth and your carry (the richest hero) gets killed, the enemy team receives significantly more gold than the base kill bounty. In extreme cases, a single kill can be worth 2,000-3,000+ gold to the killing team.
Implications for Leading Teams
If you’re ahead, comeback mechanics mean:
- Don’t feed your carry: Your most farmed hero dying gives the enemy the largest comeback swing. Protect your carry.
- Convert advantages into objectives: Gold leads are temporary. Use them to take towers, Roshan, and barracks before the enemy can catch up. Sitting on a gold lead without taking objectives invites comeback mechanics to equalize the game.
- Don’t take unnecessary fights: Every fight you lose while ahead gives the enemy comeback gold. If you don’t need to fight, don’t. Farm, take objectives, and play safe.
- Spread the gold: A team with evenly distributed net worth is less vulnerable to comeback mechanics than a team where one hero has 80% of the gold. Encourage your supports to farm when possible.
Implications for Trailing Teams
If you’re behind, comeback mechanics mean:
- Look for pickoffs on the richest enemy: Killing the enemy carry provides the largest gold swing. Set up ganks and smokes targeting their most farmed hero.
- Fight when you can: Unlike the leading team, the trailing team benefits from fighting. Even unfavorable trades can be worth it if you kill the right hero.
- Defend rather than avoid fights: Tower defense fights give you a terrain advantage plus comeback gold if you win. Don’t give up towers without a fight.
- Exploit enemy overconfidence: Ahead teams often play sloppily, diving for kills or taking unnecessary risks. Punish these mistakes and the comeback gold will swing the game back in your favor.
The comeback mechanics are one of the reasons Dota 2 games are never truly over until the Ancient falls. Many players at lower MMR brackets give up mentally when they’re behind at 15 minutes — but the comeback potential in Dota 2 means that a single won team fight can erase a 10,000 gold deficit. Never give up.
Bounty Runes and Their Impact
Bounty runes are a team-wide gold source that spawns at 0:00 and every 3 minutes afterward. They’re located in the jungles near the river, with two per side (four total). Understanding bounty rune value and securing them consistently is a major factor in team economy.
Bounty Rune Gold Values
Bounty rune gold scales with game time. At minute 0, each bounty rune provides approximately 36 gold to each team member (180 total team gold per rune). By minute 30, this value increases to approximately 54 gold each (270 total per rune). Over the course of a 40-minute game with consistent bounty rune collection, the total gold impact is substantial — potentially 5,000-10,000+ team gold.
Bounty Rune Priority
Who should pick up bounty runes In most cases, prioritize giving bounty runes to:
- Supports (Position 4/5): Supports have the lowest income and benefit most from bounty rune gold.
- Heroes with bounty multipliers: Alchemist (Greevil’s Greed multiplies bounty rune gold), Bounty Hunter (Track bonus).
- Any hero nearby: A bounty rune picked up by a carry is better than a bounty rune not picked up at all.
Contesting Enemy Bounty Runes
Securing all four bounty runes at a spawn is worth approximately 720-1080 total team gold (depending on game time). Denying the enemy even two bounty runes creates a 360-540 gold swing per spawn. Over 10 bounty rune spawns in a 30-minute game, consistent bounty rune advantage can create a 3,600-5,400 gold team differential — the equivalent of multiple tower kills.
Position 4 roamers and offlane heroes should prioritize contesting enemy bounty runes. Move toward enemy bounty locations 15-20 seconds before spawn. If the enemy contests with superior force, don’t feed — take your own runes and try again next spawn.
Kill Gold and XP Formulas
Kill gold and XP are calculated using formulas that reward killing high-value targets and penalize dying with high net worth or kill streaks.
Base Kill Gold
The base gold bounty for killing a hero is: 110 + (killed hero’s level × 8). So a level 10 hero is worth approximately 190 gold base bounty. This base bounty is then modified by net worth factors and kill streaks.
Kill Streak Bounty
Heroes on a kill streak accumulate bonus bounty gold:
| Kill Streak | Bonus Gold | Announcement |
|---|---|---|
| 3 kills | +60 gold | Killing Spree |
| 4 kills | +90 gold | Dominating |
| 5 kills | +120 gold | Mega Kill |
| 6 kills | +150 gold | Unstoppable |
| 7 kills | +180 gold | Wicked Sick |
| 8 kills | +210 gold | Monster Kill |
| 9 kills | +240 gold | Godlike |
| 10+ kills | +270+ gold | Beyond Godlike |
Ending a kill streak is worth significantly more gold than a regular kill. A “Beyond Godlike” hero who dies gives the killer 270+ bonus gold on top of the base bounty — incentivizing teams to focus the streaking hero.
Assist Gold
Heroes who assist in a kill (dealing damage or providing aura/buff/debuff within a time window) receive a portion of the kill bounty. Assist gold is divided among all assisting heroes, with the formula considering the number of assists. More assists mean less gold per assisting hero, but the total team gold from the kill remains high.
Kill XP
Kill XP follows a similar formula to kill gold: higher-level heroes give more XP when killed. The base formula is: 100 + (killed hero’s level × 8). This XP is shared among all heroes in the XP sharing range (1500 units). Like comeback gold, XP rewards are amplified when the losing team kills a high-level hero on the leading team.
Death Gold Loss
When you die, you lose 30 × your level unreliable gold. At level 25, that’s 750 gold lost per death. This is why late-game deaths are so punishing — not only do you give the enemy 500+ kill gold, but you also lose 750 gold of your own. The total gold swing from a single late-game death can exceed 1500 gold.
This death penalty makes dying at key moments catastrophic. Before taking risky fights in the late game, always ask: “Can I afford to die here” If your carry has 3000 unreliable gold and dies, they lose 750 gold AND delay their next item by the death timer duration. That’s why buying items before fights (even item components) is so important.
Power Spikes by Hero Type
Power spikes occur when a hero becomes significantly stronger relative to other heroes in the game. This can happen at specific levels, item completions, or game timings. Recognizing your hero’s power spikes — and your enemy’s — is the foundation of game-winning decision-making.
Carry Power Spikes
Carries have the most item-dependent power spikes. Their timing depends heavily on which items they build:
| Carry Type | Example Heroes | First Spike | Second Spike | Peak Timing |
|---|---|---|---|---|
| Early Game Carry | Ursa, Huskar, Razor | Level 6 + first item (10-12 min) | BKB (18-22 min) | 15-25 min |
| Mid Game Carry | Juggernaut, Luna, Sven | First major item (14-18 min) | BKB + second item (22-28 min) | 25-35 min |
| Late Game Carry | Spectre, Medusa, AM | First major item (18-25 min) | Two major items (28-35 min) | 35-50+ min |
Mid Laner Power Spikes
Mid laners typically spike earlier than carries due to solo XP advantage:
| Mid Type | Example Heroes | Key Spike | Optimal Aggression Window |
|---|---|---|---|
| Tempo Mid | Puck, QoP, Spirit Bros | Level 6-8 + mobility item | 8-20 minutes |
| Farming Mid | SF, TA, Alchemist | First big item (12-16 min) | 15-30 minutes |
| Scaling Mid | Invoker, OD, Morphling | Level 15+ with 2 items | 25-45 minutes |
Offlaner Power Spikes
Offlaners spike with utility items that enable team fights:
- Blink Dagger timing: For initiators like Axe, Magnus, Tidehunter, Blink Dagger completion is the single biggest power spike. A 12-minute Blink is devastating; a 20-minute Blink is late.
- Level 6 ultimate: Tide Ravage, Magnus RP, Enigma Black Hole — these ultimates define the early-mid game tempo.
- BKB timing: For frontline offlaners (Bristleback, Underlord), BKB completion allows them to fight freely in the middle of the enemy team.
Support Power Spikes
Supports have the most level-dependent power spikes since they have limited item income:
- Level 2-3: Supports with strong early abilities spike at level 2-3 for ganking (Earth Spirit, Tusk, Clock)
- Level 6: Many supports transform at 6 — Shadow Shaman (Serpent Ward), Witch Doctor (Death Ward), Warlock (Golem)
- Key utility item: First major utility item (Glimmer Cape, Force Staff, Blink Dagger) is a massive spike for supports
Recognizing Enemy Power Spikes
Just as important as knowing your own power spikes is recognizing when the enemy hits theirs. Check the enemy’s items frequently using the scoreboard. When you see the enemy carry complete a BKB, adjust your fight approach. When the enemy Magnus gets Blink, start playing around it.
The scoreboard is one of the most underused tools in lower MMR brackets. Checking enemy items every 2-3 minutes takes 5 seconds and can prevent game-losing surprises. Our coaching sessions emphasize scoreboard awareness as a core habit.
GPM/XPM Benchmarks by Role and MMR
Gold Per Minute (GPM) and Experience Per Minute (XPM) are the two most important economy metrics. They measure your farming efficiency and level progression. Here are benchmarks by role and MMR bracket.
GPM Benchmarks
| Role | Herald-Crusader | Archon-Legend | Ancient-Divine | Immortal |
|---|---|---|---|---|
| Pos 1 (Carry) | 400-500 | 500-600 | 600-700 | 700-800+ |
| Pos 2 (Mid) | 380-480 | 480-580 | 580-680 | 650-750+ |
| Pos 3 (Offlane) | 350-420 | 400-480 | 450-530 | 500-580 |
| Pos 4 (Soft Supp) | 250-320 | 300-380 | 350-420 | 380-450 |
| Pos 5 (Hard Supp) | 200-280 | 250-330 | 300-370 | 330-400 |
XPM Benchmarks
| Role | Herald-Crusader | Archon-Legend | Ancient-Divine | Immortal |
|---|---|---|---|---|
| Pos 1 (Carry) | 450-550 | 550-650 | 630-720 | 700-800+ |
| Pos 2 (Mid) | 500-600 | 600-700 | 680-780 | 750-850+ |
| Pos 3 (Offlane) | 400-500 | 480-570 | 530-620 | 580-670 |
| Pos 4 (Soft Supp) | 320-400 | 380-460 | 420-500 | 460-540 |
| Pos 5 (Hard Supp) | 280-360 | 340-420 | 380-460 | 420-500 |
If your GPM/XPM consistently falls below the benchmark for your role and bracket, you have a farming efficiency problem that’s costing you games. Common causes include: missing last hits during laning, not farming jungle camps between fights, dying too often (losing gold and farm time), and inefficient movement patterns between camps.
How to Improve Your GPM
- Improve last hitting: Practice in the last hit trainer. Aim for 60+ last hits by 10 minutes as a carry.
- Farm the jungle: After the laning phase, incorporate jungle camps into your farming pattern. Push lane → farm nearby jungle camps → push next lane wave.
- Minimize downtime: Always be doing something productive. Walking without purpose is lost gold. If you’re moving between lanes, farm a camp on the way.
- Don’t die: Every death costs you gold (death penalty) and time (respawn timer). Reducing deaths from 8 to 4 per game can increase your GPM by 50-100.
- Stack camps: Either stack for yourself or have supports stack for you. Triple-stacked camps are among the most efficient farm sources in the game.
Optimal Farming Patterns
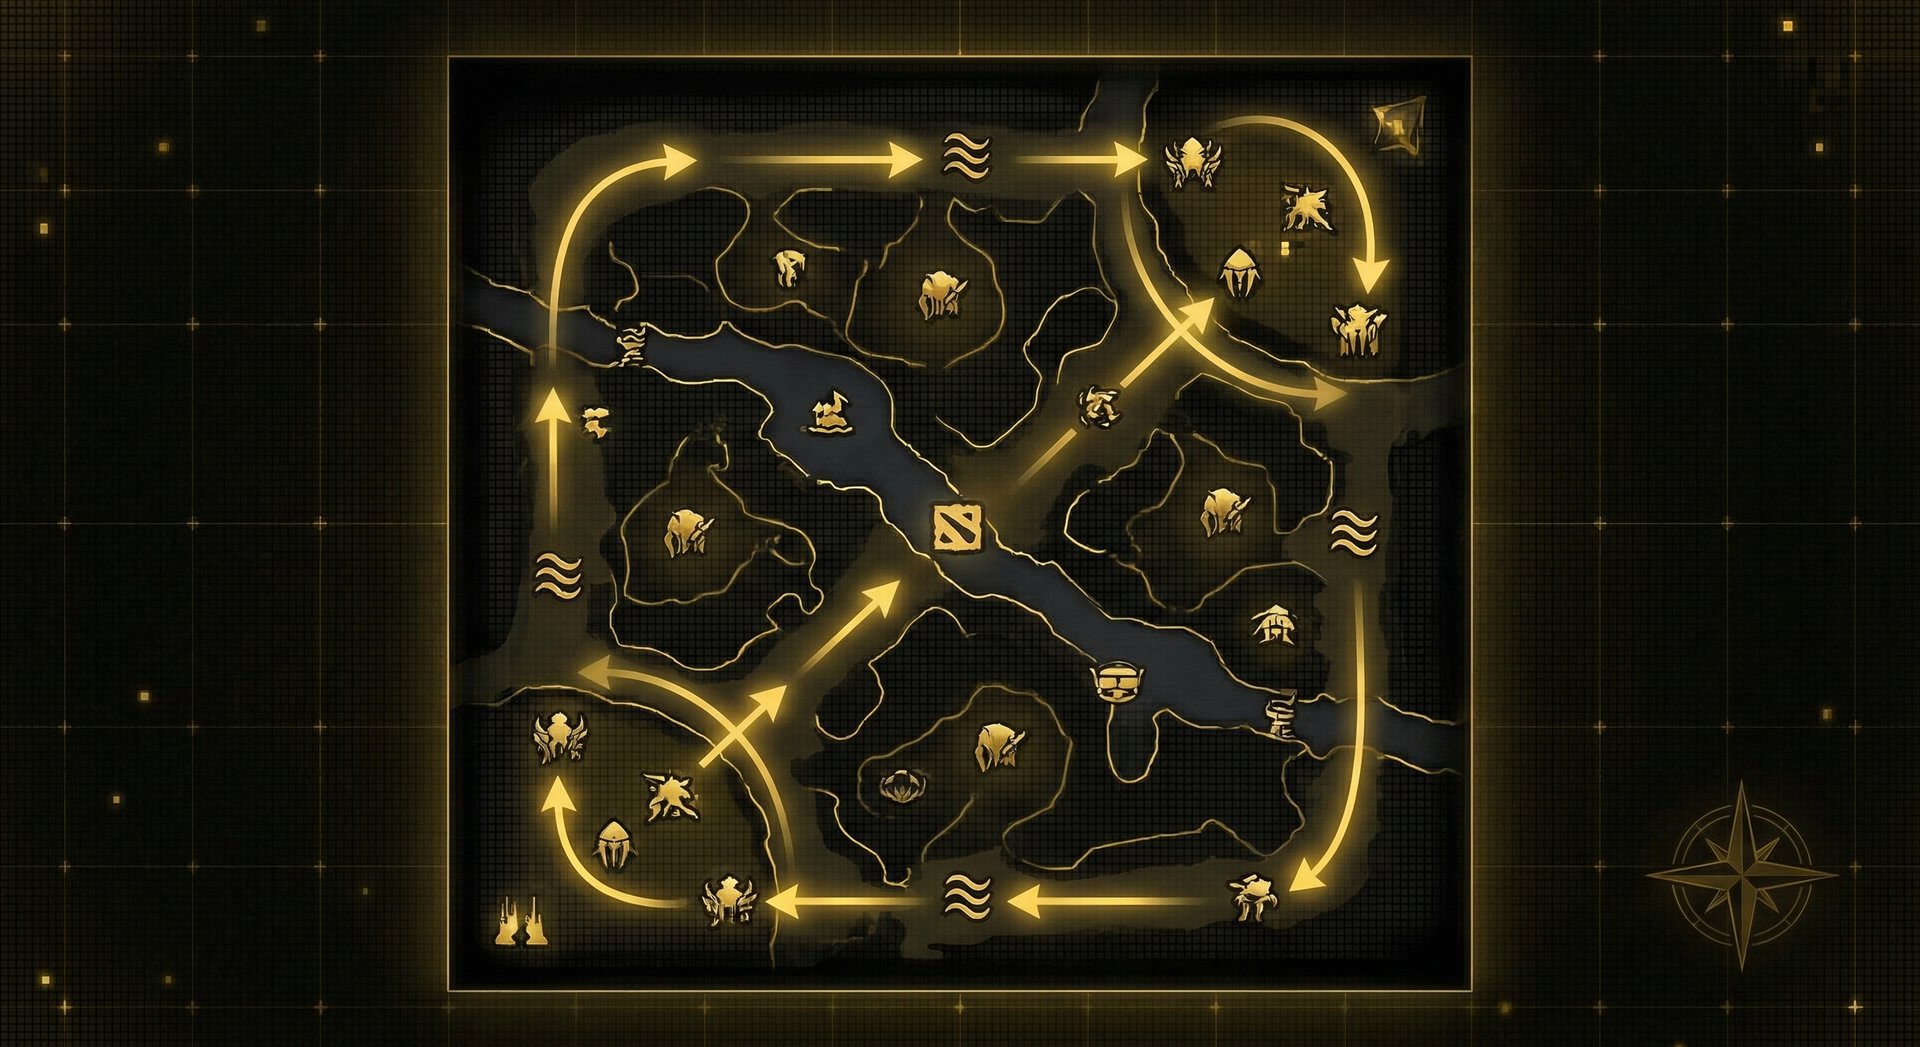
Farming patterns are the routes you take through the map to maximize gold and XP per minute. Efficient farming patterns minimize travel time between farm sources and ensure you’re always hitting creeps.
The Triangle Farm
The most fundamental farming pattern is the “triangle” — pushing a lane wave, farming the two nearest jungle camps, then returning to the lane for the next wave. This pattern maximizes your farming efficiency because you’re always killing creeps with minimal downtime.
For Radiant safe lane carry, the triangle is: safelane wave → medium camp → large camp → safelane wave. For Dire safe lane carry, the equivalent pattern uses the Dire jungle camps adjacent to the safelane.
Farming Pattern by Game Phase
Laning Phase (0-10 min): Focus on lane creeps. Farm jungle camps only when the lane wave is pushed out and you have time before the next wave arrives. Prioritize lane equilibrium and last hit accuracy.
Early Mid Game (10-20 min): Start incorporating jungle camps into your farming pattern. Push the wave → farm 1-2 camps → return for the next wave. If the lane is unsafe, shift to jungle farming entirely and let the lane push toward your tower.
Mid Game (20-30 min): Farm aggressively across the map. Use the entire friendly jungle plus any unsafe areas of the enemy jungle (if you have map control). Farm Ancient camps with stacks. Push out waves in multiple lanes using teleport scroll.
Late Game (30+ min): Farm accelerates dramatically with late-game items. Heroes like Anti-Mage with Battle Fury or Luna with Manta can clear entire jungle quadrants in 30-40 seconds. At this point, efficient farming is about using TP cooldowns, pushing waves with abilities, and farming aggressively while maintaining map awareness.
Dead Time and How to Eliminate It
“Dead time” is any time you’re not farming, fighting, or achieving an objective. Common sources of dead time:
- Walking between lanes without farming: Always farm a camp on the way
- Standing around waiting for something to happen: If you’re waiting for a team fight, farm nearby while waiting
- Going back to base unnecessarily: Use clarities, salves, and bottle instead of walking to base
- Waiting to respawn: Use buyback if the gold and timing justify it; otherwise, use the death timer to plan your next farming route
Eliminating dead time is one of the fastest ways to increase your GPM. A carry who spends 90% of the game farming versus one who spends 70% farming will have a massive gold advantage by 30 minutes — even if they have identical last hit accuracy. This efficiency difference is one of the key factors separating MMR brackets, and it’s something our coaching service specifically focuses on during replay analysis.
Key Economic Decisions
Understanding the economy is only useful if you can translate that knowledge into good decisions. Here are the most important economic decisions you’ll face in every game.
Buyback or Save
Buyback costs 200 + (net worth / 13) gold and puts your hero on a temporary gold income penalty. The decision to buyback should consider:
- Is the game-ending right now If the enemy is pushing your high ground and you’ll lose barracks or the Ancient, buyback.
- Can you turn the fight If your buyback will swing a team fight and save an objective, it’s worth it.
- Are you the carry Carry buybacks are more impactful than support buybacks in most situations.
- Can you afford the gold penalty Buyback puts you on reduced gold income for a period. In the late game when items are finished, this matters less.
Fight or Farm
The eternal Dota 2 question. As a general rule:
- Fight when: You have a power spike advantage, an objective is at stake, your team needs you, or you can secure a high-value kill
- Farm when: You’re approaching a power spike (close to a key item), the fight isn’t near an objective, your team can handle the fight without you, or fighting would be unfavorable
The carry’s “fight or farm” decision is the most impactful economic decision in the game. A carry who joins the right fights and farms during downtime will outpace one who either farms too much (team loses objectives) or fights too much (misses farm, delays items).
When to Buy Consumables vs. Save for Items
Buying consumables (TP scrolls, wards, dust, smoke, salves, clarities) is an economic investment, not a waste. A 50-gold Smoke that leads to a kill is worth far more than saving that 50 gold. However, over-buying consumables can delay key items. The balance:
- Always carry TPs: 100 gold for global mobility and defensive potential. Non-negotiable.
- Buy dust when needed: If the enemy has invisible heroes (Riki, Bounty Hunter, Shadow Blade carriers), Dust is worth the 80 gold investment.
- Supports should keep 1 Smoke and 1 Sentry in inventory: These items enable plays that are worth far more than their cost.
Item Timing vs. Team Needs
Sometimes you need to buy a defensive item (BKB, Ghost Scepter) before a damage item to survive fights. This delays your damage timing but keeps you alive. The economic principle: dead heroes don’t farm. A BKB that prevents two deaths saves more gold (from avoided death penalties) and farm time than it costs.
Net Worth Management in Late Game
In the ultra-late game (50+ minutes), most heroes have 6-slotted inventories. At this point, economy shifts from “earning gold” to “managing death costs.” Key principles:
- Keep buyback gold available at all times
- Sell and repurchase items strategically (sell midgame items for late-game upgrades)
- Consider Moon Shard consumption (frees an item slot while providing permanent attack speed)
- Use Aghanim’s Blessing (Roshan drop) to save a slot
Frequently Asked Questions
Conclusion: Master the Economy, Master the Game
Dota 2’s economy system is the invisible framework that governs every game. Players who understand gold sources, XP mechanics, power spikes, and comeback potential make better decisions at every stage of the game. They farm more efficiently, fight at the right times, convert advantages into objectives, and know when to save and when to spend.
The principles in this guide apply universally across all MMR brackets, but their impact is most pronounced in the 2K-5K range where small efficiency improvements compound into significant win rate increases. A carry who farms 50 more GPM than their opponent has an item advantage at every stage of the game — and in Dota 2, items win fights, fights win objectives, and objectives win games.
Start by focusing on the basics: last hit accuracy, farming patterns, and death reduction. Then progress to advanced concepts like power spike recognition, comeback exploitation, and net worth management. The economy of Dota 2 rewards players who are disciplined, efficient, and strategic — exactly the qualities that define consistent MMR climbers.
Ready to Climb Start Your Boost Today
Team Smurf is the #1 rated Dota 2 boosting service. Immortal-rank boosters, maximum safety, competitive pricing, 24/7 support.
Written by Team Smurf’s Immortal-rank analysts — Last verified February 2026


