How to Climb from Legend to Ancient as Pos 4 Soft Support in Dota 2 (2026 Guide)

Position 4 is the most versatile and arguably the most fun role in Dota 2. You’re the roamer, the playmaker, the hero who appears from the fog and turns losing lanes into winning ones. In the right hands, a Pos 4 can singlehandedly control the tempo of a game — ganking the enemy mid, saving your carry from a dive, stacking camps for your cores, and providing clutch saves in teamfights.
But in Legend bracket Most Pos 4 players don’t do any of that. They sit in the offlane leeching XP. They pull camps at the wrong time. They buy the wrong items. They don’t gank, don’t stack, and don’t rotate. And then they wonder why they’re stuck between 3,080 and 3,850 MMR.
If you’re a Pos 4 player looking to break into Ancient (3,850-4,620 MMR), this guide is for you. We’ll cover everything from hero selection to the ten biggest mistakes, from phase-by-phase gameplay to dealing with underperforming teammates. This is the complete playbook for climbing as a soft support.
Table of Contents
- Understanding the Legend Pos 4 Player: Why You’re Stuck
- Top 5 Heroes to Climb from Legend to Ancient as Pos 4
- 10 Mistakes That Keep Pos 4 Players Stuck in Legend
- Phase-by-Phase Guide: Playing Pos 4 from Legend to Ancient
- The Teammate Problem: Pos 4 Edition
- Realistic Timeline: Legend to Ancient as Pos 4
- Frequently Asked Questions
- Become the Playmaker Your Team Needs
Understanding the Legend Pos 4 Player: Why You’re Stuck
The Pos 4 role has the widest skill expression of any position in Dota 2. The difference between a bad Pos 4 and a great Pos 4 is astronomical — and Legend bracket is where most of the bad Pos 4 habits live.
The Legend Pos 4 Profile
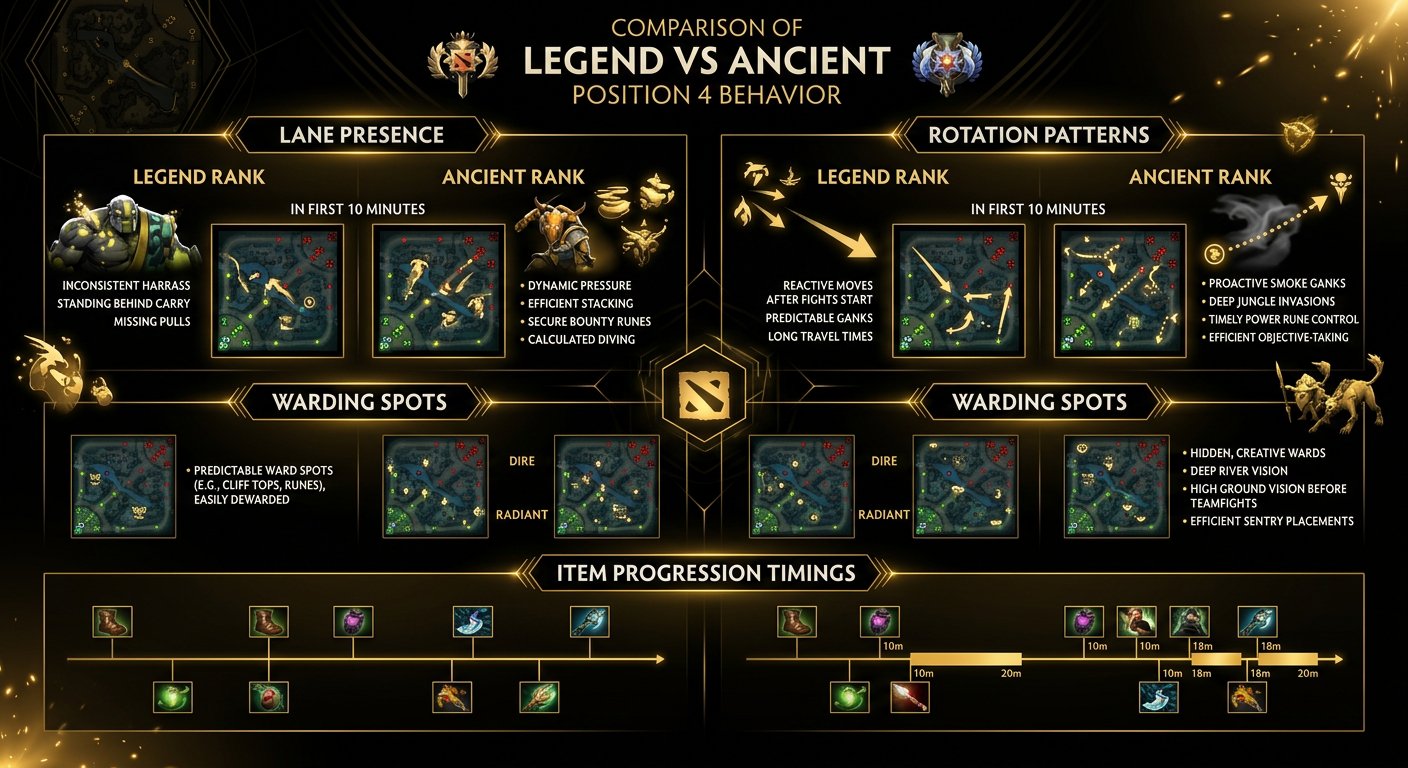
Lane presence: Inconsistent. Legend Pos 4 players fall into two traps. Either they sit behind their offlaner doing nothing useful (leeching XP, not zoning, not pulling), or they immediately abandon the lane at minute 2 to roam — often unsuccessfully, leaving their offlaner in a miserable 1v2 situation. Neither approach is correct.
Rotations: Poorly timed. When Legend Pos 4 players do rotate, they usually rotate at the wrong time. They gank mid when the enemy mid is level 7 and full HP. They show up to the safe lane when the carry doesn’t need help. They walk across the map for 30 seconds, accomplish nothing, and return to the offlane having missed 2 waves of experience.
Itemization: Greedy or thoughtless. Some Legend Pos 4 players rush Aghanim’s Scepter or Blink Dagger while their team has no wards, no dust, no smoke. Others buy random cheap items with no game plan. The best Pos 4 players build a progression: boots → utility → team items, always buying wards and detection along the way.
Vision game: Passive. Legend Pos 4 players buy wards, but they place them in the same spots every game — the predictable ward spots that everyone (including the enemy) knows. They don’t deward aggressively. They don’t use sentries to remove enemy vision. They don’t adjust their warding based on the game state.
What Ancient Pos 4 Players Do Differently
- They win the offlane through active play. Not by sitting behind the offlaner, but by zoning the enemy support, harassing the carry, pulling at the right times, and setting up kills when the opportunity arises.
- They rotate with purpose and timing. They gank mid when they have a key level (usually 3 or 4), when the enemy mid is in a vulnerable position, and when their arrival can lead to a kill. If the gank isn’t there, they don’t force it — they go back to farming or stacking.
- They control vision strategically. Wards go in spots that enable the team’s current game plan. Pushing Ward offensively. Defending Ward defensively. Their Pos 4 smokes Deward the enemy’s defensive wards first.
- They find farm without taking it from cores. Ancient Pos 4 players stack camps, farm dead lanes (lanes no core is using), and clear neutral camps between rotations. They have items without stealing core farm.
Top 5 Heroes to Climb from Legend to Ancient as Pos 4
Pos 4 hero selection should prioritize: kill potential (to win lanes and gank effectively), scaling (to remain relevant throughout the game with limited farm), and versatility (to adapt between aggressive and defensive play as needed).
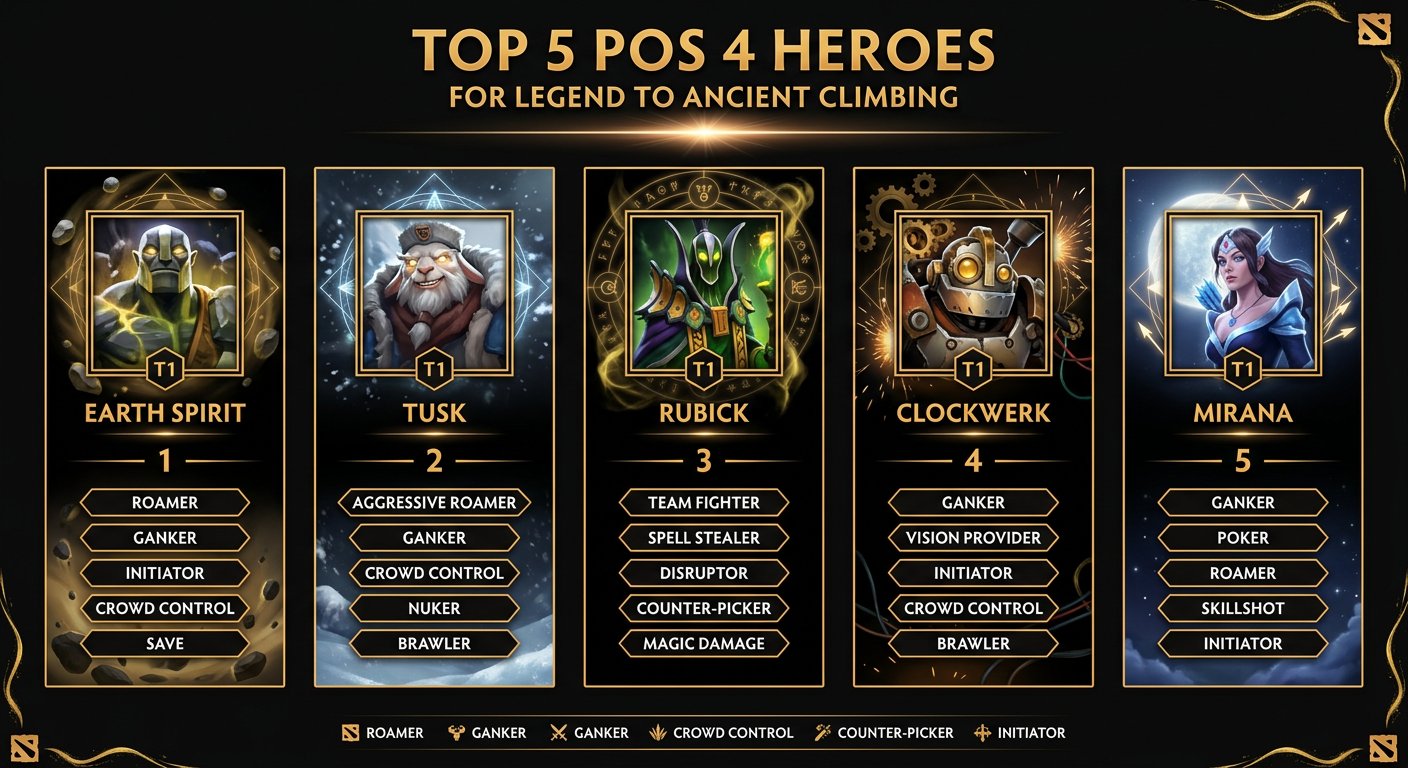
1. Earth Spirit — The Playmaker Supreme
Why Earth Spirit dominates Legend as Pos 4: Earth Spirit is the highest-skill-ceiling Pos 4 in the game, and in Legend, a good Earth Spirit is essentially playing a different game than everyone else. Rolling Boulder provides a 1200-range initiation. Boulder Smash silences from range. Magnetize is devastating in teamfights. And his ability to SAVE allies with Geomagnetic Grip (pulling them out of danger) is game-winning in a bracket where carries constantly get caught out of position.
How to play Earth Spirit for maximum MMR:
- Laning (0-6 min): ES is a terror in the offlane. At level 2, you can combo Boulder Smash (silence) → Rolling Boulder (slow/stun) to set up kills with your offlaner. At level 3, the full combo with Geomagnetic Grip adds a pull + stun. Most Legend carries can’t deal with this pressure. Buy Orb of Venom for extra slow and Boots for positioning.
- Roaming (6-12 min): Once you hit level 4-5, start rotating. Roll into the enemy mid from fog → Boulder Smash silence → your mid follows up = dead enemy. ES’s rotation speed is unmatched — Rolling Boulder covers 1200 range instantly. Gank, get a kill, push the tower, go back to farming or stacking. Build Urn of Shadows to amplify your kill potential.
- Midgame (12-25 min): Magnetize is devastating in teamfights. Each remnant refreshes the duration and adds more damage over time. In Legend teamfights, people clump together — Magnetize + 2-3 remnants deals absurd AoE damage. Build Spirit Vessel (upgrade from Urn) for anti-healing, then utility items like Eul’s Scepter, Force Staff, or Glimmer Cape.
- Late game (25+ min): ES transitions into a utility monster. Grip saves your carry from Blink initiators. Boulder Smash silences key spell casters. Rolling Boulder provides scouting and initiation. With Aghanim’s Scepter, Enchant Remnant lets you turn an enemy hero into a boulder, removing them from the fight for 3 seconds — game-winning against fed enemies.
Key ES tip: Practice your remnant management. You get Stone Remnant charges, and running out of remnants in a fight is the #1 mistake Legend ES players make. Keep at least 2 remnants in reserve at all times.
2. Tusk — The Aggressive Ganker
Why Tusk dominates Legend as Pos 4: Tusk is simple, aggressive, and devastating. Ice Shards is one of the best zoning tools in the game (it creates impassable terrain that traps enemies). Snowball provides magic immunity during its channel AND lets you bring allies. Walrus Punch is a guaranteed crit + slow. In Legend, where people don’t position to avoid ganks, Tusk thrives — every gank is a near-guaranteed kill.
How to play Tusk for maximum MMR:
- Laning: Ice Shards at level 1 is oppressive. Cast it behind the enemy carry, trapping them between your creeps and the shard wall. They either take massive creep damage trying to escape or die to you and your offlaner. Tag of the Deep adds another damage instance to your combo. Win the lane through constant aggression.
- Roaming (5-15 min): Tusk is one of the best gankers in the game. Snowball into the enemy mid from fog → Ice Shards behind them → Walrus Punch = dead. If your ally mid has any follow-up damage, the kill is guaranteed. After the gank, push the tower or stack a camp on your way back. Build Phase Boots and Blink Dagger for maximum initiation range.
- Midgame: Blink → Snowball (with an ally inside) → Ice Shards → Walrus Punch is the most devastating gank combo in Legend. You can also use Snowball defensively — if your carry gets jumped, Snowball them to safety. Build Desolator for damage or Aghanim’s Shard for Frozen Sigil utility.
- Late game: Tusk falls off as a damage dealer but remains relevant through saves (Snowball), terrain control (Shards), and Walrus Punch’s guaranteed slow. Build utility — Solar Crest, Lotus Orb, or Force Staff — depending on what your team needs.
3. Rubick — The Spell Stealer
Why Rubick dominates Legend as Pos 4: Rubick’s power comes from one ability: Spell Steal. In Legend, players don’t play around Rubick properly — they use their best abilities first, giving Rubick access to the most powerful spells in the game. A Rubick who steals Ravage, Black Hole, or Chronosphere wins teamfights singlehandedly. Additionally, Telekinesis is one of the best stuns in the game, and Fade Bolt reduces enemy damage output significantly.
How to play Rubick for maximum MMR:
- Laning: Telekinesis at level 1 is a 1.1-1.5 second stun + throw, which is incredibly powerful for setting up kills. Fade Bolt reduces the enemy’s damage, making lane trades favorable. Rubick’s laning isn’t the strongest, but with an aggressive offlaner, Telekinesis alone wins kill attempts.
- Midgame (10-25 min): Position carefully in teamfights. Your job is to: (1) Telekinesis the most dangerous enemy, (2) Fade Bolt to reduce their team’s damage, and (3) STEAL THE BEST SPELL. Prioritize stealing big ultimates (Ravage, Black Hole, Eclipse) or key utility spells (Dismember, Fiend’s Grip). Build Aether Lens for range, then Blink Dagger for positioning.
- Spell Steal priorities: Learn which enemy spells are worth stealing. In order of priority: game-winning ultimates > AoE stuns > single-target disables > damage spells > utility. Also, stolen spells from Rubick have NO CAST POINT, meaning they’re faster when Rubick uses them. A stolen Ravage from Rubick is actually better than Tidehunter’s Ravage because it’s instant.
- Late game: Rubick with Aghanim’s Scepter can hold two stolen spells simultaneously. With Blink and good positioning, you become the most versatile hero in any teamfight. Steal two ultimates and use them back-to-back for devastating effect.
4. Clockwerk — The Space Invader
Why Clockwerk dominates Legend as Pos 4: Clockwerk is the ultimate “I’m in your base, killing your carry” hero. Hookshot provides cross-map initiation onto single targets, Power Cogs traps enemies in a cage with you, and Battery Assault mini-stuns for 10 seconds, making it nearly impossible for the trapped enemy to cast spells. In Legend, where carries farm alone and supports don’t stick close enough to save them, Clockwerk picks off heroes all game long.
How to play Clockwerk for maximum MMR:
- Laning: Rocket Flare provides harass from anywhere on the map. Use it to snipe the enemy mid’s ranged creep, harass their safelane while you’re in the offlane, and scout rune spots. Battery Assault at level 2-3 wins any 1v1 trade against most supports. Power Cogs at level 3-4 creates kill setups with your offlaner.
- Roaming (6-15 min): Once you have Hookshot, become the map’s scariest presence. Hookshot an out-of-position enemy → Power Cogs → Battery Assault = dead hero. The range on Hookshot is massive (3000 at max level), meaning you can initiate from incredibly far away. Build Blade Mail and Force Staff for your core items.
- Midgame (15-25 min): Clockwerk’s midgame is about pick-offs and vision. Use Rocket Flare to scout enemy positions. Hookshot onto isolated heroes and kill them. Cogs are also useful defensively — trap an enemy who dives your carry, giving your team time to respond. Blade Mail punishes anyone who attacks you inside Cogs.
- Late game: Aghanim’s Scepter gives Hookshot a 12-second cooldown, turning you into a constant threat. You can Hookshot every fight, Hookshot to chase, Hookshot to escape. With Lotus Orb, you can also reflect spells cast on you during Cogs, adding another layer of defense for your team.
5. Mirana — The Versatile Arrow Machine
Why Mirana dominates Legend as Pos 4: Sacred Arrow is one of the most punishing abilities in Dota 2 — a 5-second stun at max range that sets up guaranteed kills. In Legend, where players don’t position to avoid long-range arrows and don’t dodge skill shots well, Mirana lands arrows far more often than she should. Moonlight Shadow provides team-wide invisibility for ganks and escapes, and Starstorm gives decent farming capability for a support.
How to play Mirana for maximum MMR:
- Laning: Arrow is your lane-winning tool. If your offlaner has a stun or slow, combo it with Arrow for a guaranteed 5-second stun. Starstorm provides decent wave clear and harass. Leap gives you an escape. Mirana’s laning is strong as long as you’re landing arrows — if you’re missing them, you’re a mediocre laner.
- Roaming (6-15 min): Smoke → walk to the enemy mid → Arrow from fog → your mid follows up. In Legend, mid ganks with Mirana arrows are absurdly effective because mid players don’t expect it. Always arrow from fog and at max range for the full 5-second stun. Build Arcane Boots and Eul’s Scepter (Eul’s sets up guaranteed arrows).
- Midgame: Moonlight Shadow is a budget Smoke of Deceit on a 60-second cooldown. Use it to initiate ganks, rotate between lanes, or escape from bad fights. Mirana with Eul’s can solo kill most heroes: Eul’s → Arrow (guaranteed because they’re in the air) → Starstorm → right clicks. Build utility after Eul’s — Force Staff, Glimmer Cape, or Spirit Vessel.
- Late game: Mirana’s late-game value comes from Arrow catches and Moonlight Shadow. A 5-second stun on the enemy carry in the late game is often an instant teamfight win. With Aghanim’s Scepter, Starstorm gains a passive component that adds damage to your teamfight contribution. Position carefully and look for long-range arrows from fog.
10 Mistakes That Keep Pos 4 Players Stuck in Legend
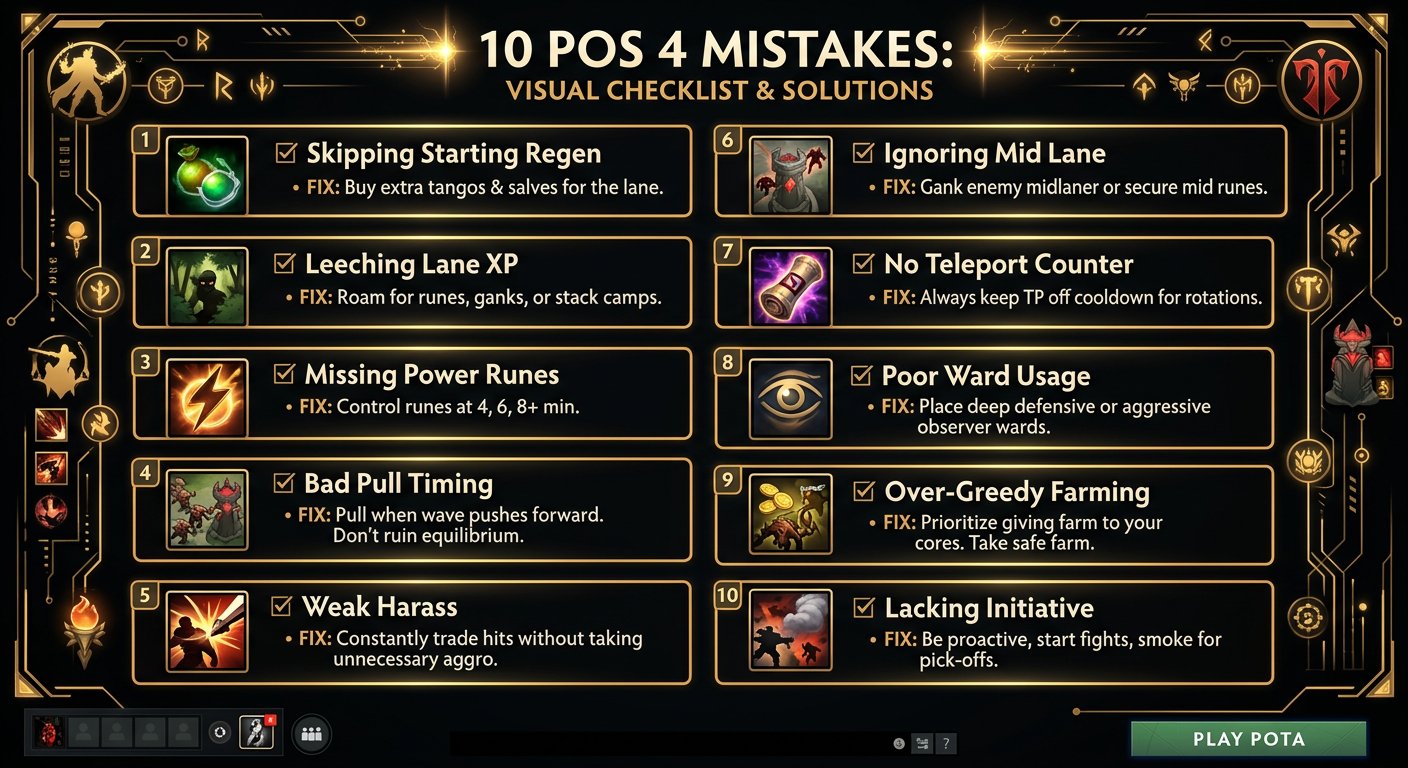
Mistake #1: Leeching XP in the Offlane
The single most common Pos 4 mistake. You stand behind your offlaner, doing nothing, while sharing their experience. This makes you BOTH under-leveled. If you’re not actively zoning, pulling, harassing, or setting up kills, you shouldn’t be in the lane.
The fix: If you’re in the lane, be doing something useful. Zone the enemy support away from the wave. Harass the enemy carry to deny them last hits. Stack the nearby jungle camp. Pull the small camp to deny your offlaner’s wave (resetting lane equilibrium). If none of these are productive, LEAVE and go do something elsewhere — gank mid, stack camps, place a ward.
Mistake #2: Not Stacking Camps
Stacking jungle camps is one of the most gold-efficient things a Pos 4 can do. It costs you 2 seconds of time and creates 100-200 gold worth of creeps for your core to farm. Yet most Legend Pos 4 players stack maybe 1-2 camps per game. Ancient Pos 4 players stack 5-10 camps per game.
The fix: At every :53-:55, ask yourself: “Am I near a jungle camp Can I stack it” If yes, stack it. Learn the stack timings for all camps on both sides of the map. Triple-stacks and quad-stacks on large camps or ancients are MASSIVELY valuable for your cores.
Mistake #3: Ganking at the Wrong Time
Legend Pos 4 players rotate to gank mid at random times — when the enemy mid is full HP under tower, when your mid isn’t ready to follow up, when you don’t have your key abilities ready. Failed ganks are WORSE than not ganking at all, because you lose time, experience, and potentially feed a kill.
The fix: Gank when ALL of these conditions are true: (1) you have your combo ready, (2) the target is in a vulnerable position (pushed up, low HP, no escape ready), (3) your ally in that lane can follow up, (4) you can approach from fog/smoke without being seen. If any condition is missing, don’t gank — go stack, farm, or place wards instead.
Mistake #4: Not Buying Detection
The enemy has a Riki, Bounty Hunter, or Clinkz, and nobody on your team has dust or sentries. This is YOUR job. As the Pos 4, you should ALWAYS have detection against invis heroes. One dust costs 80 gold. That’s nothing compared to the 300+ gold you lose when the enemy invis hero gets a kill because you couldn’t reveal them.
The fix: Check the enemy team’s heroes at the start of the game. If they have ANY invis hero, buy sentries and dust from minute 1. Keep dust in your inventory at all times. Place sentries in your jungle to prevent invis ganks. This single habit can win you 2-3 extra games per 20.
Mistake #5: Dying for No Reason
Legend Pos 4 players have the highest death count on the team, and most of those deaths are unnecessary. Walking into unwarded territory alone, standing too close to a fight without abilities, chasing a kill into the enemy triangle, staying to defend a tower that’s already lost — all of these are avoidable deaths that cost your team gold and give the enemy experience.
The fix: Before any aggressive move, ask: “If this goes wrong, do I die” If the answer is yes and the potential reward isn’t worth it, don’t do it. As a support, your death matters less than a core’s death, but it still matters. You can’t ward, deward, stack, or gank if you’re dead. Prioritize staying alive over everything except saving a core from death.
Mistake #6: Not Using Smoke
Smoke of Deceit costs 50 gold and wins teamfights. In Legend, Pos 4 players buy smoke maybe once or twice per game. In Ancient, supports buy smoke 5-10 times per game. The difference is enormous — smokes enable ganks that wards can’t prevent, turn vision disadvantages into kills, and provide the element of surprise that Legend teams don’t know how to handle.
The fix: Buy a smoke every time it’s available AND you have a plan for it. “Let’s smoke and gank their carry.” “Let’s smoke and take Roshan.” “Let’s smoke and deward their triangle.” Every smoke should have a specific objective. Buy it, ping your team, and execute.
Mistake #7: Poor Warding
Legend Pos 4 players place wards in the same spots every game. The enemy knows where they are and dewars them within 2 minutes. Wasting a 75-gold ward that provides 30 seconds of vision before being destroyed is worse than not placing it at all (because you’ve given the enemy 100 gold for dewarding).
The fix: Ward based on the game state, not on habit. If your team is pushing, ward offensively — behind the enemy tower, in their jungle, near Roshan. If your team is defending, ward defensively — in your own jungle, near your towers, on high ground. Use unconventional ward spots that the enemy doesn’t expect. And DEWARD aggressively — buy sentries and remove enemy wards whenever possible. Vision is a war, and you need to fight it actively.
Mistake #8: Not Playing Around Your Offlaner’s Timings
Your offlaner’s level 6 ultimate is one of the most important timings in the game. When they hit 6, you should be THERE, ready to follow up. A Tidehunter hitting level 6 with his Pos 4 nearby means a guaranteed kill on the enemy carry. A Tidehunter hitting level 6 while his Pos 4 is on the other side of the map is a wasted timing.
The fix: Track your offlaner’s level. When they’re about to hit 6, position yourself in the offlane. Ping your intention: “Let’s kill at level 6.” Execute the combo. This coordination is the difference between a Legend offlane duo and an Ancient one.
Mistake #9: Ignoring the Enemy Pos 5
In the laning phase, your primary target should often be the enemy Pos 5, not the carry. If you can zone their support away from the lane, your offlaner wins the 1v1 against the carry (because offlaners are designed to win 1v1s). Legend Pos 4 players ignore the enemy support and try to harass the carry directly, which is often harder and less effective.
The fix: Identify the enemy support’s position in lane. If they’re zoning your offlaner, contest them. Trade hits — you’re a Pos 4 with fighting abilities; their Pos 5 is usually a weaker trading hero. If you win the support trade, your offlaner gets free last hits and the lane shifts in your favor.
Mistake #10: Building Greedy Items
Your core item should NOT be Aghanim’s Scepter or Blink Dagger if your team has no wards, no detection, and no team items. As a Pos 4, your first items should be utility: Urn/Vessel, Force Staff, Glimmer Cape, Eul’s Scepter. These items cost less and provide more value per gold than expensive luxury items. You can build Aghanim’s later — after you’ve provided the utility your team needs.
The fix: Follow this item priority: Boots → Wards/Detection → One core utility item (Urn, Medallion, Force Staff) → Team items (Glimmer, Pipe component, Ghost Scepter) → Luxury (Blink, Aghs). This progression ensures you’re always providing maximum value at every stage of the game.
Phase-by-Phase Guide: Playing Pos 4 from Legend to Ancient
Phase 1: Pre-Game and Draft
- Pick based on lane synergy with your offlaner. If your offlaner picks Axe, pick a hero with a follow-up stun (Tusk Snowball into Axe Call). If they pick Tidehunter, pick a hero who can harass in lane while Tide farms (Mirana, Clockwerk).
- Consider the enemy carry. If the enemy carry is a melee hero, aggressive Pos 4 heroes (Tusk, Earth Spirit) excel. If the enemy carry is ranged, you might need a more defensive Pos 4 (Rubick, Mirana).
- Buy the right starting items. 2x Observer Wards, 1x Sentry Ward, Tango, and your hero-specific starting items (Orb of Venom for melee heroes, Wind Lace for ranged heroes). Don’t forget a TP scroll.
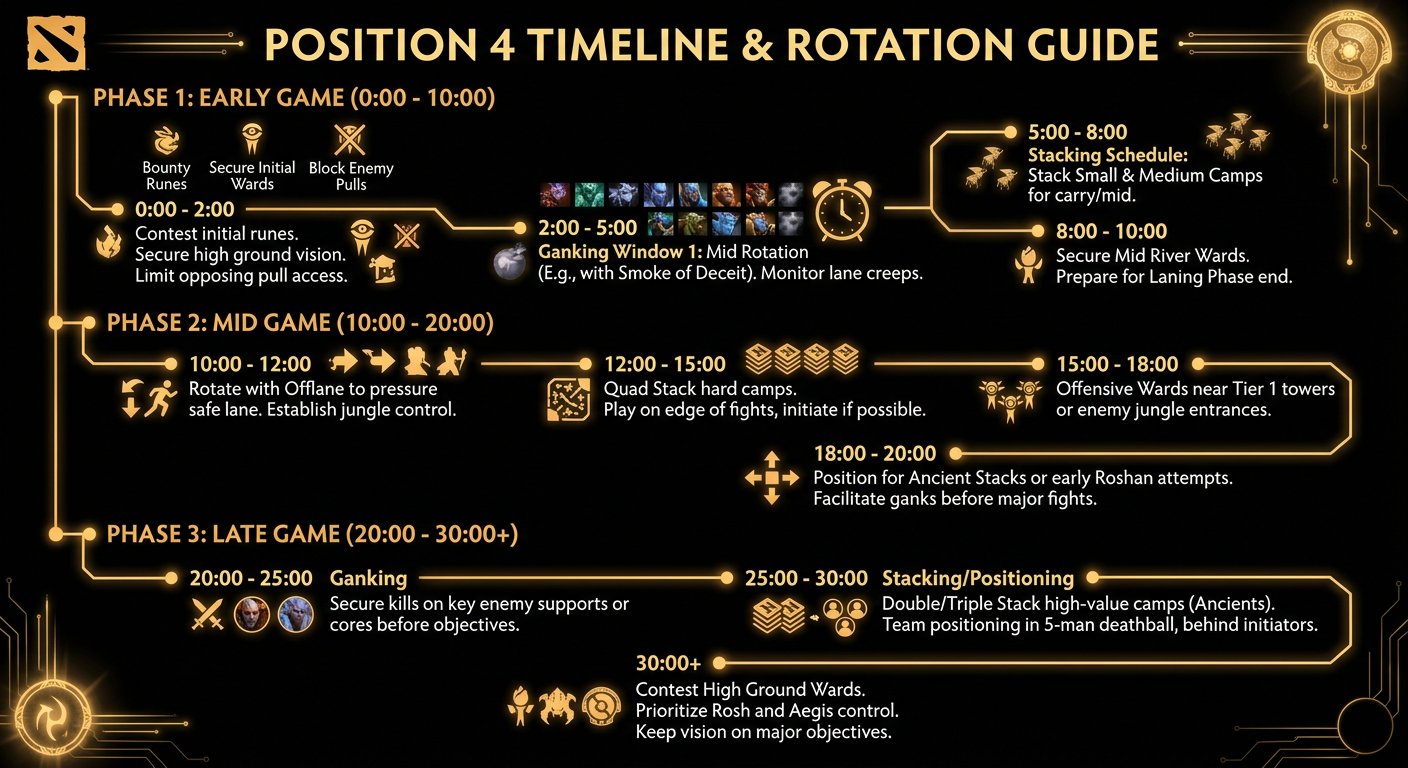
Phase 2: Laning Phase (0-8 Minutes)
Minutes 0-2: Establish lane presence. Walk to lane with your offlaner. Immediately assess: can we get a kill If the enemy carry plays aggressive, punish them with your combo. If they play safe, focus on zoning their support and denying their pull camp (put a sentry ward on their pull camp at minute 0).
Minutes 2-5: Active lane play. You should be doing one of four things at ALL TIMES:
- Zoning: Standing between the enemy support and the creep wave, trading hits and keeping them away.
- Pulling: Pulling your own or the enemy’s small camp to manipulate wave equilibrium.
- Stacking: Stacking jungle camps for later (your offlaner or mid can clear these).
- Setting up kills: Positioning for a combo with your offlaner to kill the enemy carry.
If you’re doing NONE of these, you’re wasting time. Move to something productive immediately.
Minutes 5-8: Rotation decision. By minute 5-6, assess the lane state. If you’re winning: stay and pressure the tower. If you’re even: rotate mid for a gank. If you’re losing: stack camps, place wards, and prepare for midgame. Don’t stay in a lost lane doing nothing — your time is too valuable.
Phase 3: Early Midgame (8-18 Minutes)
This is your MOST impactful phase. As Pos 4, you control the tempo of the game between minutes 8-18.
Priority actions (in order):
- Gank with your mid or offlaner. Smoke, rotate, kill, push tower. This is your bread and butter.
- Secure runes. Power runes belong to your mid. Help them secure it. Wisdom runes go to whoever needs them most (often your offlaner or mid).
- Stack camps. Every minute, stack a camp. This is passive income for your cores.
- Ward and deward. Adjust your wards every 6 minutes as the game state changes. Buy sentries to deward.
- Farm dead lanes. If no core is using a lane, push it out. You need SOME gold for your items.
What NOT to do: Don’t AFK in a lane farming. Don’t follow your offlaner everywhere. Don’t sit in trees waiting for “the perfect gank.” Be active. Be everywhere. Be the reason the enemy feels unsafe on their side of the map.
Phase 4: Mid-to-Late Game (18-30 Minutes)
Your role shifts to teamfight support and vision control.
- Teamfight positioning: Stay behind your frontline. Use your abilities to initiate (if you’re a Tusk or Earth Spirit) or to follow up (if you’re a Rubick or Mirana). Save your defensive abilities (Force Staff, Glimmer Cape) for your carry — their survival is more important than yours.
- Vision warfare: This is the phase where vision wins or loses games. Ward before every major push. Deward before every defense. Use smokes to bypass enemy ward lines. The team with better vision in the late game wins 70%+ of fights.
- Smoke initiation: You should be the one buying and calling smokes. In Legend, the player who buys smoke and pings it is the player who wins games. Be that player.
Phase 5: Late Game (30+ Minutes)
- Save your carry at all costs. Force Staff, Glimmer Cape, Ghost Scepter, Lotus Orb — use everything to keep your carry alive. In late-game teamfights, the team whose carry survives longer wins.
- Don’t get caught. As a squishy support, being caught out of position in the late game is often a lost fight. Stay with your team. Don’t ward alone in dangerous areas — bring a teammate.
- Buyback awareness: In the ultra-late game, having buyback can save the game. Even as a support, your buyback matters — you can use your abilities to defend high ground after buying back. Save 200-400 gold for buyback after 35 minutes.
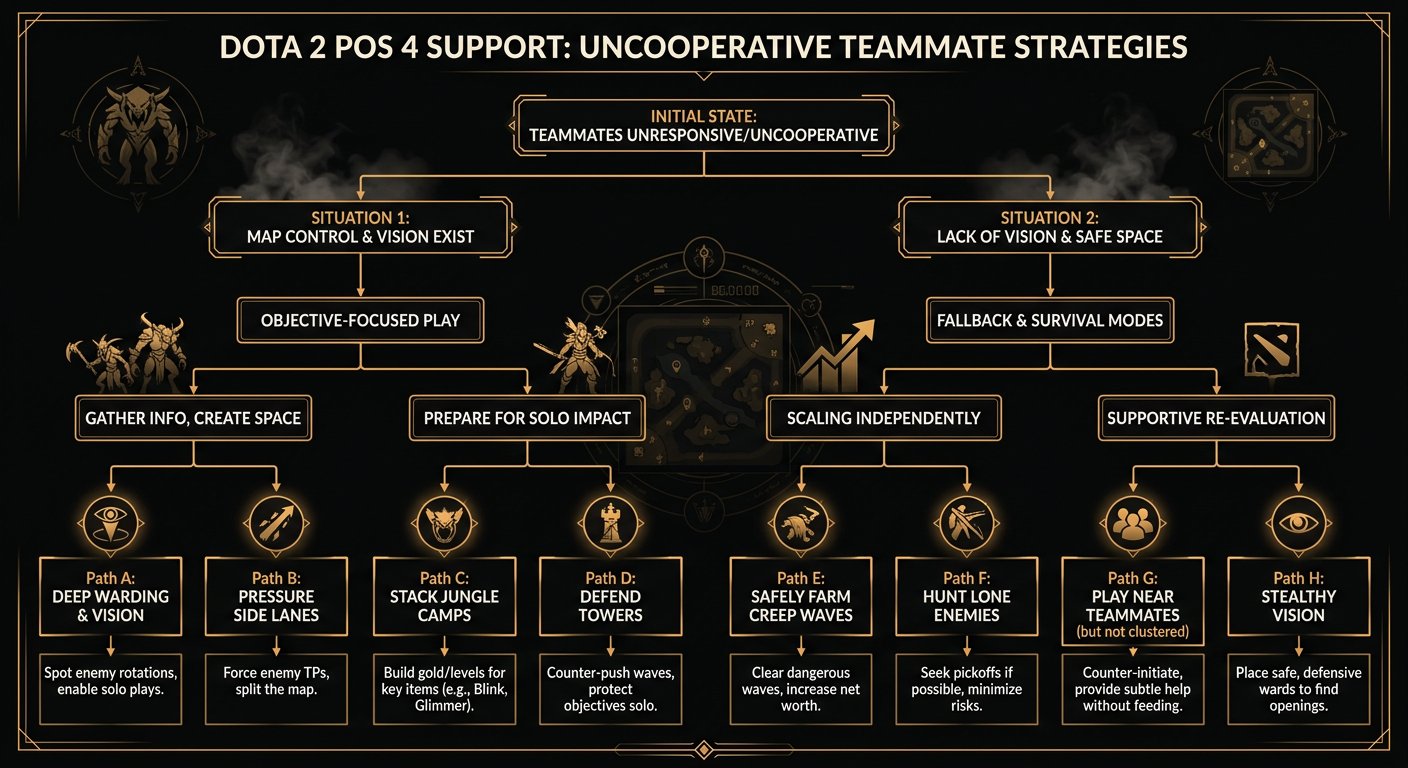
The Teammate Problem: Pos 4 Edition
When Your Offlaner is Passive
Your offlaner picks Tidehunter and AFK farms without ever trying to kill the enemy carry. Frustrating, but manageable. If your offlaner won’t fight, switch to a roaming playstyle — leave the lane after level 3, gank mid, stack camps, and play around your mid or carry instead. Let the offlaner have solo XP (which they want anyway) and create impact elsewhere.
When Your Mid Won’t Gank
You smoke, ping mid to come, and they ignore you. They want to farm. This happens constantly in Legend. Don’t waste time trying to convince them. Instead, find another ally to play with — your offlaner, your Pos 5, or even your carry (TP to save them during a dive). Not every game will have cooperative teammates, and your job is to create impact regardless.
When Nobody Buys Wards
In Legend, you might be the only person on your team who buys wards. Accept this. Wards are cheap, and vision wins games. Don’t resent it — embrace it. The player who controls vision controls the game. If your Pos 5 isn’t buying wards, buy them yourself and place them in spots that enable YOUR game plan. You’re investing 75-150 gold per ward cycle for a massive strategic advantage.
When Your Carry Blames You for the Lost Lane
Wait — that’s your Pos 5’s lane, not yours. But if your carry is blaming the team’s supports in general, mute them and move on. You can’t control someone else’s emotional state, and engaging with blame wastes your mental energy. Focus on playing well, making plays, and creating space. Your game impact speaks louder than any chat message.
For help navigating these situations, our Dota 2 coaching service can provide personalized guidance on maximizing your Pos 4 impact regardless of team dynamics.
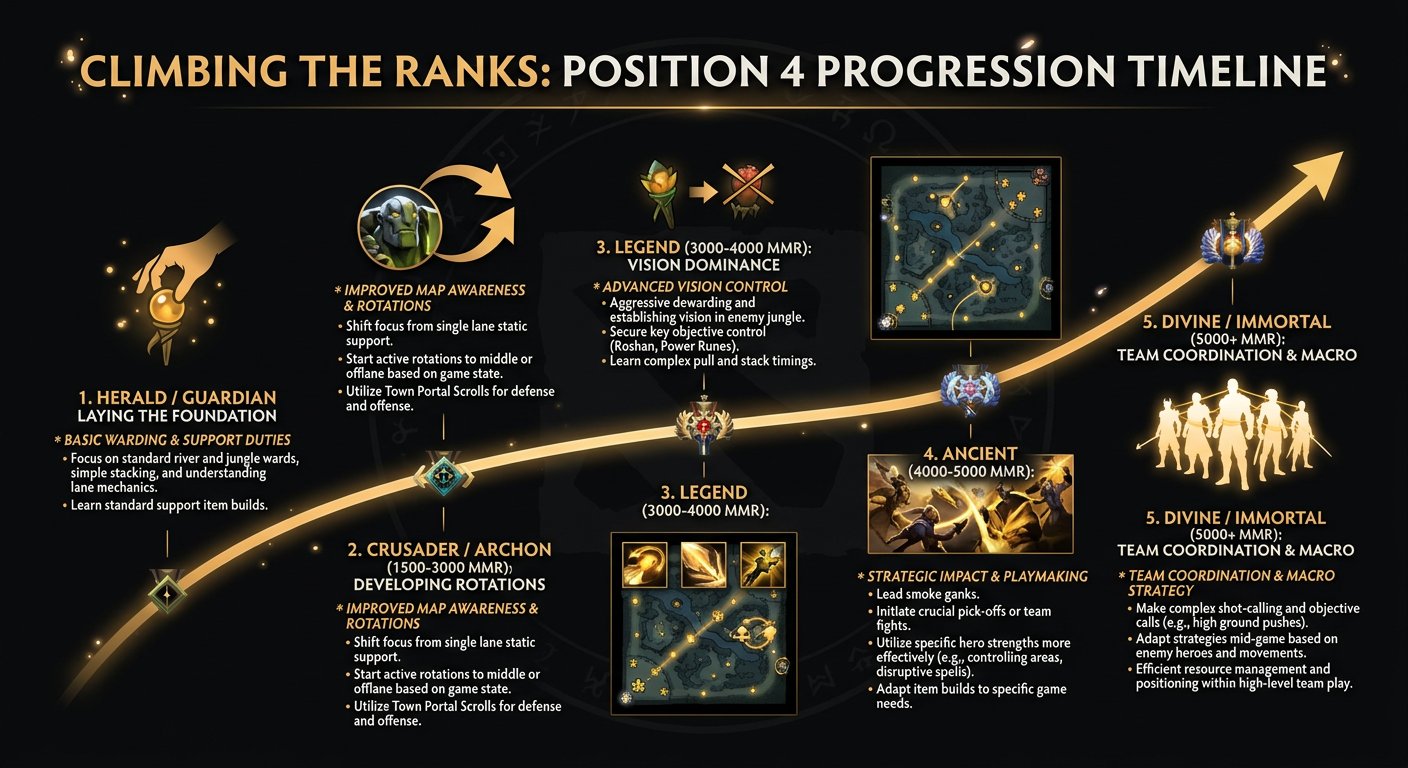
Realistic Timeline: Legend to Ancient as Pos 4
The Numbers
- MMR gap: ~770 MMR
- At 54% win rate: ~321 games (3-4 months at 3 games/day)
- At 57% win rate: ~183 games (2 months at 3 games/day)
- At 60% win rate: ~128 games (6 weeks at 3 games/day)
Pos 4 Climbing Reality Check
Pos 4 is one of the BEST roles for climbing, contrary to popular belief. Here’s why: you have the most agency over the early game, which is the most impactful phase in Legend bracket. A Pos 4 who wins all three lanes through smart rotations creates an overwhelming advantage that even mediocre cores can convert into a win.
The key is consistency. You need to provide value every game — stacking, ganking, warding, dewarding, smoking, saving. Games where you “do nothing” are games you lose. But games where you’re active from minute 1 are games you win, even when your cores are average.
Accelerators
- Watch high-MMR Pos 4 replays. Pay attention to their early-game movements, ward spots, and rotation timing. Copy what they do.
- Master 3 heroes. Earth Spirit + Tusk + one flex pick covers almost every game.
- Coaching: A coaching session focused on Pos 4 can transform your game. Coaches will show you optimal rotation timings, advanced ward spots, and how to create maximum early-game impact.
If you want to skip the grind, our MMR boost service can get you to Ancient while you focus on improving your support play.
Frequently Asked Questions
Become the Playmaker Your Team Needs
Pos 4 is the role with the most agency over whether your team wins or loses. You control the early game through ganks and lane dominance. You control the midgame through vision and smokes. You control the late game through saves and utility.
Written by Team Smurf’s Immortal-rank analysts — Rankings last verified February 2026


