Best Items for Climbing MMR in Dota 2: The Complete Itemization Guide

Every Dota 2 player has been there: you’ve farmed well, your kill count looks solid, but somehow you still lost the game. You open the scoreboard and realize your item build was wrong for the matchup. Maybe you went full damage when you needed survivability. Maybe you skipped that one critical item that would have changed every teamfight. Maybe you built the same cookie-cutter items you build every single game regardless of what the enemy drafted.
Itemization is the most underrated skill in Dota 2. While mechanics and game sense get all the attention, the ability to adapt your item build to the specific game you’re playing is what separates good players from great ones. Our boosters at TeamSmurf’s MMR Boost service consistently cite flexible itemization as one of the biggest differences between brackets.
This guide analyzes 25+ items that are critical for climbing MMR, breaks down when to buy each one, reveals the most common itemization mistakes at every bracket, and highlights the situational items that most players completely forget exist.
Table of Contents
- Itemization Fundamentals: How to Think About Items
- Cost Efficiency: Getting the Most From Your Gold
- Early Game Items That Win Lanes
- Mid-Game Power Spike Items
- Late-Game Items That Close Out Games
- Situational Items Most Players Forget
- Common Itemization Mistakes by Bracket
- Role-Specific Itemization Guidelines
- Frequently Asked Questions
Itemization Fundamentals: How to Think About Items
Before analyzing individual items, you need to understand the principles that govern smart itemization. These principles apply to every hero, every role, and every game.
Principle 1: Items Should Solve Problems
Every item purchase should answer a specific question:
- “What is the biggest threat to me or my team right now”
- “What do I need to accomplish my hero’s job this game”
- “What’s preventing me from winning fights”
If you can’t articulate why you’re buying an item, you’re probably making a mistake. “Because the guide says so” is not a good reason. A guide tells you what works in a vacuum–your game has five specific enemies with specific abilities and specific items.
Principle 2: Reactive vs. Proactive Itemization
Proactive items help you execute your game plan. A Blink Dagger on Axe lets him initiate fights–that’s proactive. A Battle Fury on Anti-Mage accelerates his farming speed–that’s proactive.
Reactive items respond to what the enemy is doing. A Black King Bar against a heavy magic-damage lineup is reactive. A Monkey King Bar against evasion is reactive.
The best item builds mix both: proactive items to advance your win condition and reactive items to survive the enemy’s threats. The ratio depends on your role–carries tend toward proactive, supports toward reactive.
Principle 3: Timing Over Perfection
A 20-minute Blink Dagger is infinitely more valuable than a 30-minute Blink Dagger + another item. In Dota 2, item timing often matters more than the item itself. A BKB purchased at the right moment (when the enemy’s magic damage peaks) wins games. The same BKB purchased 10 minutes too late might not matter.
This is why our coaching service spends significant time on purchase timing–knowing what to buy is only half the battle.
Principle 4: The Opportunity Cost of Every Purchase
Every item you buy means there’s another item you didn’t buy. Spending 5,000 gold on a damage item means you didn’t spend that gold on survivability. This seems obvious, but many players never think about what they’re giving up with each purchase.
Cost Efficiency: Getting the Most From Your Gold
Not all items give equal value per gold spent. Understanding cost efficiency helps you maximize your power at every stage of the game.
The Cost-Efficiency Concept
Cost efficiency measures how much stat value you get per gold spent. Some items are incredibly efficient (giving tons of stats for their cost), while others are expensive but provide unique effects that can’t be measured in raw stats.
| Item | Cost | Key Stats | Cost per Primary Stat Point | Efficiency Rating |
|---|---|---|---|---|
| Wraith Band | 505 | +5 Agi, +2 Str/Int, misc | ~56 gold/agi | |
| Bracer | 505 | +5 Str, +2 Agi/Int, misc | ~56 gold/str | |
| Null Talisman | 505 | +5 Int, +2 Str/Agi, misc | ~56 gold/int | |
| Magic Wand | 450 | +3 All Stats, burst heal/mana | Situational but massive value | |
| Black King Bar | 4,050 | +10 Str, spell immunity | Can’t measure–effect is priceless | |
| Eye of Skadi | 5,300 | +22 All Stats, slow | ~80 gold/stat | |
| Butterfly | 4,975 | +35 Agi, +30 Dmg, +35% Evasion | ~71 gold/agi (plus evasion) | |
| Divine Rapier | 5,950 | +350 Damage | ~17 gold/damage (!) | (if you don’t die) |
Small Items Are Incredibly Efficient
This is why stacking Wraith Bands, Bracers, and Null Talismans in the early game is so common among high-MMR players. These items give disproportionate stats for their cost. Two Wraith Bands (1,010 gold) give more agility than components of items costing 3-4x as much.
The tradeoff Small items don’t build into anything. They occupy inventory slots you’ll eventually need. But in the first 15-20 minutes, their efficiency is unmatched.
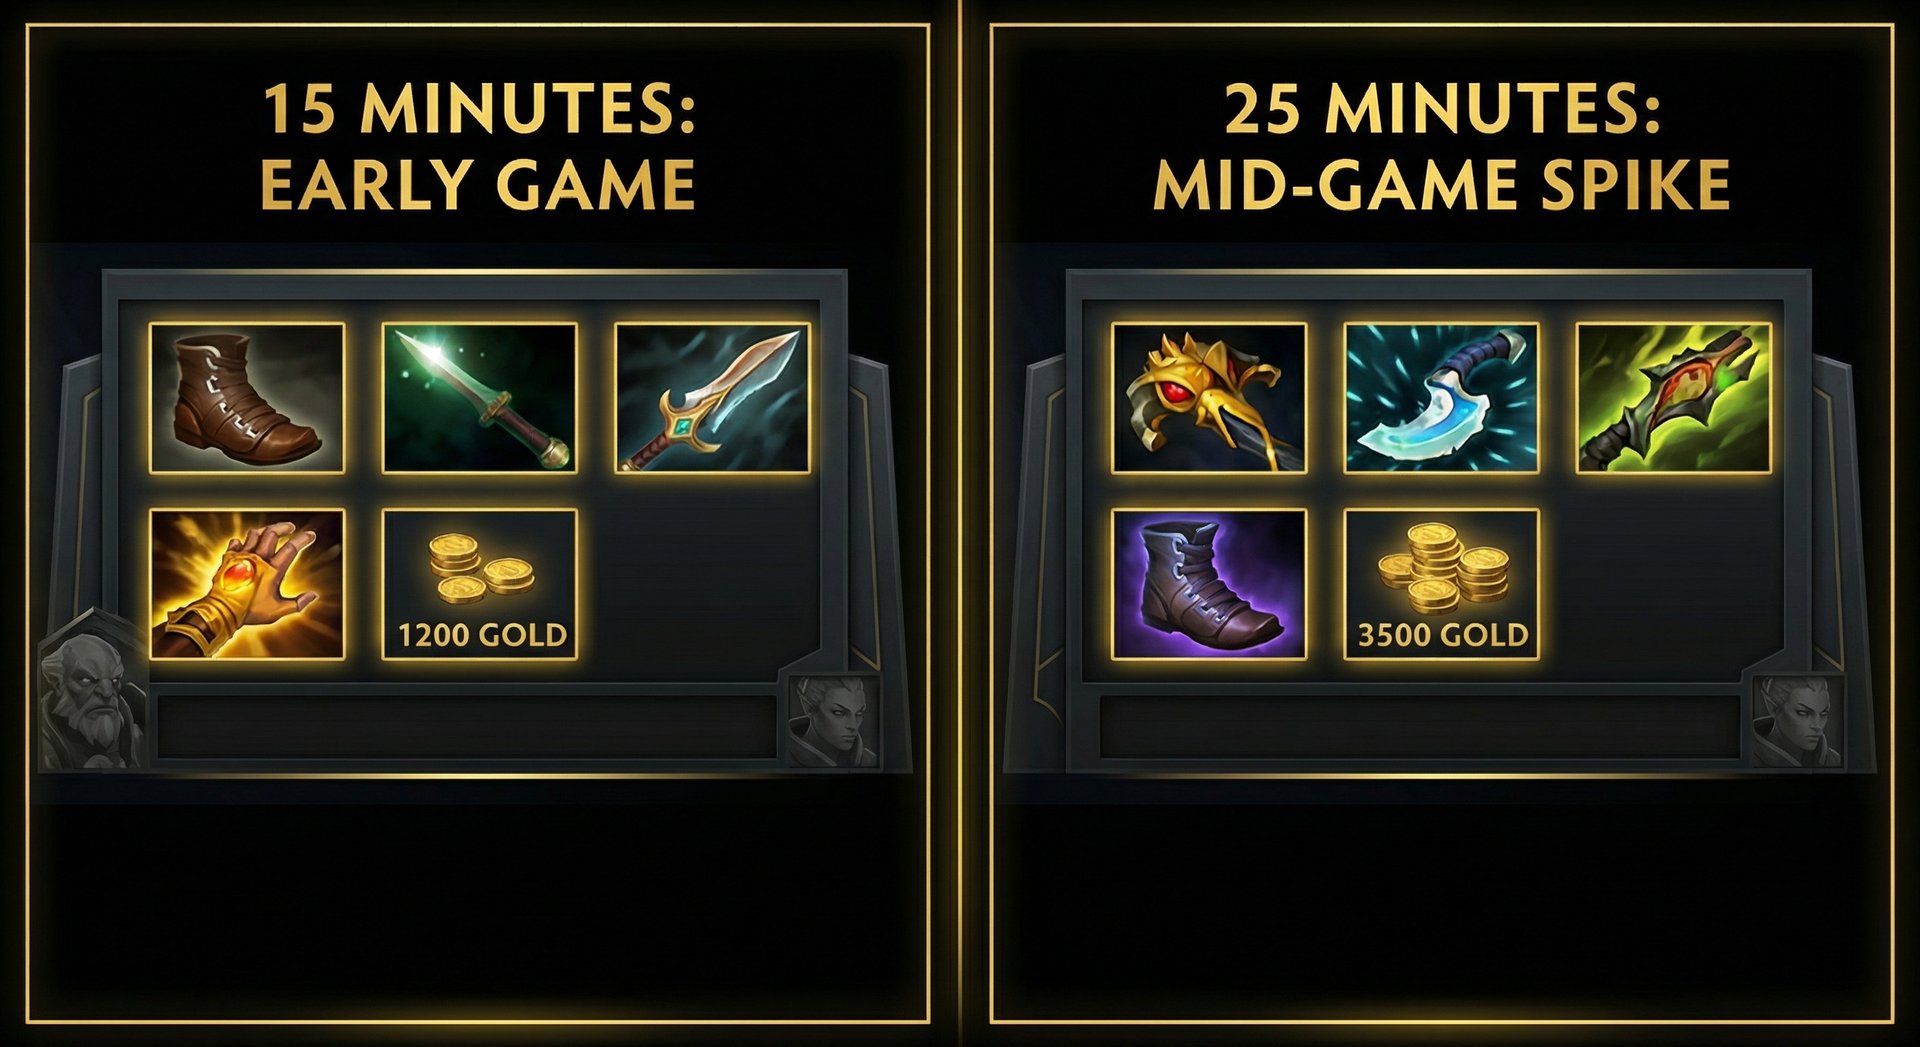
Early Game Items That Win Lanes
The laning phase sets the tone for the entire game. These items help you dominate your lane and establish the early advantages that snowball into victories.
Magic Wand (450 gold)
When to buy: Every single game. This is not optional.
Magic Wand is arguably the most cost-efficient item in Dota 2. Against spell-spamming heroes (Bristleback, Zeus, Batrider, Phantom Assassin’s dagger), a fully charged Wand provides a burst of 255 HP and 170 mana. That’s a 450-gold item providing the equivalent of a small ultimate in clutch moments.
The Wand Rule: If you are ever debating whether to buy Magic Wand, the answer is yes. Even against heroes that don’t spam spells, the 3 all-stats alone is valuable for the cost.
Boots of Speed (500 gold)
When to buy: Before minute 3 in almost every game.
Movement speed is the most important stat in the laning phase. A hero with boots can chase kills, escape ganks, and control positioning in lane. Being the first player in your lane to have boots is a tangible advantage.
Boot upgrade priority:
- Power Treads (1,400): Best for carries and heroes who benefit from attack speed + stat switching
- Arcane Boots (1,300): Essential for mana-hungry supports; often disassembled later for Lotus Orb or Aether Lens
- Phase Boots (1,500): Ideal for melee heroes who need to close gaps and deal physical damage
- Tranquil Boots (925): The roaming support’s dream–high move speed + passive regen for constant map pressure
Falcon Blade (1,125 gold)
When to buy: On melee heroes who need mana sustain and some damage to last-hit.
Falcon Blade is one of the most underrated early-game items. It provides +200 mana, +1.8 mana regen, +12 damage, and +6 HP regen. For heroes like Pangolier, Mars, Tidehunter, or any melee offlaner who burns through mana quickly, Falcon Blade solves your sustain problems for a modest investment. It lets you stay in lane longer, use your spells more liberally, and farm without constantly ferrying clarities.
Soul Ring (805 gold)
When to buy: On heroes who need frequent spell usage but have HP regeneration to spare.
Soul Ring converts 170 HP into 150 temporary mana every 25 seconds. Heroes with built-in HP regeneration (Bristleback, Underlord, Dark Seer) can abuse this to spam spells endlessly. It’s also core on many offlaners who need to use their spells to secure ranged creep last-hits and harass.
Hand of Midas (2,200 gold)
When to buy: When you’re playing a hard carry who needs to hit a specific late-game timing, AND you’re having a good lane with space to farm. Never buy Midas when you’re behind–the item provides zero combat stats and delays your fighting ability by 5-7 minutes.
When NOT to buy: When your team is losing lanes, when the enemy has an aggressive push lineup, or when you need to fight before 25 minutes. In these cases, that 2,200 gold is better spent on items that help you survive and contribute.
Mid-Game Power Spike Items
The mid-game (15-30 minutes) is where most Dota 2 games are decided. These items define power spikes that determine who controls the map.
Blink Dagger (2,250 gold)
When to buy: On initiators (Axe, Tidehunter, Magnus, Enigma, Sand King), position-dependent heroes who need precise placement, and heroes whose entire impact relies on catching enemies.
Blink Dagger is the most game-changing item in Dota 2. A 2,250-gold item that provides zero stats but enables plays that win games outright. A well-timed Blink + Black Hole can end a game. A Blink + Call can wipe a team.
The Blink Timing: On dedicated initiators, Blink should be completed by 15-18 minutes. Every minute past this window reduces its impact, because the enemy starts grouping and placing deeper wards. If your Blink comes at 25 minutes, you’ve missed the optimal initiation window.
Black King Bar (4,050 gold)
When to buy: When the enemy has significant magical damage or disabling spells that prevent you from doing your job in fights. Which is almost every game.
BKB is the single most impactful item for climbing MMR. Full stop. In brackets below Divine, players chronically undervalue BKB because it doesn’t provide flashy damage numbers. But spell immunity means you get to actually use your hero in fights instead of being chain-stunned and deleted.
The BKB Rule: If you find yourself dying in teamfights before using your key abilities, you need BKB. If you’re asking “should I buy BKB” the answer is almost always yes. The pros who skip BKB are playing at a level where they can position perfectly to avoid spells–you probably can’t.
This is one of the most common patterns our boosters notice: players at 2-4K MMR with perfect farm patterns but no BKB, dying three times in critical fights, and wondering why they lose.
Desolator (3,500 gold)
When to buy: When you’re the primary physical damage dealer and the enemy doesn’t have significant armor. Desolator provides -6 armor corruption, which amplifies all physical damage your team deals to that target.
Desolator is a tempo item. It’s strongest when completed early (15-20 minutes) and used to take towers and Roshan. Its effectiveness decreases as the game goes longer and enemies stack armor.
Best on: Templar Assassin, Weaver, Clinkz, Shadow Fiend, Nature’s Prophet, any right-click hero with an early fighting tempo.
Mekansm / Guardian Greaves (1,775 / 5,225 gold)
When to buy: On tanky offlaners or position 4 supports who plan to group with the team early. Mekansm provides a 275 HP heal to all nearby allies–enormous in early teamfights.
Guardian Greaves (the upgrade) is one of the best items in the game for push-oriented lineups. It provides the Mek heal, a mana restore, removes debuffs from the user, and passively regenerates nearby allies who are below 25% health. On heroes like Death Prophet, Enigma, or Chen, Guardian Greaves enables sustained 5-man pushes that overwhelm the enemy.
Force Staff (2,175 gold)
When to buy: Every support player should build Force Staff in 70%+ of their games. It saves allies from Clockwerk Cogs, Riki Smoke, slow fields, unfavorable positions–and it saves yourself.
Force Staff is also one of the best items against specific heroes:
- vs. Clockwerk: Push allies out of Power Cogs
- vs. Riki: Push allies out of Smoke Screen
- vs. Slark: Push yourself to safety when Pounce-leashed
- vs. Mars: Push allies out of Arena of Blood
Aghanim’s Scepter (4,200 gold)
When to buy: This is hero-dependent. Some heroes have game-changing Scepter upgrades that should be rushed (Ogre Magi, Witch Doctor, Warlock). Others have mediocre upgrades that should be skipped in favor of other items.
The Aghs Test: Before buying Aghanim’s Scepter, ask: “Does the Scepter upgrade fundamentally change how I play or how fights go” If yes, buy it. If the upgrade is just “more damage on an existing spell,” it’s often better to buy a different 4,200-gold item.
Gleipnir (6,150 gold)
When to buy: On heroes who lack reliable catch but deal area damage. Gleipnir provides a 2-second AoE root that pierces spell immunity at the root point. It’s devastating on heroes like Windranger, Gyrocopter, Medusa, and Leshrac who need enemies to stand still.
Gleipnir also provides solid attack speed and damage, making it efficient as both a farming tool (chain lightning) and a fighting item (the active root).
Late-Game Items That Close Out Games
When the game goes late, item choices become win-or-lose decisions. These are the big-ticket items that define the ultra-late game.
Satanic (5,050 gold)
When to buy: As a late-game survivability item on right-click carries. Satanic’s active ability provides 175% lifesteal for 6 seconds–combined with BKB, this makes carries nearly impossible to kill during their damage window.
The BKB + Satanic combo is the single strongest carry survivability combination in Dota 2. Pop BKB, activate Satanic, and right-click. You’re spell-immune and healing for more damage than most enemies can deal. This is the combo that turns lost games into won games in the ultra-late phase.
Eye of Skadi (5,300 gold)
When to buy: When you need everything–stats, slow, tankiness, and mana. Skadi is the ultimate “I need to be tankier while also dealing damage” item. The slow is particularly devastating against melee carries who need to stay on top of their target.
Best on: Medusa (core item every game), Morphling, Slark, Weaver, any ranged carry who benefits from kiting.
Monkey King Bar (4,975 gold)
When to buy: When the enemy has evasion sources–Butterfly, Phantom Assassin’s Blur, Windrun, Solar Crest, Halberd. MKB grants 75% chance to proc 70 bonus magical damage with True Strike on that proc.
When NOT to buy: If no enemy has evasion. MKB’s damage per gold is mediocre without the accuracy component. If you’re buying it purely for damage, Daedalus or other items are more efficient.
Assault Cuirass (5,125 gold)
When to buy: When your team needs both armor and attack speed, and the enemy is primarily physical damage. AC provides a +5 armor aura to allies and -5 armor reduction to enemies, which is a 10-armor swing in teamfights.
AC is particularly strong on teams with multiple right-click heroes who all benefit from the attack speed aura. It’s also the go-to item for high-ground pushes, as the negative armor aura accelerates tower kills.
Scythe of Vyse (5,675 gold)
When to buy: When the enemy has a single high-priority target that needs to be locked down (Anti-Mage, Storm Spirit, Morphling). Hex is a 3.5-second disable that prevents the target from using any abilities or items–including BKB.
Scythe of Vyse is one of the most underbuilt items in pub Dota 2. Players–especially supports–avoid it because of the high cost. But a position 3 or even position 4 with a Hex can completely neutralize a farmed enemy carry in fights.
Refresher Orb (5,000 gold)
When to buy: On heroes with game-changing ultimates that can be used twice in one fight. Tidehunter with two Ravages. Enigma with two Black Holes. Warlock with two Chaotic Offerings. Refresher turns already-strong teamfight heroes into game-ending ones.
Refresher Shard (1,400 from Roshan): The Roshan-dropped Refresher Shard is essentially a free Refresher use. This is why Roshan control becomes increasingly important as the game goes late–the Shard can single-handedly win a teamfight.
Divine Rapier (5,950 gold)
When to buy: When you’re losing and nothing else will work, OR when you’re so far ahead that losing the Rapier is unlikely. Rapier provides 350 raw damage–more than any other item in the game–but drops on death.
The Rapier Decision: If you’re 20K gold behind, conventional items won’t close the gap. Rapier is a Hail Mary that can equalize a losing game through sheer damage output. On heroes with built-in survivability (Medusa with Mana Shield, Gyrocopter with Flak Cannon + BKB), Rapier is often the correct play when behind.
Situational Items Most Players Forget
These are the items that don’t appear in standard guides but can be game-winning when purchased in the right situation.
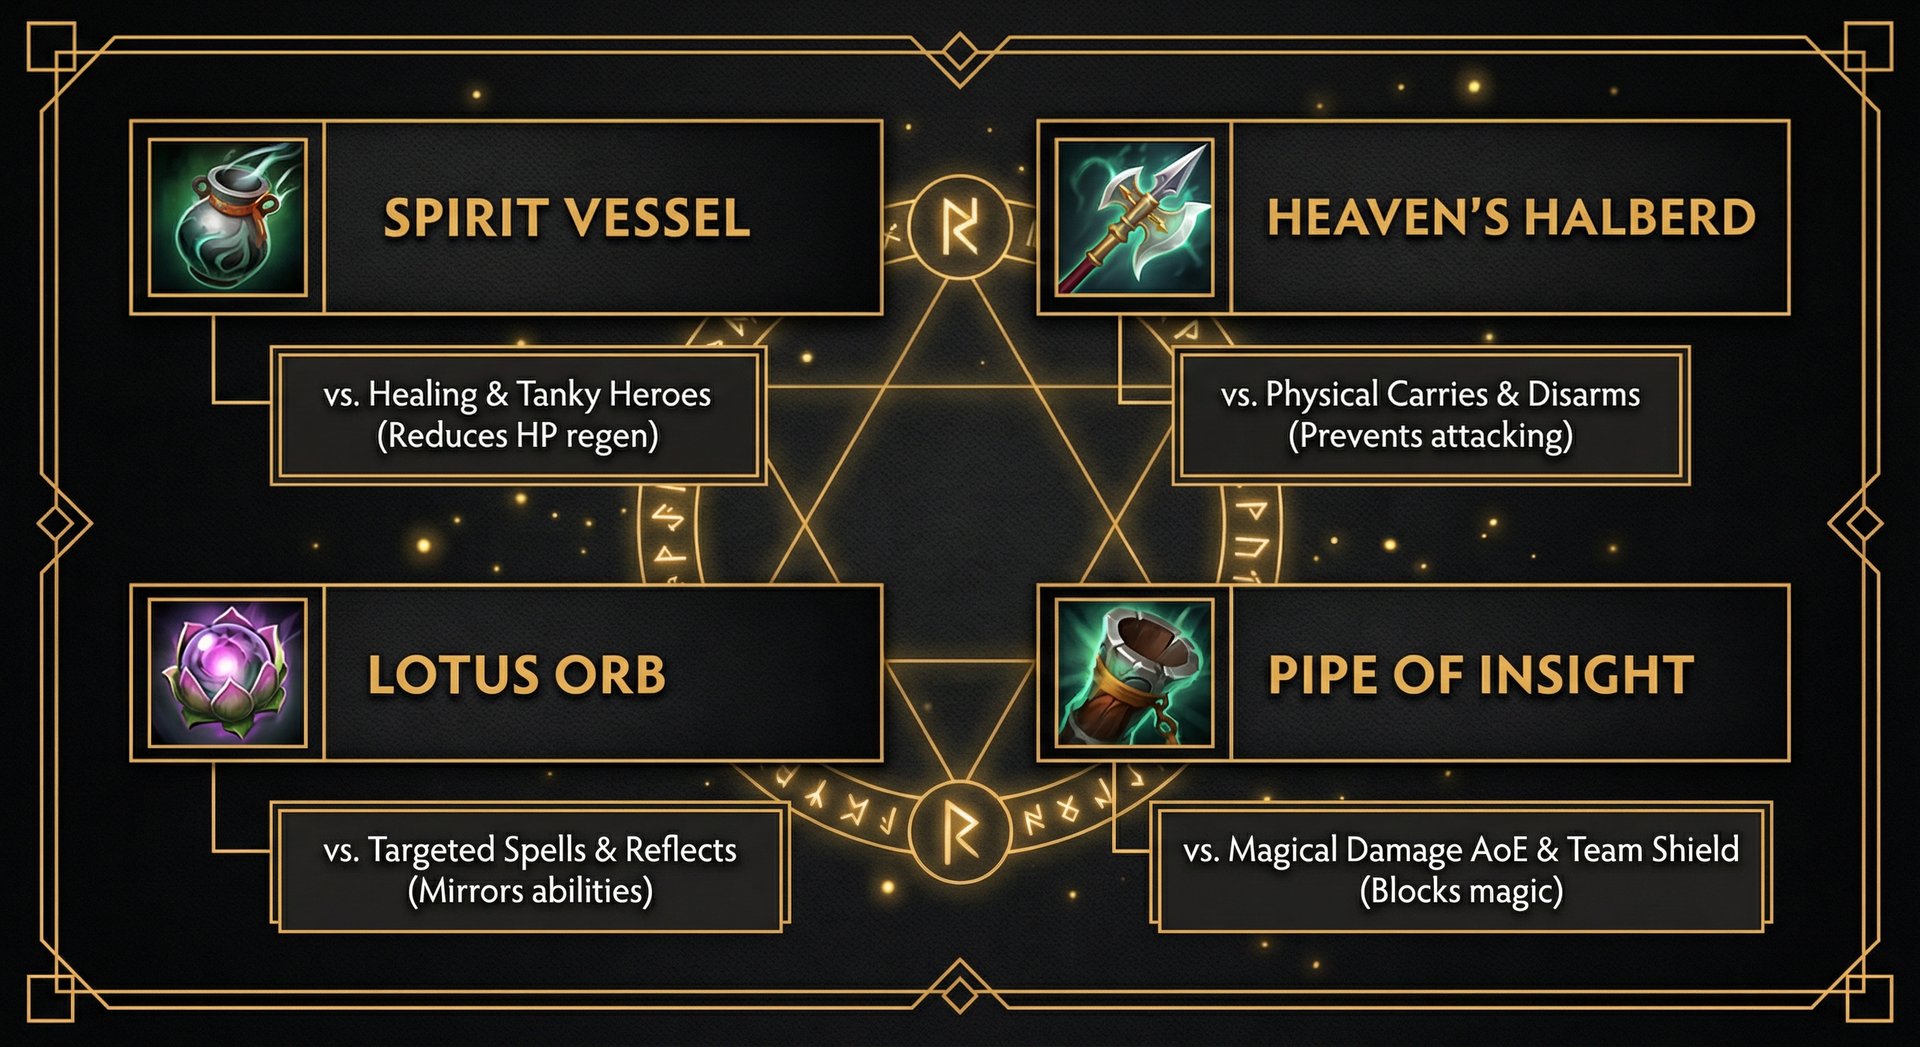
Spirit Vessel (2,620 gold)
When to buy: Against heroes who rely on healing–Alchemist, Huskar, Morphling (Str morph), Necrophos, Lifestealer. Spirit Vessel reduces all healing and regeneration by 45% and deals damage based on current HP.
Spirit Vessel is absurdly cost-efficient for what it does. It’s an upgrade from Urn of Shadows, which you should already be building in many games. The healing reduction alone can neutralize an enemy hero’s entire game plan. If no one on your team has one against a healing-dependent enemy, you’re making a critical error.
Heaven’s Halberd (3,550 gold)
When to buy: Against right-click carries. Halberd’s active ability disarms the target for 3 seconds (5 seconds on melee, 3 on ranged), AND it cannot be dispelled by anything except BKB activation. This means you can completely shut down the enemy carry for the first 3-5 seconds of a fight.
Halberd is the perfect offlaner item: it gives 20% evasion, 20% status resistance, Strength, and the disarm. It’s especially devastating against carries who don’t want to build BKB (like Wraith King or Lifestealer).
Lotus Orb (3,850 gold)
When to buy: Against teams with strong single-target spells. Lotus Orb’s active reflects all targeted spells back at the caster for 6 seconds. Enemy Lina wants to Laguna Blade your carry Lotus Orb reflects it back at her.
Beyond the reflect, Lotus Orb also provides a basic dispel on cast–removing silences, slows, and other debuffs from your ally. This makes it a dual-purpose save item that’s criminally underbuilt by position 3 and 4 players.
Pipe of Insight (3,475 gold)
When to buy: When the enemy has heavy magical AoE damage (Zeus, Leshrac, Jakiro, Venomancer). Pipe’s active provides a 450 magic damage barrier to all nearby allies. That’s 2,250 total damage absorbed across your team–for 3,475 gold.
Pipe is a team item that should be bought by the offlaner or position 4. In games against heavy magic damage lineups, Pipe is more impactful than almost any other single item purchase. If you lose a game where the enemy had Zeus and no one on your team built Pipe, the loss was partly an itemization failure.
Silver Edge (5,450 gold)
When to buy: When the enemy has heroes with critical passive abilities that can be disabled by Break. Break disables passives for 4 seconds. Key targets:
- Bristleback: Disables Bristleback passive (his main survivability)
- Spectre: Disables Dispersion (her damage reflect)
- Phantom Assassin: Disables Blur (her evasion)
- Huskar: Disables Berserker’s Blood (his attack speed + magic resistance)
- Timbersaw: Disables Reactive Armor (his armor + regen stacking)
Silver Edge also provides 175 bonus damage on the attack out of invisibility, making it a strong ganking item.
Linken’s Sphere (4,600 gold)
When to buy: Against teams with strong single-target initiations–Doom, Batrider Lasso, Beast Master Roar, Legion Commander Duel. Linken’s blocks one targeted spell every 12 seconds.
The key insight: Linken’s can be cast on allies. A support buying Linken’s to protect their carry from Doom is an incredibly high-impact play that few players in lower brackets consider.
Aeon Disk (3,000 gold)
When to buy: On supports who keep getting instantly killed at the start of fights. Aeon Disk triggers when you drop below 70% HP, providing a strong dispel and 2.5 seconds of damage immunity. This gives you time to use your abilities and items (Force Staff, Glimmer Cape, etc.) before dying.
Aeon Disk is a lifesaver against burst-heavy lineups (Tiny combo, Lina burst, PA crits on supports). If you’re a support player who feels like you die before casting a single spell in fights, Aeon Disk is your answer.
Nullifier (4,725 gold)
When to buy: When the enemy has save mechanisms that prevent you from killing targets. Nullifier applies a continuous dispel that removes Ghost Scepter, Glimmer Cape, Force Staff, Eul’s Scepter, and many other defensive effects. It also applies a mute, preventing item usage entirely.
Nullifier is the carry’s answer to supports who stack save items. If you’re a farmed PA and the enemy Oracle keeps Ghost Sceptering or the enemy support Glimmers the target you’re hitting, Nullifier removes all of those saves instantly.
Common Itemization Mistakes by Bracket
Different brackets have distinct itemization patterns. Here’s what we see most commonly when reviewing games through our coaching service:
Herald to Guardian (0-1,500 MMR)
| Mistake | Why It’s Wrong | What to Do Instead |
|---|---|---|
| No boots until 10+ minutes | Movement speed is critical for trading, escaping, and last-hitting | Buy boots before minute 3 in almost every game |
| Building damage with no survivability | Dead heroes deal zero damage | Alternate damage and defense items |
| Never buying TP scrolls | Can’t respond to ganks, pushes, or fights on the other side of the map | Always carry a TP. Always. |
| Same items every game | Cookie-cutter builds don’t address the specific enemy lineup | Check what the enemy heroes do and buy items that counter them |
Crusader to Archon (1,500-3,000 MMR)
| Mistake | Why It’s Wrong | What to Do Instead |
|---|---|---|
| Skipping BKB | Getting chain-stunned in every fight | BKB should be your 2nd or 3rd major item on most cores |
| Building farming items when behind | Battle Fury at 25 minutes doesn’t help you fight | When behind, build fighting items; farm items are luxury purchases when ahead |
| No team items (Pipe, Crimson, Mek) | Everyone builds selfishly; no one builds for the team | Offlaners should build at least one team aura item |
| Late-game boot upgrades | Sitting on brown boots at 15 minutes | Complete boot upgrade as early as possible for the stat/utility boost |
Legend to Ancient (3,000-5,000 MMR)
| Mistake | Why It’s Wrong | What to Do Instead |
|---|---|---|
| Not adapting items to the game | Following guides blindly without considering the matchup | Evaluate each item choice against what the enemy is building |
| Forgetting Spirit Vessel | Critical against healing heroes but often no one buys it | Nominate someone (usually pos 3/4) to build Vessel early |
| Buying Aghs when it’s mediocre | 4,200 gold on a subpar upgrade vs. BKB or Blink | Only buy Aghs if the upgrade is truly game-changing for your hero |
| Never selling early items | Double Wraith Band at 40 minutes wastes two slots | Sell early-game items once you need slots for late-game purchases |
Divine to Immortal (5,000+ MMR)
| Mistake | Why It’s Wrong | What to Do Instead |
|---|---|---|
| Greedy item builds on position 3 | Offlaner building carry items instead of auras and team utility | Accept your role; your team needs your auras more than your damage |
| Not itemizing for Roshan | Roshan timing is critical at high MMR | Build items that accelerate Rosh (Medallion, Desolator, Vladmir’s) |
| Fixed BKB timing | Sometimes BKB first is correct; sometimes it’s third item | Evaluate BKB timing based on when the enemy wants to fight |
Regardless of your bracket, improving itemization is one of the fastest ways to climb. It requires no mechanical skill improvement–just better decision-making. If you’re stuck at your current rank, our calibration service can reset your starting point, and our coaching can teach you the item decision-making framework that high-MMR players use instinctively.
Role-Specific Itemization Guidelines
Position 1 (Carry) Itemization
Your items should maximize damage output while keeping you alive long enough to deal that damage.
Core items to consider every game:
- BKB (non-negotiable in 80%+ of games)
- One lifesteal item (Satanic, Morbid Mask, Vladmir’s)
- One primary damage item (Desolator, Daedalus, Butterfly, MKB)
- Situational defense (Linken’s, Manta Style for dispel, Skadi for tankiness)
The Carry’s 6-Slot Decision: In the ultra-late game, your six items should provide: damage, attack speed, survivability (BKB), lifesteal, and a situational slot. If you’re missing any of these categories, you have a weakness the enemy can exploit.
Position 2 (Mid) Itemization
Mid heroes vary enormously–from burst casters (Lina, Invoker) to right-clickers (Templar Assassin, Shadow Fiend) to utility/tempo controllers (Puck, Pangolier). But some principles apply universally:
- Your first major item should be completed by 12-16 minutes. This is your power spike.
- Consider Bottle (always on mid) and when to refill it (rune timings, fountain trips).
- Mid heroes often need both damage AND initiation (Blink/Shadow Blade + damage item).
Position 3 (Offlane) Itemization
Your job is to be the team’s frontline, provide auras and utility, and initiate fights. Your items should reflect this.
Priority items:
- Blink Dagger or other initiation tool
- One team aura: Pipe, Crimson Guard, Vladmir’s, or AC
- Utility: Halberd, Lotus Orb, or Blade Mail
- BKB if needed to ensure you can initiate without being stunned
The biggest mistake position 3 players make is building like a carry. Your team doesn’t need two damage dealers–it needs someone to create space and provide team-wide benefits. Pipe + Blink on an Underlord is infinitely more valuable than a farming-focused build.
Position 4 and 5 (Support) Itemization
Support itemization is about maximizing impact with limited gold. Every item needs to pull its weight.
Essential support items ranked by priority:
- Boots (non-negotiable)
- Magic Wand (non-negotiable)
- One save item: Glimmer Cape (1,950), Force Staff (2,175), or Ghost Scepter (1,500)
- Wards and detection: Always have sentries and dust when needed
- Second save item or team item: Mekansm, Lotus Orb, Aeon Disk
The Support Economy: With limited gold income, supports need to prioritize. Spend gold on sentries and dust before luxury items. A 75-gold sentry that prevents a gank is more valuable than saving for a 2,000-gold item. This philosophy is drilled into our players during coaching sessions.
Itemization and Game Phases: A Summary Table
| Game Phase | Minutes | Itemization Focus | Key Items |
|---|---|---|---|
| Early Lane | 0-8 | Lane sustainability, last-hit efficiency | Wraith Band/Bracer/Null, Magic Wand, Boots |
| Mid Game | 8-20 | Power spikes, fighting capability | BKB, Blink, Desolator, Mekansm, Aghs |
| Late Mid | 20-35 | Team items, specialized counters | Pipe, Halberd, Gleipnir, Silver Edge, Force Staff |
| Late Game | 35-50 | Maximize slot efficiency, team completion | Satanic, Skadi, AC, Scythe, Butterfly |
| Ultra Late | 50+ | Win-condition items, consumable buffs | Refresher, Rapier, Moon Shard (consumed), Aghs Blessing |
Frequently Asked Questions
Conclusion: Win the Item Game, Win More MMR
Itemization is one of the few skills in Dota 2 that you can improve through pure knowledge and decision-making–no mechanical practice required. By understanding when and why to buy each item, you’ll find yourself winning fights you previously lost, surviving ganks you previously died to, and pushing advantages that previously slipped away.
Start with the basics: buy BKB more often, build team items as an offlaner, carry detection against invis, and always ask “why am I buying this” before every purchase. These simple habits will yield immediate MMR gains.
For players who want an expert to review their item builds and identify patterns holding them back, our coaching service includes full replay analysis with a focus on itemization decisions. And if you need a fresh start at a higher rank to practice these concepts in better-quality games, check out our MMR boost or calibration service.
Every item you buy is a decision. Make better decisions, and the MMR will follow.
Ready to Climb Start Your Boost Today
Team Smurf is the #1 rated Dota 2 boosting service. Immortal-rank boosters, maximum safety, competitive pricing, 24/7 support.
Written by Team Smurf’s Immortal-rank analysts — Last verified February 2026


