Mastering the Laning Phase in Dota 2: Complete Guide from Immortal Players

The laning phase is where Dota 2 games are won and lost. Every creep you secure, every trade you take, and every rotation you make in the first ten minutes ripples through the rest of the match. Whether you’re a Herald player struggling to last-hit under tower or a Legend carry trying to break into Ancient, understanding the laning phase at a fundamental level is what separates good players from great ones.
This guide was written with insights from our Immortal-ranked boosters and coaches at TeamSmurf Coaching — players who have collectively played tens of thousands of games at the highest level. We’re breaking down every aspect of the laning phase: creep aggro manipulation, trading patterns, pulling and stacking, lane equilibrium, kill lanes, rune control, power spikes, and role-specific strategies for every position.
By the end of this guide, you’ll have a framework that can immediately add 500+ MMR to your gameplay — no exaggeration. Laning is that important.
Table of Contents
- Why the Laning Phase Matters So Much
- Creep Aggro Mechanics Explained
- Last-Hitting and Denying Fundamentals
- Trading and Harass Patterns
- Lane Equilibrium and Wave Control
- Pulling and Stacking
- Kill Lanes and Aggression Windows
- Rune Control and Timing
- Power Spikes by Hero and Role
- Role-Specific Laning Strategies
- Common Laning Phase Mistakes by Rank
- FAQ
Why the Laning Phase Matters So Much
In Dota 2, the laning phase typically spans from 0:00 to roughly 10:00–12:00 on the game clock. During this period, heroes occupy their designated lanes, farm creeps for gold and experience, and attempt to create advantages over their opponents through kills, denies, and map control.
Why is this phase so critical? Because Dota 2 is fundamentally a snowball game. A carry who finishes laning with 60 last hits and zero deaths is in a completely different game than one who has 30 last hits and two deaths. That gap doesn’t close on its own — it compounds. The farmed carry gets their item timing 3–5 minutes faster, takes fights they shouldn’t be able to win, and accelerates even further.
Our MMR Boost service analysts have reviewed thousands of replays across all skill brackets. The single most predictive factor for match outcome? Laning phase net worth difference at 10 minutes. When one team has a collective 3,000+ gold lead at 10 minutes, they win roughly 65–70% of the time. At 5,000+ gold, that climbs to over 80%.
The good news? Laning is the most improvable skill in Dota 2. Unlike game sense, which develops over hundreds of games, laning mechanics can be drilled and refined in practice mode. Let’s start with the most misunderstood mechanic in the game.
Creep Aggro Mechanics Explained
Creep aggro manipulation is arguably the single highest-impact mechanical skill in Dota 2’s laning phase. Understanding it separates players who “just lane” from players who dominate lanes.
How Creep Aggro Works
Lane creeps follow a priority system when choosing their target:
- Closest enemy hero attacking a friendly hero (within 500 range)
- Closest enemy creep attacking a friendly hero
- Closest enemy creep attacking a friendly creep
- Closest enemy tower
- Closest enemy creep
- Closest enemy hero
The critical mechanic: you can draw creep aggro by right-clicking an enemy hero anywhere on the map, as long as you’re within 500 range of enemy creeps. The creeps don’t care if the hero you clicked is across the map — they just detect that you issued an attack command on an enemy hero.
Creep Aggro Cooldown
Creep aggro has a 3-second cooldown. After creeps switch aggro to you (or after you draw aggro), there’s a 3-second window where your actions won’t change their targeting. This cooldown resets after 3 seconds, meaning you can manipulate aggro again.
How to Use Creep Aggro for Last-Hitting
This is the bread and butter of high-level laning. Here’s the step-by-step process:
- Stand behind or beside your ranged creep
- When an enemy creep is low, right-click an enemy hero (even if they’re far away) to draw the enemy creep wave toward you
- The creeps walk toward you, separating the low-HP creep from the wave and bringing it into easy last-hit range
- Last-hit the creep while it’s isolated and close to you
- Walk back so the creeps re-aggro onto your wave
This technique lets you last-hit from a safe position even in a losing lane. Melee carries use this constantly against ranged offlaners — instead of walking up to the creep wave and getting harassed, they pull individual creeps toward them.
Using Creep Aggro to Win Trades
The flip side of aggro manipulation is using it offensively. When you want to trade hits with an opponent:
- Hit them when they have more creeps around them. If you right-click them near your large creep wave, their creeps hit you — but so do your creeps hit them when they retaliate.
- De-aggro after trading. After you hit the enemy hero and the creeps turn on you, right-click one of your own creeps. After the 3-second aggro cooldown, the creeps will switch off you.
- Attack from fog. Attacks issued from fog of war (trees, high ground) don’t draw creep aggro. This is why harassing from tree lines is so effective.
Advanced Aggro Tricks
The double-wave pull: In mid lane, you can draw the enemy wave toward your tower by aggroing at the right moment. If you aggro just as the waves are about to meet, you can pull the enemy wave past your wave toward your tower, creating a massive farm advantage.
Aggro denial in safelane: As a carry, if the lane is pushing toward the enemy, you can aggro their creeps onto you and walk them past the wave, effectively “pulling” the lane back toward your tower without needing a camp pull.
Resetting ranged creep aggro: The ranged creep is the most important creep to deny (it gives the most XP). You can use aggro tricks to make the enemy ranged creep focus your ranged creep, speeding up its death for an easier deny.
Last-Hitting and Denying Fundamentals
Mechanical last-hitting is the foundation everything else builds on. If you can’t secure creeps reliably, no amount of game knowledge will save your lane.
Gold and XP Values
| Creep Type | Base Gold | XP Given | Deny XP Reduction |
|---|---|---|---|
| Melee Creep | 36–42 | 57 | 50% reduced to enemy |
| Ranged Creep | 48–54 | 69 | 50% reduced to enemy |
| Siege Creep | 66–80 | 88 | 50% reduced to enemy |
| Super Melee Creep | 36–42 | 57 | — |
Denying is massive. Every deny cuts the XP your opponent receives by 50%. In a lane where you’re denying 3–4 creeps per wave, your opponent is losing roughly 100–140 XP per wave. Over 10 waves, that’s a full level difference. Denying also gives you a small gold bounty.
Last-Hit Timing by Attack Animation
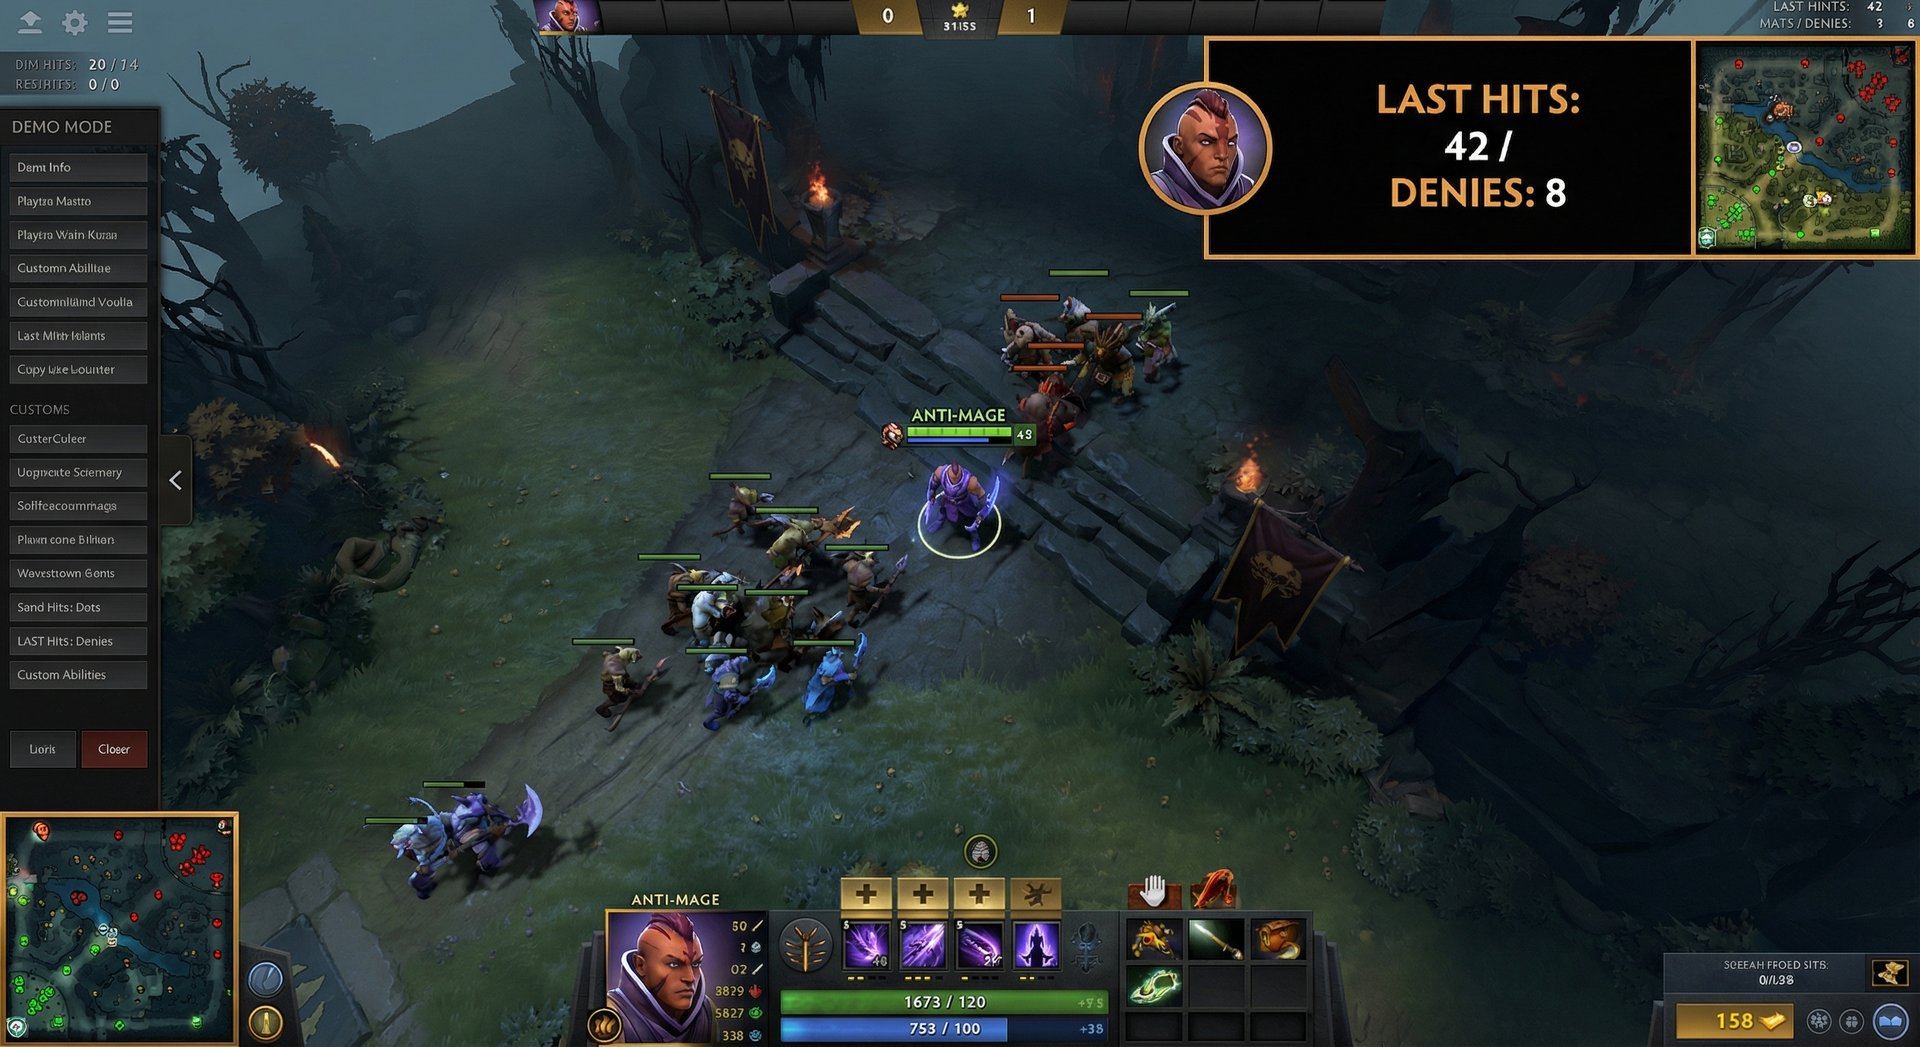
Every hero has a different attack animation — the wind-up time before your attack actually lands. Fast attack animations (like Anti-Mage, Juggernaut, Clinkz) make last-hitting easier. Slow animations (Lina, Crystal Maiden, Treant Protector) require earlier timing.
Practice tip: Go into demo mode with your hero, buy no items, and try to get every last hit for 10 minutes. Start with easy heroes (Jugg, AM) and work toward difficult ones (Clinkz, Techies). Aim for 60+ last hits in 10 minutes with no pressure — that’s your baseline.
Quelling Blade Breakpoints
Quelling Blade adds bonus damage to creeps (18 for melee heroes, 5 for ranged heroes). For many melee carries, Quelling Blade is the difference between getting a last hit and missing it, especially under tower. Always buy Quelling Blade on melee carries.
Under-Tower Last-Hitting
Tower damage to creeps follows predictable patterns:
- Melee creeps: Two tower hits + one hero hit (at base damage levels). Let the tower hit twice, then attack.
- Ranged creeps: Varies by hero damage. Generally, one tower hit + one or two hero hits. Pre-damage the ranged creep with one hit before the tower targets it, then finish after one tower hit.
- Siege creeps: Highly variable. Practice these specifically.
Under-tower last-hitting is where most low-MMR players bleed gold. If you can reliably farm under tower, you can survive even the hardest lanes without losing too much. Our coaching sessions dedicate significant time to this specific skill because the payoff is enormous.
Trading and Harass Patterns
Trading refers to exchanging damage with your lane opponent. Good trading wins lanes; bad trading loses them. The key principle: every trade should be HP-efficient in your favor.
When to Trade
- When you have more creeps than the opponent. Your creeps deal damage to them when they attack you back. With a 4-creep advantage, creep damage adds up fast.
- When they go for a last hit. Players are locked in their attack animation during last hits. Punish them with a free hit.
- When you have a regen advantage. If you have more tangoes/salves than them, trade aggressively. You’ll regenerate; they won’t.
- When your spells are off cooldown and theirs aren’t. Track enemy ability cooldowns and trade when you have more tools available.
- When you’re in fog. Attack from trees or high ground so creeps don’t aggro you.
When NOT to Trade
- When you’re under their creep wave. You’ll take creep damage and lose the trade.
- When they have kill threat. Trading a carry to 50% HP when the enemy has a stun combo is just dying with extra steps.
- When you’re the carry and they’re the support. Supports exist to trade HP for the carry’s free farm. If the support is trading 1-for-1 with you, they’re winning because your HP is worth more.
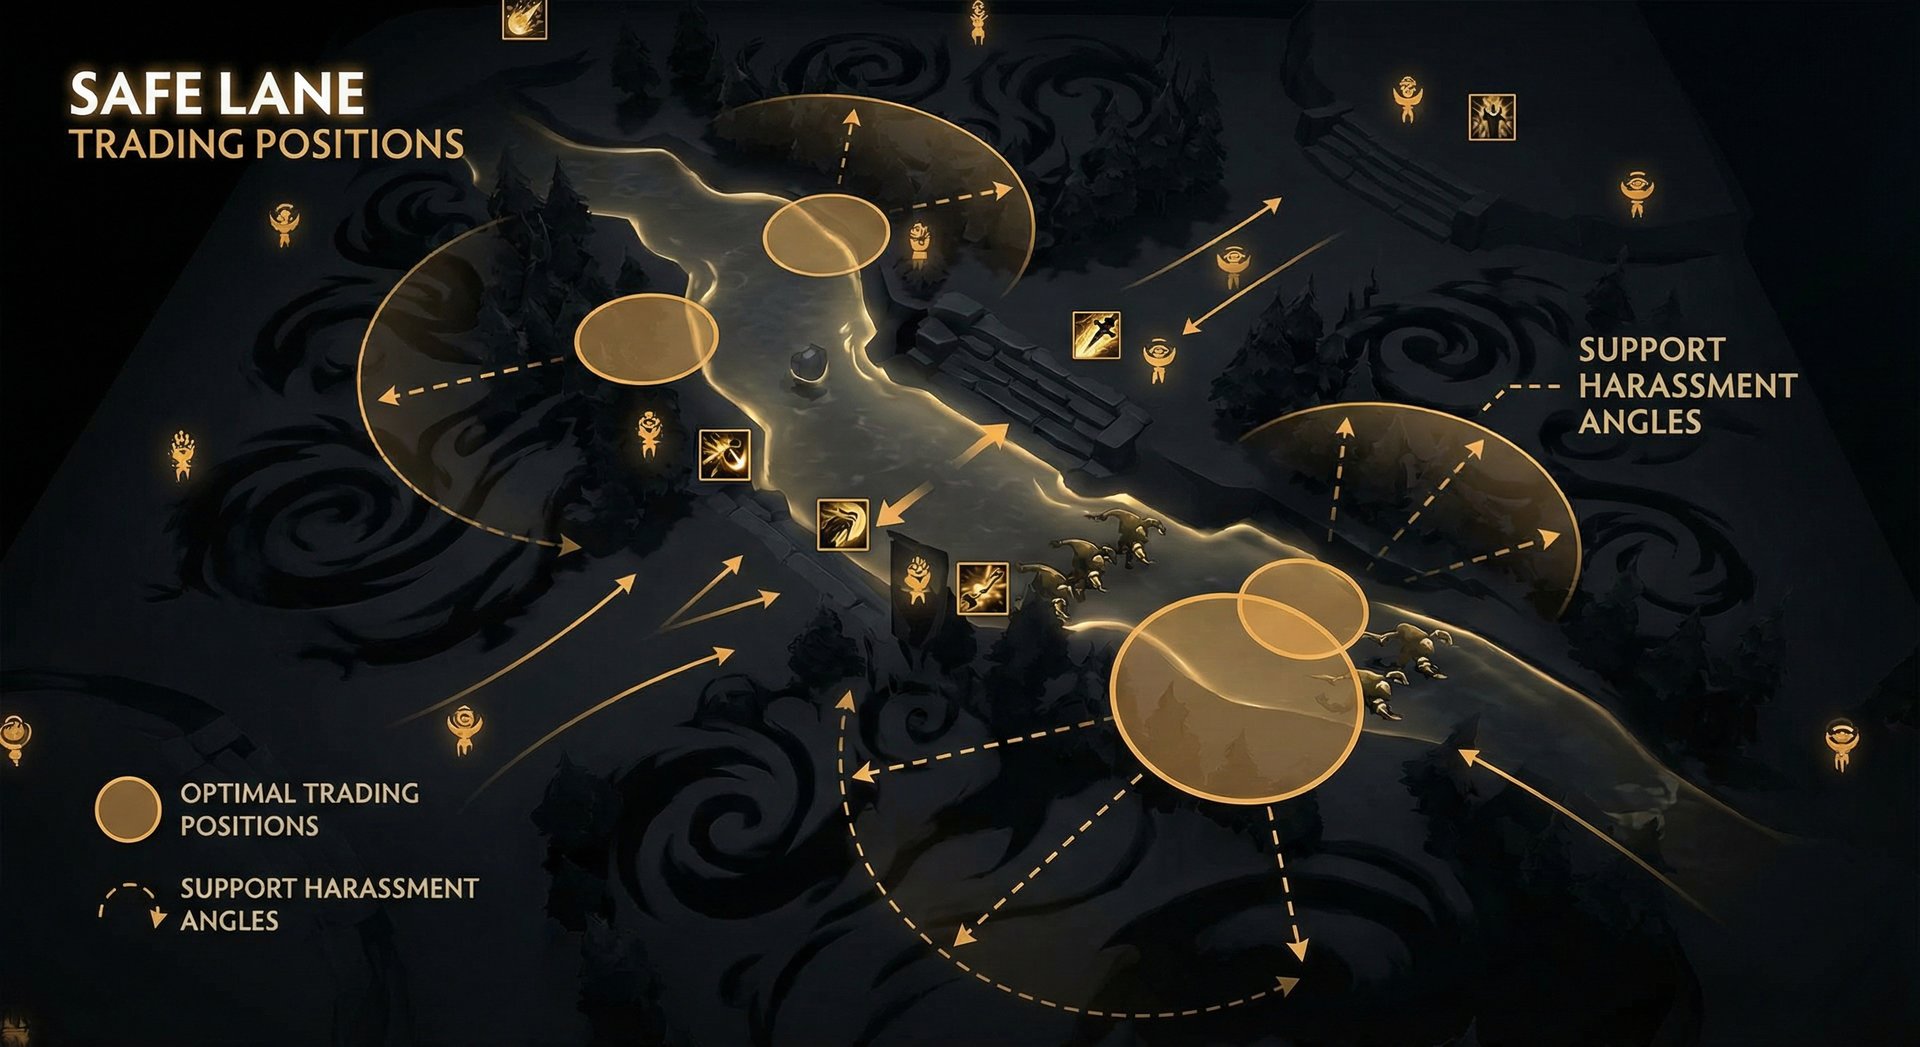
Harass Patterns by Role
Support harass: Walk up from an angle (not through creeps), right-click once or twice, then back off before creep aggro stacks. Use attack-move commands from tree lines. Focus harass when the enemy carry goes for last hits. Spend your regen items to sustain this aggression.
Offlane harass: Offlaners typically harass with abilities rather than right-clicks because they’re outnumbered. Use your spells to zone the carry during the first few waves when their support might be pulling or warding.
Mid harass: Mid is the most nuanced lane for trading. Use high ground advantage aggressively — when you’re on your high ground and the enemy is on their low ground, your attacks have a 25% miss chance, but theirs don’t when you step down. Trade on your side, retreat to high ground after.
Lane Equilibrium and Wave Control
Lane equilibrium — the position where the creep waves meet — is one of the most important concepts in high-level Dota 2. Controlling where the wave sits determines who can farm safely, who is vulnerable to ganks, and who has tower protection.
Ideal Wave Position by Role
| Role | Ideal Wave Position | Why |
|---|---|---|
| Safelane Carry | Close to your tower (not under it) | Safe farming, hard for enemy to dive, support can pull |
| Offlaner | Close to your tower | Same reasons — safe farming distance from enemy tower |
| Mid | On your high ground | Uphill advantage for trades, closer to your tower for safety |
| Support (4/5) | N/A — you don’t farm | Your job is to control equilibrium FOR your core |
How Equilibrium Shifts
The creep wave pushes toward the side with fewer units or less total HP. Common causes of equilibrium shifts:
- Auto-attacking creeps instead of only last-hitting → pushes the wave
- Using AoE spells to harass that also hit creeps → pushes the wave
- Not denying → your creeps die slower, so you push
- Pulling by the enemy support → their wave has fewer creeps, so yours pushes
- Denying more than last-hitting → their creeps die faster, lane pulls toward you
Resetting Equilibrium
If the wave is in a bad position, you have several options:
- Pull the neutral camp (safelane/offlane) to redirect your creep wave
- Aggro the creeps past the wave to reset their pathing
- Hard push the wave into the enemy tower so it resets from scratch
- Deny aggressively to slowly pull the wave back
Knowing which option to use and when is a hallmark of high-MMR play. In general, pulls are the most reliable equilibrium reset, which is why pulling mechanics are so critical to understand.
Pulling and Stacking
Pulling is the act of dragging neutral creeps into the path of your lane creeps, diverting your wave into the jungle. Stacking creates additional neutral creeps in a camp so that a single pull fully clears your wave.
Why Pull?
- Resets lane equilibrium. Your creep wave gets diverted into the jungle, meaning fewer friendly creeps in lane. This pulls the enemy wave toward your tower.
- Denies gold and XP from the enemy. Your creeps die to neutrals instead of giving the enemy anything.
- Gives the support gold and XP. You get the neutral camp bounty and any last hits you secure.
Small Camp Pull (Safelane)
The small camp near your safelane tower is the standard pull camp. Pull timing: attack the camp at :15/:45 (game clock seconds). Walk toward the lane so the neutrals follow you into the path of your creep wave.
Important: A small camp pull alone won’t fully kill your creep wave. Your creeps will kill the neutrals and then march into lane with reduced HP. This can actually make things worse because you now have a slow, wounded creep wave pushing. To fix this:
- Stack the small camp first (pull at :53 to stack, then pull the double-stack at :15/:45)
- Chain-pull — connect the small camp pull into the nearby medium camp by aggroing the medium camp as your creeps finish the small camp
Stacking Mechanics
Neutral camps respawn every minute (at :00) if the camp box is empty. To stack, pull the existing neutrals out of the camp box before the minute mark:
| Camp Type | Stack Timing (seconds before :00) | Notes |
|---|---|---|
| Small Camp | :53–:55 | Attack and walk away from the lane |
| Medium Camp | :53–:55 | Varies slightly by spawn box |
| Large Camp | :53–:56 | Some large camps need earlier pulls |
| Ancient Camp | :52–:53 | Ancients are slower, need more lead time |
Pro tip: Stack timing varies by which direction you pull the neutrals. Always pull away from the spawn box, not toward your lane. The spawn box is a rectangle around the camp — if any unit is inside it at :00, the camp won’t respawn.
Offlane Pulling
Since the map rework, offlane pulls have become more viable. The hard camp near the offlane can be pulled into the enemy creep wave to deny your opponent’s farm. This requires specific timing and often catapult waves for the best effect.
When NOT to Pull
- When your carry is under tower and can’t last-hit there efficiently
- When pulling would expose your carry to a kill attempt (enemy dive threat)
- When the lane equilibrium is already in a good spot
- When you’re needed in lane for trading/zoning
A bad pull is worse than no pull. If your carry pings you furiously after a pull, they’re probably right — you just handed the enemy a free wave of uncontested farm under your tower while your carry scrambled.
Kill Lanes and Aggression Windows
Not every lane should be played for farm. Some hero combinations have massive kill potential, and recognizing these windows is what separates passive laners from dominant ones.
What Makes a Kill Lane?
Kill lanes require three ingredients:
- Reliable crowd control (stun, root, slow) — You need to lock someone down
- Burst damage — Enough combined damage to kill before their support reacts
- Mana sustainability — You need multiple kill attempts, not just one
Classic Kill Lane Combos
| Combo | Kill Threat Level | Power Window | How It Works |
|---|---|---|---|
| Juggernaut + Crystal Maiden | High | Level 2 | CM freezes, Jugg spins for free damage |
| Ursa + Snapfire | Very High | Level 2–3 | Cookie into Ursa = instant death |
| Tusk + Any burst hero | High | Level 2 | Snowball → Ice Shards = enemy trapped |
| Mars + Hoodwink | Very High | Level 3 | Spear pin → Bushwhack = long lockdown |
| Skywrath + any stun | Extreme | Level 3–5 | Any stun duration + Arcane Bolt spam = dead |
Executing Kill Lanes
Step 1: Harass them to kill range. Don’t go for the kill at full HP unless your burst is overwhelming. Whittle them down to 60–70% first through right-click trades and spell harass.
Step 2: Control the creep wave. You don’t want to dive under tower. Keep the wave in the middle of the lane or slightly toward the enemy’s side, so you have room to chase without tower interference.
Step 3: Wait for their cooldowns. Track the enemy’s escape abilities. If their stun/escape just went on cooldown, that’s your window.
Step 4: Commit fully. Half-hearted kill attempts are worse than no attempt. If you go, both heroes need to go all-in. Hesitation = the enemy escapes at 10 HP and you’ve wasted resources.
Recognizing When You’re in a Kill Lane (as the Victim)
If you’re laning against a known kill combo:
- Buy extra regen — you’ll need it
- Stay near your tower or where your support can help
- Don’t let them harass you below 70% — that’s when they go
- Identify which ability starts their combo and play around its range
- Consider buying a Magic Stick early — it can save your life against spell-heavy lanes
If you’re consistently dying in lane to kill combos, consider our Dota 2 Coaching service where our Immortal coaches can review your replays and show you exactly where your positioning breaks down.
Rune Control and Timing
Runes spawn at specific intervals and controlling them provides significant laning advantages.
Rune Types and Spawn Times
Power Runes (bounty, haste, double damage, illusion, regeneration, arcane, invisibility, water) spawn at the river rune spots. Since the map update, power runes spawn at one of the two river locations every 2 minutes (2:00, 4:00, 6:00, etc.).
Bounty Runes spawn in the jungle at 0:00 and every 3 minutes afterward. They provide gold to the entire team of whoever picks them up.
Water Runes spawn at both power rune locations at 2:00 and 4:00, providing HP and mana regen. These are crucial for mid lane sustainability.
Rune Control by Role
Mid laners: Rune control is your top priority after last-hitting. Push the wave into the enemy tower before the rune spawn time so you can walk to the rune without missing CS. A Double Damage rune at 4:00 can single-handedly win a mid lane.
Supports: Secure bounty runes for your team. At 0:00, contest the enemy bounty if it’s safe. At 3:00 and 6:00, make sure you or a teammate picks them up. Each bounty rune denied from the enemy is gold your team has and they don’t.
Carries: You generally shouldn’t leave lane for runes. Let your support handle bounties. Exception: if a regen or DD rune is nearby and you can grab it without missing a wave.
Playing Around Rune Spawns
The 6:00 power rune is often the most impactful. Many mid laners hit level 6 around this time, so combining a power rune with their ultimate creates massive kill potential. If you’re a side lane, be aware of the mid laner potentially rotating with a haste or invis rune at 6:00.
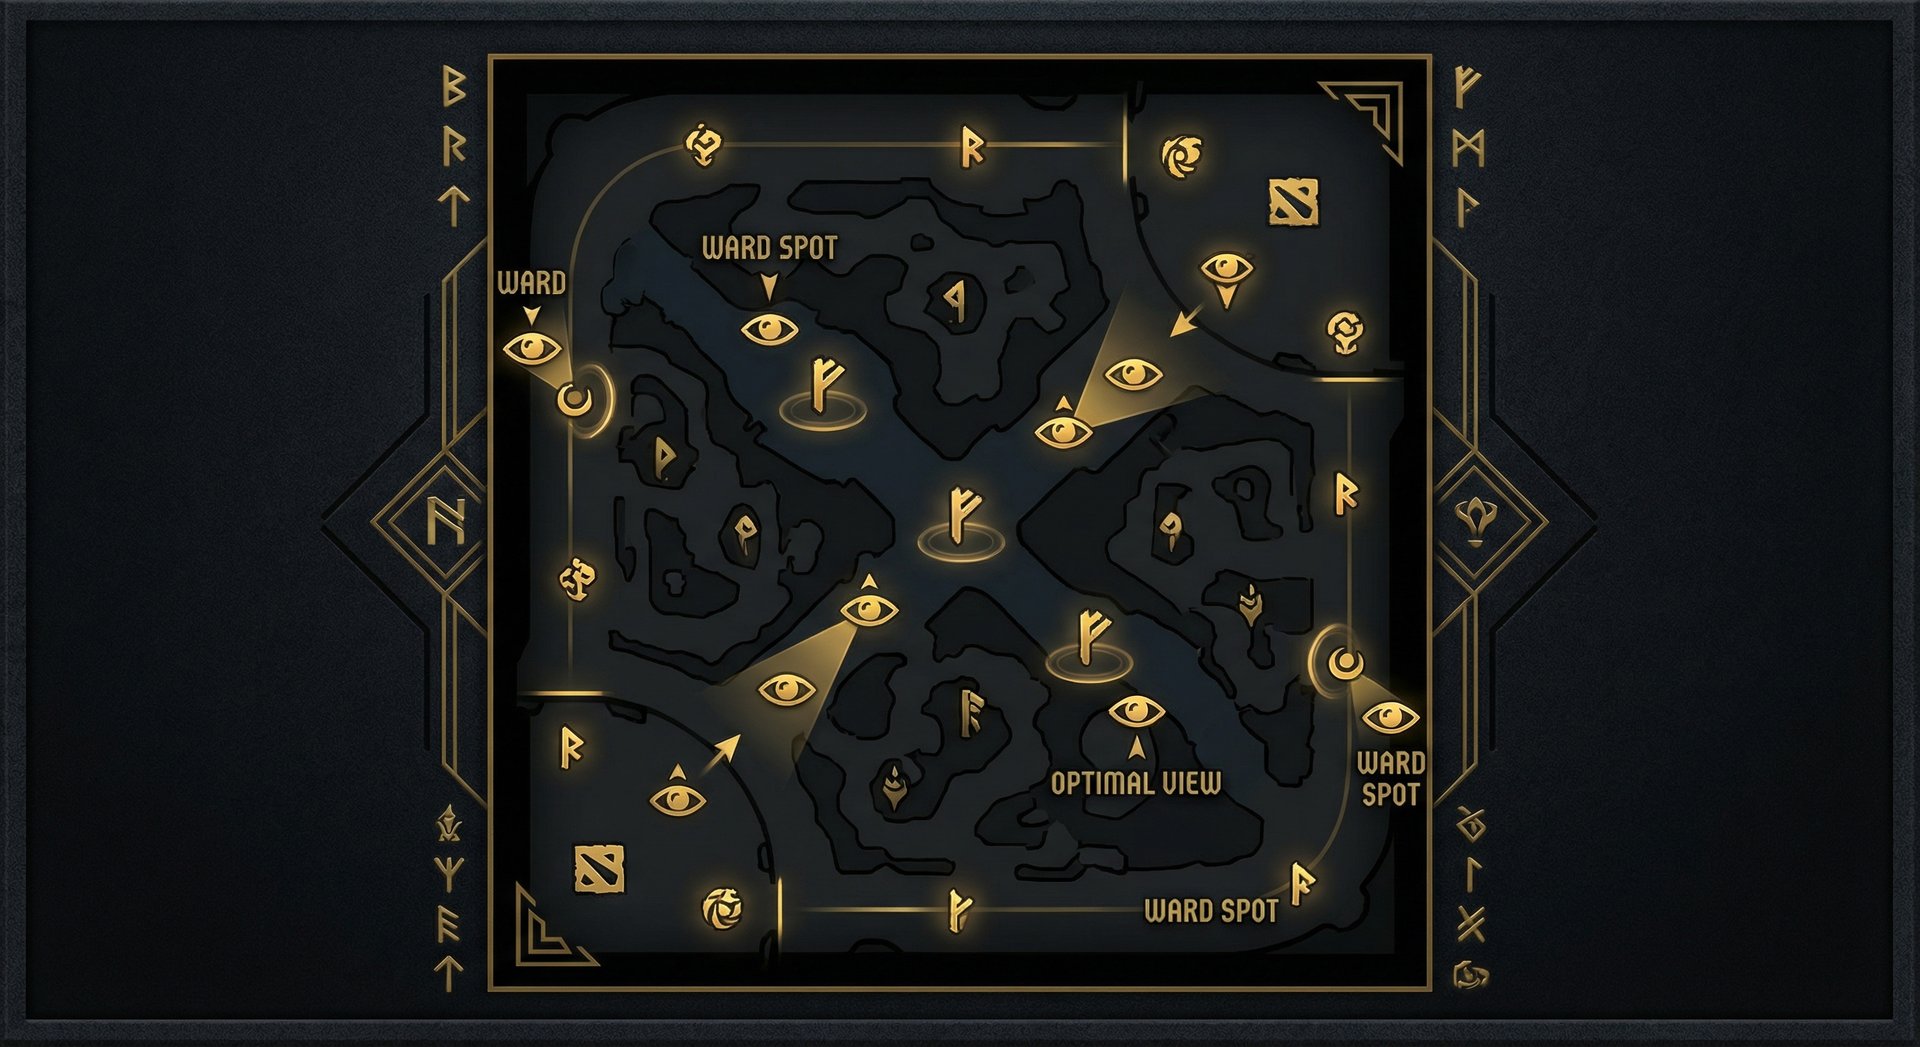
Ward the rune spot if you’re a support. Information about which rune spawned — and who picked it up — can prevent deaths across the map.
Power Spikes by Hero and Role
Power spikes are moments when a hero becomes significantly stronger relative to their lane opponent. Recognizing and exploiting these spikes is how Immortal players dominate lanes.
Level-Based Power Spikes
| Level | Why It’s a Spike | Example Heroes |
|---|---|---|
| Level 2 | Second ability unlocked — many kill combos online | Juggernaut (Spin + Crit), Ursa (Fury Swipes + Overpower) |
| Level 3 | Two points in one ability = significant damage increase | Skywrath (2x Arcane Bolt), Zeus (2x Arc Lightning) |
| Level 5 | Three points in primary nuke — max lane dominance | Queen of Pain (3x Shadow Strike), Lina (3x Dragon Slave) |
| Level 6 | Ultimate unlocked — game-changing for many heroes | Templar Assassin, Huskar, Viper, all supports with kill ults |
Item-Based Power Spikes
- Boots of Speed: Movement speed advantage in lane = free trades. If you have boots and your opponent doesn’t, you can chase for extra hits and disengage at will.
- Magic Stick/Wand: Against spell-heavy heroes (Bristleback, Zeus, Phantom Assassin with dagger spam), a full stick can heal 150+ HP instantly.
- Orb of Venom: On melee offlaners (Underlord, Mars, Axe), this slow makes trades devastating because the enemy can’t escape your attack range easily.
- First big item component: A Mithril Hammer or Javelin significantly increases damage output. Ring of Health provides sustain that wins attrition wars.
Timing Your Aggression
The cardinal rule: be aggressive when you hit a power spike BEFORE your opponent. If you hit level 6 and your enemy is still level 5, the next 30–60 seconds are your window to get a kill or force them to retreat. Don’t waste spike windows by playing passively.
Similarly, if the enemy hits a spike first, play safe. An Ursa who just hit level 6 with full HP will absolutely kill you if you trade. Back off, give up some creeps if needed, and wait for your own spike.
Role-Specific Laning Strategies
Position 1 — Safelane Carry
Your entire job in lane is to get farm. That’s it. Kills are a bonus; last hits are the priority.
Starting items: Quelling Blade, Tango, two Iron Branches, Slippers of Agility or Gauntlets of Strength (depending on hero). Some carries grab a Circlet for early stat efficiency.
Laning priorities (in order):
- Don’t die
- Get every last hit possible
- Deny when safe to do so
- Communicate with your support about pulls and kill opportunities
Key principles:
- Focus on last-hitting, not harassing. Let your support handle harass.
- Use aggro tricks to secure CS from safe positions.
- If the lane is unwinnable (enemy trilane or hard counter), farm jungle camps between waves starting at level 3–4.
- Don’t waste mana on harass unless it secures a kill. Your mana is for farming spells later.
- Communicate to your support when you want pulls and when you don’t.
If you’re struggling to farm efficiently in your bracket, our Dota 2 MMR Boost service can help you push past frustrating rank plateaus while you work on improving your mechanics.
Position 2 — Mid Lane
Mid lane is a 1v1 duel where every mechanical edge matters. High ground advantage, creep aggro, rune control, and power spike awareness all compound.
Starting items: Varies widely by hero. Common starts include 2x Tango + 2x Iron Branch + Faerie Fire, or Bottle rush builds with minimal regen.
Key principles:
- Control the ranged creep. Denying the ranged creep is worth more XP than securing a melee last hit. Prioritize it.
- Use high ground. Stand on your high ground, force the enemy to come to your side. Step down to last hit, then retreat uphill.
- Push before rune spawns. Shove the wave at :45 so creeps die to the enemy tower, then walk to the rune uncontested.
- Bottle management. Don’t waste bottle charges. Each charge is precious. Use it after trades, not to top off 90% HP.
- Watch for ganks. Mid is the most-ganked lane. Buy wards if your supports don’t, and watch the minimap every 3–5 seconds.
Position 3 — Offlane
The offlane is about disruption, not farming. Your goal is to make the enemy carry’s life miserable while getting enough levels to be relevant.
Starting items: Tango, healing salve, Stout Shield (on melee heroes), Ring of Protection, or Orb of Venom depending on matchup.
Key principles:
- Contest the pull. If the enemy support is pulling, contest it. Block the camp, fight them at the camp, or pull the wave yourself.
- Trade with the carry. Force the carry to choose between last-hitting and fighting you. If they have to spend regen on your harass, you’re winning.
- Cut waves. If the lane is lost, go behind the enemy tower and intercept their creep wave. This denies the enemy carry a full wave and pulls equilibrium back toward your tower.
- Know when to leave. If you’re getting absolutely nothing from the lane (no XP, no farm), go jungle or rotate to gank mid. Dead time in a lost offlane helps nobody.
- Get levels, not items. Offlaners scale with levels more than gold in the early game. If you’re getting XP but not last hits, that’s acceptable.
Position 4 — Soft Support (Offlane Support)
You enable your offlaner’s aggression and create chaos in the enemy safelane.
Starting items: Observer ward, Tango, Clarity, Wind Lace or Orb of Venom, Sentry if needed for dewarding.
Key principles:
- Stack and pull the offlane camps when equilibrium is bad
- Harass the enemy carry from fog
- Rotate mid for kills if your offlane is stable
- Secure bounty runes at spawn timings
- Don’t leech XP from your offlaner if you’re not actively doing something useful in lane
Position 5 — Hard Support (Safelane Support)
The hard support dictates the safelane’s success. Your job is threefold: zone the offlaner, control equilibrium via pulls, and keep your carry alive.
Starting items: Observer ward, Sentry ward, Tango (share 2 with mid), Clarity, Enchanted Mango, Healing Salve.
Key principles:
- Zone from minute zero. Stand between the enemy offlaner and the creep wave. Right-click them every time they approach. Your carry should be free-farming for the first 2–3 minutes.
- Pull at the right times. Pull when the wave is pushing. Don’t pull when your carry needs you in lane. Stack before pulling for full wave clears.
- Sacrifice your HP and regen, not your carry’s. Bring plenty of regen. Your job is to be the punching bag so your carry farms uninterrupted.
- Know when to leave. If your carry is level 5–6 and the lane is stable, you can rotate to help mid or secure runes. Don’t overstay in a lane where you’re just leeching XP.
- Stack camps for your carry. While moving between lanes, stack the triangle or jungle camps. A 3-stack ancient camp at 7 minutes can accelerate your carry’s farm dramatically.
Common Laning Phase Mistakes by Rank
Herald to Crusader (0–2,300 MMR)
- Auto-attacking creeps. Only attack creeps to last-hit or deny. Every other attack pushes your lane.
- Not buying enough regen. Starting with one set of tangoes is asking to get zoned. Bring extra regen — it pays for itself.
- Never pulling. Supports at this level stand in lane leeching XP. Learn to pull; it’s the single highest-impact skill for low-MMR supports.
- Fighting at level 1. Level 1 fights without a plan usually trade evenly at best. Wait for level 2–3 spikes.
- Not watching the minimap. If you die to a mid rotation you didn’t see coming, it’s a minimap problem, not a hero problem.
Archon to Legend (2,300–3,850 MMR)
- Not using aggro tricks. Players at this level know last-hitting but don’t manipulate creep aggro. Start doing it and you’ll instantly farm more safely.
- Bad pull timing. Pulling when the lane is fine, not pulling when it’s pushed. Understand WHY you pull, not just the mechanic.
- Overstaying in lost lanes. Dying twice in lane and then staying for a third death is ego, not strategy. Rotate, jungle, or ask for help.
- Not tracking enemy cooldowns. If the enemy Slardar just used Crush, you have 13 seconds of safety. Use it aggressively.
Ancient to Divine (3,850–5,620 MMR)
- Inefficient trading. Trading when it’s not HP-efficient, especially as a carry against a support who wants to trade.
- Not abusing power spikes. Players know about spikes but don’t act on them aggressively enough. Be proactive, not reactive.
- Predictable patterns. Going for the same harass angle every time, pulling at the same clock time. Mix it up so the enemy can’t predict you.
- Ignoring rune timings. Missing bounty runes is like missing 2–3 last hits per spawn for your entire team.
If you’re stuck in any of these brackets and want personalized guidance, our Dota 2 Coaching sessions with Immortal players focus heavily on laning phase improvement. Alternatively, our MMR Calibration service can give your account a strong starting point for a new ranked season.
Advanced Laning Techniques
Creep Wave Cutting
Wave cutting means intercepting the enemy creep wave behind their tower before it reaches the lane. This is primarily an offlane technique used when the lane is unwinnable.
How to do it:
- Walk behind the enemy tier 1 tower (through the trees or around the side)
- Intercept the enemy creep wave as it walks down the lane
- Tank the creeps near your own incoming wave so both waves clash near your tower
- The enemy carry’s lane equilibrium is completely destroyed
Why it works: The carry has to choose between farming under their own tower (awkward positioning) or chasing you (leaving the lane). Meanwhile, you’re getting full wave XP and denying them a clean wave to farm.
Heroes excellent at wave cutting: Axe (Counter Helix), Tidehunter (Kraken Shell), Dark Seer (Ion Shell), Bristleback (Quill Spray), and any tanky offlaner with AoE.
Catapult Waves and Tower Pressure
Siege creeps (catapults) spawn every 5 minutes (5:00, 10:00, etc.). These waves are significantly stronger for pushing and can be leveraged for tower damage or dive setups.
At 5:00, consider pushing aggressively with the catapult wave. The catapult takes reduced damage from towers and deals significant structure damage. If you’ve been winning the lane, this is your chance to threaten or take the tier 1 tower early.
Lane Swaps
Sometimes the best laning strategy is to abandon your assigned lane entirely. If your safelane is being crushed but your offlane is winning, swapping lanes can stabilize both. This requires communication and is more common at higher MMR, but the concept is valuable at any rank.
TP Scroll Awareness
Always have a TP scroll after the first few minutes. If the enemy dives your carry in the safelane and you’re a mid laner with kill potential, TPing in for a counter-kill can swing the entire game. Conversely, be aware that the enemy can TP to counter your dives.
How to Practice Laning
Improvement requires deliberate practice, not just playing more games. Here’s a structured practice routine used by our coaches:
Daily Laning Drill (15 minutes)
- Demo mode last-hitting (5 min): No items, no abilities. Goal: 50+ CS in 5 minutes.
- Under-tower last-hitting (5 min): Set up the wave to push under your tower. Practice with different heroes.
- Aggro drill (5 min): Practice pulling individual creeps out of the wave using aggro tricks. Set up a bot opponent if needed.
Replay Analysis
Watch your own replays from the laning phase. For each death or missed CS, identify what you could have done differently. Be specific: “I died at 3:45 because I didn’t track their level 3 power spike” is useful. “I need to play better” is not.
Watch pro player replays too. Focus on their mouse movements, aggro manipulation, and positioning relative to the creep wave. Sites like Dotabuff let you find replays by hero and skill bracket.
Frequently Asked Questions
Ready to Climb? Start Your Boost Today
Team Smurf is the #1 rated Dota 2 boosting service. Immortal-rank boosters, maximum safety, competitive pricing, 24/7 support.
Final Thoughts
The laning phase is the foundation of every Dota 2 game. Master it, and you’ll win more games even if your mid-game and late-game decision-making isn’t perfect. A 10-minute lead gives you room for mistakes; a 10-minute deficit puts you on a knife’s edge.
Start with the basics: last-hitting, denying, creep aggro. Then layer on trading patterns, equilibrium control, and pulling mechanics. Finally, develop your game sense — power spike awareness, rune control, and rotation timing.
If you’re looking for rapid improvement, our Immortal coaching sessions provide personalized lane analysis that can shortcut months of solo practice. And if you want to push your account past a frustrating plateau while you continue learning, our MMR Boost service and Calibration service are trusted by thousands of players.
Good luck in your lanes — and remember, every creep counts.


