Dota 2 Roles Explained: The Definitive Guide to Positions 1 Through 5

Dota 2 is a team game, and every team needs structure. That structure comes from the five-position role system — a framework that defines each player’s responsibilities, farm priority, hero pool, itemization, and playstyle. Understanding these roles isn’t just important for improving your own play; it’s essential for understanding how the entire game works.
Whether you’re a new player trying to figure out where you belong, a veteran looking to switch roles, or a grinder who wants to deepen their understanding of team dynamics, this guide covers every role in extreme depth. We’ll examine each position’s responsibilities in every phase of the game, the ideal hero pools, itemization priorities, playstyle nuances, the most common mistakes players make, and exactly how to excel at each role.
This is the longest and most detailed roles guide you’ll find anywhere. Let’s dive in.
Table of Contents
Role System Overview
The role system in Dota 2 is organized around farm priority — who gets the most gold. This isn’t arbitrary; it’s based on which heroes scale best with items and which heroes are effective with minimal resources.
| Position | Name | Farm Priority | Typical Lane | Core Responsibility |
|---|---|---|---|---|
| 1 | Hard Carry | Highest | Safe Lane | Scale with items, deal primary damage late game |
| 2 | Midlaner | High | Mid Lane (solo) | Win lane, create space, tempo control |
| 3 | Offlaner | Medium | Off Lane | Initiate fights, frontline, aura items |
| 4 | Soft Support | Low | Off Lane (with Pos 3) | Roam, gank, secondary ward duty |
| 5 | Hard Support | Lowest | Safe Lane (with Pos 1) | Protect carry, primary ward duty, save allies |
The “position number” directly correlates with farm priority. Position 1 gets the most farm, Position 5 gets the least. This means Position 5 typically ends the game with the least gold and items, while Position 1 ends with the most. The system works because different heroes need different amounts of gold to be effective — a Crystal Maiden with just Glimmer Cape and Force Staff is highly effective, while a Phantom Assassin with only those items is useless.
Why Farm Priority Matters
Dota 2’s map has limited resources. There are only so many creeps, jungle camps, and bounty runes. If all five players on a team try to farm equally, nobody gets enough gold to be effective. The role system solves this by establishing a clear hierarchy:
- Position 1 gets first priority on safe lane farm and the team’s most valuable jungle camps.
- Position 2 gets mid lane farm and secondary jungle access.
- Position 3 gets off lane farm and whatever jungle isn’t being used by Positions 1 and 2.
- Positions 4 and 5 survive on assist gold, passive gold, and whatever scraps they can find without taking farm from cores.
Respecting farm priority is one of the most important team dynamics in Dota 2. When a Position 4 takes the carry’s jungle camp, it doesn’t just slow the Position 1 down — it delays the entire team’s power spike. Understanding and respecting farm priority is the difference between coordinated teams and chaotic ones.
Position 1: Hard Carry
What the Carry Does
The Hard Carry is the team’s primary late-game insurance policy. The carry’s job is to accumulate gold and items faster than anyone else on the map and become the team’s primary damage dealer. In the late game, a fully farmed carry is the most powerful hero on the map — capable of killing enemy heroes in seconds, destroying buildings rapidly, and carrying (hence the name) their team to victory.
The carry’s game follows a predictable arc:
- Laning (0-10 min): Farm creeps in the safe lane, protected by the Position 5 support. Focus entirely on last-hitting and not dying.
- Farming (10-25 min): Rotate between lane creeps and jungle camps, building core items. Join fights only when favorable or necessary.
- Fighting (25+ min): With core items complete, group with the team, take objectives, and win teamfights through superior damage output.
Laning Phase Responsibilities
- Last-hit every creep possible. A good carry in Divine+ bracket hits 60-80 last hits by 10 minutes. A great carry hits 80-100. The difference in gold is enormous.
- Deny creeps when safe to do so. Denying deprives the enemy offlaner of gold and experience, making their game harder.
- Communicate with your support. Tell your Position 5 when you need them to pull, when the lane is pushing too far, or when you’re ready for a kill attempt.
- Don’t die. Dying in lane as a carry is devastating — you lose gold, miss multiple waves of creeps, and give the enemy offlaner a power boost. Playing safe and farming is almost always better than going for a risky kill.
Mid Game Responsibilities
- Farm aggressively but efficiently. Once you have your first major item (Battle Fury, Maelstrom, Manta Style, etc.), your farming speed increases dramatically. Establish a farming pattern: push a lane, farm nearby jungle camps, push the next lane, repeat.
- Join fights you can win. Don’t ignore every fight to farm, but also don’t join fights you can’t contribute to. The general rule: join fights that happen near you or fights where your team can win with your presence. Skip fights across the map where teleporting there would cost you a full wave of creeps and jungle camps.
- Carry a TP Scroll. Always. If a fight breaks out near a tower, you can TP in to help. If you’re being ganked, you can TP to safety.
- Take towers when possible. If you win a fight or find an undefended lane, push the tower. Carry heroes typically have the highest building damage on the team.
Late Game Responsibilities
- Be at every important fight. In the late game, your team cannot win a teamfight without you. Stay with your team or be ready to TP immediately.
- Position yourself carefully in teamfights. As the carry, the enemy team will try to kill you first. Stay behind your frontliners (offlaner) and let them initiate before you commit.
- Focus the right targets. Kill enemy supports and squishy heroes first, then deal with the tanky frontline. BKB timing is critical — activate it before using your key damage abilities, not as a panic button after you’ve been disabled.
- Push objectives after winning fights. A teamfight win in the late game should always translate into an objective — Roshan, Barracks, or the Ancient.
Hero Pool
The best carry heroes in the 2026 meta include:
| Hero | Playstyle | Key Items | When to Pick |
|---|---|---|---|
| Faceless Void | Teamfight carry; Chronosphere combo | MoM, BFury/Mael, BKB, Daedalus | When team has AoE damage to combo with Chrono |
| Juggernaut | All-rounder; fights early and late | BFury, Manta, BKB, Butterfly | Almost always — versatile and safe |
| Phantom Assassin | Burst physical damage; snowball | Desolator, BKB, Satanic, Abyssal | Against low-armor lineups; when you can snowball |
| Luna | Push-oriented; fast farming | Manta, BKB, Satanic, Butterfly | When team wants to push early (deathball/tempo) |
| Wraith King | Simple; tanky; two lives | Blink, Radiance/Armlet, BKB | Into lineups without heavy mana burn; reliable pick |
| Lifestealer | Anti-tank; BKB built into kit | Armlet, Desolator, Basher, AC | Against strength/high-HP enemy lineups |
Itemization Priorities
Carry itemization follows a general framework:
- Farming accelerator: Your first major item should increase your farm speed — Battle Fury, Maelstrom, Manta Style with illusions, or Radiance.
- BKB: Almost every carry needs Black King Bar to survive teamfights. The timing of your BKB purchase is one of the most impactful decisions in the game.
- Damage item: After survivability, get a damage multiplier — Daedalus (crit), Butterfly (attack speed + evasion), Desolator (armor reduction).
- Luxury/situational: Late game extensions like Satanic (lifesteal), Abyssal Blade (stun), Eye of Skadi (slow), or Monkey King Bar (true strike against evasion).
Common Mistakes
- Farming too passively. Some carries farm their jungle for 30 minutes and never join a fight. The best carries balance farming with fighting — they hit their item timings and immediately use them to take objectives.
- Not carrying a TP Scroll. This kills more carries than any enemy hero. Always have a TP.
- Fighting without BKB. If the enemy has stuns and magic damage, fighting without BKB is a death sentence. Get it before it’s too late.
- Poor BKB timing in fights. Don’t pop BKB immediately — wait until the enemy commits their disables on your frontliner, then activate and fight. Conversely, don’t wait so long that you die before pressing it.
- Ignoring team calls. If your team is fighting for Roshan and you’re farming a jungle camp, you’re the problem. High-value objectives take priority over farm.
How to Excel at Carry
- Master last-hitting. Spend 15 minutes in the Last Hit Trainer every day. Aim for 70+ last hits by 10 minutes consistently.
- Develop farming patterns. Learn the optimal route between lane creeps and jungle camps for each carry hero. Efficiency is everything.
- Watch your replays. Focus on moments where you died — could you have positioned better Should you have bought BKB earlier Were there fights you should have joined or avoided
- Learn when to fight. This is the hardest carry skill to develop. As a rule: fight when you have a power spike (just completed a major item), skip fights where you’d have to TP across the map and lose farm.
Position 2: Midlaner
What the Midlaner Does
The midlaner is the team’s tempo controller. Playing in a solo lane (1v1 against the enemy mid), the midlaner gains levels faster than any other role, hitting Level 6 first and having the first opportunity to impact the side lanes. A winning midlaner creates space for their carry to farm by pressuring the enemy team, while a losing midlaner puts the carry under pressure by letting the enemy mid roam freely.
The midlaner’s game arc varies more than the carry’s, depending on the hero:
- Tempo mids (Void Spirit, Puck, Spirit Breaker): Win lane → roam and gank → snowball into teamfight presence → end the game before the enemy carry comes online.
- Farming mids (Templar Assassin, Alchemist, Medusa): Win or survive lane → farm aggressively → hit power spikes → carry from the mid position.
- Hybrid mids (Invoker, Lina, Storm Spirit): Win lane → alternate between farming and ganking → scale into powerful late-game threats.
Laning Phase Responsibilities
The mid lane is the most mechanically demanding lane in the game. You’re in a pure 1v1 matchup where every last hit, deny, and harass trade matters:
- Win the last-hit battle. Whoever gets more last hits has more gold and a better item timing. Use your abilities to secure contested last hits.
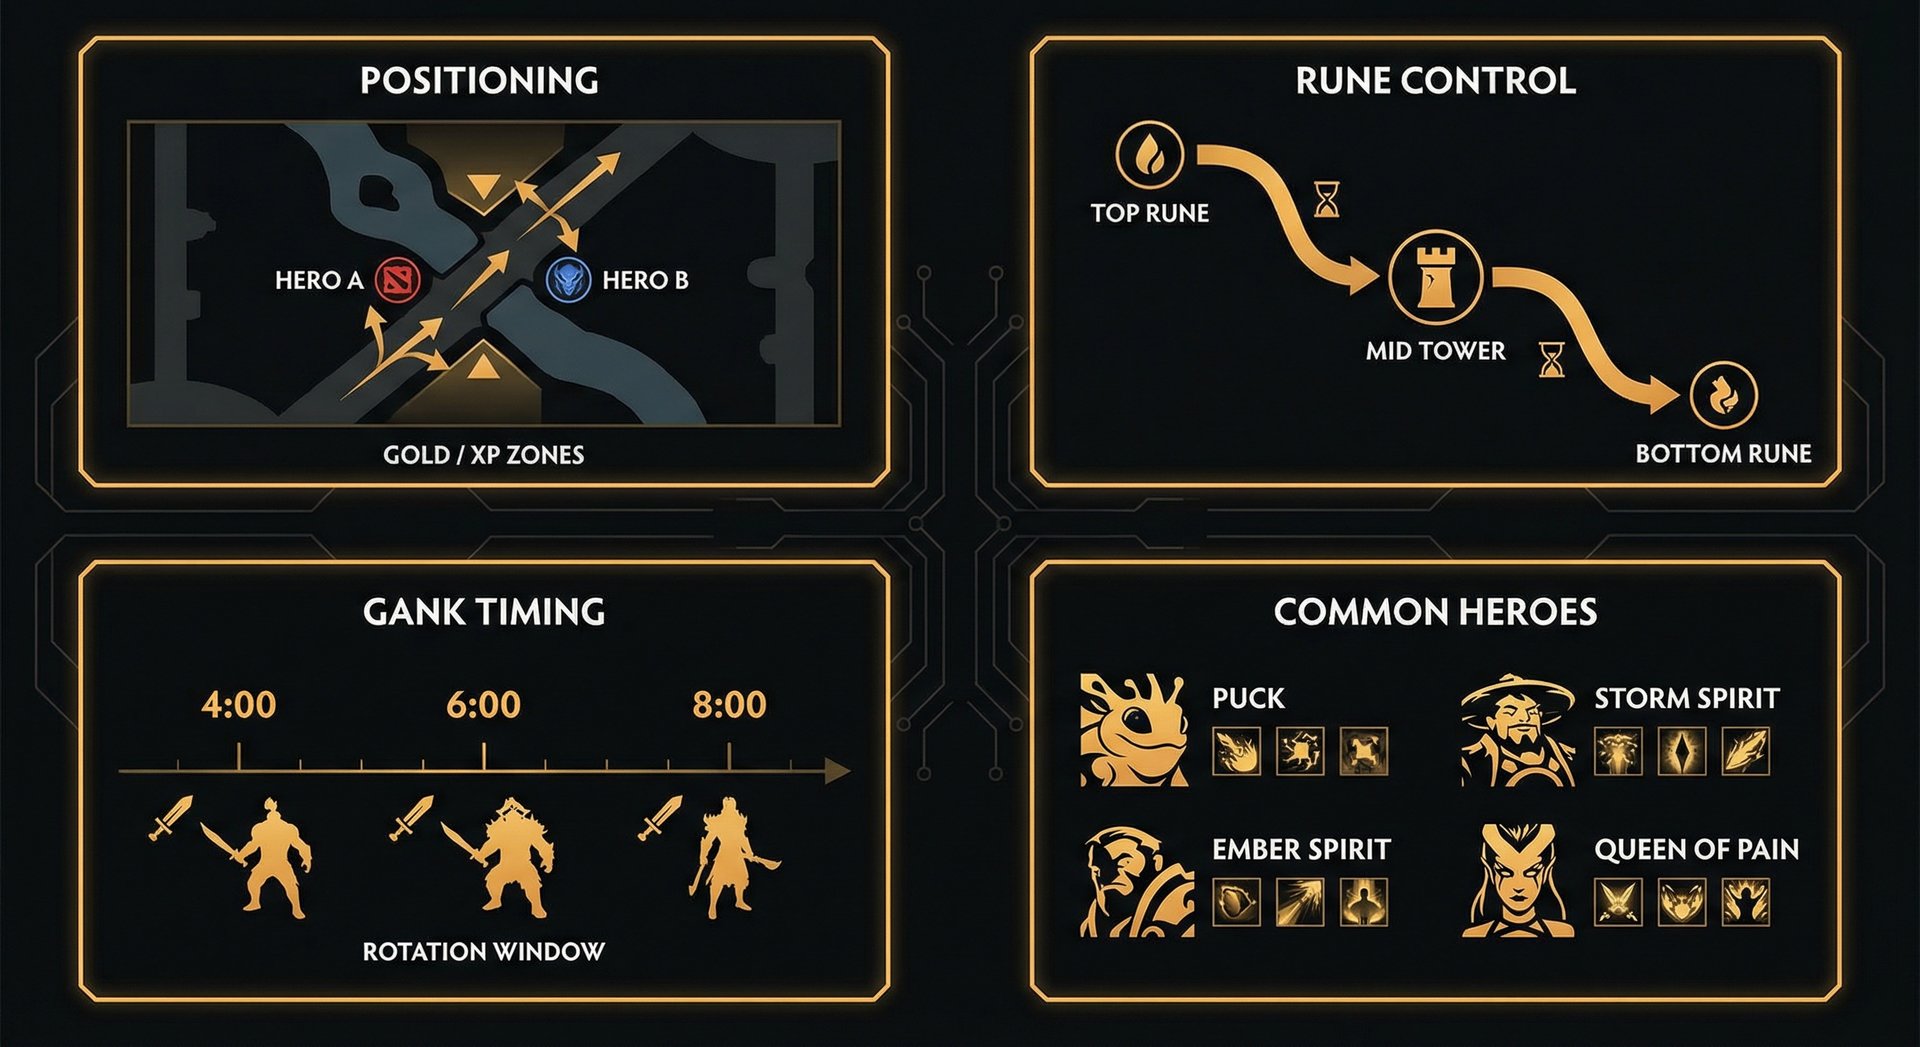
- Control the runes. Water runes spawn at 2:00 and 4:00 in the river; power runes (bounty + buff runes) spawn every 2 minutes in the river. Securing runes gives you regeneration, gold, and potentially a powerful buff (Haste, Double Damage) that you can use to gank or dominate the lane.
- Harass efficiently. Every auto-attack and ability you land on the enemy mid chips away at their health, forcing them to use regen or retreat. But don’t sacrifice last hits for harass — gold efficiency is paramount.
- Avoid ganks. The mid lane is the most ganked lane on the map because it’s central and a high-value target. Ward the adjacent high grounds (or ask your support to), and be aware of missing enemy supports. If you can’t see the enemy Position 4, play safe.
Post-Lane Responsibilities
- Control the game tempo. After winning your lane (or when you hit Level 6-7), start looking for opportunities to gank side lanes. A successful gank from the mid hero can break the enemy carry’s lane and secure a tower.
- Take your tower first. If you’ve won your lane convincingly, push the enemy mid Tier 1 tower. This opens up the enemy’s triangle (their primary farming area) and gives your team map control.
- Farm between ganks. Don’t sacrifice your own farm to roam aimlessly. The best mids farm a wave, check the map for opportunities, farm the jungle if nothing’s available, push another wave, and repeat. Constant movement and efficiency.
- Secure key objectives. Mid heroes are often critical for Tormentor and Roshan attempts due to their higher level and item timing compared to other heroes at the same game time.
Hero Pool
| Hero | Playstyle | Key Items | When to Pick |
|---|---|---|---|
| Invoker | Versatile; combo-based; scales infinitely | Hand of Midas, BKB, Aghs, Refresher | Into most lineups; pairs well with Void/Magnus |
| Lina | Lane dominator; burst damage; tower pusher | Astral Conduit, BKB, Aghs, Daedalus | When you want reliable lane win + scaling |
| Void Spirit | Mobile assassin; burst combo; map control | Astral Conduit, Eul’s, BKB, Aghs | Against squishy supports; when mobility matters |
| Puck | Elusive initiator; Dream Coil catch | Blink, Witch Blade, BKB, Aghs | When team needs initiation from mid |
| Storm Spirit | Snowball assassin; infinite mobility with mana | Orchid, BKB, Bloodstone, Aghs | Against low-lockdown lineups |
| Templar Assassin | Lane dominator; Roshan specialist; physical burst | Desolator, BKB, Daedalus, Swift Blink | When team needs early Rosh + physical damage |
Common Mistakes
- Losing the lane and then trying to farm passively. If you lose mid, you need to adapt — either rotate to gank a side lane or farm the jungle aggressively. Staying in a lost lane and dying repeatedly is the worst outcome.
- Over-roaming without farm. Ganking is important, but if your ganks fail and you’ve lost 2 waves of mid creeps, you’re worse off. Only roam when the opportunity is clear (enemy hero is overextended, your rune is good, your support has set up vision).
- Not taking the mid tower when you should. Many mids win their lane but never push the tower, wasting their advantage. If the enemy mid is dead or missing, push the tower.
- Ignoring Roshan. Mid heroes like TA and Invoker can take Roshan early with minimal help. Not capitalizing on this is a huge missed opportunity.
- Rigid skill/item builds. The mid role requires the most adaptability. If you’re building the same items in the same order every game, you’re not adapting to the enemy lineup.
Position 3: Offlaner
What the Offlaner Does
The offlaner is the team’s frontline initiator and space creator. Playing in the “hard lane” (the lane closest to the enemy’s safe farm area), the offlaner faces the enemy carry and support — a challenging 1v2 or 2v2 matchup. The offlaner’s job isn’t to win the lane (though they can); it’s to survive, gain levels, disrupt the enemy carry’s farm, and then transition into a teamfight-winning frontliner in the mid and late game.
If the carry is the team’s sword, the offlaner is the team’s shield. Offlaners build tanky, aura-heavy items that benefit the whole team, and they’re expected to be the first hero into every fight — absorbing damage and using their abilities to control the enemy team while their carry deals damage from behind.
Laning Phase Responsibilities
- Don’t die. This is the number one priority. A dead offlaner gives the enemy carry free farm and bonus gold. Even if you’re getting minimal farm, as long as you’re gaining experience and not feeding, you’re doing your job.
- Disrupt the enemy carry’s farm. Use your abilities and presence to make the enemy carry’s lane as uncomfortable as possible. Pull the enemy creep wave, contest last hits, and trade HP when favorable.
- Secure experience. Even if you can’t get last hits, staying in experience range (1,500 units from dying creeps) keeps you leveling. Reaching Level 6 for your ultimate is often your primary laning objective.
- Control the lane equilibrium. If the enemy support pulls their neutral camp, you need to disrupt the pull (block the camp, contest the pull). If the lane is pushing toward the enemy tower, let it push back toward yours where you’re safer.
- Call for ganks when appropriate. If the enemy carry overextends, ping your Position 4 support and mid hero for a gank opportunity. A kill on the enemy carry is worth significantly more than a kill on a support.
Mid Game Responsibilities
- Be the one who starts fights. Once you have Blink Dagger (or your hero’s equivalent initiation tool), your job is to find fights and initiate them. Ward aggressively, look for enemy heroes out of position, and jump on them.
- Build aura and team items. Your item choices should benefit the whole team — Pipe of Insight (magic damage barrier for allies), Guardian Greaves (heal and dispel for allies), Crimson Guard (physical damage block for allies), Assault Cuirass (armor and attack speed aura), Vladmir’s Offering (lifesteal and damage aura). These items are often more impactful than selfish damage items.
- Create space for your carry. By pressuring the enemy team with aggressive ward placement, tower dives, and fight initiation, you force them to deal with you instead of farming your carry’s jungle. This “space creation” is one of the offlaner’s most important and least appreciated roles.
- Control Outposts and Tormentors. As the most durable hero on the team, you’re often responsible for securing and defending these objectives.
Late Game Responsibilities
- Frontline in every fight. You’re the first in and (ideally) the last to die. Your job is to absorb cooldowns and damage so your carry and mid can deal damage safely.
- Use your ultimate at the right time. A well-timed Ravage, Berserker’s Call, or Arena of Blood can win a teamfight single-handedly. A poorly timed one can lose it. Patience and timing are everything.
- Peel for your carry when necessary. If the enemy dive hero (Storm Spirit, Slark) is targeting your carry, it may be more important to peel (protect by stunning/slowing the diver) than to initiate on the enemy team.
Hero Pool
| Hero | Playstyle | Key Items | When to Pick |
|---|---|---|---|
| Axe | Blink initiator; BKB-piercing Call | Bastion Shield, Blink, Blade Mail, BKB | Against melee-heavy lineups; always reliable |
| Tidehunter | Ultimate-dependent teamfighter; very tanky | Blink, Refresher, Shiva’s, Greaves | When team needs big AoE initiation |
| Mars | Space controller; Arena + Spear combo | Blink, BKB, Refresher, Desolator | With AoE damage teammates; into ranged lineups |
| Beastmaster | Push-oriented; BKB-piercing Roar | Helm of the Overlord, Aghs, AC, Refresher | When team wants early push; against slippery carries |
| Sand King | AoE stun + Epicenter combo; lane dominator | Blink, BKB, Aghs, Shiva’s | Against grouping lineups; strong laner |
| Centaur Warrunner | Tanky; Stampede global utility | Blink, Hood/Pipe, Heart, Aghs | When team needs global engage/disengage tool |
Common Mistakes
- Trying to 1v1 the enemy carry. You’re usually against a carry + support. Don’t be overly aggressive in a 1v2 — focus on not dying and getting levels.
- Building selfish items. An offlaner who builds Daedalus instead of Pipe is failing their team. Your items should help the whole team, not just you.
- Not initiating. Some offlaners with Blink Dagger play too passively, waiting for the “perfect” blink. A good initiation is better than a perfect one that never comes. If you see 2-3 enemies grouped and your team is nearby, go.
- Ignoring the carry’s lane. After the laning phase, some offlaners farm their own jungle and ignore the game. Your job is to make plays, not farm.
- Dying with your ultimate ready. If you have Ravage/Call/Arena available and you die without using it, that’s a catastrophic waste. Be aware of your positioning and don’t get caught before a fight.
Position 4: Soft Support
What the Soft Support Does
The Position 4 is the team’s playmaker and roaming threat. Also called the “soft support” or “4 position,” this role has the most diverse playstyle of any position in Dota 2. The soft support starts in the offlane with the Position 3, helps them survive the laning phase, and then transitions into a roaming, ganking, vision-controlling force that creates opportunities across the entire map.
The Position 4 is the role with the highest game impact relative to farm in many pubs. A great Position 4 controls the tempo of the game — their ganks secure kills for cores, their ward placement reveals enemy movements, and their teamfight presence often determines who wins.
Laning Phase Responsibilities
- Support your offlaner. Help the Position 3 survive and gain levels. Harass the enemy carry, disrupt pulls, and secure kills when the opportunity arises.
- Stack camps. Between lane activities, stack neutral camps for your cores to farm later. A single triple-stack at the 10-minute mark can give your mid or carry a massive gold injection.
- Roam when your offlaner is stable. Once your offlaner has reached Level 3-4 and can survive alone, look for roaming opportunities. The most common roaming targets are the enemy mid (surprise gank from high ground) and the enemy carry (if they’re overextended). A successful gank can snowball a lane.
- Secure bounty runes. Bounty runes spawn every 3 minutes and are worth significant gold in the early game. Contest and secure your team’s bounties, and steal the enemy’s when safe.
Mid Game Responsibilities
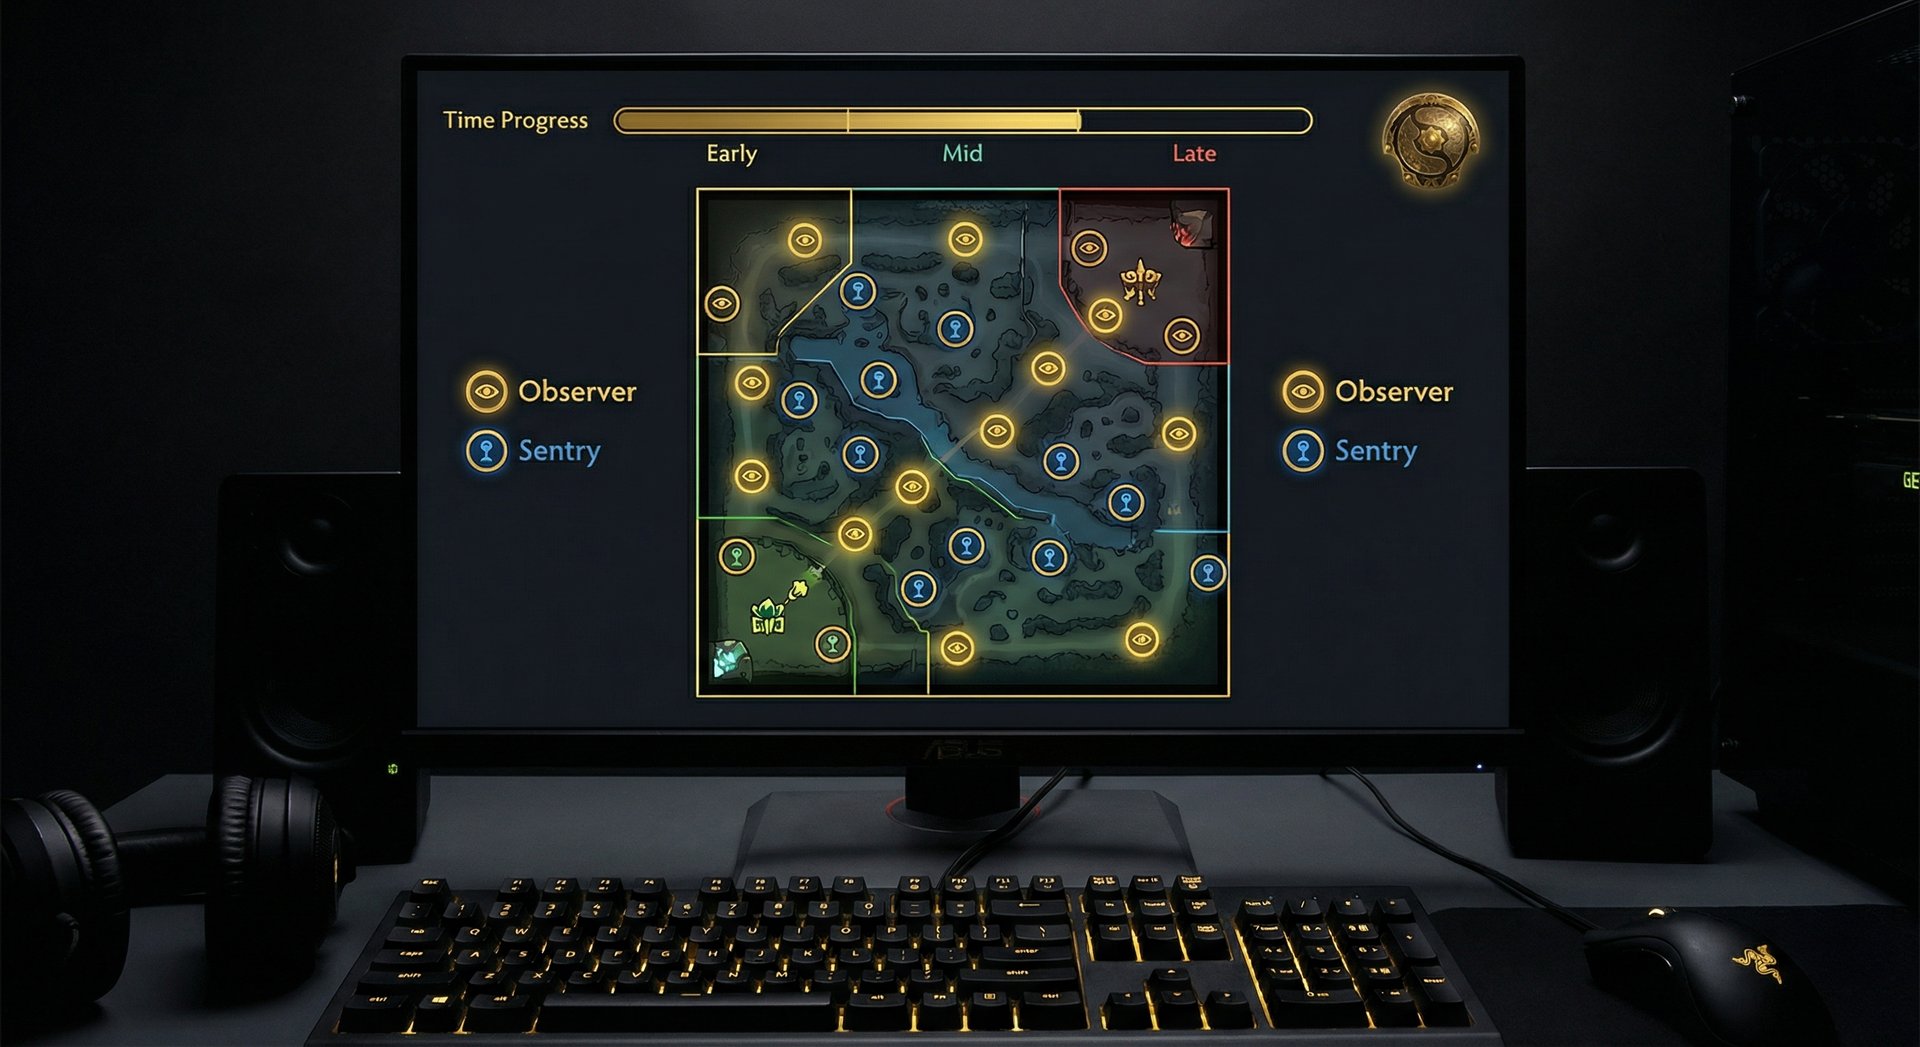
- Control vision. While the Position 5 is the primary warder, the Position 4 should be placing offensive (deep enemy territory) wards and dewarding enemy vision. Sentries on common ward spots and observers on high ground near objectives are your bread and butter.
- Set up kills and ganks. Use Smoke of Deceit to gank enemy cores who are farming alone. Coordinate with your mid and offlaner for ganks. A single successful smoke gank can lead to a tower, Roshan, or Tormentor.
- Provide utility in teamfights. Your items (Force Staff, Glimmer Cape, Eul’s Scepter) should be used to save allies and disrupt enemies during fights. A Force Staff that saves your carry’s life is worth more than any damage item.
- Don’t steal farm from cores. This is the hardest discipline for Position 4 players. It’s tempting to farm that empty lane or jungle camp, but if your carry or mid could be farming it, leave it for them. Your gold comes from assists, passive income, and objectives.
Hero Pool
| Hero | Playstyle | Key Items | When to Pick |
|---|---|---|---|
| Earth Spirit | Ultimate roamer; silence/stun/save kit | Urn, Force Staff, Aghs Shard, BKB | When you want maximum early game impact |
| Tusk | Aggressive ganker; Snowball save/initiate | Urn, Blink, Aghs, BKB | With any core; universally good pairing |
| Mirana | Long-range catch; team invisibility | Urn, Force Staff, Aghs, Eul’s | When team needs roaming + late game scaling |
| Rubick | Spell Steal disruption; teamfight swinger | Blink, Aghs, Aether Lens, Force Staff | Against lineups with powerful ultimates to steal |
| Spirit Breaker | Global ganker; Charge across the map | Urn, BKB, Aghs, Refresher | Against squishy cores; when global pressure matters |
| Clockwerk | Pick-off specialist; Hookshot initiation | Force Staff, Blade Mail, Aghs, BKB | Against ranged cores who need to be isolated |
Common Mistakes
- Staying in the offlane too long. If your offlaner is Level 5 and doing fine, leave. Go gank mid, stack camps, place wards. Sharing XP when it’s not needed slows both of you down.
- Roaming without a plan. Don’t roam aimlessly hoping to find a kill. Roam with purpose: “I’m going to smoke mid because the enemy mid has no TP and is pushed up.”
- Building greedy items. Aghanim’s Scepter is tempting on many Position 4 heroes, but if your team needs a Glimmer Cape or Force Staff to survive teamfights, buy the team item first.
- Not carrying TP Scrolls. If the enemy dives your carry and you don’t have a TP to respond, you’ve failed your most basic duty.
- Taking farm from cores. That jungle camp you just farmed was your carry’s. That lane you just pushed was your mid’s. Be disciplined about farm priority.
Position 5: Hard Support
What the Hard Support Does
The Position 5 is the team’s guardian, enabler, and selfless backbone. The hard support has the lowest farm priority, the fewest items, and often the most deaths — but their impact on the game is enormous. A great Position 5 wins the carry’s lane, controls vision, saves allies from certain death, and makes the entire team stronger through their presence.
Playing Position 5 is often described as the “hardest” role because you must have the highest game knowledge (understanding every hero’s abilities, power spikes, and timing) while having the fewest resources to work with. You can’t brute-force your way out of mistakes with items — you have to play perfectly with whatever you have.
Laning Phase Responsibilities
- Win the carry’s lane. This is your primary job for the first 10 minutes. Your carry’s success in the laning phase is directly tied to your performance. Harass the enemy offlaner relentlessly, making their life miserable so your carry can farm in peace.
- Pull and stack neutral camps. Pulling the small camp into your lane at :15/:45 each minute (timings vary by camp) controls lane equilibrium and gives your carry safe farm close to your tower. Stacking camps provides bonus farm for your carry later.
- Zone the enemy. “Zoning” means standing between the enemy offlaner and the creep wave, threatening them with right-clicks and abilities if they approach. Effective zoning denies the enemy offlaner both gold and experience.
- Buy and place wards. You are the primary warder. Observer Wards should be placed to prevent ganks on your carry and provide vision of the enemy’s movements. Sentry Wards should deward common enemy ward spots.
- Manage your consumables wisely. You start the game with limited regen items. Don’t waste them — trade efficiently with the enemy and use your consumables to sustain through the trades.
Mid Game Responsibilities
- Transition to full-time vision control. By the mid game, you should be placing wards proactively around the next objective your team wants to take (tower, Tormentor, Roshan). Deward enemy vision that threatens your carry’s farm areas.
- Stay alive. A dead support can’t save anyone. Position yourself behind your cores in fights, and don’t faceplant into the enemy team to get off one ability. Your continued existence (and ability to cast multiple rounds of spells) is more valuable than one extra stun.
- Save your cores. Items like Glimmer Cape (grants invisibility + magic resistance) and Force Staff (pushes an ally away from danger) are designed to save teammates. Prioritize saving your carry over killing an enemy support.
- Buy Smoke of Deceit. Smoking with your team to make plays is one of the most impactful things a support can do. Initiate smokes, ping your team to group, and lead the charge.
Hero Pool
| Hero | Playstyle | Key Items | When to Pick |
|---|---|---|---|
| Witch Doctor | Lane bully; Maledict + Death Ward burst | Glimmer, Force Staff, Aghs, Aeon Disk | With teamfight-heavy lineups; into melee offlaners |
| Warlock | Teamfight amplifier; Fatal Bonds + Golem | Glimmer, Force Staff, Refresher, Aghs | When team wants 5v5 teamfight dominance |
| Dazzle | Save specialist; Shallow Grave prevents death | Glimmer, Force Staff, Solar Crest, Greaves | When enemy has single-target burst; to protect carry |
| Crystal Maiden | Mana aura; lane control; AoE ultimate | Glimmer, Force Staff, BKB, Aghs | When team is mana-hungry; into low-mobility lineups |
| Ogre Magi | Tanky harasser; simple but effective | Force Staff, Glimmer, Aghs, Solar Crest | Into melee offlaners; when you want a lane bully |
| Lich | Ranged harass; armor reduction; Chain Frost | Glimmer, Force Staff, Aeon Disk, Aghs | Against grouping enemies; for safe laning |
Common Mistakes
- Leaving your carry’s lane too early. If the enemy offlaner is Level 5 and your carry is Level 4, leaving lane to roam means your carry will get bullied or killed. Make sure the lane is stable before leaving.
- Not buying wards. Wards are free. There is no excuse for having 0 wards on the map. Buy and place them constantly — vision wins games.
- Dying first in every fight. Position 5 heroes are squishy, but that doesn’t mean you should die instantly. Stay at the back of fights, cast your spells, and use your items to save allies. Dying with Glimmer Cape and Force Staff unused is a waste.
- Being too passive in lane. Some supports stand behind their carry and do nothing. Your job is to harass, pull, and zone. If the enemy offlaner is comfortably getting last hits, you’re failing.
- Not stacking camps. It takes 5 seconds to stack a camp. The gold your carry gets from a triple-stacked camp can be the difference between hitting their item timing or not. Stack whenever you pass a camp around :53-:55.
How to Excel at Position 5
- Master lane mechanics. Learn pull timings for every camp, practice zoning patterns against different offlane heroes, and understand when to trade and when to conserve your HP.
- Develop ward sense. Watch high-MMR support players and learn their ward placements. Different game states demand different ward locations — early game wards protect lanes; mid game wards control objectives; late game wards prevent surprise pushes.
- Learn every hero in the game. As Position 5, you interact with every hero. Knowing the enemy’s cooldowns, power spikes, and weaknesses lets you play around them effectively.
- Communicate constantly. Ping missing heroes, call out enemy items (BKB, Blink Dagger), suggest objectives, and coordinate smoke ganks. The Position 5 is often the team’s shotcaller.
Role Synergy & Draft Considerations
No role exists in isolation. The best Dota 2 teams have synergy between all five positions. Here’s how roles interact:
Carry + Hard Support Synergy
The carry and Position 5 share a lane and their synergy determines the early game. Aggressive carries (Juggernaut, Ursa) pair well with aggressive supports (Witch Doctor, Crystal Maiden) who can set up kills. Farming carries (Luna, Medusa) pair well with defensive supports (Dazzle, Lich) who can protect them.
Mid + Soft Support Synergy
The mid and Position 4 coordinate on ganks. A mid hero with strong catch (Puck, Storm Spirit) pairs well with a roaming Position 4 (Tusk, Earth Spirit) for devastating dual-roam ganks. Conversely, if your mid is a farming type (TA, Alchemist), the Position 4 should focus on ganking without mid assistance.
Offlaner + Soft Support Synergy
The offlane duo needs kill potential to pressure the enemy carry. Classic combos include Axe + Skywrath Mage (Call + Bolt spam), Mars + Hoodwink (Arena + Acorn Shot), and Centaur + Tusk (Snowball into Hoof Stomp). If your offlane duo has no kill potential, the enemy carry will free-farm and outscale you.
Draft Balance
A well-drafted team needs:
- Physical AND magical damage. If your entire team deals physical damage, the enemy buys armor and you can’t kill anyone. If your entire team deals magical damage, one BKB negates everything.
- Initiation. At least one hero (usually the offlaner or Position 4) needs a reliable way to start fights.
- Lockdown (stuns/disables). Without stuns, mobile enemy heroes (Storm Spirit, Slark, Void Spirit) will run circles around you.
- Save. At least one hero should be able to save allies (Dazzle’s Shallow Grave, Force Staff, Glimmer Cape).
- Push potential. You need heroes that can take buildings. A team of 5 teamfight heroes that can’t push towers will win fights and lose the game because they can’t convert kills into objectives.
Which Role Should You Play to Climb
This is one of the most common questions in Dota 2, and the honest answer is: play the role you enjoy and understand best. However, here are some practical considerations:
| Role | Climbing Pros | Climbing Cons | Best For |
|---|---|---|---|
| Carry (Pos 1) | Highest late-game impact; can solo carry games with farm | Dependent on supports in lane; vulnerable to bad early games | Players with strong farming mechanics and patience |
| Mid (Pos 2) | Highest early game impact; snowball potential; solo lane | Most contested role; high mechanical demand; targeted by ganks | Mechanically skilled players who want to control the tempo |
| Offlane (Pos 3) | Initiation wins pub games; tanky heroes are forgiving | Reliant on team following up; can feel impactless if team doesn’t fight | Players who enjoy leading fights and shotcalling |
| Soft Support (Pos 4) | Highest early game roaming impact; flexible hero pool | Falls off late game; reliant on cores to capitalize on space | Aggressive players who love ganking and creating chaos |
| Hard Support (Pos 5) | Controls vision, which controls the game; consistent impact | Lowest resources; can feel powerless with bad cores; least “flashy” | High-IQ players who enjoy strategy over mechanics |
Our Recommendation for Climbing
Mid (Position 2) and Offlane (Position 3) tend to be the most effective climbing roles in pubs because they combine independent agency (solo lane or self-sufficient lane) with high teamfight impact. A snowballing mid can take over a game single-handedly, and a well-timed offlaner initiation wins fights regardless of how well your carry is farming.
That said, if you’re a carry player at heart, don’t force yourself to play mid — you’ll perform worse on an unfamiliar role than you would on your main. Climb with what you know, and optimize within that role.
If you’re stuck at a particular rank despite solid play, our MMR Boost service can help you break through. And if you want personalized role advice, our coaching sessions include role-specific analysis to help you identify exactly what’s holding you back. For players recalibrating, our calibration service ensures your starting rank is where it should be.
Frequently Asked Questions
Ready to Improve Your Dota 2 Experience
Team Smurf offers professional Dota 2 services — Immortal-rank boosters, maximum safety, competitive pricing, and 24/7 support.


