Dota 2 Farming Guide: How to Hit 10 CS/Min and Accelerate Your Farm

Gold wins games in Dota 2. The team with more gold has better items, stronger heroes, and more map control. And the single most reliable way to earn gold is farming — last-hitting lane creeps, clearing jungle camps, and maximizing every second of the game clock.
Yet most Dota 2 players farm terribly. The average Herald player hits 3–4 CS/min. Crusaders manage 5–6. Even Legends and Ancients rarely exceed 7–8 CS/min consistently. Meanwhile, Immortal players and professional carries routinely hit 10+ CS/min, accumulating 700–900+ GPM and completing major items 5–10 minutes faster than their lower-ranked counterparts.
That gap isn’t just mechanical skill — it’s efficiency. Knowing WHERE to farm, WHEN to farm, and HOW to farm without wasting a single second. This guide, written with insights from our Immortal coaches at TeamSmurf, breaks down every aspect of farming in Dota 2: lane farming fundamentals, jungle patterns, stacking techniques, farming hero tier lists, item timing benchmarks, GPM goals by rank, and the efficiency secrets that separate good farmers from great ones.
Table of Contents
- Why Farming Efficiency Matters
- CS/Min Explained: What the Numbers Mean
- Lane Farming Fundamentals
- Jungle Farming Patterns
- Stacking: The Multiplier Effect
- Best Farming Heroes Tier List
- Item Timing Benchmarks
- GPM Goals by Rank
- Efficiency Secrets from Immortal Players
- Farming by Game Phase
- Common Farming Mistakes
- FAQ
Why Farming Efficiency Matters
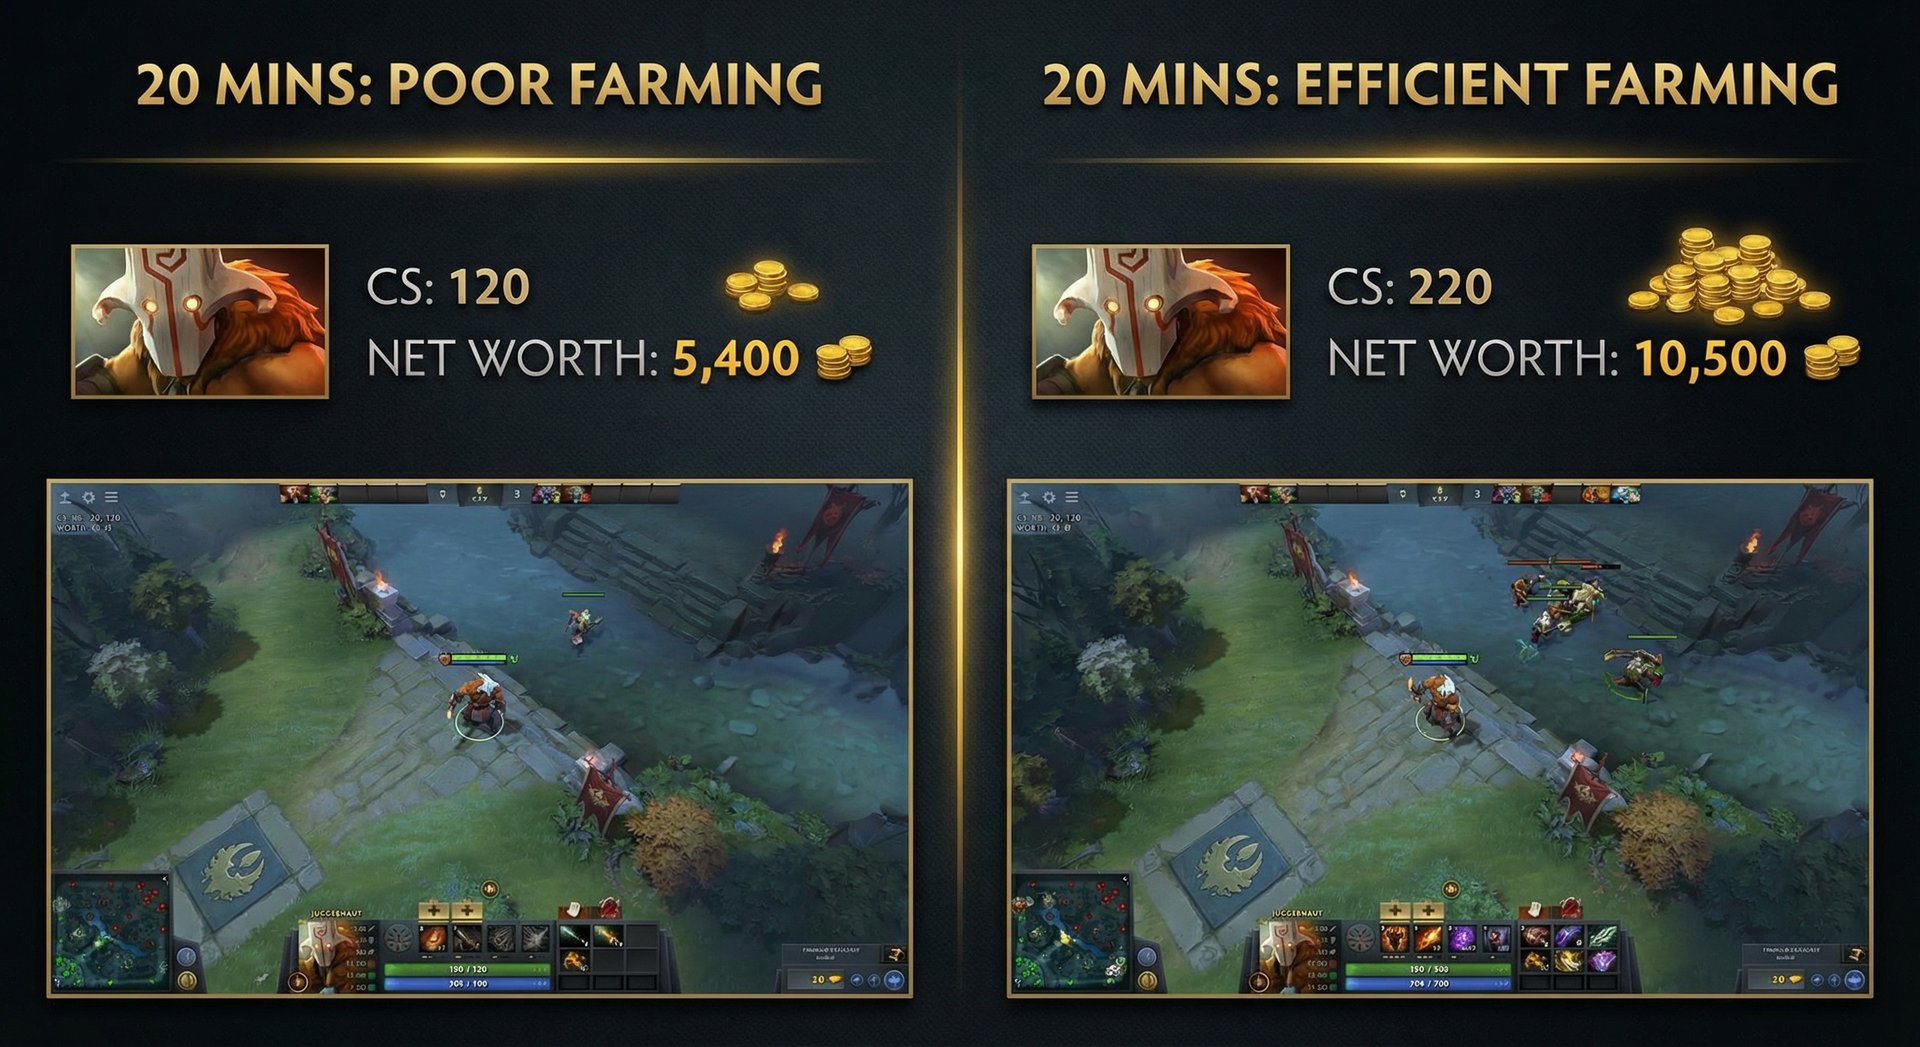
Let’s quantify the impact of good farming with real numbers.
A standard lane creep wave spawns every 30 seconds and contains 3 melee creeps and 1 ranged creep (with siege creeps every 5 minutes). Each wave is worth approximately 150–200 gold. Over 10 minutes, that’s roughly 3,000–4,000 gold from lane creeps alone.
Add jungle camps (which respawn every minute and range from 50–200+ gold per camp), and the total available gold on the map at any given time is enormous. The question is: how much of that gold are you capturing
| Player Type | CS at 10 min | CS at 20 min | GPM | First Major Item Timing |
|---|---|---|---|---|
| Herald Carry | 25–35 | 80–120 | 350–400 | 22–28 minutes |
| Crusader Carry | 40–50 | 120–160 | 400–480 | 18–24 minutes |
| Legend Carry | 50–65 | 160–220 | 480–550 | 16–20 minutes |
| Ancient Carry | 60–75 | 200–260 | 550–620 | 14–18 minutes |
| Divine Carry | 70–85 | 240–300 | 620–700 | 13–16 minutes |
| Immortal Carry | 80–100+ | 280–350+ | 700–900+ | 11–15 minutes |
The difference between a Herald and an Immortal carry at 20 minutes is roughly 150–200 CS — that’s 6,000–8,000 gold. That’s an entire major item’s worth of gold. The Immortal carry has their second or third item when the Herald is finishing their first. This gap makes fights unwinnable for the lower-farmed team.
Our MMR Boost service analysts consistently observe that the #1 difference between rank brackets is farming efficiency, not mechanical outplays or game-winning strategies. Players who farm better win more. Period.
CS/Min Explained: What the Numbers Mean
CS stands for “Creep Score” — the total number of last-hits you’ve secured. CS/min is your creep score divided by minutes played.
CS/Min Benchmarks
| CS/Min | Rating | What It Means |
|---|---|---|
| 3–4 | Poor | Missing most last hits, not jungling between waves |
| 5–6 | Below Average | Getting lane CS but not supplementing with jungle |
| 7–8 | Average (for Legend+) | Decent laning, some jungle farming, room to improve |
| 8–9 | Good | Efficient farming patterns, minimal dead time |
| 10+ | Excellent | Professional-level efficiency, maximizing every second |
| 12+ | Exceptional | Perfect efficiency on fast-farming heroes (Anti-Mage, Luna, etc.) |
The 10 CS/Min Goal
Hitting 10 CS/min consistently is the gold standard for carry players. At 10 CS/min in a 30-minute game, you’d have 300 CS. Depending on the mix of lane creeps, jungle creeps, and siege creeps, that translates to roughly 12,000–15,000 gold from farming alone (not counting passive gold, kills, or assists).
10 CS/min requires:
- Missing almost no lane creeps (during laning phase)
- Efficiently clearing jungle camps between waves
- Using stacked camps as gold accelerators
- Having zero “dead time” — every second is spent hitting something
- Using farming abilities optimally (AoE clears, illusions, summons)
Lane Farming Fundamentals
Last-Hit Mechanics
Last-hitting is the act of delivering the killing blow to a creep, securing the gold bounty. The fundamentals:
- Watch creep HP bars. Each creep has a visible HP bar. Wait until the bar is low enough that your attack damage will kill it, then attack.
- Know your damage. Your hero’s attack damage is shown on your HUD. If your damage is 55, attack when the creep has less than 55 HP (accounting for armor reduction).
- Account for attack animation. There’s a delay between clicking and your attack landing. Fast attack animations (Juggernaut, Anti-Mage) are more forgiving than slow ones (Lina, Crystal Maiden).
- Use Quelling Blade. Quelling Blade adds 18 damage to melee attacks on creeps and 5 for ranged. Always buy it on melee carries.
Wave Manipulation for Farming
The position of the creep wave determines how safely and efficiently you can farm.
Ideal wave position for farming: Near your tower, but not under it. This lets you farm safely (enemies must cross the river and past your tower to threaten you) while keeping creeps in easy last-hit range.
How to maintain this position:
- Only last-hit — don’t auto-attack creeps between last hits
- Deny friendly creeps to keep the wave from pushing
- Use creep aggro to pull the wave toward you (right-click enemy hero to draw creeps your way)
- Ask your support to pull neutral camps to reset equilibrium
For a deep dive into wave control, check our complete laning phase guide.
Under-Tower Last-Hitting
When the wave is pushed under your tower, last-hitting becomes more challenging but not impossible.
| Creep Type | Tower Hits to Low HP | Your Action |
|---|---|---|
| Melee Creep | 2 tower hits | Let tower hit twice, then last-hit |
| Ranged Creep | ~2 tower hits (but may die) | Hit once before tower targets it, then last-hit after one tower hit |
| Siege Creep | Many tower hits | Practice timing; varies by hero damage |
Pro tip: If your hero’s damage is too low to last-hit after tower hits, pre-damage creeps with one attack before the tower starts hitting them. This extra hit brings them into kill range after the standard tower hits.
Pushing Waves
Once the laning phase ends (around 10–12 minutes), your approach to lane creeps changes. Instead of carefully last-hitting, you want to push waves quickly — clear the entire wave in 2–3 seconds using abilities, then move to the jungle.
This is called “shove and farm” and is the core mid-game farming pattern. You clear the lane wave with AoE/abilities, then farm 1–2 jungle camps before the next wave arrives, then return to lane to shove again. This maximizes both lane and jungle gold.
Jungle Farming Patterns
The jungle is the second major source of farm in Dota 2, and efficient jungle usage is what elevates good farmers to great farmers.
Jungle Camp Values
| Camp Type | Gold (Approx.) | Respawn Timer | Notes |
|---|---|---|---|
| Small Camp | 50–90 | Every minute (:00) | Easy to clear, low value |
| Medium Camp | 80–130 | Every minute (:00) | Good supplementary farm |
| Large Camp | 110–180 | Every minute (:00) | Primary jungle farm target |
| Ancient Camp | 150–250 | Every minute (:00) | High value, requires specific heroes/items to clear early |
Basic Jungle Route (Safelane Carry)
After the laning phase, a typical carry farming route looks like this:
- Shove the lane wave toward the enemy tower using AoE abilities
- Walk to the nearest large camp and clear it
- Clear the adjacent medium camp while the large camp is down
- Return to lane for the next wave
- Repeat
The key is timing — you should arrive back in lane just as the next creep wave meets. If you’re late, you miss lane CS. If you’re early, you waste time standing in lane doing nothing.
Triangle Farming
The “triangle” refers to the cluster of jungle camps near each team’s secret shop area (the large camp, medium camp, and ancient camp arranged in a triangle). Triangle farming is the most efficient jungle pattern because:
- Three camps are very close together, minimizing travel time
- Ancient camps provide the highest gold per camp
- The triangle is typically in safe territory (near your tier 2 tower)
- Supports can stack the triangle for you, multiplying the gold available
Triangle farming route:
- Clear the large camp
- Walk to the medium camp, clear it
- Walk to the ancient camp, clear it
- By now, the lane wave is arriving — go shove the lane
- Return to the triangle (camps have respawned)
Full-Map Farming (Advanced)
Immortal carries don’t just farm one area — they farm the entire map efficiently. This involves:
- Pushing all three lanes. Use TP scrolls, illusions, or global abilities to push out lanes that are pushing toward your base.
- Farming the enemy jungle. When you have map control, farm the enemy’s jungle camps for additional gold. This also denies the enemy farm.
- Split-farming with illusions. Heroes like Naga Siren, Phantom Lancer, and Terrorblade can send illusions to farm distant camps while their main hero farms elsewhere.
- Using Boots of Travel. TP to any lane that’s pushing toward you, clear the wave, and TP back or walk to nearby jungle camps.
Stacking: The Multiplier Effect
Stacking is the technique of pulling neutral creeps out of their camp at the right time (:53–:55 before the minute mark) so the camp respawns a fresh set of creeps. The original creeps return to the camp, which now has double the creeps. You can stack multiple times for triple, quadruple, or even quintuple stacks.
Why Stacking Is a Farming Cheat Code
A single ancient camp is worth ~200 gold. A triple-stacked ancient camp is worth ~600 gold. That’s a 3x multiplier for 2 seconds of work (pulling the camp at the right time). Over a game, stacking can provide an extra 2,000–5,000 gold to your carry.
| Stack Size | Ancient Camp Gold (Approx.) | Time Investment | Efficiency |
|---|---|---|---|
| 1 stack (default) | ~200 | 0 seconds | Baseline |
| 2 stack | ~400 | 2 seconds | 200 gold/sec |
| 3 stack | ~600 | 4 seconds total | 150 gold/sec |
| 4 stack | ~800 | 6 seconds total | 133 gold/sec |
| 5 stack | ~1,000 | 8 seconds total | 125 gold/sec |
Nothing else in Dota 2 gives this return on time investment. Stacking is the single most gold-efficient support action in the game.
Stack Timings
| Camp Type | Pull Timing | Direction |
|---|---|---|
| Small Camp | :53–:55 | Away from spawn box |
| Medium Camp | :53–:55 | Away from spawn box |
| Large Camp | :53–:56 | Away from spawn box (varies by camp) |
| Ancient Camp | :52–:53 | Away from spawn box (Ancients are slow) |
Who Should Stack
- Position 5 support: Primary stacker. Stack between pulls, ward runs, and rotations.
- Position 4 support: Secondary stacker. Stack when near camps and not actively fighting.
- Carry (self-stack): If your supports aren’t stacking, do it yourself. As you walk between lane and jungle, pull camps at :53 as you pass by.
- Heroes with summons/illusions: Beastmaster, Lycan, Phantom Lancer, and others can use summons to stack while their main hero farms elsewhere.
Clearing Stacks
Not all heroes can clear large stacks efficiently. The ability to clear stacks depends on:
- AoE damage: Heroes like Luna (Moon Glaives), Gyrocopter (Flak Cannon), Medusa (Split Shot), and Sven (Great Cleave) excel at clearing multi-stacks.
- Lifesteal/sustain: You need to survive the damage from multiple camp stacks. Lifesteal items (Mask of Madness, Satanic) or sustain abilities (Juggernaut Healing Ward) help.
- Physical vs. magical damage: Ancient camps have high magic resistance. Physical damage heroes clear ancients faster.
Best Farming Heroes Tier List
Some heroes are built to farm. They have abilities that accelerate their gold intake far beyond what other heroes can achieve. If you want to hit 10+ CS/min, picking the right hero is half the battle.
S-Tier Farming Heroes (10+ CS/Min Achievable)
| Hero | Why They Farm Fast | Key Farming Ability | GPM Potential |
|---|---|---|---|
| Anti-Mage | Blink for instant camp-to-camp travel, Mana Break for fast kills | Blink (mobility between camps) | 800–1000+ |
| Luna | Moon Glaives bounce between all creeps in a camp | Moon Glaives (cleave AoE) | 750–950 |
| Naga Siren | Mirror Image illusions farm 3–4 camps simultaneously | Mirror Image (multi-camp farming) | 800–1100+ |
| Terrorblade | Conjure Image creates farming illusions, Metamorphosis for ancients | Conjure Image + Metamorphosis | 750–950 |
| Medusa | Split Shot hits all nearby creeps simultaneously | Split Shot (multi-target) | 700–900 |
| Alchemist | Greevil’s Greed gives bonus gold per kill, escalating bounties | Greevil’s Greed (bonus gold) | 900–1200+ |
A-Tier Farming Heroes (8–10 CS/Min Achievable)
| Hero | Why They Farm Fast | Key Farming Ability | GPM Potential |
|---|---|---|---|
| Sven | Great Cleave hits all nearby creeps, massive with stacks | Great Cleave | 700–850 |
| Phantom Assassin | Dagger for last hits, Blink Strike for mobility, crit for instant kills | Stifling Dagger + Crit | 650–800 |
| Juggernaut | Blade Fury for wave clear, decent attack speed for jungle | Blade Fury | 600–750 |
| Gyrocopter | Flak Cannon + Call Down for wave/stack clear | Flak Cannon | 650–800 |
| Phantom Lancer | Illusion army clears camps, Doppelganger for safety | Juxtapose illusions | 650–800 |
| Wraith King | Skeletons farm jungle, Vampiric Aura sustains, simple execution | Mortal Strike skeletons | 600–750 |
B-Tier Farming Heroes (6–8 CS/Min Typical)
| Hero | Notes |
|---|---|
| Faceless Void | No farming abilities — relies on raw attack speed and Time Walk for camp-to-camp movement |
| Lifestealer | Feast provides sustain but no AoE; farms jungle well but slowly |
| Ursa | Single-target fighter, clears camps fast but one at a time |
| Troll Warlord | High attack speed but single target; farms steadily, not explosively |
| Drow Ranger | Multishot helps with wave clear but less efficient in jungle |
Item Timing Benchmarks
Item timings — when you complete key items — are the most tangible measure of farming efficiency. Here are benchmarks for major carry items:
Core Item Timing Goals
| Item | Cost | Herald Timing | Legend Timing | Immortal Timing |
|---|---|---|---|---|
| Battle Fury | 4,100 | 22–28 min | 15–18 min | 12–14 min |
| Manta Style | 4,600 | 25–32 min | 18–22 min | 14–17 min |
| Black King Bar | 4,050 | 22–28 min | 16–20 min | 13–16 min |
| Eye of Skadi | 5,300 | 28–35 min | 22–26 min | 18–22 min |
| Butterfly | 4,975 | 30–38 min | 24–28 min | 20–24 min |
| Satanic | 5,050 | 30–38 min | 25–30 min | 22–26 min |
Timings assume the item is not the first item purchased (include boots + early items).
Example Item Timing Progression (Anti-Mage)
A good Anti-Mage game should look roughly like this:
| Game Clock | Item Completed | CS at This Point |
|---|---|---|
| 0:00–1:00 | Starting items (Quelling Blade, Tango, Ring of Health) | 0 |
| 12–14 min | Battle Fury + Treads | 80–100 |
| 18–20 min | Manta Style | 160–200 |
| 24–26 min | Eye of Skadi or Abyssal Blade | 260–300 |
| 30–32 min | Butterfly or BKB | 350–400 |
If you’re consistently 5+ minutes behind these timings, farming efficiency is your bottleneck. Consider our coaching service for a replay analysis that pinpoints exactly where your farm breaks down.
GPM Goals by Rank
GPM (Gold Per Minute) is the most direct measure of farming speed. Here’s what you should target based on your rank:
| Rank | Carry GPM Target | Mid GPM Target | Offlane GPM Target |
|---|---|---|---|
| Herald (0–770) | 400+ | 380+ | 350+ |
| Guardian (770–1,540) | 450+ | 420+ | 380+ |
| Crusader (1,540–2,310) | 500+ | 470+ | 400+ |
| Archon (2,310–3,080) | 550+ | 520+ | 430+ |
| Legend (3,080–3,850) | 600+ | 560+ | 460+ |
| Ancient (3,850–4,620) | 650+ | 600+ | 490+ |
| Divine (4,620–5,620) | 700+ | 640+ | 520+ |
| Immortal (5,620+) | 750+ | 680+ | 550+ |
These are targets for WINNING games. In losing games, GPM naturally drops because you have less map control and fewer safe farming areas.
Track your GPM on Dotabuff or OpenDota. Look at your average GPM over the last 20 games on carry heroes. If it’s below the target for your rank, farming efficiency is the #1 area to improve.
Efficiency Secrets from Immortal Players
These are the techniques that separate 700 GPM players from 500 GPM players. Each one seems small individually, but combined, they add thousands of gold over a game.
1. Never Stand Still
Every second not hitting a creep is gold lost. Immortal carries are ALWAYS moving toward the next farm source. Between last-hitting lane creeps, they’re walking toward a jungle camp. Between jungle camps, they’re walking toward a lane. There is no “idle time.”
Test yourself: Watch your own replay at 2x speed. Every time your hero is standing still or walking without purpose for more than 3 seconds, that’s dead time. Immortal players have almost zero dead time.
2. Plan Your Farm Route 30 Seconds Ahead
Don’t decide where to farm when the current camp is dead. Decide where you’re going NEXT while you’re clearing the current camp. This eliminates the “stand and think” pause that costs 2–3 seconds per camp transition — 2 seconds × 100 camps = over 3 minutes of wasted time per game.
3. Use Abilities to Farm, Not Just Right-Clicks
Many players “save” abilities for fights and right-click jungle camps slowly. Immortal players use farming abilities aggressively:
- Anti-Mage: Blink to each camp (don’t walk), use Counterspell between camps to block damage
- Luna: Lucent Beam to soften camps, Moon Glaives passively clear everything
- Sven: Storm Hammer to damage stacks before cleaving them down
- Juggernaut: Blade Fury clears wave + adjacent small camp simultaneously
The exception: don’t use your abilities if you need them for an imminent fight. But if no fight is likely in the next 30 seconds, use everything to farm faster.
4. Stack Your Own Camps
If you’re farming jungle at :50 and standing near a camp, pull it at :53 to stack. This takes 2 seconds and gives you an extra camp worth of gold when you return. Self-stacking is free money that most players below Divine never do.
5. Farm Dangerous Areas with TP Scroll Ready
Immortal carries farm aggressively — including the enemy jungle — but they ALWAYS have a TP scroll. If enemies appear, they TP out to safety. The risk-reward is excellent: you get extra gold from enemy camps, and if you see them coming (via wards or minimap), you TP away for free.
6. Push Waves Before Farming Jungle
Always shove the lane wave into the enemy tower before rotating to jungle. This accomplishes two things:
- You get the lane CS (don’t waste it)
- The enemy tower kills your creeps, denying them from the enemy and resetting the wave
Players who go straight to jungle without shoving the wave waste an entire wave of CS every rotation.
7. Carry a Quelling Blade for Tree Chopping
Use Quelling Blade (or its upgrade, Battle Fury) to cut trees and create shortcuts between camps. Cutting one tree can save 2–3 seconds per rotation, which adds up to minutes over a full game.
8. Use Illusions/Summons to Farm Multiple Locations
Heroes with illusions or summons can farm two or three places at once:
- Naga Siren: Send illusions to farm all three triangle camps while your main hero pushes a lane
- Terrorblade: Conjure Image clears a camp while you farm another
- Phantom Lancer: Doppelganger into a camp, let illusions kill it while you move to the next
- Beastmaster/Lycan: Send boars/wolves to farm a camp while you push lane
9. Prioritize High-Value Camps
Not all camps are equal. Prioritize:
- Ancient camps (150–250 gold) — highest value per clear
- Large camps (110–180 gold) — second highest
- Lane waves (~180 gold) — comparable to large camps but also give tower pressure
- Medium camps (80–130 gold) — fill gaps between large camps
- Small camps (50–90 gold) — lowest priority, only farm if nothing else is available
10. Avoid Unnecessary Fights
This is the hardest efficiency secret for most players to accept: not every fight is worth joining. If a skirmish breaks out across the map and you can’t meaningfully contribute (too far away, no TP, fight will be over before you arrive), keep farming. The gold you earn will contribute more to winning the NEXT fight than a late TP to a fight that’s already decided.
The exception: if the fight is at a major objective (Roshan, high ground) or your team is defending, TP in. But random 3v3 skirmishes at the 15-minute mark Often better to keep farming.
Farming by Game Phase
Early Game (0–10 Minutes)
Focus: Lane creeps. Jungle is supplementary.
- Get every last hit possible in lane
- Start incorporating jungle camps at level 3–4 (between waves)
- Ask your support to stack camps for you (especially ancients)
- Don’t die — a death at 5 minutes costs you 30–45 seconds of farm time + gold loss
CS target: 50–70 at 10 minutes (lane + jungle)
Mid Game (10–25 Minutes)
Focus: Shove and farm pattern. Lane → jungle → lane → jungle.
- Push waves aggressively (into enemy tower if safe)
- Farm the triangle camps efficiently
- Clear stacked camps (this is where 2,000+ gold spikes come from)
- Carry a TP scroll to join critical fights
- Use farming items (Battle Fury, Maelstrom, Radiance) to their full potential
CS target: 200–280 at 25 minutes
Late Game (25+ Minutes)
Focus: Farm while pressuring. You should be pushing lanes AND farming jungle.
- Push all three lanes using illusions, summons, or TP scrolls
- Farm the enemy jungle when you have map control
- Keep buyback gold at all times (don’t spend your last 400 gold on components if you don’t have buyback)
- Farm is less important than fighting correctly — but between fights, maximize every second
CS target: 350+ at 35 minutes for carries
Common Farming Mistakes
1. Farming the Wrong Side of the Map
If the enemy is grouping on the bottom side of the map, farm the top side. If you’re farming on the same side as the enemy, you’ll get ganked and lose both the farm and the death timer. Read the minimap and farm the SAFE side of the map.
2. Walking Between Camps Instead of Farming Them
Low-MMR players walk past camps on their way between lanes. Immortal players clear every camp they walk by. If you pass within 300 units of a jungle camp and don’t kill it, you’ve left gold on the ground.
3. Fighting Without Farm
If you’re a carry at 15 minutes with Treads and Yasha, you don’t have the items to fight effectively. Taking fights before your power spike wastes time and often results in death. Farm until you have your first core item, then consider fighting.
4. Not Using Farming Items
Battle Fury, Maelstrom, Radiance — these items exist to accelerate farm. If you buy Battle Fury on Anti-Mage and then don’t farm aggressively for the next 10 minutes, you’ve wasted 4,100 gold on an item that’s not earning its value. Farming items need to be USED — clear camps, push waves, generate gold.
5. Ignoring Lane Creeps for Jungle
Lane creeps are worth more than most jungle camps. Never skip a lane wave to farm jungle. The pattern is lane → jungle → lane, not jungle → jungle → jungle.
6. Dying with Unreliable Gold
When you die in Dota 2, you lose unreliable gold (gold from creep kills). Dying with 2,000 unreliable gold can cost you 400+ gold. Before farming dangerous areas, check if you can buy an item component to convert unreliable gold into an item. If you die with items, you lose nothing. If you die with unspent gold, it’s gone.
7. Not Having TP Scroll
Dying because you didn’t have a TP scroll to escape is the most avoidable death in Dota 2. Always carry one. The 100 gold cost is trivial compared to the 30+ seconds of farm time you lose from dying.
Farming Practice Routine
Dedicate 15 minutes per session to farming practice:
- Demo mode last-hitting (5 min): No items, get 50+ CS in 5 minutes
- Demo mode jungle clearing (5 min): Practice your hero’s jungle route. Time how fast you can clear all camps.
- Full game focus (next game): Set a CS/min goal BEFORE the game. Check your CS at 10, 20, and 30 minutes.
Track your progress over weeks. Your 10-minute CS should improve by 5–10 CS per week if you’re practicing consistently.
For personalized farming improvement, our Immortal coaches can watch your replays, identify farming inefficiencies, and give you specific drills tailored to your hero pool and rank. If you want to see what Immortal-level farming looks like on your account, our MMR Boost service lets you watch replay demos of professional-level play on your own account.
Frequently Asked Questions
Ready to Climb Start Your Boost Today
Team Smurf is the #1 rated Dota 2 boosting service. Immortal-rank boosters, maximum safety, competitive pricing, 24/7 support.
Conclusion
Farming in Dota 2 isn’t glamorous. It’s not the flashy Rampage clip or the game-winning Black Hole. But farming is the engine that powers everything else. Better farm means better items. Better items mean winning fights. Winning fights means taking objectives. Taking objectives means winning games.
The path from 5 CS/min to 10 CS/min is paved with deliberate practice, efficient routing, smart item choices, and the discipline to keep farming when the game tempts you to do something else. Every creep you last-hit, every stack you clear, every second of dead time you eliminate brings you closer to that next rank.
Start tracking your CS/min today. Set a goal 1 CS/min higher than your current average. Practice the techniques in this guide for two weeks, and you’ll see measurable improvement in both your farm numbers and your win rate.
For accelerated improvement, our Dota 2 Coaching service offers personalized farming analysis from Immortal players who consistently hit 10+ CS/min. And if you want to see your account at the rank your skills deserve, our MMR Boost and Calibration services are just a click away.
Now go farm. Every creep counts.


