Best Dota 2 Settings and Hotkeys: The Complete Pro Player Setup Guide

Your settings and hotkeys in Dota 2 can be the difference between executing a clutch combo flawlessly and fumbling through your inventory in a teamfight. Every Immortal player and professional has spent hours optimizing their setup — and while personal preference plays a role, there are objectively better configurations that reduce input delay, improve visibility, and help you play faster.
This guide covers everything: video settings for maximum FPS and clarity, audio settings you might be overlooking, interface tweaks that give you more information, advanced options that most players never touch, custom hotkey layouts used by pros, quickcast vs normal cast, and specific configurations from top professional players.
Whether you’re a new player setting up Dota 2 for the first time or a veteran looking to optimize, this guide will transform your setup. Our Immortal coaches at TeamSmurf consistently find that settings optimization is one of the quickest ways to improve a player’s performance.
Table of Contents
Video Settings
Video settings impact two things: how well you can see the game (visual clarity) and how smooth the game runs (FPS). For competitive play, FPS and clarity always trump visual beauty.
Resolution and Display Mode
Resolution: Use your monitor’s native resolution. If you’re on a 1920×1080 (1080p) monitor, use 1920×1080. Running at a lower resolution to gain FPS creates a blurry image that makes it harder to see important details like ability indicators and unit health bars.
Display mode: Use Exclusive Fullscreen for maximum FPS. This gives Dota 2 full control of your GPU, reducing input lag and improving frame times. Borderless Windowed is convenient for alt-tabbing but adds 5–15ms of input lag due to the Windows compositor.
Aspect ratio: Match your monitor (16:9 for most). Ultra-wide monitors (21:9) give a slight competitive advantage with more horizontal vision, but tournaments typically enforce 16:9.
Rendering Settings
| Setting | Recommended (Competitive) | Recommended (Visual Quality) | FPS Impact |
|---|---|---|---|
| Render Quality | 100% | 100% | High |
| Texture Quality | Medium–High | High | Low–Medium |
| Effects Quality | Low | Medium–High | Medium |
| Shadow Quality | Off or Low | Medium | High |
| Anti-Aliasing | Off or FXAA | FXAA or MSAA | Medium–High |
| Specular | Off | On | Low |
| Ambient Occlusion | Off | On | Medium |
| V-Sync | Off | Off | Adds input lag |
| Tree Quality | Low | Medium | Medium |
| Animate Portrait | Off | On | Low |
| Additive Light Pass | Off | On | Low |
| World Lighting | Low | High | Medium |
| Compute Shaders | Off (unless modern GPU) | On | Varies |
Why Turn Shadows Off?
Shadows are the single biggest FPS drain in Dota 2, and they provide almost zero competitive benefit. In fact, shadows can actually obscure important visual information like ability AoE indicators on the ground. Turn them off or set them to low.
The V-Sync Trap
Never use V-Sync. V-Sync synchronizes your frame output with your monitor’s refresh rate to eliminate screen tearing, but it adds significant input lag (often 20–50ms). In a game where milliseconds matter for last-hitting and ability timing, this is unacceptable. If screen tearing bothers you, use G-Sync (NVIDIA) or FreeSync (AMD) instead — these provide tear-free gameplay without input lag.
Target FPS
Aim for a minimum of 60 FPS at all times, including teamfights. Ideally, target 120+ FPS on a 144Hz monitor. If your FPS drops below 60 during teamfights, lower Effects Quality and Shadow Quality first — these are the biggest drains during particle-heavy fights.
Use cl_showfps 1 in the console to display your FPS counter.
Audio Settings
Audio in Dota 2 provides critical gameplay information that many players underutilize.
Core Audio Settings
- Master Volume: Keep at a comfortable level where you can hear all game sounds clearly without fatigue.
- Music Volume: Turn it down or off. Music is atmospheric but competes with important gameplay audio cues like ability sounds, hero voice lines, and ping alerts. Most pro players play with music off or very low.
- Game Sound Volume: Maximum. Every ability, item activation, and attack has a unique sound. You should hear Pudge’s hook, Clockwerk’s cogs, and Smoke of Deceit usage even in chaotic fights.
- Voice Chat Volume: Keep at a level where teammates are audible but not overpowering game sounds.
- Unit Speech Volume: Medium. Hero voice lines provide information (“I’m under attack!”) but can be chatty.
Audio Cues You Might Be Missing
Dota 2 has dozens of subtle audio cues that convey information:
- Smoke of Deceit break sound: When an enemy breaks your smoke (walks near you while smoked), there’s a distinct audio cue. If you hear it, you know enemies are nearby.
- Roshan sounds: You can hear Roshan being attacked from certain positions near the pit. If you hear melee attacks near Rosh pit, the enemy might be doing Roshan.
- Invisibility detection: When an invisible enemy walks near a sentry ward, there’s a distinct shimmer sound.
- Blink Dagger sound: Every blink has an audio cue. You can hear enemies blinking in fog.
- Last-hit sound: The satisfying “clink” of gold tells you whether you got the last hit even without looking at the creep.
Headphones vs Speakers
Use headphones for competitive play, always. Headphones provide better directional audio (you can tell which direction sounds come from), isolate external noise, and let you hear subtle cues that speakers might miss. Any decent gaming headset works — you don’t need audiophile equipment.
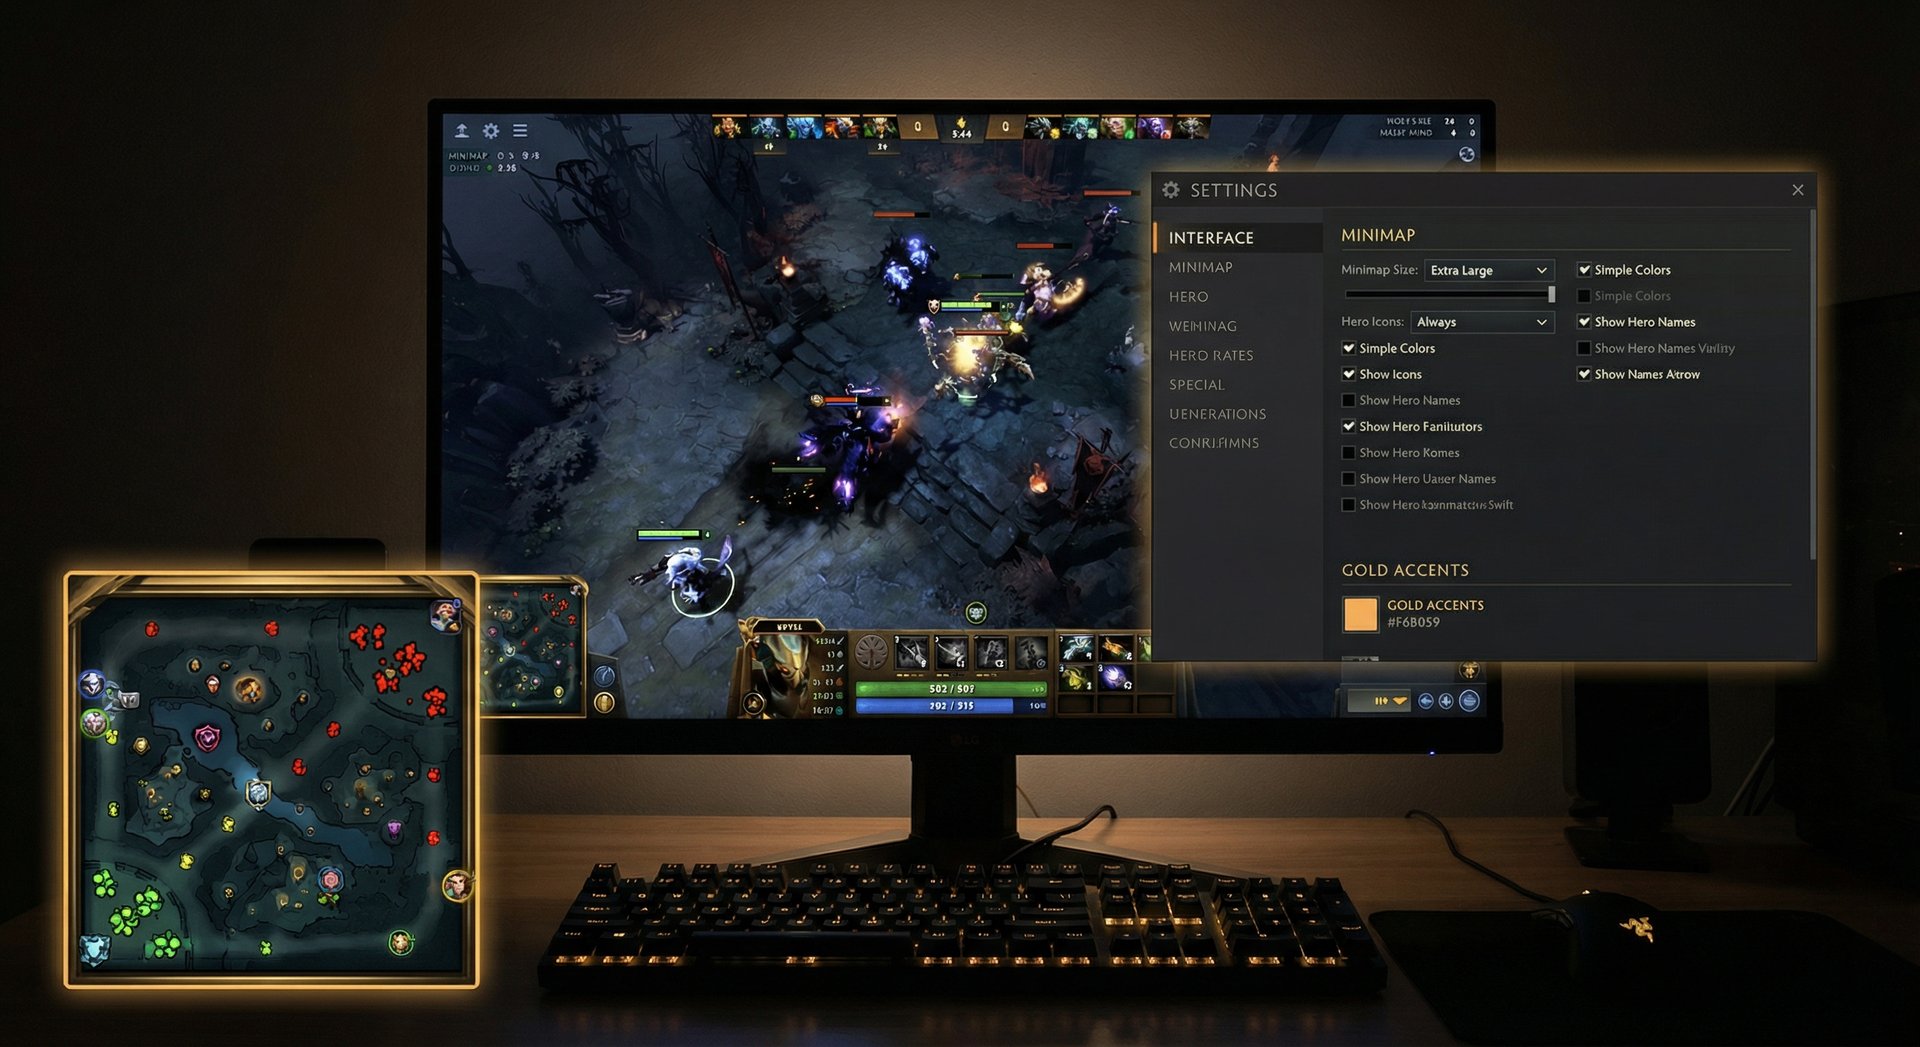
Interface and HUD Settings
Interface settings determine what information is displayed on screen and how you interact with it. Proper interface setup gives you a significant information advantage.
Critical Interface Options
| Setting | Recommended | Why |
|---|---|---|
| Show Health Bars | Always | See all unit health at all times |
| Health Bar Size | Large | Easier to see in teamfights |
| Show Damage Numbers | On | Track your damage output |
| Show Hero Names Above Health Bars | Off | Reduces visual clutter; learn heroes by model |
| Show Ability Rangefinder | On | Shows ability range when hovering — essential for learning ranges |
| Minimap on Left | Personal preference | Some pros prefer left (avoids accidental clicks when moving camera right) |
| Use Simple Minimap Colors | On | Easier to distinguish friend from foe |
| Show Neutral Spawn Boxes | On | See exact spawn boxes for stacking/blocking |
| Differentiate Ally Health Bars | On | See ally HP as green, enemy as red — clearer in fights |
| Show Tower Attack Range | On | Know exactly when you’ll draw tower aggro |
| Holding ALT Shows Extended Info | On (default) | ALT shows additional ability info, HP numbers, mana costs |
| Teleport Requires Hold/Stop | On | Prevents accidental TP cancellation |
| Channeled Abilities Require Hold/Stop | On | Prevents accidental channel cancellation |
Minimap Configuration
The minimap is your most important source of information in Dota 2. Configure it properly:
- Minimap Hero Size: Increase to 120–130%. Larger hero icons on the minimap are easier to glance at and track.
- Use Hero Icons (not color dots): Hero icons let you identify WHO is where, not just that someone is there. This is essential for tracking enemy heroes.
- Minimap Misclick Protection: If you accidentally click the minimap while moving your camera, enable the ALT-click protection (requires ALT+click to interact with minimap).
- Background Opacity: Keep at default or slightly increased for better visibility.
HUD Scaling
If you’re playing at 1440p or 4K, the default HUD may be too small. Increase HUD scale until the ability icons, item slots, and minimap are comfortably visible without straining your eyes. At 1080p, the default scale is generally fine.
Advanced Settings
The advanced settings tab contains options that can dramatically improve your gameplay but are overlooked by most players.
Critical Advanced Options
- Auto-Attack: Set to “Standard” or “Never.” “Standard” means your hero auto-attacks after completing an action. “Never” means you must manually right-click to attack. Most pro players use “Standard” because it helps secure last hits during busy moments, but some use “Never” for complete control. Avoid “Always” — it causes your hero to mindlessly push waves.
- Auto-Attack After Spell: Off. When this is on, your hero auto-attacks the nearest unit after casting a spell, which can break your positioning, draw creep aggro, or push the wave unintentionally.
- Unified Unit Orders: On if you play micro-intensive heroes (Chen, Meepo, Visage, Beastmaster). This means your control group orders apply to all selected units simultaneously. Off if you prefer individual unit control.
- Smart Double-Tap: On. This allows you to double-tap a self-castable ability/item to use it on yourself. For example, double-tapping Force Staff uses it on yourself. Essential for quick self-casts in fights.
- Double-Tap Timeout: Set to a comfortable window (300–500ms). Too short and you’ll misfire double-taps; too long and it delays intentional double-tap self-casts.
- Shop on Right: Personal preference, but some players prefer the shop on the right side to match typical UI conventions.
- Sticky HP Bar: On. Shows your current HP bar at the top of the screen even when your hero isn’t selected.
- Move After Ability Target Cancelled: On. If you cancel an ability targeting, your hero moves toward where you clicked instead of standing still.
Network Settings
- Network Quality: Set to “High” if your internet connection can handle it. This sends more data between you and the server, reducing rubber-banding and improving responsiveness.
- Strict Solo Queue: On if you want to avoid playing against parties when you’re solo. This may increase queue times but improves match fairness.
- Server Selection: Select the server with the lowest ping. Use
pingcommand in console to test latency. Ideally under 50ms; playable up to 100ms.
Hotkey Configuration
Default Dota 2 hotkeys are functional but not optimal. A well-designed hotkey layout minimizes finger travel, groups related actions together, and ensures every critical command is one keypress away.
Core Ability Hotkeys
The default ability keys are Q, W, E, D, F, R. Most players keep these unchanged because they’re intuitive and well-positioned. However, some alternatives:
| Action | Default | Common Alternative | Notes |
|---|---|---|---|
| Ability 1 | Q | Q | Rarely changed |
| Ability 2 | W | W | Rarely changed |
| Ability 3 | E | E | Rarely changed |
| Ultimate | R | R | Rarely changed |
| Ability 4 (extra) | D | D | For heroes with 5+ abilities |
| Ability 5 (extra) | F | F | For heroes with 6+ abilities |
| Talent Tree | U (left) / I (right) | Various | Some bind to mouse buttons |
Item Hotkeys — The Most Important Optimization
Item hotkeys are where most players’ setups fall apart. You have six item slots plus a neutral item slot and a TP slot. In a teamfight, you might need to use BKB, Blink Dagger, Scythe of Vyse, and Refresher Orb within seconds. Fumbling for the right key loses fights.
Recommended item hotkey layout:
| Slot | Recommended Key | Typical Item Placed Here |
|---|---|---|
| Item Slot 1 | Space | Blink Dagger / most-used active |
| Item Slot 2 | Mouse 4 (Side Button) | BKB / defensive item |
| Item Slot 3 | Mouse 5 (Side Button) | Second active item |
| Item Slot 4 | C | Utility item (Force Staff, etc.) |
| Item Slot 5 | V | Situational active |
| Item Slot 6 | B or Z | Least-used active / passive item |
| TP Slot | T | Town Portal Scroll (always) |
| Neutral Item | N or G | Neutral item (passive usually) |
Key principle: Put your most-used active item on your most accessible key. For most players, Space bar and mouse side buttons are the easiest to hit instantly. Your Blink Dagger should ALWAYS be on your most comfortable key because split-second blinks save lives.
Control Groups (for Micro Heroes)
If you play heroes that control multiple units (Meepo, Chen, Visage, Beastmaster, Lone Druid, Arc Warden), control groups are essential:
| Group | Recommended Key | Assigned To |
|---|---|---|
| Group 1 | 1 | Main hero |
| Group 2 | 2 | All controlled units (excluding hero) |
| Group 3 | 3 | All units (hero + summons) |
| Group 4 | 4 | Individual unit (e.g., specific Meepo clone) |
| Select All Units | Tab | Cycle through all controlled units |
Other Essential Hotkeys
| Action | Recommended Key | Why It Matters |
|---|---|---|
| Attack Move | A | Essential for orb-walking and chasing into fog |
| Stop | S | Cancels animations, stops movement, fakes abilities |
| Hold Position | H | Hero stands still and attacks anything in range |
| Move | M | Move without attacking (walk past enemies) |
| Patrol | Unbound | Rarely used; can unbind |
| Select Hero | F1 | Instantly selects and centers on your hero |
| Select Courier | F2 | Select your courier |
| Deliver Items | F3 | Send items from base to your hero |
| Open Shop | F4 or Home | Quick shop access |
| Scoreboard | ` (tilde) | Check enemy items, levels, net worth |
| Chat Wheel | Y | Quick communication |
| Glyph | J | Fortify buildings (team ability) |
| Scan | Unbound or custom | Scan map area for enemy presence |
Quickcast, Autocast, and Smart Cast
Quickcast is the single most impactful hotkey setting for improving your reaction time. Understanding the three casting modes is essential.
Normal Cast
Press key → ability range indicator appears → left-click to confirm cast.
Pros: You see the exact range and AoE before committing. Good for learning new heroes and abilities. Cons: Requires two inputs (key + click) which is slower. In fast-paced fights, the extra click can cost you.
Quickcast
Press key → ability instantly casts at your cursor position. No confirmation click needed.
Pros: Significantly faster execution. Reduces time between deciding to cast and actually casting. Essential for combos (Blink → Hex, Eul’s → stun). Cons: No range indicator — you need to know ability ranges from experience. Misclicks cast the ability immediately with no undo.
Quickcast on Key Release
Hold key → range indicator shows → release key to cast.
Pros: Best of both worlds — you get the range indicator while holding, and cast on release. Cons: Slightly slower than pure quickcast because you need to hold and release rather than tap. Some players find the hold-to-show delay awkward.
Autocast
Toggle an ability to automatically cast when conditions are met (e.g., Drow Ranger’s Frost Arrows auto-cast on attack, Ogre Magi’s Bloodlust auto-cast on allies).
How to toggle: ALT + ability key (default) or right-click the ability icon. Autocast is essential for orb-walking — toggle Frost Arrows on, and they’ll fire automatically with each attack without drawing creep aggro (unlike manually clicking the ability before each attack, which doesn’t draw aggro either but requires more input).
Recommended Quickcast Setup
Most Immortal players use one of these approaches:
Option A — Full quickcast: All abilities and items on quickcast. This is the fastest option and what most pro players use. You learn ranges through experience.
Option B — Hybrid: Abilities on quickcast, items on normal cast (or vice versa). Some players prefer normal cast on targeted items like Scythe of Vyse to avoid misclicks.
Option C — Quickcast on key release: Everything on key-release quickcast. Good for players transitioning from normal cast who want the safety net of range indicators.
Our recommendation: Use full quickcast for abilities and items once you’re comfortable with ranges. The speed improvement is dramatic, especially for initiators and combo heroes (Puck, Invoker, Storm Spirit, Tinker). If you’re new to quickcast, switch one ability at a time over several games rather than changing everything at once.
Quickcast for Items
Quickcast on items is where the biggest speed gains happen:
- Blink Dagger: Quickcast means you press the key and instantly blink. No click needed. This saves 100–200ms on every blink initiation.
- BKB: Quickcast for instant activation. In fights where you need BKB before the enemy stun lands, quickcast can be the difference between activating in time and getting chain-stunned.
- Hex/Scythe of Vyse: Quickcast for instant hex on the target under your cursor. Critical for catching enemies before they BKB or escape.
- Eul’s Scepter: Quickcast for instant self-Eul’s (self-targeting with quickcast: hover over yourself + press key).
Camera Settings
Camera control is one of the most underrated skills in Dota 2. Proper camera settings and habits let you see more of the map and react faster to threats.
Camera Speed
Default camera speed is often too slow for experienced players. Increase edge pan speed or mouse-drag speed until camera movement feels responsive without being uncontrollable. Most pros use camera speeds between 3000–5000.
Camera Grip vs Edge Pan
Edge Pan: Move your mouse to the screen edge to scroll the camera. This is the default and what most players use. It’s intuitive but means your cursor has to travel to the edge of the screen.
Camera Grip (Middle Mouse): Hold middle mouse button and drag to move the camera. Your cursor stays centered, and you move the camera by dragging. Some players find this more precise and faster.
Recommendation: Use edge pan with a comfortable speed. Camera grip is a viable alternative if you find edge pan imprecise.
Camera Lock
Never lock your camera. Camera-locked play (where the camera always centers on your hero) is a massive handicap in Dota 2. You need to look at other parts of the map — checking enemy positions, scouting with wards, watching teamfights happening elsewhere.
Use your “Select Hero” key (F1 or custom bind) to snap back to your hero when needed. The habit should be: look at the map, press F1 to recenter, look at the map again.
Camera Position Keybinds
You can bind specific camera positions for quick reference. Some players bind keys to their lane, the Roshan pit, or key jungle areas. This is more common in RTS games but can be useful for supports who need to watch multiple lanes.
Pro Player Configurations
Every pro player has a unique setup, but studying their configurations reveals common patterns. Here are setups from some notable players:
Topson (Mid Player, 2x TI Winner)
| Setting | Topson’s Config |
|---|---|
| Abilities | Q, W, E, D, F, R (default) |
| Items | Space, Mouse4, Mouse5, Z, X, C |
| Quickcast | All abilities and items on quickcast |
| Auto-Attack | Standard |
| Camera Speed | High (~4500) |
| DPI | ~800 |
Puppey (Captain/Support, Team Secret)
| Setting | Puppey’s Config |
|---|---|
| Abilities | Q, W, E, D, F, R |
| Items | Alt+Q, Alt+W, Alt+E, Alt+A, Alt+S, Alt+D |
| Quickcast | Abilities on quickcast, items mixed |
| Auto-Attack | Standard |
| Control Groups | 1, 2, 3, 4 (for Chen/Enchantress) |
| Notes | Uses ALT-modifiers heavily for items |
Arteezy (Carry Player)
| Setting | Arteezy’s Config |
|---|---|
| Abilities | Q, W, E, D, F, R |
| Items | Space, 1, 2, 3, Mouse4, Mouse5 |
| Quickcast | Full quickcast on everything |
| Auto-Attack | Standard |
| TP Scroll | T |
| DPI | ~400 (low sensitivity) |
Miracle- (Mid/Carry, Nigma Galaxy)
| Setting | Miracle-‘s Config |
|---|---|
| Abilities | Q, W, E, D, F, R |
| Items | Space, Alt+Q, Alt+W, Alt+E, Alt+A, Alt+S |
| Quickcast | All quickcast |
| Auto-Attack | Standard |
| Camera | Edge pan, high speed |
Common Patterns Among Pros
- All use quickcast on abilities (some exceptions for specific heroes)
- Space bar is always a key item slot — usually their Blink Dagger or most critical active item
- Mouse side buttons are used for items by nearly everyone who has them
- ALT+key combos are popular for secondary item slots
- Auto-Attack on Standard is the most common setting
- Camera speed is high — pros move their camera constantly and quickly
- Low-to-medium mouse DPI (400–800) for precision, compensated by high in-game camera speed
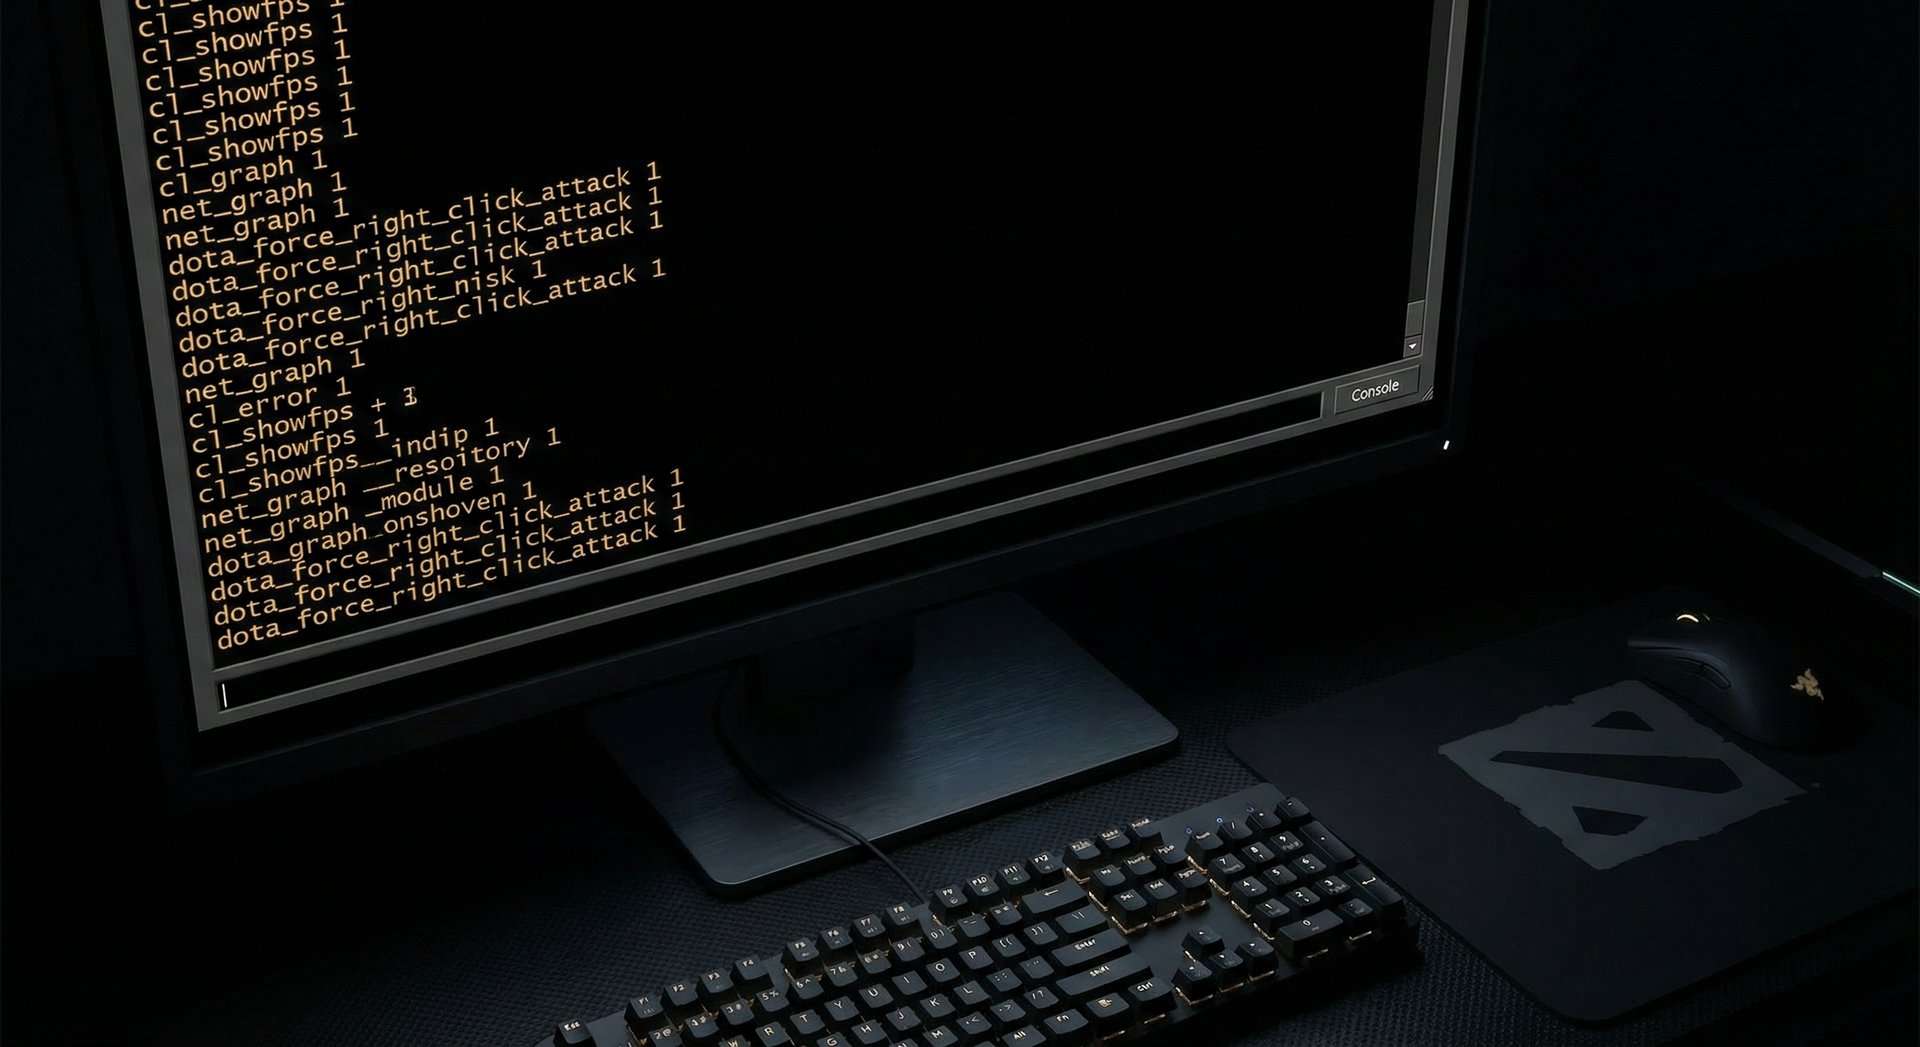
Useful Console Commands
Dota 2’s console (enable in Settings → Advanced → Console) provides access to commands that can improve your experience.
Performance Commands
| Command | Effect |
|---|---|
cl_showfps 1 |
Shows FPS counter |
net_graph 1 |
Shows network stats (ping, packet loss, FPS) |
fps_max 0 |
Removes FPS cap (let your hardware run freely) |
engine_no_focus_sleep 0 |
Game runs at full speed even when alt-tabbed |
r_particles 0 |
Reduces particle effects (may break some visuals) |
Gameplay Commands
| Command | Effect |
|---|---|
dota_force_right_click_attack 1 |
Right-clicking enemy units forces attack (useful for denying) |
dota_player_auto_repeat_right_mouse 1 |
Hold right-click to continuously move (stops stuttering) |
dota_minimap_hero_size 1000 |
Increases minimap hero icon size |
dota_hud_healthbar_number 1 |
Shows HP numbers on health bars |
dota_disable_range_finder 0 |
Shows a green/red line from hero to cursor indicating ability range |
Important: dota_force_right_click_attack
This command is arguably the most important console command in Dota 2. When enabled, right-clicking an allied creep will attack it for a deny instead of following it. Without this, you need to press A+click (attack command) to deny, which is slower and less intuitive. Enable this immediately.
Launch Options
Add these to your Steam launch options (right-click Dota 2 → Properties → Launch Options):
-console— Enables console on startup-high— Sets Dota 2 to high priority in Windows (may improve FPS stability)-novid— Skips the intro video for faster loading-dx11— Forces DirectX 11 (try-vulkanfor AMD GPUs)
Performance Optimization Beyond Settings
Hardware Considerations
Dota 2 is more CPU-intensive than GPU-intensive. A strong single-core CPU performance matters more than a top-tier graphics card. For most players:
- CPU: Any modern quad-core or better (Intel i5/i7 or AMD Ryzen 5/7) handles Dota 2 easily
- GPU: Mid-range is plenty (GTX 1060/RX 580 or newer for 1080p 144fps)
- RAM: 16GB recommended for smooth performance
- Storage: SSD for faster loading times (not FPS, but quality of life)
- Monitor: 144Hz makes a noticeable difference in smoothness. 240Hz is nice but marginal.
Windows Optimization
- Disable Windows Game Mode (can cause frame drops)
- Disable hardware-accelerated GPU scheduling if experiencing stutters
- Close background applications (Chrome, Discord screen share, OBS) to free resources
- Keep graphics drivers updated
- Set Dota 2 to High Priority in Task Manager
Network Optimization
- Use a wired Ethernet connection instead of WiFi whenever possible
- Close bandwidth-heavy applications (streaming, downloads) while playing
- Select the server with the lowest ping in Dota 2 settings
- If experiencing packet loss, try changing DNS servers to Google (8.8.8.8) or Cloudflare (1.1.1.1)
Building Your Setup: Step-by-Step
If you’re starting from scratch, here’s the order to configure your Dota 2 setup:
- Video settings first. Get stable FPS above 60, prioritizing performance over visuals.
- Enable console and run key commands (
dota_force_right_click_attack 1,cl_showfps 1). - Set up item hotkeys. This is the biggest gameplay improvement. Put your most-used items on Space and mouse buttons.
- Configure quickcast. Start with abilities on quickcast, add items over time.
- Adjust interface settings. Enable health bar numbers, tower range, spawn boxes, and minimap hero icons.
- Fine-tune audio. Turn down music, keep game sounds high.
- Practice in demo mode. Spend 15 minutes with your new settings before playing a real game. Muscle memory needs time to adjust.
Settings alone won’t make you Immortal, but they remove friction between your decisions and your execution. Combined with game knowledge from our coaching service and consistent practice, optimized settings can meaningfully accelerate your improvement.
If you’re looking to test your new setup in ranked but want to start from a clean slate, our MMR Calibration service can set your account up for success. And if you’re stuck in low priority due to disconnection issues while optimizing your setup, our LP Removal service can get you back to ranked quickly.
Frequently Asked Questions
r_particles 0 can help but may cause visual issues.dota_force_right_click_attack 1 is the single most important command — it lets you deny creeps by right-clicking them. dota_player_auto_repeat_right_mouse 1 for smoother movement. cl_showfps 1 or net_graph 1 for monitoring performance. dota_disable_range_finder 0 for showing ability range lines. These four commands should be in every player’s autoexec config.autoexec.cfg in your Dota 2 config folder (typically Steam\steamapps\common\dota 2 beta\game\dota\cfg\). Add your console commands one per line. These commands will execute automatically every time Dota 2 launches, so you don’t need to type them manually each session. Essential for maintaining your custom settings across reinstalls and updates.Ready to Climb? Start Your Boost Today
Team Smurf is the #1 rated Dota 2 boosting service. Immortal-rank boosters, maximum safety, competitive pricing, 24/7 support.
Conclusion
Optimizing your Dota 2 settings and hotkeys is one of the fastest, most concrete ways to improve your gameplay. It’s not about finding a “magic configuration” — it’s about removing barriers between your brain and the game. When your Blink Dagger is on an accessible key, your quickcast is dialed in, your FPS is stable, and your interface shows you the information you need, you can focus entirely on the game itself.
Take the time to set up your configuration properly. Test it in demo mode. Give yourself 20–30 games to adjust. And then enjoy the results — smoother execution, faster reactions, and fewer fumbled teamfights.
For more ways to improve your Dota 2 gameplay, explore our coaching sessions, check out our MMR boosting service, or read our other in-depth guides. Good luck, and may your hotkeys never fail you.


