Best Carry Heroes to Gain MMR in Dota 2: Complete Pos 1 Tier List 2026

Climbing MMR as a carry player in Dota 2 is simultaneously the most rewarding and most punishing experience in competitive gaming. You hold your team’s win condition in your hands — but one bad lane, one missed timing, or one poor hero pick can send the entire game spiraling. If you’ve been grinding ranked matches and wondering why your MMR refuses to budge, the answer often starts at the hero selection screen.
This complete Pos 1 tier list for 2026 breaks down the best carry heroes in Dota 2 across every skill bracket, from Herald to Immortal. We’re not just listing heroes — we’re giving you farming patterns, itemization guides, fight timing windows, and bracket-specific advice that will genuinely help you climb. Whether you’re a 2K player trying to break into Archon or a Divine carry looking to hit Immortal, this guide has something for you.
And if you want the fastest possible route to your target rank, TeamSmurf’s MMR boosting service uses many of these exact heroes to achieve insane win rates during boosts.
Table of Contents
- How This Tier List Works
- S-Tier Carries: The Best of the Best
- A-Tier Carries: Reliable Climbers
- B-Tier Carries: Situational Powerhouses
- Universal Farming Patterns Every Carry Must Know
- When to Fight vs. When to Farm: The Decision Framework
- Bracket-Specific Hero Recommendations
- Core Itemization Principles for Pos 1
- Top 10 Mistakes Carry Players Make
- FAQ
How This Tier List Works
Before we dive into individual heroes, let’s establish what makes a carry “good for climbing.” Tournament tier lists and pub tier lists are completely different animals. A hero like Morphling might dominate a pro match with perfect team coordination, but he’ll lose you MMR in solo queue if your team doesn’t understand his playstyle.
Our ranking criteria weighs the following factors:
- Solo queue independence: Can the hero function without relying on perfect team play
- Farming speed: How quickly can the hero recover from a bad lane and accelerate
- Fight contribution at power spikes: Does the hero have clear timing windows
- Versatility: Can the hero adapt to different game states
- Skill floor vs. ceiling: How much mechanical skill is needed to be effective
- Current patch strength (7.36+): Recent buffs, nerfs, and meta shifts
Each hero is rated S, A, or B tier. S-tier means “pick this hero and win more than you lose with minimal effort.” A-tier means “strong and reliable, but requires some game knowledge.” B-tier means “powerful in the right hands or matchups, but not a default pick.”
| Tier | Heroes | Summary |
|---|---|---|
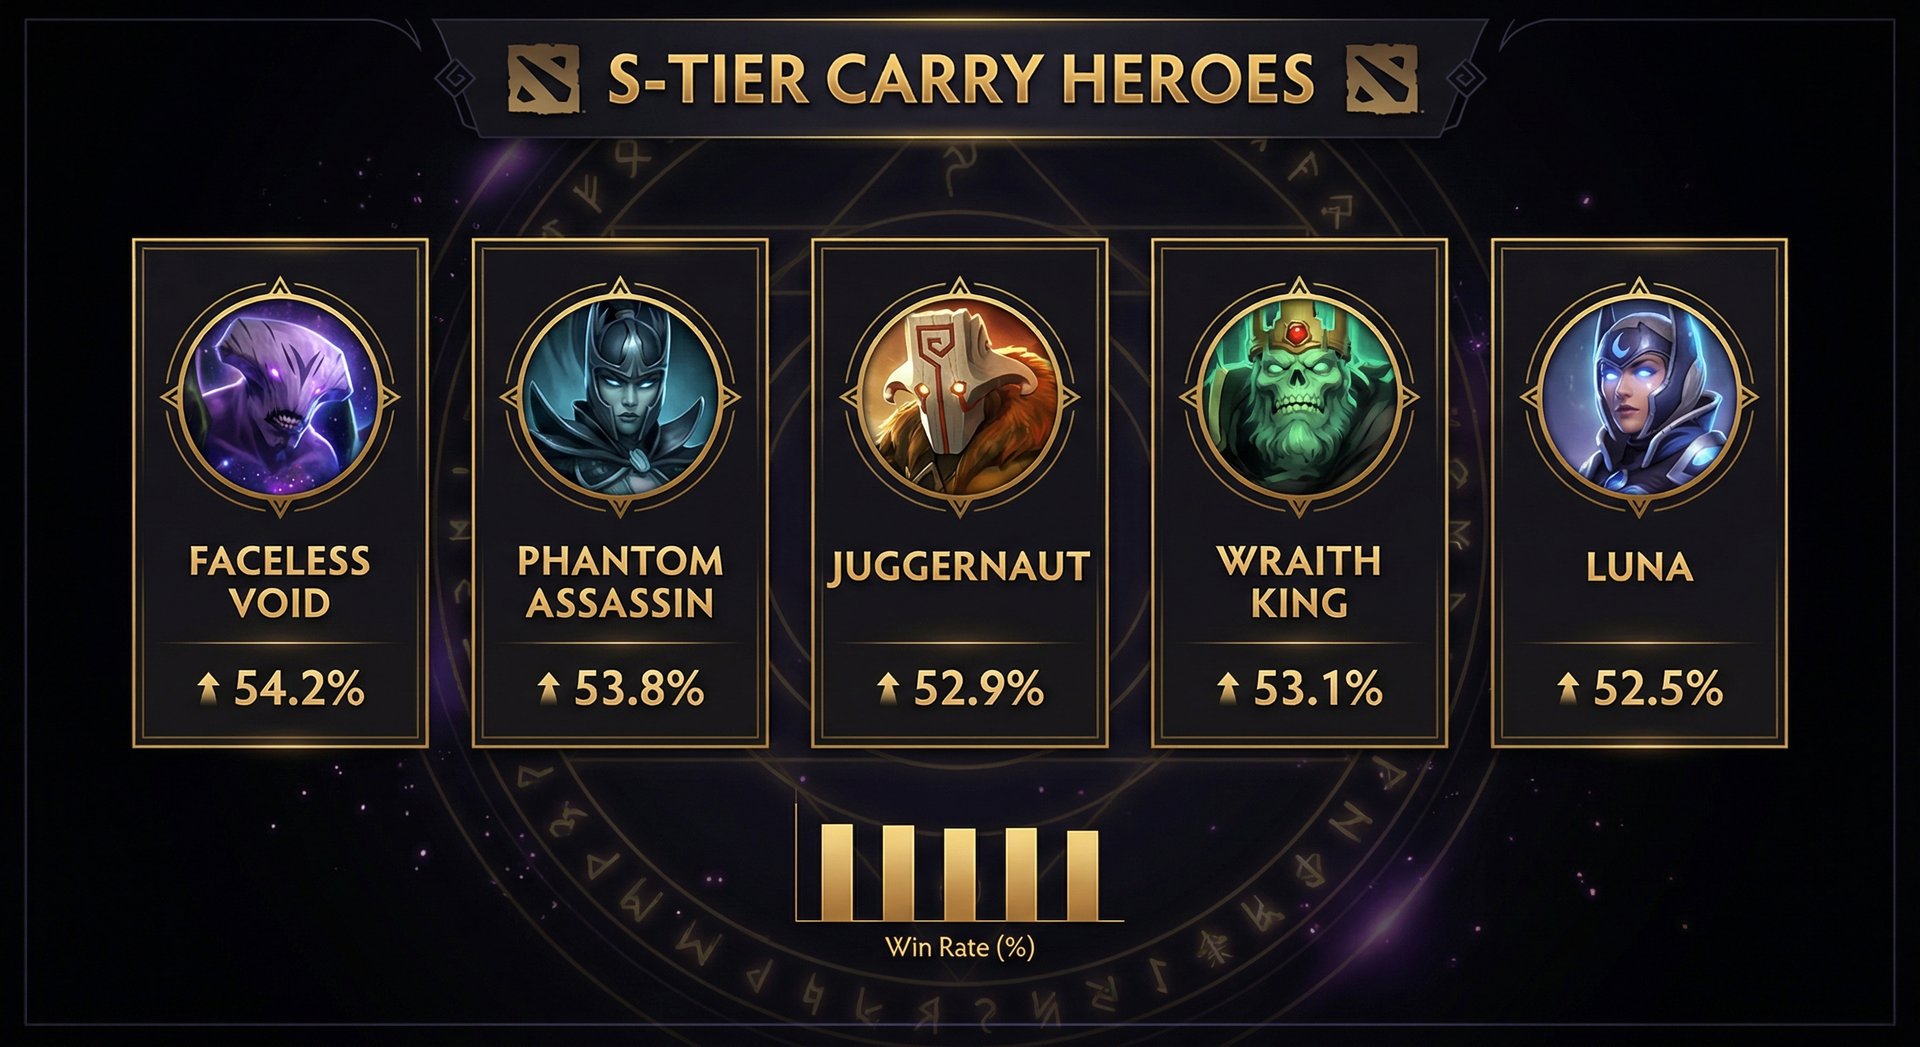
| S-Tier | Faceless Void, Phantom Assassin, Juggernaut, Wraith King, Luna | Dominant in most brackets, high win rates, forgiving to play |
| A-Tier | Lifestealer, Ursa, Slark, Chaos Knight, Medusa, Troll Warlord | Very strong with proper execution, some matchup dependency |
| B-Tier | Anti-Mage, Spectre, Terrorblade, Morphling, Phantom Lancer, Drow Ranger, Naga Siren | High ceiling but situational; punished easily if misplayed |
S-Tier Carries: The Best of the Best
1. Faceless Void
Win rate across all brackets: ~53%
Best brackets: Archon through Immortal
Difficulty: Medium
Faceless Void has been a top-tier carry for what feels like an eternity, and 2026 is no different. The reason is simple: Chronosphere is the single most game-winning ultimate in Dota 2. A good Chrono wins team fights regardless of how far behind your team is. A great Chrono wins games that should be unwinnable.
Why Void is S-tier for climbing:
- Chronosphere provides guaranteed kill potential even in disorganized pubs
- Time Walk makes him extremely survivable — one of the most forgiving carries to play
- Time Dilation shuts down ability-dependent heroes in fights
- Scales incredibly well into late game while still contributing at 20-25 minutes
- Can solo kill most heroes once he has two core items
Farming pattern: Void’s farming speed is average early on. You want to prioritize lane farm until level 6, then look for a kill with Chronosphere. Between Chronos, farm the triangle and nearby jungle camps. With Maelstrom or Battle Fury (matchup dependent), your farming speed spikes dramatically. Target 8-10 CS per minute by the 20-minute mark.
Itemization path:
- Starting: Tango, Quelling Blade, Slippers of Agility, Iron Branch x2
- Early game: Power Treads → Mask of Madness OR Maelstrom
- Mid game: Battle Fury (if farming game) OR Mjollnir (if fighting) → BKB
- Late game: Daedalus, Butterfly, Satanic, Refresher Orb
When to fight vs. farm: Fight whenever Chronosphere is off cooldown AND you have at least one core damage item. Farm between Chrono cooldowns. This rhythm — farm, Chrono, kill, farm, Chrono, kill — is what makes Void so effective for climbing. You’re never completely passive.
Pro tip: In lower brackets (Herald through Archon), enemies often clump together. Don’t try for “perfect” Chronos — a 3-man Chrono that catches your teammate is still better than waiting for a 5-man Chrono that never comes. Our Dota 2 coaching service specifically covers Chrono usage and timing for Void players.
2. Phantom Assassin
Win rate across all brackets: ~52%
Best brackets: Herald through Ancient
Difficulty: Low-Medium
PA is the ultimate “I will solo carry this game” hero. Her kit is designed to delete enemy heroes from the map, and in disorganized pub games where enemies don’t itemize properly against her, she’s an absolute menace.
Why PA is S-tier for climbing:
- Stifling Dagger makes last-hitting trivially easy, even in hard lanes
- Phantom Strike provides both gap closing and attack speed
- Blur makes her nearly impossible to find on the map for uncoordinated teams
- Coup de Grace crits can one-shot supports and delete cores in 2-3 hits
- Extremely simple to execute — low mechanical skill requirement
Farming pattern: PA’s farming pattern revolves around Stifling Dagger. Use Dagger to secure ranged creeps and contested last hits in lane. Once you have Battle Fury (target 14-16 minutes), your farming explodes. Clear the wave with one Dagger and 2-3 auto attacks, then rotate to jungle camps. With BF + Desolator, you can clear Ancient stacks instantly with crits.
Itemization path:
- Starting: Tango, Quelling Blade, Stout Shield
- Early game: Power Treads → Battle Fury (rush)
- Mid game: Desolator → BKB
- Late game: Abyssal Blade, Satanic, Nullifier
Fight timing: PA’s biggest power spike is Battle Fury + Desolator (around 22-25 minutes in an average game). This is when you should be looking for kills aggressively. Before BF, play passive unless your support sets up easy kills. After BKB, you can front-to-back team fight confidently.
3. Juggernaut
Win rate across all brackets: ~52%
Best brackets: All brackets
Difficulty: Low
Juggernaut is arguably the most well-rounded carry in Dota 2. He can fight early with Blade Fury, sustain with Healing Ward, farm efficiently, and his ultimate Omnislash provides guaranteed burst damage. There’s almost never a game where Juggernaut is a “bad” pick.
Why Juggernaut is S-tier for climbing:
- Blade Fury provides magic immunity from level 1 — incredibly forgiving in lane
- Healing Ward lets you sustain through trades and push towers
- Omnislash is a reliable kill tool at all stages of the game
- Can be played as a fighter or a farmer depending on the game state
- Strong laning phase with spin + right clicks
- One of the lowest skill-floor carries in the game
Farming pattern: Juggernaut farms lane efficiently with his high base damage. After getting Maelstrom or Battle Fury, rotate between lane and triangle. Use Healing Ward to sustain while farming dangerous areas. Jugg’s farming is steady, not explosive — you won’t outfarm a Luna or AM, but you make up for it by joining fights and getting kills.
Itemization paths (two main builds):
Fight-early build: Phase Boots → Maelstrom → Manta Style → Basher → Butterfly
Farm-heavy build: Power Treads → Battle Fury → Manta Style → Skadi → Butterfly
Which build to choose: If your team has strong teamfight and needs you to participate early, go Maelstrom. If the game is slow and you can farm freely, Battle Fury scales better. In doubt, Maelstrom is safer for solo queue.
4. Wraith King
Win rate across all brackets: ~54%
Best brackets: Herald through Legend
Difficulty: Very Low
Wraith King is the ultimate noob-friendly carry, and we mean that as the highest compliment. Having two lives in a game where death is the biggest punishment is absurdly powerful, especially in chaotic lower-bracket games. WK’s simplicity is his strength — you can focus entirely on decision-making instead of mechanical execution.
Why WK is S-tier for climbing:
- Reincarnation = two lives. This alone makes him S-tier below Legend
- Only one active ability (stun) — impossible to misplay mechanically
- Skeletons provide free farming acceleration and push power
- Vampiric Spirit gives built-in lifesteal — no lifesteal item needed
- Naturally tanky, hard to burst down
- Strong laning phase with high base damage and a reliable stun
Farming pattern: WK’s skeletons are his farming tool. Use them to clear extra jungle camps while you lane. After Radiance (if you go that build) or Armlet, your farming speed increases. WK isn’t the fastest farmer, but his reliability and survivability compensate — you almost never die while farming, which means consistent GPM.
Itemization path:
- Starting: Tango, Quelling Blade, Gauntlet of Strength x2
- Early game: Armlet of Mordiggian (core on WK) → Power Treads
- Mid game: Blink Dagger OR Desolator → BKB
- Late game: Assault Cuirass, Abyssal Blade, Overwhelming Blink
Fight timing: WK wants to fight constantly after Armlet. His power curve is front-loaded — he’s strongest relative to other carries in the mid game. Don’t play WK as a passive farmer. Use your stun, use your two lives, and take fights. If you die once in a fight, that’s fine — your team just got a massive mana burn on the enemy.
5. Luna
Win rate across all brackets: ~53%
Best brackets: Crusader through Divine
Difficulty: Low-Medium
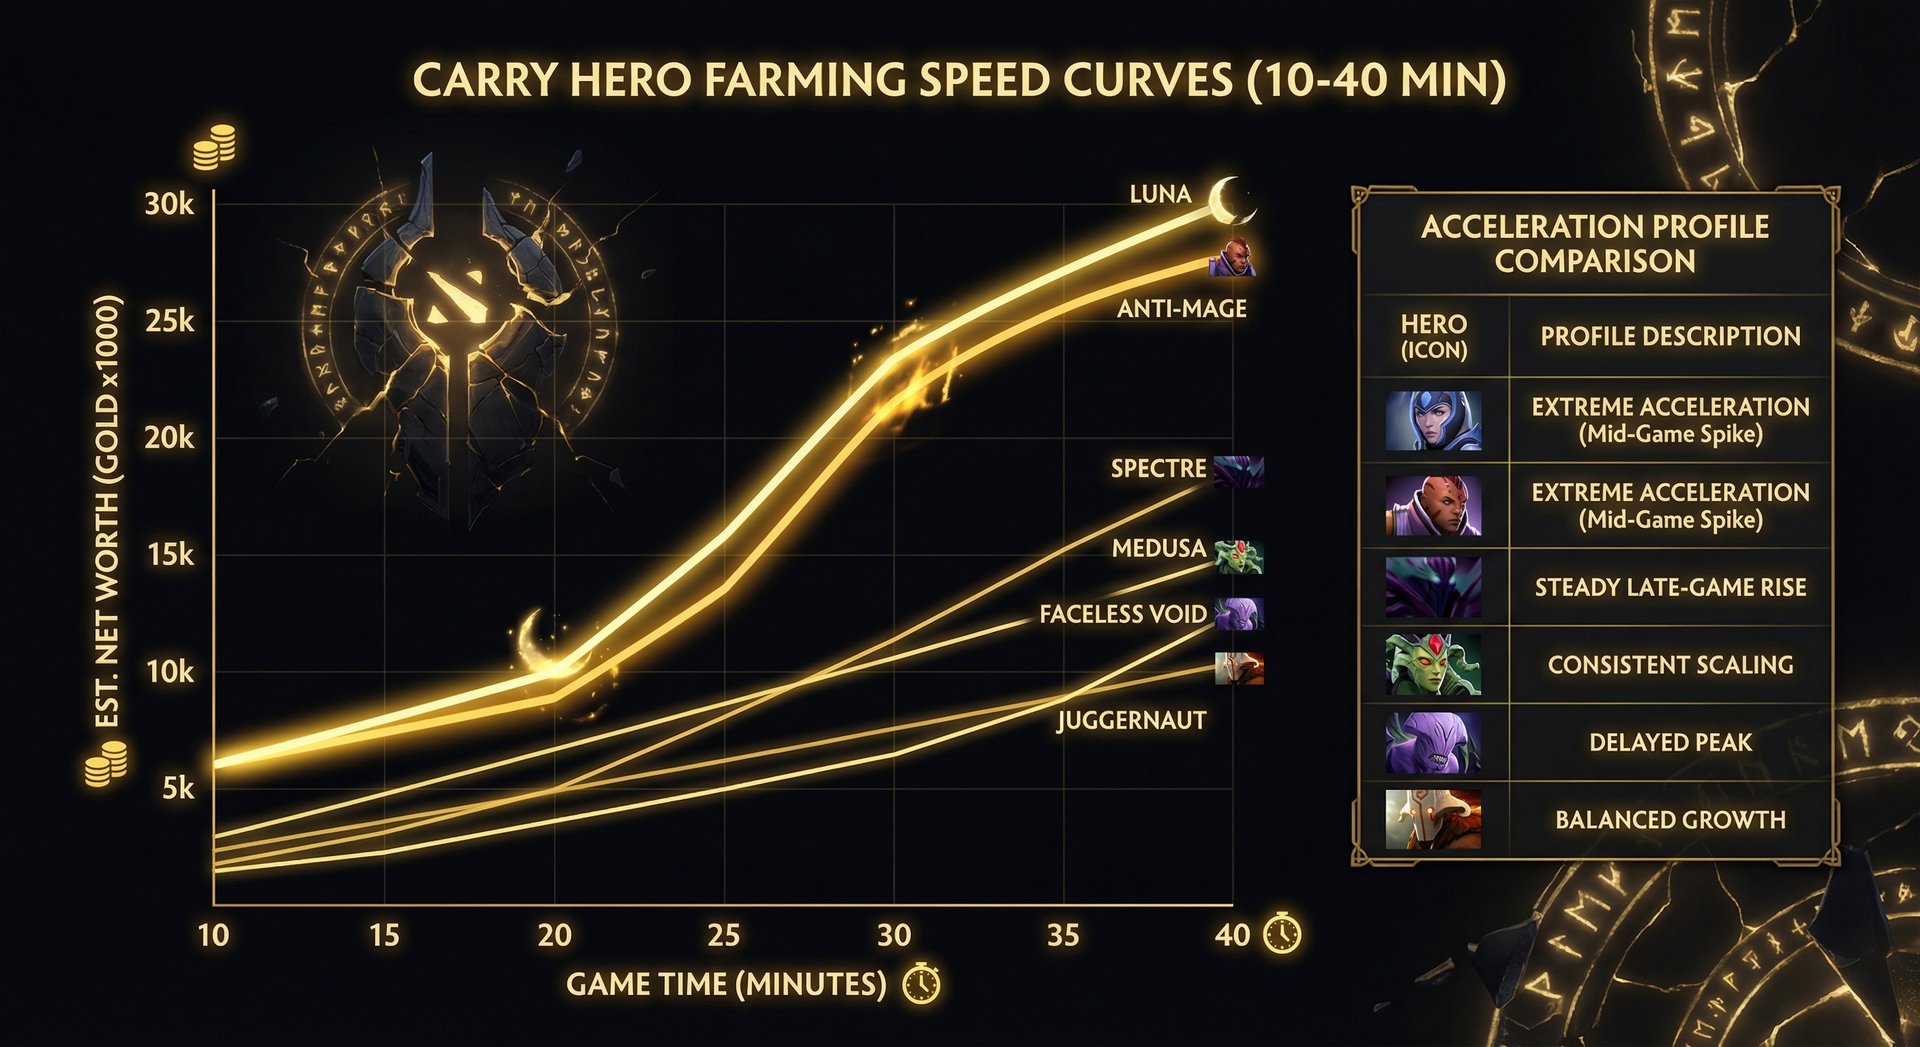
Luna is the fastest-farming carry in Dota 2, full stop. Moon Glaives let her clear entire waves and jungle camps in seconds. In a meta where hitting item timings faster than the enemy carry wins games, Luna’s farming speed gives her an enormous edge.
Why Luna is S-tier for climbing:
- Moon Glaives = fastest farming speed of any carry
- Eclipse provides massive burst damage in early-mid game fights
- Lunar Blessing aura benefits your entire team passively
- Extremely strong high-ground push with glaives bouncing through buildings
- Can hit 700+ GPM consistently even in losing games
Farming pattern: Luna’s farming pattern is all about efficiency. After your first core item (usually Mask of Madness or HotD), you should be clearing the lane in 3-4 seconds with glaives, then immediately moving to jungle camps. Stack the triangle whenever possible — Luna clears triple-stacked ancients faster than any other carry. Target 10+ CS per minute from 15 minutes onward.
Itemization path:
- Starting: Tango, Wraith Band components
- Early game: Power Treads → Mask of Madness
- Mid game: Manta Style → BKB
- Late game: Butterfly, Satanic, Skadi, Silver Edge
Fight timing: Luna’s biggest timing is level 6 with Eclipse. At this point, if you can find isolated heroes, Eclipse will kill them outright. The second major spike is around 20-22 minutes when you have Manta + BKB. At this point, group with your team and start pushing. Luna falls off relative to hard carries late game, so don’t let the game go past 40 minutes if you can help it.
A-Tier Carries: Reliable Climbers
6. Lifestealer
Win rate: ~52% | Best brackets: Archon through Immortal | Difficulty: Medium
Lifestealer is the anti-tank carry. His Feast passive deals percentage-based damage, meaning he shreds high-HP heroes like Centaur, Pudge, and Bristleback. Rage provides built-in BKB, letting you skip or delay the actual BKB purchase and hit other items faster.
Key strengths:
- Rage gives magic immunity without needing BKB
- Feast deals percentage HP damage — melts tanky offlaners
- Infest provides escape, initiation, and burst damage
- Strong in extended fights due to lifesteal sustain
- Excellent Roshan threat at all stages
Itemization: Armlet → Desolator → Assault Cuirass OR Phase → Radiance → Basher → AC. The Armlet build is for fighting; the Radiance build is for farming. In solo queue, Armlet + Deso is almost always better because it lets you fight early.
When to pick: Pick Lifestealer when the enemy team has 2+ high-HP strength heroes. Avoid picking him into heavy kiting (Ghost Scepter, Force Staff, Glimmer Cape lineups).
7. Ursa
Win rate: ~53% | Best brackets: Herald through Ancient | Difficulty: Low-Medium
Ursa is a lane dominator and early-game monster. Fury Swipes stack damage exponentially, meaning Ursa wins almost every 1v1 in the game. If you want to play aggressively from minute one, Ursa is your hero.
Key strengths:
- Fury Swipes makes him the strongest 1v1 fighter at nearly every stage
- Overpower provides instant attack speed for burst combos
- Enrage reduces all damage taken and dispels — incredibly hard to kill
- Fastest Roshan killer in the game — can solo Rosh at level 7-8 with lifesteal
- Simple execution, devastating when ahead
Itemization: Phase Boots → Morbid Mask → Blink Dagger → BKB → Abyssal Blade → Satanic. Blink is non-negotiable on Ursa. Without Blink, enemies simply run away. With Blink, you jump on them and delete them before they can react.
Critical tip: Always Roshan the moment you have lifesteal. The Aegis on Ursa is game-breaking. Do it again every time Rosh respawns. In lower brackets, enemies almost never contest Roshan — free Aegis every 8-11 minutes.
8. Slark
Win rate: ~51% | Best brackets: Archon through Divine | Difficulty: Medium-High
Slark is the snowball carry. Essence Shift permanently steals stats from enemies you attack, meaning the longer the game goes and the more fights you win, the more powerful you become. Shadow Dance makes you nearly impossible to kill when played correctly.
Key strengths:
- Essence Shift snowballs — each kill makes you permanently stronger
- Shadow Dance provides insane regen and untargetability
- Dark Pact dispels almost everything — counters most disables
- Pounce provides a leash that prevents enemies from escaping
- Excellent at pickoffs and hunting isolated heroes
Itemization: Power Treads → Diffusal Blade → Sange & Yasha → BKB → Skadi → Abyssal. Diffusal is core because the mana burn combined with Essence Shift’s AGI steal makes you an unstoppable dueling machine.
Playstyle note: Slark does NOT want to team fight 5v5. He wants to pick off lone heroes, steal their stats, regenerate with Shadow Dance, then pick off the next one. Think of him as an assassin, not a front-liner.
9. Chaos Knight
Win rate: ~54% | Best brackets: Herald through Legend | Difficulty: Low
CK is the ultimate pubstomper in lower brackets. His ultimate creates illusions that deal 100% damage — when Phantasm is up, CK hits like an absolute truck. The RNG on his stun and crit can be frustrating, but the sheer burst damage he provides is unmatched.
Key strengths:
- Phantasm illusions deal full damage — insane burst potential
- Chaos Bolt provides a long-duration stun (up to 4 seconds)
- Reality Rift pulls enemies into your illusion army — guaranteed kill
- Naturally tanky strength hero — hard to burst
- Destroys towers with illusions after winning fights
Itemization: Power Treads → Armlet → Manta Style → BKB → Heart of Tarrasque. Armlet is broken on CK because illusions copy the Armlet bonus — each illusion gets +65 damage and +500 HP.
10. Medusa
Win rate: ~51% | Best brackets: Legend through Immortal | Difficulty: Medium
Medusa is the late-game insurance policy. If the game goes past 35-40 minutes and Medusa has her items, she’s nearly impossible to kill and deals massive AoE damage. Mana Shield makes her the tankiest carry in the game.
Key strengths:
- Mana Shield makes her effectively have 2-3x the HP of other carries
- Split Shot provides massive AoE damage in team fights
- Stone Gaze is a fight-winning ultimate — forces enemies to look away or get stunned
- Scales harder than almost any carry into ultra-late game
Itemization: Power Treads → Mage Slayer OR Maelstrom → Manta Style → Skadi → Butterfly → Rapier. Medusa’s item builds have evolved — Mage Slayer provides excellent stats and farming acceleration. Skadi is core for the mana pool and stats.
Warning: Medusa is bad in lower brackets because she needs time to farm. In Herald-Crusader games where team fights start at 10 minutes and never stop, Medusa often can’t reach her timings. Only pick her in brackets where you can expect 30+ minute games with some space.
11. Troll Warlord
Win rate: ~51% | Best brackets: Archon through Divine | Difficulty: Medium
Troll Warlord is a versatile fighter-farmer who excels at taking Roshan and manfighting. His ultimate, Battle Trance, makes him unkillable for several seconds while massively boosting his attack speed. Troll is excellent at split-pushing, Roshing, and forcing the enemy to respond to him.
Key strengths:
- Ranged and melee toggle provides incredible flexibility
- Battle Trance makes him nearly invincible for its duration
- Fervor stacks attack speed — becomes a machine gun on focused targets
- One of the fastest Roshan killers
- Strong laning with ranged harass and melee last-hitting
Itemization: Phase Boots → Maelstrom → BKB → Satanic → Daedalus → Abyssal. BKB is even more essential on Troll than most carries because Battle Trance forces you to attack the nearest enemy — getting disabled during ult is devastating.
B-Tier Carries: Situational Powerhouses
B-tier heroes aren’t bad — they’re situational. In the right game, they can be the best pick. In the wrong game, they’ll lose you MMR. The key difference between B-tier and higher tiers is consistency.
12. Anti-Mage
Win rate: ~49% | Best brackets: Legend through Immortal | Difficulty: High
Anti-Mage is the most polarizing carry in Dota 2. When AM gets a good lane and hits his Battle Fury by 14-15 minutes, he takes over the game by outfarming everyone. When he has a bad lane and gets a 20-minute Battle Fury, he’s a liability.
Why he’s B-tier: AM requires excellent farming efficiency, map awareness, and decision-making. In lower brackets, AM players often farm for 35 minutes while their team loses 4v5. The hero punishes poor decision-making harder than almost any other carry. He also gets destroyed by certain matchups (heroes with catch like Storm Spirit, Spirit Breaker).
When to pick: Pick AM when you have a strong front-liner mid and offlane who can create space, and the enemy team has 2+ intelligence-heavy heroes for Mana Void to destroy. Avoid picking AM into gap-closers and heavy disable.
Itemization: Power Treads → Battle Fury (rush by 14-16 min) → Manta Style → Abyssal Blade → Butterfly → Skadi
13. Spectre
Win rate: ~52% | Best brackets: Crusader through Ancient | Difficulty: Medium
Spectre is the hardest scaling carry in Dota 2. Haunt lets her join fights from anywhere on the map. Dispersion returns damage to attackers. Desolate provides pure damage on isolated targets. The problem She has one of the worst laning phases in the game.
Why she’s B-tier: Spectre needs 25+ minutes to become relevant. In today’s fast-paced meta, that’s often too long. If the enemy pushes aggressively between 15-25 minutes, Spectre may never come online. However, if you CAN survive that window, Spectre wins 60%+ of games that go past 40 minutes.
When to pick: Pick Spectre when your team has strong early-game heroes who can hold towers while you farm. Great against squishy lineups where Desolate shreds isolated supports.
Itemization: Power Treads → Blade Mail → Radiance OR Manta Style → Skadi → Heart → Butterfly
14. Terrorblade
Win rate: ~50% | Best brackets: Ancient through Immortal | Difficulty: High
TB has the highest farming potential of any carry thanks to Metamorphosis and Conjure Image. He can farm all three lanes plus jungle simultaneously with illusions. Sunder is one of the most clutch abilities in the game — instantly swapping HP with an enemy.
Why he’s B-tier: TB has the lowest base HP in the game. He gets one-shot by magic burst in the early-mid game. He requires precise micro management of illusions and excellent positioning. In lower brackets, TB players don’t use illusions efficiently and die to magic damage constantly.
When to pick: Pick TB against physical damage lineups where his insane armor (highest AGI gain in the game) shines. Avoid TB against heavy magical burst (Lina, Lion, Skywrath).
Itemization: Power Treads → Dragon Lance → Manta Style → Skadi → Butterfly → Satanic
15. Morphling
Win rate: ~48% | Best brackets: Divine and Immortal only | Difficulty: Very High
Morphling is the highest skill-ceiling carry in Dota 2. His attribute shift mechanic lets him go full AGI for damage or full STR for survivability in real-time. In the hands of a skilled player, Morphling is nearly unkillable and deals absurd damage.
Why he’s B-tier: Below Divine, Morphling loses more games than he wins. The hero requires perfect attribute shifting — one mistake (shifting too much AGI against burst) and you’re dead. He also has a terrible laning phase and needs 3+ items to be effective.
When to pick: Only pick Morphling if you have 200+ games on him. Seriously. This is not a hero you “try out” in ranked. When mastered, he’s the best carry in the game. When not mastered, he’s the worst.
16. Phantom Lancer
Win rate: ~50% | Best brackets: Archon through Divine | Difficulty: Medium
PL creates an army of illusions that overwhelm the enemy. Against teams without AoE, PL is nearly impossible to deal with — they literally can’t find the real one. Doppelganger provides a strong dispel and escape mechanism.
Why he’s B-tier: PL gets hard-countered by AoE (Earthshaker, Ember Spirit, Leshrac). If the enemy picks strong AoE heroes, your illusions die instantly and you become a mediocre right-clicker. He’s also mana-dependent and needs Diffusal Blade to function.
Itemization: Power Treads → Diffusal Blade → Manta Style → Heart → Skadi → Butterfly
17. Drow Ranger
Win rate: ~50% | Best brackets: Crusader through Ancient | Difficulty: Medium
Drow’s Marksmanship provides massive AGI and proc damage, making her a devastating right-clicker. Gust provides AoE silence, and Frost Arrows slow enemies. She also buffs ranged teammates with her aura.
Why she’s B-tier: Drow gets destroyed by gap-closers. If a PA, Slark, or Storm Spirit jumps on her, Marksmanship turns off (it deactivates when enemies are close) and she dies. Drow requires careful positioning that lower-bracket players often can’t maintain.
When to pick: Pick Drow with 2+ other ranged heroes on your team to maximize the aura. Avoid picking into heavy dive lineups.
18. Naga Siren
Win rate: ~49% | Best brackets: Ancient through Immortal | Difficulty: High
Naga is the split-push queen. Her illusions can farm the entire map simultaneously, and Song of the Siren provides a guaranteed disengage or initiation setup. In long games, Naga outfarms every other carry.
Why she’s B-tier: Naga requires excellent illusion micro and map awareness. She needs 30+ minutes to come online, and in lower brackets, teammates will flame you for “not fighting” while you farm with illusions. She’s also a poor fighter until very late game.
Itemization: Power Treads → Diffusal Blade → Manta Style → Heart → Skadi → Butterfly
Universal Farming Patterns Every Carry Must Know
Regardless of which hero you pick, your farming efficiency is the single biggest determinant of your success as a carry. The difference between a 3K and a 6K carry isn’t reaction time or game knowledge — it’s how much gold they get per minute.
The Triangle Priority System
The “triangle” (the three jungle camps near the outpost, adjacent to the safe lane T2 tower) is the most important farming area for your carry. Here’s why:
- It contains the highest-value jungle camps (ancients + large camp)
- It’s close to your safe lane for quick lane farm rotations
- It’s defensible — enemies have to commit deeply to contest it
- Stacking the camps multiplies their value exponentially
Farming rotation:
- Clear the lane wave (push it past the river if safe)
- Move to the closest jungle camp
- Clear 2-3 jungle camps while the next wave arrives
- Return to lane for the next wave
- Repeat endlessly
Target CS benchmarks by game time:
| Time | Minimum CS | Good CS | Excellent CS |
|---|---|---|---|
| 10 min | 50 | 70 | 90+ |
| 15 min | 80 | 110 | 140+ |
| 20 min | 120 | 160 | 200+ |
| 25 min | 160 | 220 | 270+ |
| 30 min | 200 | 280 | 340+ |
If you’re consistently below the “Minimum CS” column, your farming pattern is the biggest thing holding you back. Focus on this before anything else. Even if you’re making good fight decisions, you can’t fight effectively without items, and items come from farm.
Stacking and Efficiency
Every carry player should know how to stack camps. Pull jungle creeps away from their camp at the :53-:55 second mark (varies slightly by camp), and new creeps will spawn. This doubles (or triples) the camp’s value.
Ask your supports to stack for you. In solo queue, this doesn’t always happen, so learn to stack yourself between farming rotations. Stacking the Ancient camp is especially valuable — a triple-stacked Ancient camp is worth 500-700 gold.
Dead Time Awareness
“Dead time” is any second you spend not hitting creeps, heroes, or buildings. Walking between camps Dead time. Standing in fog waiting for a gank Dead time. TPing to a fight that’s already over Dead time.
High-MMR carries minimize dead time ruthlessly. Every second counts. If you TP to a fight, make sure the fight is actually happening and you can contribute. If you’re walking to a camp, make sure you’re not walking past a creep wave you could farm instead.
This concept alone — minimizing dead time — can increase your GPM by 100-150 if you actively focus on it.
When to Fight vs. When to Farm: The Decision Framework
This is the single most important decision a carry player makes, and most players below Divine get it wrong constantly. They either fight too much (losing farm and dying) or farm too much (letting their team lose 4v5).
Here’s a simple framework:
Fight when ALL of these are true:
- Your ultimate / key spell is available (Chrono, Omnislash, Eclipse, etc.)
- You have a core item advantage (you just finished BKB while the enemy carry is still farming theirs)
- Your BKB / survivability tool is available
- The fight is near your team or an objective (tower, Roshan, outpost)
- You can see at least 3+ enemy heroes (so you know it’s a real fight, not a bait)
Farm when ANY of these are true:
- Your ultimate is on cooldown (especially Chrono, Eclipse, Haunt)
- You’re close to a major item (within 500-800 gold of finishing BKB/Manta/etc.)
- The enemy team is grouped as 5 (farming the opposite side of the map is safer)
- You just died and have no buyback (play safe, farm, get buyback gold)
- You’re behind on items (fighting from behind as a carry rarely works)
The golden rule: If you’re unsure whether to fight or farm, ask yourself: “If I show up to this fight, will I actually get kills and survive” If the answer is uncertain, farm. A carry who farms efficiently and shows up to the right fights will climb faster than one who shows up to every fight.
If this decision-making process feels overwhelming, professional coaching from TeamSmurf can review your replays and show you exactly where your fight-vs-farm decisions cost you games.
Bracket-Specific Hero Recommendations
Not all heroes work equally well in all brackets. The reason is simple: different brackets have different playstyles. Herald games are chaotic brawls; Immortal games are strategic chess matches. Your hero pick should match the style of games at your MMR.
| Bracket | MMR Range | Best Carry Picks | Why |
|---|---|---|---|
| Herald | 0-700 | Wraith King, PA, Juggernaut | Simple execution, forgiving, can solo carry fights |
| Guardian | 700-1500 | WK, PA, Jugg, CK, Ursa | Same as Herald but enemies are slightly more organized |
| Crusader | 1500-2200 | PA, Jugg, Luna, Void, Ursa | Players start understanding farming; Luna’s speed shines |
| Archon | 2200-2900 | Void, PA, Luna, Slark, Lifestealer | More structured games; Void’s Chrono becomes devastating |
| Legend | 2900-3700 | Void, Luna, Medusa, Troll, Slark | Players give carries space; late-game heroes become viable |
| Ancient | 3700-4600 | Void, Luna, TB, AM, Morphling | Efficient farming rewarded; high-ceiling heroes start working |
| Divine | 4600-5500 | Void, Morphling, TB, Naga, AM | Mechanical skill and decision-making fully rewarded |
| Immortal | 5500+ | Meta-dependent; any hero with mastery | All heroes viable with sufficient skill and game understanding |
If you’re in Herald or Guardian and finding it incredibly difficult to climb, you’re not alone. Check out our guides on escaping Herald rank and climbing from Guardian to Crusader for bracket-specific strategies that go beyond just hero picks.
Alternatively, if you want to skip the grind entirely, TeamSmurf’s MMR boost service can get you to your target rank quickly so you can play at the level you deserve.
Core Itemization Principles for Pos 1
Knowing WHAT to buy is just as important as knowing WHICH hero to play. Here are the universal itemization principles that every carry player needs to internalize:
1. BKB Timing
BKB is the most important item for carries. Period. In almost every game, you need BKB, and the timing of your BKB purchase often determines whether you win or lose. Here’s the general rule:
- Buy BKB as your 2nd or 3rd major item in most games
- Rush BKB first if the enemy has 3+ disables that prevent you from hitting
- Delay BKB to 4th item only if the enemy team has almost no magic damage or disables (rare)
The most common mistake in lower brackets: buying BKB too late. A 25-minute BKB with 10 seconds of magic immunity wins fights. A 40-minute BKB with 6 seconds doesn’t do much.
2. Farming Items vs. Fighting Items
Every carry build involves a choice: do I buy a farming item first to accelerate, or a fighting item to join fights early
| Farming Items | Fighting Items |
|---|---|
| Battle Fury | Desolator |
| Maelstrom / Mjollnir | BKB |
| Radiance | Diffusal Blade |
| Mask of Madness | Basher / Abyssal |
| Hand of Midas | Blink Dagger |
General rule: If your team is winning or the game is slow, buy a farming item first. If your team is losing and needs you to fight, buy a fighting item. In solo queue, fighting items are usually safer because you can’t rely on teammates to create space.
3. Adapt Your Build
Don’t follow the same item build every game. Here are common adaptations:
- Enemy has lots of physical damage Prioritize Butterfly, Assault Cuirass, or armor items
- Enemy has break Don’t rely on passive abilities (bad for Spectre, PA)
- Enemy has Halberd or Ghost Scepter Buy Nullifier
- Enemy has evasion Buy MKB
- Enemy is kiting you Buy Blink or Swift Blink
- You keep getting burst down Buy Satanic or Linken’s Sphere
4. Buyback Gold
After 30 minutes, always keep buyback gold. Dying without buyback in the late game often means losing the game — the enemy pushes high ground and ends while you’re dead for 60+ seconds. This is non-negotiable. If you have 4000 gold and your next item costs 5000, don’t spend to 0 and die. Keep 3000-4000 reserved for buyback.
Top 10 Mistakes Carry Players Make (And How to Fix Them)
Even with the right hero pick and item build, there are common mistakes that sabotage carry players at every bracket. Here are the top 10:
- Fighting without key items. Don’t join fights before you have your core items. A PA without BF is useless in a team fight.
- Showing on the map unnecessarily. Don’t farm a pushed lane when the enemy team is missing. Farm jungle safely instead.
- Ignoring power spikes. When you finish a major item (BKB, Manta, etc.), immediately look for a fight or objective. Don’t just keep farming.
- Poor last-hitting. Practice last-hitting in demo mode. Aim for 60+ CS at 10 minutes minimum.
- Not stacking camps. Free gold is being left on the map every minute you don’t stack.
- TPing to lost fights. If your team is already dead and the enemy is pushing, DON’T TP to defend 1v5. Farm the opposite side and trade towers.
- No buyback awareness. After 30 minutes, always have buyback. Always.
- Dying to ganks while farming. Check the minimap every 3-5 seconds. If you see 3 enemies and 2 are missing, assume they’re coming for you.
- Wrong item build. Build according to the game, not according to a guide. MKB against evasion. BKB against disables. Adapt.
- Tilting after a bad lane. Bad lanes happen. The difference between winning and losing after a bad lane is whether you keep farming efficiently or start making desperate plays.
These mistakes are exactly what professional boosters at TeamSmurf exploit to maintain 90%+ win rates during boosts. They farm efficiently, fight at the right times, and never make emotional decisions.
Frequently Asked Questions
Conclusion: Choosing Your Carry and Committing
The best carry heroes in Dota 2 for 2026 are the ones that match your playstyle, your bracket, and your willingness to practice. S-tier heroes like Faceless Void, PA, Juggernaut, Wraith King, and Luna are safe picks for almost any game. A-tier heroes like Lifestealer, Ursa, and Slark are powerful with the right matchup knowledge. B-tier heroes like Morphling and Terrorblade reward mastery with some of the highest ceilings in the game.
The common thread across ALL successful carry players is farming efficiency, fight timing, and item adaptation. Master these three pillars and you’ll climb with any hero on this list.
Ready to Climb Start Your Boost Today
Team Smurf is the #1 rated Dota 2 boosting service in 2026. Immortal-rank boosters, maximum safety, competitive pricing, 24/7 support.
Written by Team Smurf’s Immortal-rank analysts — Rankings last verified February 2026


