How to Climb from Archon to Legend as Pos 4 Soft Support in Dota 2 (2026 Guide)

Position 4 soft support is the most chaotic, creative, and misunderstood role in Archon Dota. It’s the role where you can roam the map making plays from minute 1, where a single smoke gank can snowball the entire game, and where the difference between a good pos 4 and a bad one is measured in thousands of net worth across your team.
It’s also the role where Archon players make the most excuses. “I’m just a support, I can’t carry.” “My cores are bad, I can’t do anything.” “I had no gold for items.” These are all lies you tell yourself to avoid confronting the truth: Position 4 is one of the highest-impact roles in Dota 2, and if you’re stuck in Archon, it’s because you’re not playing it correctly.
The Archon-to-Legend climb as a pos 4 is about understanding your two jobs: win the early game through rotations and win the mid-game through vision, saves, and playmaking. Do these two things consistently, and your MMR will climb faster than you expect. This guide will show you exactly how.
Table of Contents
- Understanding the Archon Pos 4 vs. the Legend Pos 4
- Top 5 Heroes to Climb from Archon to Legend as Pos 4
- The 10 Most Common Mistakes Archon Pos 4 Players Make
- Phase-by-Phase Guide for Archon Pos 4 Players
- Dealing With the “Archon Teammate” Problem
- Your Realistic Timeline: Archon to Legend
- Frequently Asked Questions
- Ready to Make Plays Start Your Climb Now
Understanding the Archon Pos 4 vs. the Legend Pos 4
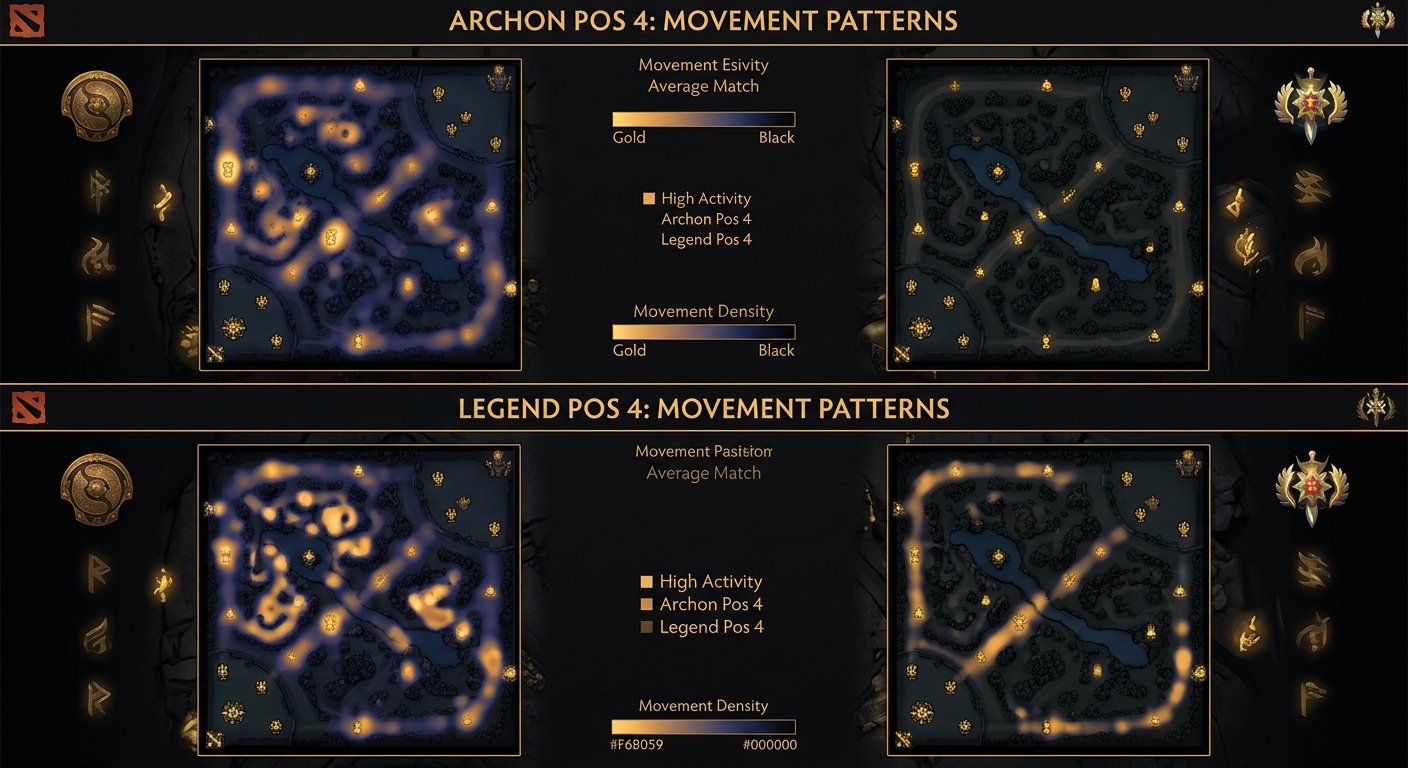
The Activity Gap
The single biggest difference between Archon and Legend pos 4 players is activity level. An Archon pos 4 sits in the offlane for 10 minutes, occasionally throws a spell, and then wanders around the map aimlessly for the rest of the game. A Legend pos 4 is constantly moving–harassing in lane, pulling camps, rotating to mid for a gank, smoking to the enemy jungle, stacking camps for their mid, warding aggressively–they never stop.
Let’s put numbers on it. An average Archon pos 4 might make 2-3 meaningful plays (kills, saves, rotations) in the first 15 minutes. A Legend pos 4 makes 6-10. That gap is enormous. Every additional play you make creates a ripple effect–a kill on the enemy mid gives your mid a level advantage, which translates into a won rune fight, which becomes a rotation that kills the enemy carry. One play leads to three more.
The Vision Gap
Archon pos 4 players treat wards as an afterthought. They’ll buy an observer ward, place it in the same spot every game (the rune spot), and consider their warding duties complete. Legend pos 4 players treat vision as a strategic weapon. They ward aggressively to enable ganks, defensively to protect farming cores, and always dewarding to blind the enemy team.
Good warding wins games. A well-placed aggressive ward in the enemy jungle at 10 minutes reveals their carry’s farming patterns, enabling your team to hunt them down. A defensive ward protecting your carry’s farming triangle prevents ganks and lets them farm efficiently. Vision is the difference between your team making informed decisions and stumbling around in the dark.
The Efficiency Gap
Archon pos 4 players have massive amounts of dead time–periods where they’re doing literally nothing productive. Walking between lanes without purpose. Standing in trees waiting for something to happen. Following their offlaner around like a lost puppy. Every second of dead time is a second where you could be stacking a camp, placing a ward, pulling a lane, or setting up a gank.
Legend pos 4 players always have a plan. They know where they’re going, why they’re going there, and what they’ll do when they arrive. Between rotations, they stack camps. Between stacks, they ward. Between wards, they pull. There’s no wasted movement, no dead time, no standing around.
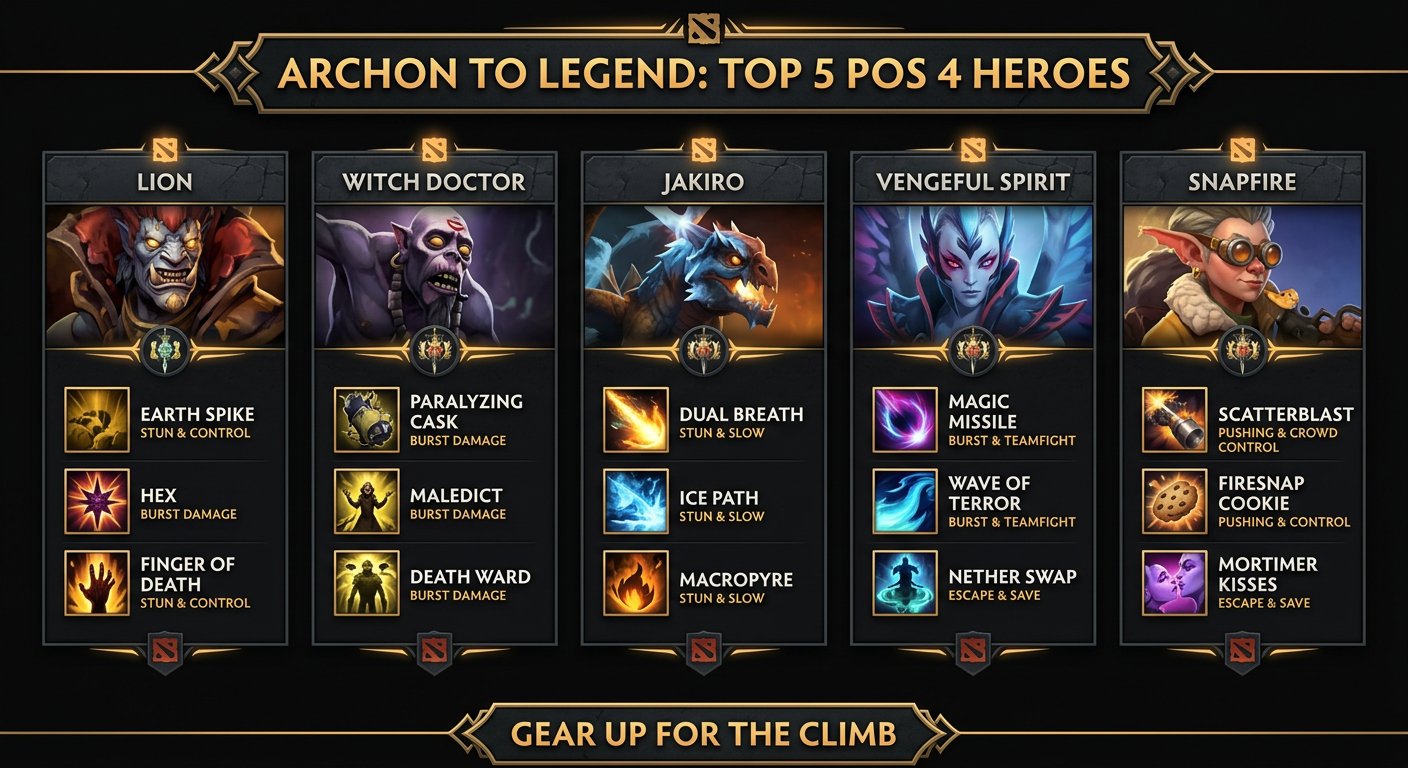
Top 5 Heroes to Climb from Archon to Legend as Pos 4
1. Spirit Breaker
Why he’s perfect for climbing: Spirit Breaker is the ultimate pos 4 for climbing because he has global presence. Charge of Darkness lets you gank any lane from anywhere on the map, and in Archon, enemies rarely react to Charge until it’s too late. Greater Bash provides lockdown, Bulldoze gives magic resistance, and Nether Strike is a BKB-piercing stun. You don’t need items to be effective–just levels and aggression.
Item build: Boots → Urn of Shadows → Phase Boots → Spirit Vessel → Blade Mail or Glimmer Cape → Black King Bar or Aghanim’s Scepter.
How to play him in Archon: Start in the offlane and help your pos 3 get level 2-3. Then start charging. Charge the enemy mid when they push their wave forward. Charge the enemy carry when they walk up for a last hit. Charge the enemy support when they ward. The key is CONSTANT pressure–you want the enemy team to feel like they’re being hunted at all times. In Archon, players don’t check the minimap for Charge animations, so you’ll get away with ganks that would never work in higher brackets. Build Urn early to snowball your gold from kills, then Spirit Vessel to counter enemy regen and deal percentage-based damage.
Key tip: Charge from fog whenever possible. If the enemy can see you channeling Charge from the offlane, they have 3-4 seconds to react. If you charge from behind your tower or from the jungle, they have less than a second. Also, always carry a TP scroll–after a successful charge, you can TP back to your lane or to another lane to charge again.
2. Mirana
Why she’s perfect for climbing: Mirana’s Sacred Arrow is a 5-second stun at max range–the longest non-ultimate stun in the game. In Archon, players walk in predictable patterns and rarely dodge skillshots, which means you’ll land arrows that would never connect in Legend. Leap provides mobility and escape, Starstorm adds burst damage, and Moonlight Shadow (ultimate) gives your entire team invisibility for ganks and escapes. Archon players almost never buy detection, making Moonlight Shadow a free teamfight tool.
Item build: Boots → Urn of Shadows → Arcane Boots → Spirit Vessel → Force Staff or Eul’s Scepter → Aghanim’s Scepter → Solar Crest.
How to play her in Archon: Start in the offlane, land level 1 arrows from fog to secure kills with your pos 3. After level 3, start roaming. Position yourself on high ground or behind trees where enemies can’t see you, and wait for them to walk in a straight line–then fire the arrow. A 5-second stun at level 1 is enough time for any teammate to walk up and kill the target. In mid-game, use Moonlight Shadow offensively for smoke-like engagements. Tell your team “ult ready, let’s group,” then pop the invisibility and walk as a team into the enemy jungle for a pick-off. In Archon, this works almost every time because nobody carries dust.
Key tip: Arrow hitbox is much wider than it looks. When in doubt, throw it. The worst that happens is you miss and try again in 15 seconds. The best that happens is a 5-second stun that leads to a kill and objective. Also, arrow from behind trees across the river to hit the enemy mid–the travel time across the river means the arrow reaches them before they can react.
3. Clockwerk
Why he’s perfect for climbing: Clockwerk is a catch machine. Hookshot provides long-range initiation, Battery Assault mini-stuns and deals damage in close range, Power Cogs traps enemies in a small area, and Rocket Flare gives global vision and wave clear. In Archon, isolated heroes are everywhere–a carry farming alone in the jungle, a mid walking to grab a rune, a support warding without backup. Clockwerk punishes all of them.
Item build: Urn of Shadows → Tranquil Boots → Spirit Vessel → Force Staff → Blade Mail → Aghanim’s Shard → Aghanim’s Scepter.
How to play him in Archon: In lane, use Battery Assault and Power Cogs to secure kills. If you can trap the enemy carry inside Cogs at level 2-3 with Battery Assault running, they die–period. After laning, Clockwerk becomes a hunter. Use Rocket Flare to scout jungle camps and lane positions. When you spot an isolated enemy, Hookshot in, Cogs them, and Battery Assault while your team collapses. The key is NEVER Hookshot into multiple enemies–Clockwerk is incredible at solo pick-offs but terrible in 5v5 brawls. Pick your targets carefully.
Key tip: Power Cogs push enemies away AND drain their mana. In Archon, heroes like Wraith King and Sven who rely on mana for their stuns become useless inside Cogs because you drain all their mana. This also works defensively–Cogs your own carry to protect them from melee heroes chasing them down.
4. Earth Spirit
Why he’s perfect for climbing: Earth Spirit is the highest-skill-ceiling pos 4 in the game, and if you invest the time to learn him, he’s the single best climbing hero in the role. Rolling Boulder provides mobility and initiation, Boulder Smash pushes enemies (or stones) for stuns, Geomagnetic Grip pulls allies to safety or stones for silences, and Magnetize deals massive damage over time in team fights. His toolkit is so versatile that he can gank, save, initiate, and deal damage–all from a support budget.
Item build: Urn of Shadows → Tranquil Boots → Spirit Vessel → Force Staff or Glimmer Cape → Eul’s Scepter → Aghanim’s Scepter.
How to play him in Archon: Earth Spirit requires practice, but his power in Archon is unmatched. Starting from level 2, you can kill almost anyone with your combo: place a Remnant, Boulder Smash it into the enemy (stun), then Rolling Boulder into them. This combo deals 300+ damage at level 2 and stuns for 1.5 seconds–more than enough for your offlaner to follow up. After laning, roam constantly. Smoke, roll into the enemy mid, kick them into your team. Use Geomagnetic Grip to pull allies out of danger when they’re caught out of position–Archon carries get caught constantly, and your saves will win games. In team fights, Magnetize 2-3 enemies and refresh it with Remnants to deal 600+ damage over time while your team cleans up.
Key tip: Practice the kick-into-roll combo in private lobbies. Place a Remnant behind you, Boulder Smash the enemy hero, then immediately Rolling Boulder to follow them. This displacement combo is Earth Spirit’s bread and butter and can relocate enemy heroes from safe positions into your team’s killing zone. 30 minutes of practice will change your entire understanding of the hero.
5. Hoodwink
Why she’s perfect for climbing: Hoodwink brings incredible burst damage, a long-range nuke, tree-based mobility, and a disarm/slow to the pos 4 role. Acorn Shot bounces for surprising damage, Bushwhack stuns enemies near trees (and there are trees EVERYWHERE), Scurry gives evasion and tree-walking, and Sharpshooter is a long-range nuke that break and slows. In Archon, players don’t respect tree positioning, which means Bushwhack lands constantly.
Item build: Tranquil Boots → Urn of Shadows → Medallion of Courage (into Solar Crest) → Gleipnir → Aghanim’s Scepter → Glepnir.
How to play her in Archon: Hoodwink’s laning is about Bushwhack. Position yourself near trees (which is easy–mid lane and side lanes all have trees nearby), and Bushwhack the enemy for the stun + Acorn Shot damage. The burst at level 3 is genuinely scary–300+ damage that most Archon players don’t expect from a pos 4. After laning, Hoodwink transitions into a semi-core roamer. Her farm speed with Acorn Shot is decent, and she scales well with items like Gleipnir and Aghanim’s. Use Scurry to navigate through trees for creative gank angles, and Sharpshooter to snipe enemies running away from fights. The break on Sharpshooter is incredibly valuable against Bristleback, Phantom Assassin, and other passive-dependent heroes.
Key tip: Acorn Shot creates a tree on impact. This means you can Acorn Shot a hero in the middle of the lane (where there are no trees), and then immediately Bushwhack them using the tree your Acorn Shot just created. This combo works even in open areas and is incredibly difficult for Archon players to anticipate or dodge.
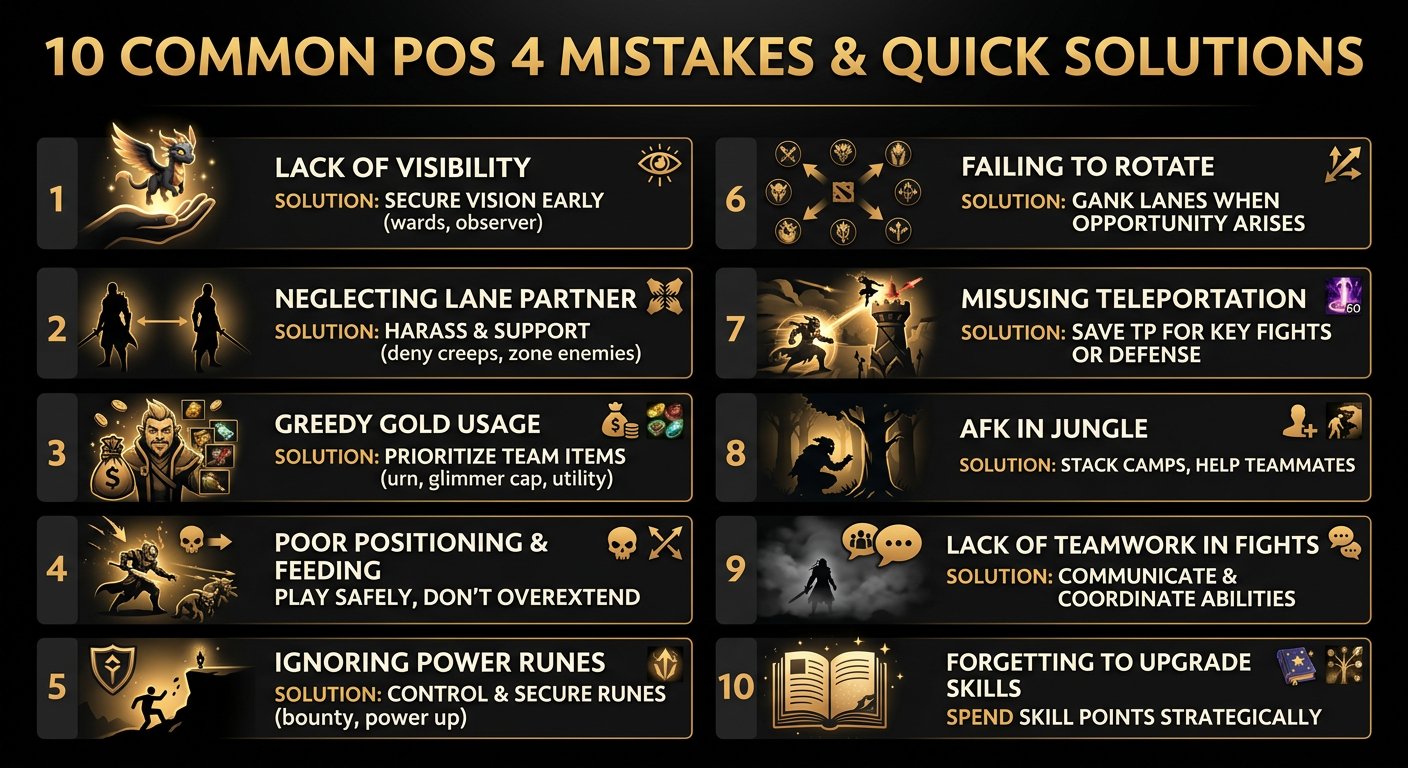
The 10 Most Common Mistakes Archon Pos 4 Players Make
Mistake #1: Staying in the Offlane Too Long
The number one mistake. Archon pos 4 players sit in the offlane for 12-15 minutes, soaking experience from their offlaner, accomplishing nothing, and reaching level 6 at the same time as their pos 3–who would have gotten there faster solo. You are not a lane partner after level 3-4. You are a roamer.
The fix: Leave the offlane by 4-5 minutes unless you have kill potential. If you and your pos 3 are killing the enemy carry, stay. If you’re just standing in trees watching your pos 3 last hit, leave. Go stack camps, gank mid, or rotate to the safe lane to help your carry. Your offlaner wants solo experience–give it to them.
Mistake #2: Not Stacking Camps
Stacking jungle camps is the single most gold-efficient thing a pos 4 can do, yet Archon pos 4 players almost never do it. A triple-stacked large camp gives your mid or carry 500+ gold when cleared. That’s almost a free item component, and it costs you 3 seconds of walking past the camp at :53.
The fix: Make it a habit. Every minute at :50-:53, stack a nearby jungle camp if you’re in the area. Prioritize the large camps (they give the most gold when stacked). You should be stacking 3-5 camps per game minimum. Tell your carry or mid about the stacks so they actually clear them.
Mistake #3: Placing Wards in the Same Spots Every Game
Archon pos 4 players have three ward spots: rune spot, rune spot, and rune spot. They place the same wards in the same locations regardless of what’s happening in the game. These predictable wards get dewarded easily and provide minimal strategic value.
The fix: Ward based on what your team needs RIGHT NOW. If your carry is farming the triangle, ward the jungle entrance to protect them. If your team is pushing a tower, ward behind the tower to see TP rotations. If you’re setting up a gank, ward the enemy jungle to spot their farming patterns. Every ward should have a specific purpose, and that purpose changes throughout the game.
Mistake #4: Never Buying Smoke of Deceit
Smoke of Deceit costs 50 gold, breaks when you get near an enemy hero, and enables guaranteed kill opportunities. In Archon, pos 4 players never buy it. The shop has 3 smokes stacked up at 25 minutes because nobody on either team has purchased one.
The fix: Buy a smoke every 5-7 minutes. Ping your teammate (mid or offlaner), type “smoke,” and walk together into the enemy jungle. In Archon, enemies farm alone in dangerous positions constantly. A 2-man smoke gank results in a kill 80%+ of the time because the target has no wards, no detection, and no awareness that you’re coming.
Mistake #5: Not Carrying Detection
The enemy has a Riki or Bounty Hunter. Your team is dying to invisible ganks. And you, the pos 4, don’t have a single Sentry Ward or Dust of Appearance in your inventory. This is unforgivable.
The fix: If the enemy has ANY invisible hero (Riki, Bounty Hunter, Clinkz, Weaver, Nyx) or Shadow Blade builder, carry Dust at ALL times after minute 5. Place Sentry Wards in your carry’s farming areas and around objectives. Detection is cheap–100 gold for Dust, 75 for Sentries. The cost of NOT having detection is dying repeatedly to invisible ganks, which costs thousands of gold in death bounties and lost farm.
Mistake #6: Building Greedy Items
Archon pos 4 players build Aghanim’s Scepter as their first item on every hero. They save gold for 25 minutes, have no impact in the mid-game, and finally complete their Aghs at 30 minutes when the game is already decided. Meanwhile, they could have built Force Staff + Glimmer Cape for the same gold and saved their carry’s life five times.
The fix: Your first items should be utility items that save lives and enable plays. Force Staff, Glimmer Cape, Eul’s Scepter, Spirit Vessel–these are your priority items. They cost 2,000-3,000 gold, come online quickly, and provide immediate team value. Save Aghanim’s for your third or fourth item, after you’ve already built the essentials.
Mistake #7: Dying for Wards
Archon pos 4 players walk alone into the enemy jungle to place a ward. They get killed by three enemy heroes. The ward gets dewarded immediately because the enemy saw them place it. Net result: negative gold, negative experience, and no vision gained.
The fix: Only ward with an escort or when you have information about enemy positions. If you can see 4 enemy heroes on the map across the map, it’s safe to ward. If you can’t see anyone, assume they’re in the area you’re trying to ward. Alternatively, ward while pushing with your team or after winning a fight–these are safe warding windows where the enemy is dead or retreating.
Mistake #8: Ignoring the Enemy Mid
Archon pos 4 players focus exclusively on their own lane and never rotate to mid. The enemy mid gets a free lane, hits level 6 first, and starts dominating the game. Meanwhile, your mid is pinging you for help and you’re in the offlane doing nothing useful.
The fix: After level 3-4, your first rotation should almost always be mid. The mid lane is short, which means ganks happen quickly. If you have a stun or slow, smoke from the offlane, walk to mid, and gank the enemy mid. Even if you don’t get the kill, forcing them to use their regen and play cautiously gives your mid an advantage. One successful mid gank is worth more than 10 minutes of sitting in the offlane.
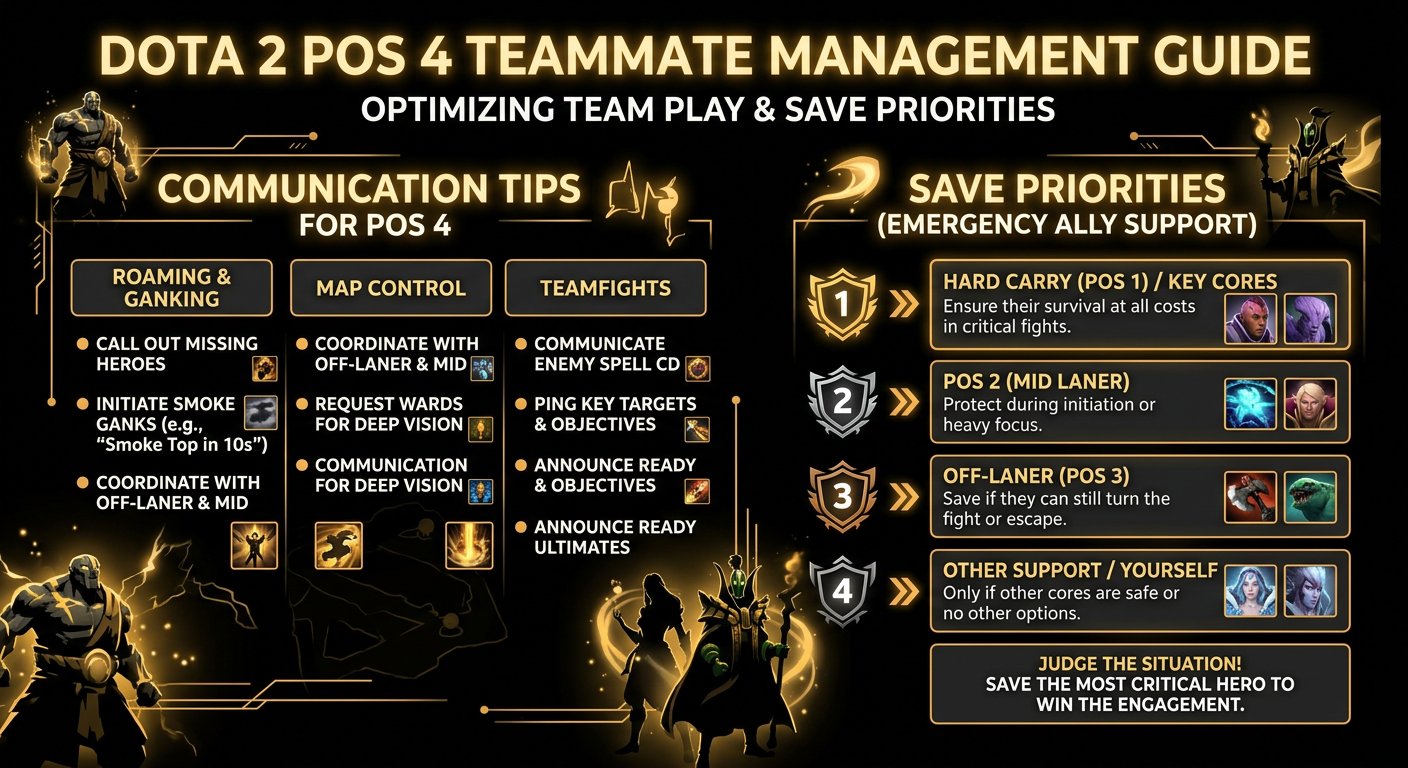
Mistake #9: Not Saving Your Cores
In team fights, Archon pos 4 players try to deal damage instead of saving their cores. They’re front-lining as a 1,200 HP support while their carry gets stunned and killed behind them. They have Glimmer Cape and Force Staff but never use them on teammates–only on themselves.
The fix: In team fights, your job is to save your carry and mid, NOT to deal damage. Stand behind your cores, watch for enemy initiation, and be ready with saves. The moment your carry gets stunned, Force Staff them out. When the enemy jumps on your mid, Glimmer Cape them for the magic resistance. A pos 4 who consistently saves their carry is worth more than a pos 4 who deals 3,000 damage and then watches their carry die.
Mistake #10: Tilting When Cores Don’t Carry
Your carry has 150 CS at 30 minutes. Your mid went 0-5 in lane. You’ve been playing your heart out as pos 4, landing arrows, placing wards, making plays–and it doesn’t seem to matter. The temptation to tilt is overwhelming.
The fix: Accept that some games are unwinnable. Even the best pos 4 players in the world lose 40% of their games. What matters is your CONSISTENCY over many games, not any individual game’s result. If you play 100 games with a 55% win rate, you climb 300 MMR. That’s the math. Focus on playing your best every game, and the MMR will follow. One bad carry doesn’t define your bracket–your average performance over 50 games does.
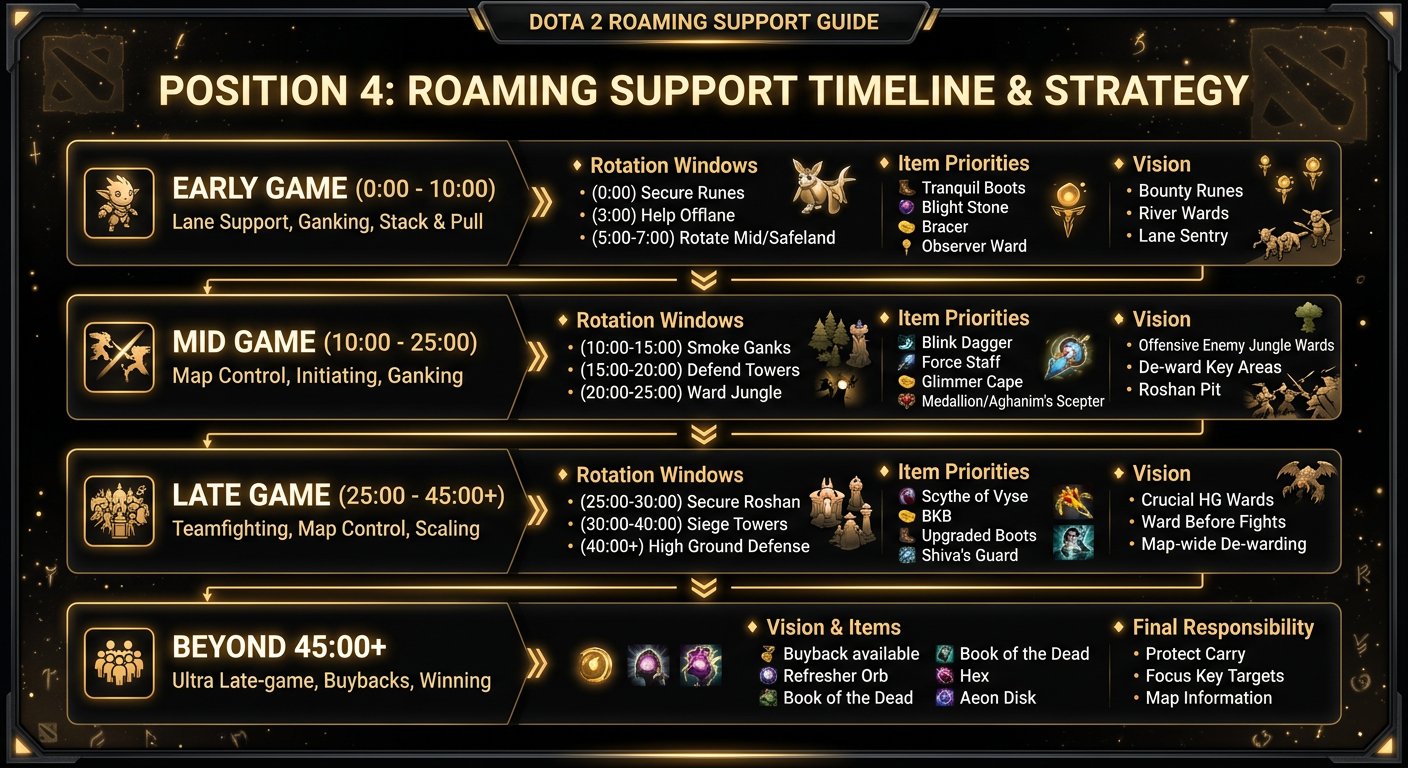
Phase-by-Phase Guide for Archon Pos 4 Players
Laning Phase (0:00 – 10:00)
Goals: Win or contest the offlane, rotate mid at least once, stack 2+ camps, place 2+ aggressive wards.
The first 10 minutes define your game as a pos 4. Your activity during this window determines whether your team enters the mid-game ahead or behind.
- Minutes 0-3: Offlane pressure. Help your pos 3 secure level 2-3. Harass the enemy carry, pull the enemy small camp if the lane is pushed too far under your tower, and look for kill opportunities. If the lane matchup is strong (Axe + Skywrath, Bristleback + Jakiro), play aggressively and go for kills.
- Minutes 3-5: First rotation. By now, your offlaner should be comfortable in lane. Leave and make a play. The best target is usually the enemy mid–smoke from the offlane, walk to mid, and gank. If mid rotation isn’t available, stack camps or ward the enemy jungle.
- Minutes 5-7: Return to offlane or second rotation. Check on your offlane. If they need help, return briefly. If they’re fine, make another rotation or gank the enemy safe lane to disrupt their support’s pull patterns.
- Minutes 7-10: Stack camps and prepare for mid-game. Stack the large jungle camps on your side of the map for your mid or carry. Place your second round of wards–aggressive wards if you’re winning, defensive wards if you’re losing. Prepare for the transition to mid-game.
Critical mindset: You are a free agent. Your pos 3 wants solo experience. Your carry wants safe farm. Your mid wants an advantage. You provide all of this by being constantly active–never idle, never AFK in lane, always moving with purpose.
Early Mid-Game (10:00 – 20:00)
Goals: Complete your first utility item, maintain vision, enable smoke ganks, help take objectives.
- Vision priority: By 10 minutes, you should be placing wards proactively, not reactively. Ward the enemy jungle if your team is ahead, ward your own jungle if you’re behind. Deward enemy observers using Sentries–in Archon, enemies place wards in predictable spots (rune spots, cliff wards), making them easy to deward.
- Smoke ganks: Buy a smoke every 5 minutes and organize a gank. Your target priority is: enemy mid > enemy carry > enemy pos 3. Killing the enemy mid at 12 minutes delays their item timing by 2-3 minutes, which is game-changing.
- Objective support: When your team takes a tower, be there to help. Your job isn’t to hit the tower–it’s to provide vision of incoming enemies, stun anyone who tries to defend, and heal/save your cores if a fight breaks out.
- Item completion: Your first item should be done by 15-18 minutes. Force Staff if the enemy has catch (Slark, Clockwerk, Riki). Glimmer Cape if the enemy has magic burst (Zeus, Lina, Lion). Spirit Vessel if the enemy has healing (Huskar, Alchemist, Lifestealer).
Mid-Game (20:00 – 30:00)
Goals: Control vision around objectives, enable Roshan attempts, save cores in team fights, build toward second item.
- Roshan ward: Always have a ward near Roshan pit. Knowing when the enemy is attempting Roshan is one of the highest-value pieces of information in the game. If you spot them doing Roshan, your team can contest and steal–potentially winning the game.
- Team fight role: Position behind your cores. Your job is to cast your spells, use your save items, and keep your carry and mid alive. Don’t chase kills–let your cores chase. You stay close to whoever is most important on your team and protect them.
- Second item completion: By 25-28 minutes, you should have your second utility item. This dramatically increases your impact. Force Staff + Glimmer Cape together means you can save any ally from almost any initiation. Spirit Vessel + Force Staff means you can heal allies, reduce enemy healing, and reposition.
- Smoke usage: Continue buying smokes. At this point in the game, smokes should be used for Roshan attempts and high-ground pushes, not just ganks. Smoke your team to sneak Roshan without the enemy knowing.
Late Game (30:00+)
Goals: Win the vision war, save your carry in the decisive fight, don’t get picked off.
- Vision supremacy: Late game, vision wins games. The team with better ward coverage makes better decisions, gets better initiations, and avoids bad fights. Ward aggressively around the enemy base when pushing, and defensively when defending. Deward constantly–late game enemy wards can lead to picks that end the game.
- Positioning discipline: In late game, your death costs less than your carry’s death, but it still matters. A dead pos 4 can’t use Force Staff, Glimmer Cape, or stuns to save their carry. Stay alive by positioning behind your team and NEVER walking alone without vision.
- Item optimization: Late game, sell your early items (Urn, basic boots) for better items. Ghost Scepter against physical damage carries, Aeon Disk against initiation combos, or even a late BKB if you need to channel a key ability without interruption.
- Buyback management: Unlike cores, your buyback is more situational. If buying back means you can save your carry or turn a fight, it’s worth it. If buying back means you walk back and die again, save the gold.
Dealing With the “Archon Teammate” Problem
When Your Offlaner Wants You to Stay in Lane
Some Archon offlaners expect their pos 4 to sit in lane for 15 minutes. They’ll ping you if you leave, flame you if you rotate, and blame you if they die 1v2. This is their problem, not yours.
- Communicate early. At the start of the game, tell your offlaner: “I’ll help you level 3, then I’m roaming.” Setting expectations prevents conflict later.
- Don’t let guilt trap you. If your offlaner dies 1v2 after you leave, that’s their positioning error, not your rotation error. They need to adapt to playing 1v2–which most offlane heroes are designed to do. Your presence on the map creating pressure elsewhere is more valuable than babysitting.
- Come back for kills. If the enemy duo is pushing aggressively and your offlaner has a kill setup (Axe Call, Centaur Stomp), rotate back for the kill opportunity. Show your offlaner that you’re not abandoning them–you’re being efficient.
When Your Carry Is Getting Ganked Constantly
Your carry is dying to ganks because the enemy team is focusing them. This is actually your problem–at least partially.
- Ward their farming area. Place observers and sentries in the areas your carry farms. This is your responsibility and it prevents 90% of ganks.
- TP to save them. Always carry a TP scroll. When your carry gets ganked and you see it on the minimap, TP to the nearest tower and help. A single stun from a TP-ing pos 4 can turn a gank into a counter-kill.
- Counter-gank with smoke. If the enemy is repeatedly ganking your carry, set up a counter-gank. Ward their approach path, wait in hiding with your offlaner or mid, and ambush the gankers. One successful counter-gank often stops the enemy from ganking for the next 10 minutes.
When Nobody Wants to Group for Objectives
You’re pinging Roshan, the enemy team just lost two heroes, and your team is farming jungle on four different corners of the map. Welcome to Archon.
- Smoke forces grouping. Buy a smoke, ping “Gather here,” and use the smoke. When teammates see the smoke effect on their hero, they understand that something is happening and follow along. Smoke is the Archon grouping tool.
- Take the lead. Most Archon teams lack a shotcaller. Be that person. Simple calls like “Rosh now,” “push mid,” or “smoke top” give your team direction. You’ll be surprised how many Archon players follow calls when someone makes them confidently.
- Ping item completions. When your carry finishes a big item, ping it and type “let’s fight.” Archon players often don’t realize they’ve hit a power spike until someone points it out.
When Your Team Doesn’t Buy Wards
Plot twist: they shouldn’t have to. You’re the pos 4. Buying wards is literally part of your job description. In Archon, the pos 5 might not buy wards either, in which case you need to buy enough for both of you. It’s frustrating, but 150 gold per minute on wards is the single best investment you can make.
- Share the ward burden. If your pos 5 is buying wards, great–coordinate placement locations. If they’re not, buy wards yourself. Don’t wait for someone else to do your job.
- Deward to fund your wards. Dewarding gives you 100 gold per ward. If you deward 2 enemy wards per game, you’ve paid for your own wards plus some. Carry Sentries and check common ward spots.
Your Realistic Timeline: Archon to Legend
Pos 4 Climbing Characteristics
Pos 4 is one of the best roles for climbing because your impact is immediate and visible. Unlike carry (who needs 20 minutes to come online) or offlane (who depends on team follow-up), a pos 4 can create kills from minute 1 and snowball the entire map. The catch is that your impact diminishes in the late game if your cores don’t capitalize on the space you create.
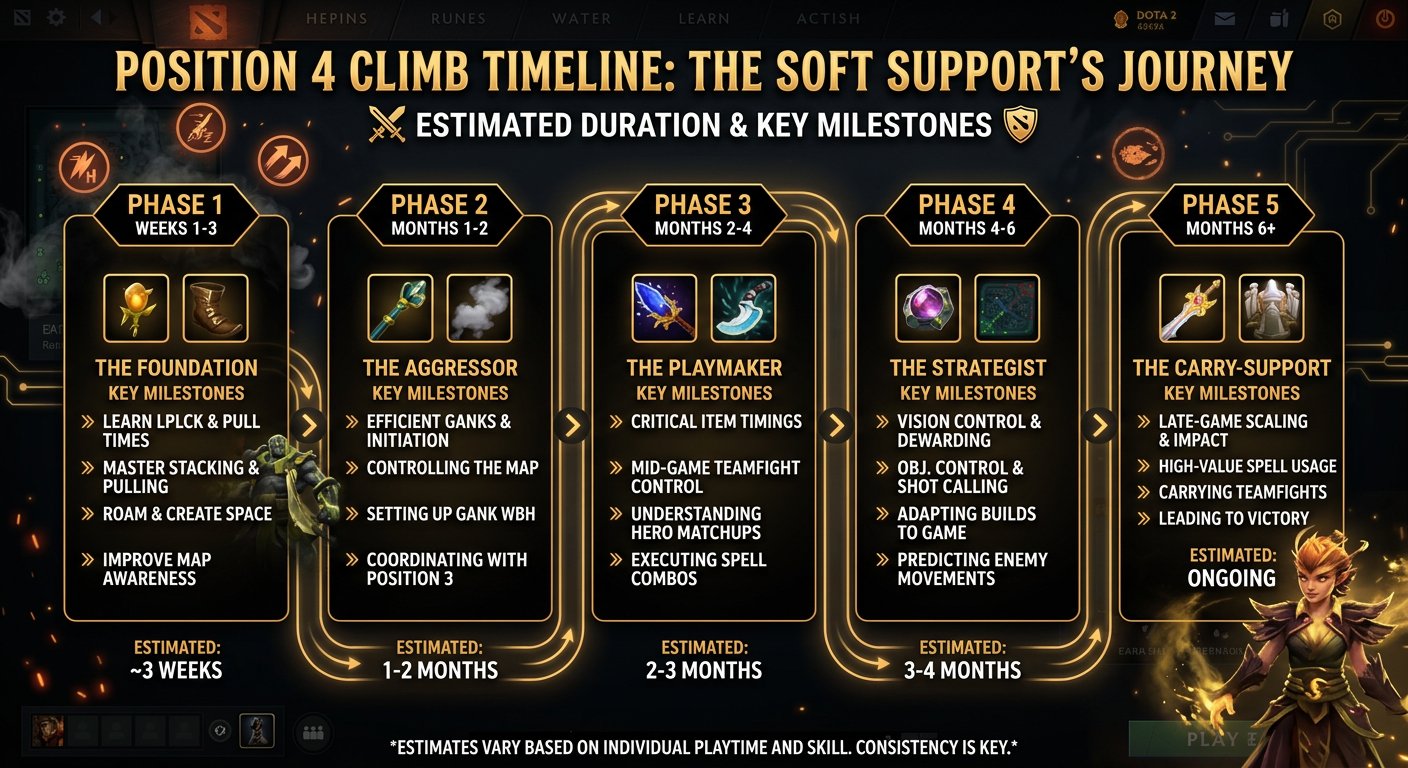
The Realistic Estimate
- Best case (62-67% win rate): 2-3 weeks. Possible if you’re spamming Spirit Breaker or Earth Spirit and making constant plays across the map.
- Average case (55-58% win rate): 5-7 weeks. Solid climbing with occasional losses due to core performance variance.
- Slow case (52% win rate): 3-4 months. Improvement is happening but slowly. Coaching from an Immortal pos 4 player can dramatically accelerate this by identifying rotation and warding patterns you’re missing.
Tips for Faster Climbing
- Spam Spirit Breaker. He’s the single fastest-climbing pos 4 hero in the game. His global pressure is unmatched in Archon, and his item build is cheap and effective.
- Track your smoke usage. After every game, check: “How many smokes did I buy” If the answer is 0-1, you’re leaving free MMR on the table. Aim for 3-4 smokes per game.
- Review your first 10 minutes. Watch replays of your first 10 minutes exclusively. Count your rotations, camps stacked, wards placed, and kills secured. Compare to a high-MMR pos 4 replay–the activity gap will shock you.
- Communicate positively. As a pos 4, you interact with every lane. Being positive, making calls, and encouraging your team is a legitimate strategy for winning more games. Teams with good morale make better decisions.
If you’re tired of the grind, our MMR boosting service can handle the toughest stretch for you. Or invest in coaching sessions with a high-MMR support player who will review your replays and give you a personalized improvement roadmap. Sometimes the fastest way to climb is having an expert tell you exactly what you’re doing wrong.
Frequently Asked Questions
Ready to Make Plays Start Your Climb Now
Position 4 is the most exciting role in Dota 2. Every game is different, every rotation is a gamble that can pay off enormously, and every smoke gank is a mini-movie where you’re the hero.
Written by Team Smurf’s Immortal-rank analysts — Rankings last verified February 2026


