Dota 2 Warding Guide: The Complete Vision Guide to Winning More Games

Vision wins games. It’s one of the oldest maxims in Dota 2, and it remains as true in 2026 as it was when the game launched. Yet the vast majority of players–especially in brackets below Divine–treat warding as an afterthought, something the position 5 does on autopilot while the rest of the team ignores the minimap entirely. If you want to climb MMR, mastering vision control is one of the single highest-impact skills you can develop. In this exhaustive guide, we’ll cover every aspect of warding in Dota 2: observer and sentry mechanics, the best ward spots for every phase of the game, advanced dewarding techniques, how to combine smoke with vision plays, and how to turn vision control into a consistent win condition.
Whether you’re a support main looking to refine your craft or a core player who wants to understand why your supports keep pinging the minimap, this guide has something for you. And if you want to see how top-level players approach vision control firsthand, consider our Dota 2 Coaching service where Immortal-rank players can walk you through real-time warding decisions in your own games.
Table of Contents
- Understanding Observer and Sentry Ward Mechanics
- The Economics of Vision
- Best Ward Spots: Laning Phase (0-10 Minutes)
- Best Ward Spots: Mid Game (10-25 Minutes)
- Best Ward Spots: Late Game (25+ Minutes)
- Offensive vs. Defensive Warding
- The Art of Dewarding
- Smoke + Ward Combinations
- Vision Control as a Win Condition
- Common Warding Mistakes by Bracket
- Advanced Warding Tips from Immortal Players
- FAQ
Understanding Observer and Sentry Ward Mechanics
Before we dive into specific ward spots and strategies, you need to understand exactly how wards work in Dota 2. Many players have a surface-level understanding–observer wards give vision, sentries reveal invisible units–but the details matter enormously when you’re trying to optimize your vision game.
Observer Wards
Observer wards are your primary vision tool. Here’s what you need to know:
- Cost: Free (since Patch 7.23)
- Stock replenish time: 135 seconds per ward
- Maximum stock: 4 observer wards in the shop at any time
- Duration: 6 minutes
- Vision range: 1400 units during the day, 1400 units at night
- Health: 200 HP, requires 2 hits from heroes to destroy
- Bounty: 100 gold to the player who kills it, plus a small amount of XP
- Placement range: 500 units
The most critical detail many players overlook is the stock replenish time. At 135 seconds per ward, you can have a maximum of roughly 2 observers on the map per player if your entire team is buying and placing them. In practice, supports are doing most of the work, which means ward availability is a genuine constraint. Every wasted ward–placed in a spot that gives you information you don’t need–is a 135-second window where you could be blind somewhere important.
Sentry Wards
Sentry wards serve two purposes: revealing invisible units (including other wards) and providing True Sight in their radius. Key stats:
- Cost: 50 gold per sentry
- Stock replenish time: 70 seconds
- Duration: 8 minutes
- True Sight range: 1000 units
- They do NOT provide regular vision–you need another vision source to see what they reveal
- Health: 200 HP, requires 2 hits
That last point is crucial and commonly misunderstood. A sentry ward alone doesn’t let you see enemy wards. You need vision from an observer ward, a hero, a creep, or another source in the area. This is why “sentry on top of observer” is such a common and effective combination–the observer gives you vision, the sentry reveals anything invisible in the area.
Ward Placement Mechanics
Wards have specific rules about where they can be placed:
- Wards can be placed on any passable terrain within placement range
- Wards placed on higher ground can see lower ground, but not vice versa (elevation vision rules)
- Wards are blocked by trees–their vision doesn’t pass through tree lines
- Ward vision follows normal fog-of-war rules, meaning it’s reduced at night to 800 units
- There are specific “ward cliffs” designed by Valve as premium ward locations, but creative off-cliff placements are often more effective because they’re harder to deward
Understanding elevation is particularly important. A ward on a cliff overlooking the river will see the entire river area below, but a ward placed in the river won’t see up onto adjacent cliffs. This asymmetry is what makes high-ground ward spots so valuable–and so contested.
The Economics of Vision
Let’s talk about the gold math behind vision control, because it’s more significant than most players realize.
Observer wards are free, but sentries cost 50 gold each. Over the course of a 40-minute game, a diligent support might buy 15-25 sentries. That’s 750-1,250 gold spent purely on dewarding and invisible hero detection. At the same time, each enemy observer you deward gives you 100 gold bounty.
| Action | Gold Impact | Notes |
|---|---|---|
| Placing an observer ward | Free | Opportunity cost: 135s stock cooldown |
| Buying a sentry | -50 gold | 70s stock cooldown |
| Killing an enemy observer | +100 gold | Plus XP bounty |
| Killing an enemy sentry | +50 gold | Breaks even on sentry cost |
| Your observer gets dewarded | -100 gold to enemy | Plus wasted ward stock |
The real economic impact of warding isn’t in the direct gold numbers–it’s in the information advantage. A well-placed ward that spots a gank rotation saves a core player’s life, which might be worth 300-600 gold in avoided death and lost farm time. A ward that reveals Roshan can swing a 3,000+ gold Aegis. Vision is the highest-value investment in the game per gold spent.
This is something our MMR Boost players consistently cite as a key difference between brackets: in Immortal games, wards are treated as strategic investments. In Archon games, they’re placed reflexively in the same spots every game.
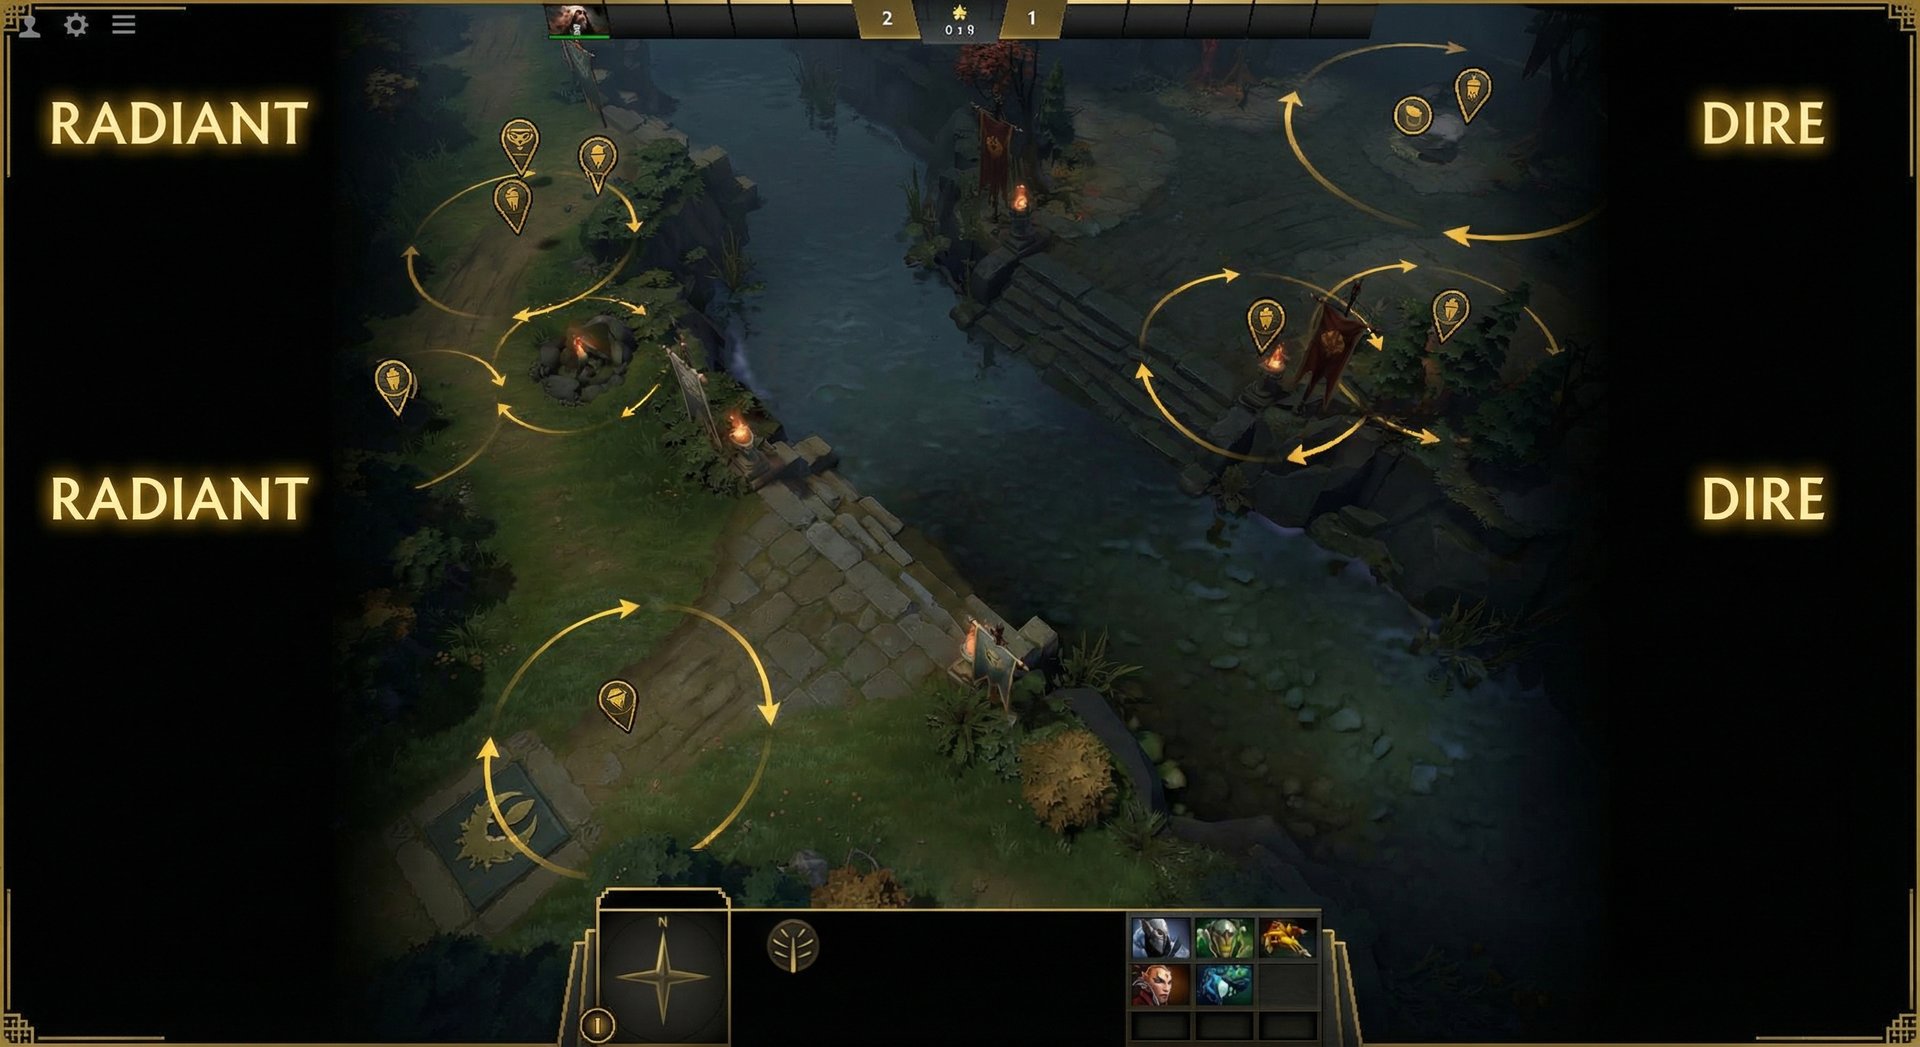
Best Ward Spots: Laning Phase (0-10 Minutes)
The laning phase is where your first observer wards set the tone for the game. You start with 2 observers in stock, and your goal is to maximize the information they provide for your lanes.
Safelane (Carry + Support) Ward Spots
Pull camp ward: One of the most impactful early wards is one that gives vision of the enemy’s pull camp while also watching for rotations from the mid lane or enemy support. Place it on the small cliff overlooking the pull camp area–this lets your offlaner know when pulls are happening and whether it’s safe to contest.
Lane entrance ward: Place this at the entrance to your safelane jungle, near the T1 tower area. This catches enemy supports trying to rotate behind you and gives you advance warning of ganks. This is particularly valuable in the first 5 minutes when enemy offlaners and supports are actively looking for kills.
Rune ward: If your mid player is rune-dependent (Storm Spirit, Bottle users), consider placing a ward that covers one of the 2-minute power runes. The river wards near the bounty rune areas serve double duty–they show rune spawns AND river movement.
Offlane Ward Spots
Behind T1 ward: As the offlane support, your priority ward is one that shows you whether the enemy carry is farming near the T1 tower and whether supports are rotating. The classic spot is the cliff behind the enemy safelane T1 tower, but experienced players know to check this spot with sentries early.
River junction ward: Place this where the river meets the enemy jungle entrance. This shows mid rotations, support movements, and rune activity. It’s especially valuable if your offlane is playing aggressively and needs to know when to back off.
Mid Lane Ward Spots
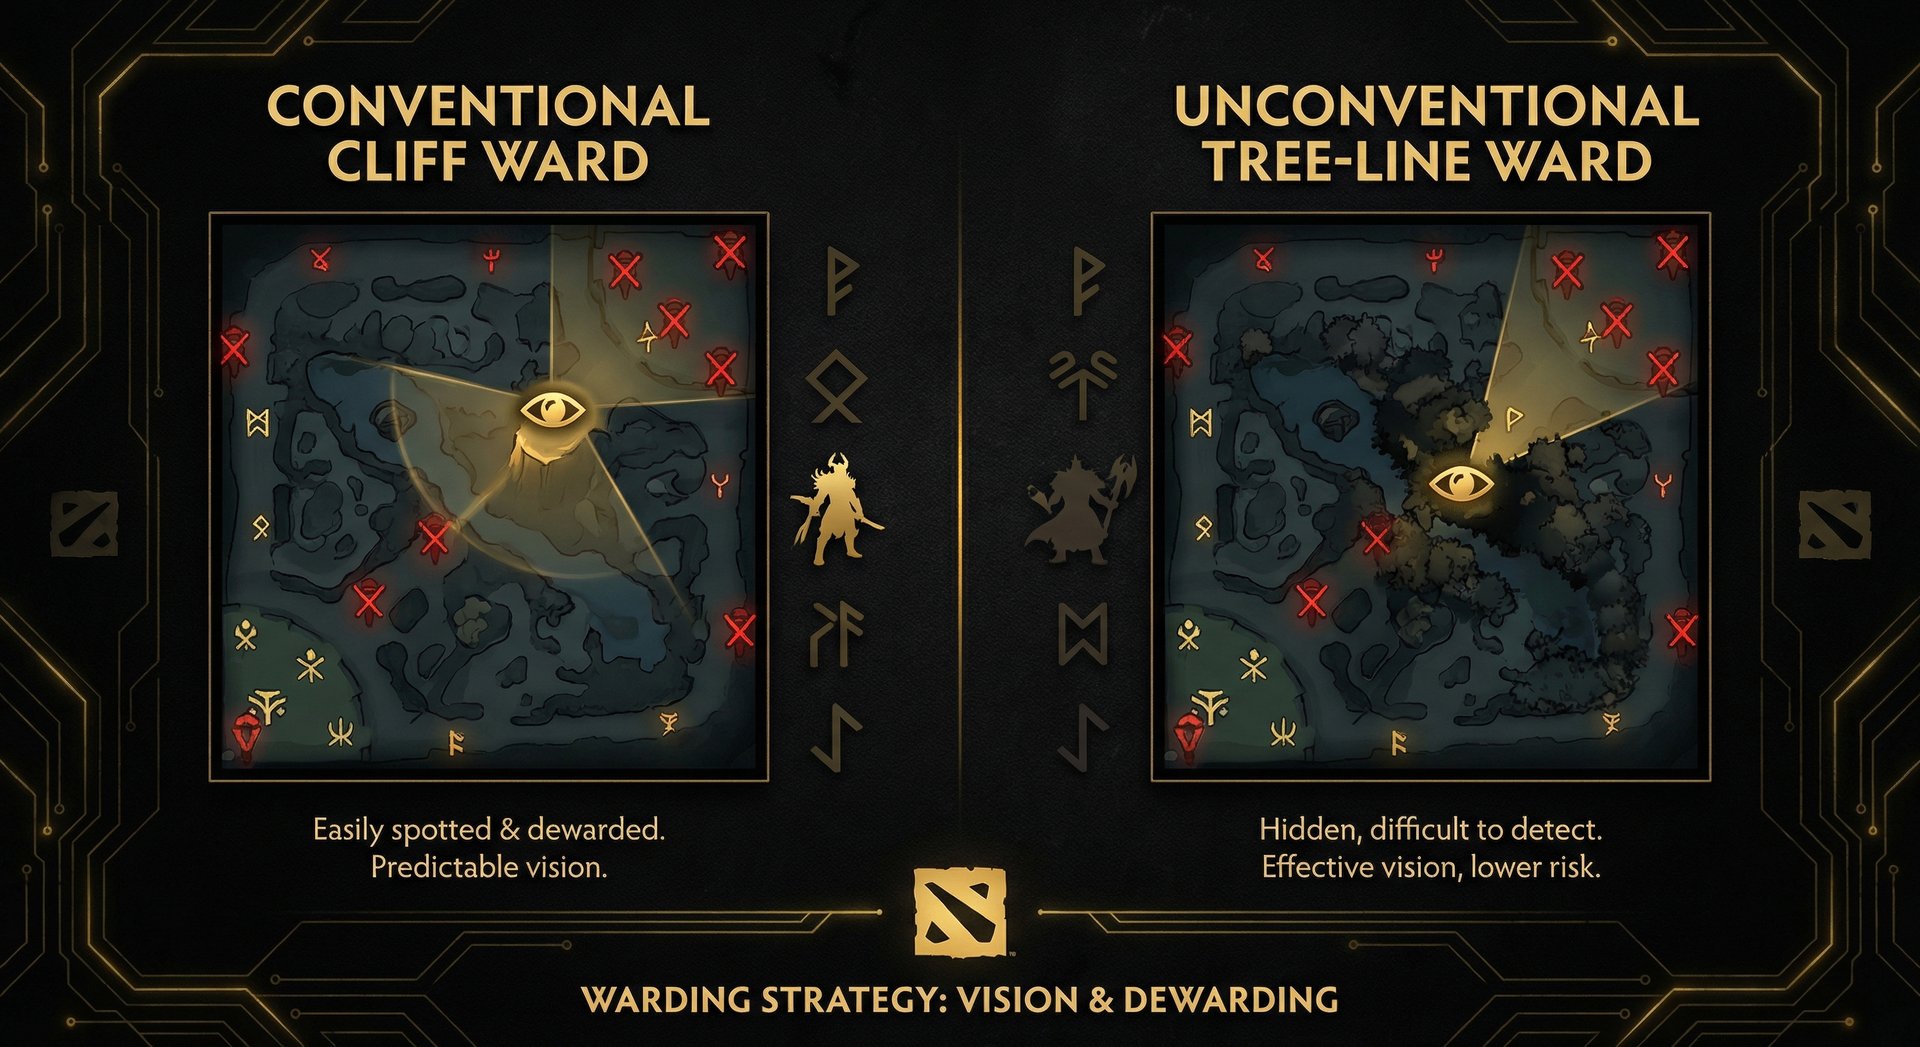
High ground wards: The classic mid ward spots are on the cliffs flanking the mid lane. These give your mid player vision of the enemy high ground (huge for trading and CS) and also spot incoming ganks from both sides. In 2026, these spots are so commonly dewarded in higher brackets that many players opt for creative alternatives.
Alternative mid wards: Instead of the obvious cliff spots, try placing wards in the trees near the mid lane. They provide less overall vision but are significantly harder to deward. A ward placed in the treeline near the enemy mid T1 can spot both the mid player and support rotations without being easily found by sentries.
Best Ward Spots: Mid Game (10-25 Minutes)
The mid game is where vision control becomes truly dynamic. Towers start falling, the map opens up, and the team with better vision can control key areas–Roshan, jungle entries, and push routes.
Roshan Area Wards
Roshan vision is arguably the most important vision in the game from 15 minutes onward. There are several ways to ward Roshan:
Direct Roshan pit ward: Placed inside or at the entrance of the Roshan pit, this gives you immediate knowledge when the enemy starts Roshan. The downside is that it’s the first place enemies will sentry when they go for Rosh.
Approach wards: Instead of warding the pit directly, ward the routes enemies take to reach Roshan. A ward near the river entrance to the Rosh side of the map shows you when 3-4 heroes suddenly move in that direction, which is a dead giveaway. These are harder to deward because the enemy doesn’t know exactly where to sentry.
Post-Rosh wards: After a Roshan fight, immediately ward the pit entrance area. The next Roshan spawn (8-11 minutes after death) will be a key fight, and having early vision lets you prepare.
Jungle Control Wards
As teams start invading each other’s jungle, vision in jungle chokepoints becomes critical:
Triangle ward: The “triangle” (the area between the ancient camp, the medium camp, and the hard camp in each team’s primary jungle) is where cores farm most efficiently. Warding the enemy triangle gives you gank opportunities; warding your own triangle defensively warns your carry of incoming threats.
Chokepoint wards: Each jungle has natural chokepoints where heroes must pass through. Ward these to track enemy movements without committing to deep wards that might get dewarded quickly.
Pushing Wards
When your team is preparing to push a T2 or T3 tower, vision behind that tower is essential:
Behind-the-tower ward: Place an observer behind the tower you’re about to push. This shows you if the enemy is TPing in, setting up a counter-initiation, or if they’ve abandoned the tower. This single ward can be the difference between a successful push and a teamwipe.
Flank wards: When pushing, the biggest danger is getting flanked. Ward the sides of your push route to spot heroes trying to wrap around behind your team.
Best Ward Spots: Late Game (25+ Minutes)
Late-game warding is about high-ground defense or siege, Roshan control, and tracking key enemy heroes. The map is more open (many towers are down), and vision becomes both more important and harder to maintain.
High Ground Defense Wards
When you’re defending your base, ward placement shifts to a purely defensive posture:
T3 approach wards: Place observers in front of your T3 towers to see enemy formations before they commit to a push. This gives you time to position and decide whether to defend or trade objectives elsewhere.
Jungle entrance wards: Even in late game, ward the entrances to your remaining jungle areas. If your carry needs to farm between pushes, they need to know it’s safe.
High Ground Siege Wards
When you’re the one pushing high ground, vision is your most critical tool:
Uphill vision: The high ground defense advantage is massive in Dota 2. You need observer wards on the enemy high ground to remove the miss chance on uphill attacks and to see defensive positions. Heroes like Beastmaster, Clockwerk, or Nightstalker can provide temporary flying vision, but a well-placed ward is more reliable.
Wraparound vision: When sieging, ward the enemy’s escape routes and potential TP locations. If you win the fight, you want to see where survivors run so you can chase efficiently.
Roshan Timer Wards
In late game, Roshan respawns are game-deciding moments. Cheese and Refresher Shard from second and third Roshans can swing fights completely. Keep permanent vision near the Roshan approach routes, and be prepared to contest with smokes (more on this below).
Offensive vs. Defensive Warding
One of the most important concepts in vision control is understanding when to ward offensively and when to ward defensively. This is directly tied to the state of the game.
| Game State | Warding Style | Reasoning |
|---|---|---|
| Your team is winning / ahead | Offensive (enemy jungle, Roshan, push routes) | You want to invade their space and maintain pressure |
| Your team is losing / behind | Defensive (your jungle, triangle, T2/T3 approaches) | You need to protect farming space and avoid getting picked off |
| Even game | Mixed (contest Roshan, ward key objectives) | Focus on the next objective your team wants to take |
| Split push happening | Split (deep lane wards + defensive wards) | Track the split pusher AND protect against 4-man pushes |
A common mistake in lower MMR brackets is that supports ward offensively even when the team is behind. If your team just lost a teamfight and the enemy is pushing your T2 towers, placing a ward deep in the enemy jungle is wasteful–you can’t safely act on that information. Instead, ward your own jungle entrances so your carry can farm safely while you recover.
This concept of adapting your ward game to the actual game state is something we emphasize in our Coaching sessions. Many players develop rigid warding habits that don’t adapt to what’s actually happening in the game.
The Art of Dewarding
Dewarding–finding and destroying enemy wards–is just as important as placing your own. A player who can consistently deward effectively is worth hundreds of gold per game to their team and denies the enemy critical information.
How to Find Enemy Wards
There are several methods for locating enemy wards:
1. Predictive dewarding: The most reliable method. Think about where YOU would place a ward if you were the enemy support, then sentry that area. Common ward spots are common for a reason–most supports gravitate to the same cliff spots and chokepoints. Start by checking the “usual suspects” and you’ll catch 60-70% of wards.
2. Behavioral tells: If the enemy reacts to your movements when they shouldn’t have vision, they have a ward nearby. For example, if you smoke into the enemy jungle and they immediately rotate to defend before seeing you on their own wards, there’s probably an observer somewhere along your smoke route. Mark the area mentally and deward after.
3. Placement timing: If you see the enemy support walk toward a specific area and then immediately leave, they likely just placed a ward. Note the location and time, then sentry that area.
4. Hero abilities: Certain heroes have abilities that reveal wards: Zeus’s Lightning Bolt and Thundergod’s Wrath give True Sight briefly, Beastmaster’s Hawk provides flying vision, and heroes with Gem of True Sight naturally reveal wards. If you have these tools, use them proactively.
Sentry Placement for Dewarding
When placing sentries to deward, maximize your coverage:
- Place sentries in locations that cover multiple possible ward spots at once
- The sentry’s 1000 True Sight radius should overlap with the most likely observer locations
- Remember: you need regular vision too. Place sentries where you have existing vision from creeps, towers, or your own observers
- If you’re dewarding a cliff ward, you may need to cut a tree or find an angle where your sentry’s True Sight reaches the cliff
Gem of True Sight
Gem (cost: 900 gold) provides a permanent 1200-radius True Sight aura around the carrier. It’s the ultimate dewarding tool but comes with significant risk–it drops on death and can be picked up by the enemy.
When to buy Gem:
- When you’re ahead and unlikely to die
- When the enemy has multiple invisible heroes (Riki, Bounty Hunter, etc.)
- When your team is pushing and needs to clear defensive wards quickly
- When you have a hero who is hard to kill (Bristleback, Tidehunter, etc.)
When NOT to buy Gem:
- When you’re behind and at risk of feeding it
- When your most durable hero is a squishy support
- When the enemy has heroes that can easily pick you off (Spirit heroes, Slark, etc.)
Smoke + Ward Combinations
Smoke of Deceit is one of the most underused items in lower MMR brackets, and it’s incredibly powerful when combined with warding. Here’s how to use smokes to enhance your vision game.
Smoke Warding
The basic concept: use a Smoke of Deceit to safely place deep offensive wards that you couldn’t normally place without getting caught. This is especially important in the mid and late game when the map is dangerous and supports can get picked off while warding.
Solo smoke warding: As a support, smoke yourself and walk into the enemy jungle to place deep wards. The smoke keeps you invisible to wards and towers, so you can reach spots you’d normally die trying to ward. The risk is getting caught by an enemy hero walking near you (which breaks smoke).
Team smoke + ward: When your team smokes for a gank or Roshan, the support should carry wards to place along the route. Even if the gank fails, you’ve established vision in enemy territory. This is a free bonus that many supports forget about.
Smoke Dewarding
If you suspect the enemy has deep wards in your jungle but it’s too dangerous to walk there openly, smoke yourself and bring sentries. The smoke lets you safely sweep the area for wards without the enemy knowing you’re there.
Smoke Timing
Smokes are limited (stock refreshes every 7 minutes, max 3 in shop), so use them wisely. The best times to smoke for warding purposes:
- Immediately after winning a teamfight (enemy is dead and can’t respond)
- When the enemy is showing on the opposite side of the map
- Before a key objective (Roshan, tower push) to establish vision without being spotted
- Night time (reduced enemy vision makes smoke even safer)
Vision Control as a Win Condition
Let’s elevate this discussion from individual ward spots to the strategic level. Vision control isn’t just a support task–it’s a team win condition.
The Information Advantage
In theory, Dota 2 is a game of imperfect information. Both teams are making decisions with incomplete knowledge of the enemy’s positions, items, and intentions. Vision control shifts this balance. The team with better vision has:
- Better gank success rate: You can see isolated enemy heroes and coordinate pickoffs
- Better gank avoidance: Your cores see ganks coming and escape safely
- Better objective control: You know when Roshan is being attempted, when towers are being pushed
- Better teamfight initiation: You can see enemy formations and find ideal engagement angles
- Better farm efficiency: Cores can farm aggressively when they can see the nearby area is safe
Every single one of these advantages translates directly to gold and XP leads, which compound over the course of the game. A team that consistently maintains better vision will, on average, win significantly more games–even if their mechanical skill is equal to the opponent’s.
Vision Control and MMR
One of the most reliable patterns our MMR Boosting players observe is the dramatic difference in ward usage between brackets:
| Bracket | Avg. Observers Placed (per team, per game) | Avg. Dewarding Rate | Key Vision Issues |
|---|---|---|---|
| Herald-Guardian | 5-8 | Under 10% | Supports barely ward; nobody dewrds |
| Crusader-Archon | 10-14 | 15-25% | Same spots every game; reactive not proactive |
| Legend-Ancient | 14-18 | 25-40% | Decent warding but poor adaptation to game state |
| Divine-Immortal | 18-24 | 40-60% | Strategic warding; cores help with sentries; smoked ward placements |
The jump in ward usage and dewarding from Legend to Immortal is massive. If you can adopt Immortal-level vision habits in a Legend game, you’ll have an enormous advantage. For players looking to accelerate this learning curve, our Calibration service paired with coaching can help you start in a bracket that challenges you to develop better habits.
The Support Duo Vision Dance
In high-level Dota 2, the position 4 and position 5 coordinate their vision game. Here’s how this typically works:
- Position 5 (Hard Support): Focuses on defensive wards, lane wards during early game, and sentry usage for dewarding. They’re more likely to stay near the carry and place wards in safer areas.
- Position 4 (Soft Support): Handles offensive wards, deep jungle vision, and smoke-warding rotations. They typically have more mobility and can take risks placing wards in dangerous areas.
When both supports understand their vision responsibilities, the team has consistent information flow throughout the game. When only one support is warding, there are inevitable gaps.
Common Warding Mistakes by Bracket
Herald-Guardian Mistakes
- Not buying wards at all (they’re free!)
- Placing both starting observers on rune spots regardless of lane matchup
- Never buying sentries unless facing a Riki or Bounty Hunter
- Walking to ward spots through enemy vision, dying, and then not warding
Crusader-Archon Mistakes
- Always placing wards on the same cliff spots every game (predictable and easily dewarded)
- Warding offensively when the team is behind
- Not adjusting ward spots based on which towers are down
- Ignoring smoke for safe ward placement
Legend-Ancient Mistakes
- Dewarding reactively instead of proactively (waiting until something bad happens instead of anticipating ward locations)
- Not communicating ward timers to the team
- Core players refusing to carry and place wards in their farming areas
- Using all ward stock at once instead of staggering placements for continuous coverage
Divine+ Mistakes
- Over-relying on predictive dewarding against creative opponents
- Not adapting ward style fast enough when the game state changes (e.g., losing a key fight shifts the game from offensive to defensive)
- Tunnel vision on Roshan wards at the expense of lane push vision
Advanced Warding Tips from Immortal Players
These are the nuances that separate good warders from great ones:
1. Ward Staggering
Don’t place both observers at the same time. Stagger them so one expires, gets replaced, and you always have continuous vision. If you place both at 10:00, you’ll have a gap at 16:00 when both expire simultaneously and only have 2 wards in stock.
2. Unconventional Spots
The best wards are ones the enemy doesn’t think to deward. Instead of using cliff wards, place observers in tree lines, on ramps, or in unusual corners. They might give slightly less vision, but they last the full 6 minutes because nobody finds them. A 6-minute ward in a decent spot provides more total value than a 1-minute ward in a “perfect” spot that gets immediately dewarded.
3. The “Information Already Known” Test
Before placing a ward, ask: “Does this ward tell me something I don’t already know” If your team already has vision of an area through other means (creep lanes, heroes passing through, other wards), placing another ward there is redundant. Find a blind spot and fill it.
4. Ward for Your Win Condition
If your win condition is your carry farming until they’re 6-slotted, ward defensively around their farming patterns. If your win condition is early aggression, ward enemy jungle chokepoints for pickoffs. If your win condition is Roshan, ward Rosh approaches. Vision should serve your strategy, not exist in a vacuum.
5. Use Alt-Click to Communicate
Alt-click enemy wards on the minimap to alert your team. Alt-click your observer wards in inventory to signal that wards are available to place. Communication is vision’s partner–great wards are useless if your team doesn’t watch the minimap. For more on in-game communication tools, check out our Dota 2 Communication Guide.
6. Night Vision Awareness
Observer ward vision is reduced at night (800 units instead of 1400). This means your ward coverage effectively shrinks every night cycle. Plan ward placements with this in mind–wards that cover a wide area during the day might leave dangerous blind spots at night. Consider placing wards that cover chokepoints rather than open areas during night-heavy game phases.
7. Carry a TP When Warding
Always have a TP scroll when going to place aggressive wards. If you get spotted and the enemy collapses, you need an escape plan. Too many supports die walking to ward spots without TP scrolls, feeding gold and losing the ward they were going to place.
Warding for Specific Heroes
Your warding priorities should change based on what heroes are in the game:
Against Invisible Heroes (Riki, Bounty Hunter, Clinkz, Nyx)
Sentry usage increases dramatically. Key sentry locations include: your jungle entrances, behind your mid T1, near your carry’s farming area, and at Roshan. You may need to dedicate 100-150 gold per minute on sentries alone.
Against Ganking Heroes (Spirit Breaker, Clockwerk, Storm Spirit)
Defensive wards become critical. Ward all approach routes to your cores’ farming areas. The goal is to see these heroes coming before they reach your teammates. River wards and jungle entrance wards are premium.
Against Split-Push Heroes (Nature’s Prophet, Tinker, Anti-Mage)
Ward your side lanes deeply. You need to see the split pusher’s movements to decide whether to TP react or ignore and push elsewhere. Deep lane wards near the enemy’s TP-in locations are valuable.
Against Roshan-Focused Lineups (Ursa, Troll Warlord, Templar Assassin)
Roshan vision is non-negotiable. Keep permanent observer/sentry coverage near Rosh. If these heroes are missing from the map and you don’t have Rosh vision, assume they’re doing Rosh and rotate immediately.
Vision and Map Control: The Bigger Picture
Vision doesn’t exist in isolation–it’s part of your team’s overall map control strategy. Here’s how vision integrates with other aspects of Dota 2:
Tower control + Vision: Towers provide free vision. When you lose a tower, you lose a permanent vision source and need to compensate with wards. When you take an enemy tower, you gain map control AND reduce the enemy’s need for wards in that area (since their tower was providing vision). This is why taking T1 towers is so impactful–it simultaneously reduces enemy vision and expands yours.
Scan + Vision: The Scan ability (available every 210 seconds) can supplement your ward vision. Use Scan to check Roshan when you suspect the enemy is there but don’t have ward vision. Use it to verify whether a dangerous area is safe before farming there. Scan + wards together give you comprehensive information.
Buyback + Vision: In late game, vision of the enemy’s buyback status (checking hero gold via scoreboard) combined with map vision lets you make informed decisions about committing to fights and objectives.
If you’re struggling with integrating vision into your overall game strategy, or if you want to see how high-MMR players handle vision from the core role perspective, our Low Priority Removal service can help you get back to ranked matches where you can practice these skills without the frustration of LP games.
Practicing Your Warding
Like any skill, warding improves with deliberate practice. Here’s how to get better:
- Watch replays from the support’s perspective. Watch your own replays and note every time vision (or lack of it) influenced the outcome. Then watch Immortal-rank replays and compare their ward placements to yours.
- Use the “ward overlay” in practice mode. Load into a custom lobby and experiment with ward placements. Check the vision range from different spots without the pressure of a real game.
- Track your dewarding stats. After each game, check how many wards you dewarded vs. how many sentries you used. A healthy ratio is dewarding at least one ward per 2-3 sentries purchased.
- Learn from the best. Check out high-level support streamers and YouTube content creators who explain their warding decisions. Our guide to Best Dota 2 YouTube Channels and Streamers can point you in the right direction.
FAQ
Ready to Climb Start Your Boost Today
Team Smurf is the #1 rated Dota 2 boosting service. Immortal-rank boosters, maximum safety, competitive pricing, 24/7 support.
Conclusion
Vision control is the backbone of strategic Dota 2. It’s not glamorous–there’s no “Ward Placed” notification that makes your team celebrate. But the players who master warding consistently win more games, climb MMR faster, and find more enjoyment in the strategic depth of Dota 2. From the first observer placed at the rune to the final ward that lights up the enemy base before a throne push, vision tells the story of every game.
Start small: commit to always spending your wards when they’re in stock, buy sentries proactively, and watch the minimap. Then evolve into adapting your ward game to the game state, using smokes for deep vision, and dewarding efficiently. The gap between your current rank and the next one might just be a few well-placed wards away.
For personalized guidance on improving your vision game and overall Dota 2 performance, explore our Coaching service or check out our MMR Boost service to see how high-level supports operate in your bracket. Good luck, and may your wards always survive the full 6 minutes.


