Dota 2 Roaming Support Guide: How to Dominate the Early Game as Pos 4

The position 4 roaming support is arguably the most impactful role during the first ten minutes of a Dota 2 match. While carries farm and mid laners trade hits, a skilled roamer can single-handedly swing multiple lanes in their team’s favor, secure crucial early kills, and set the tempo for the entire game. Yet despite its enormous influence, roaming remains one of the most misunderstood and poorly executed roles in pub matchmaking — and it’s one of the biggest differentiators between players stuck at their current MMR bracket and those who climb consistently.
In this exhaustive guide, we’ll break down everything you need to know about playing position 4 roaming support at the highest level: the best heroes for the job, optimal gank timings, rune control fundamentals, smoke rotation strategies, power spike windows, and — critically — when you should roam and when you should stay in lane. Whether you’re a 2K player looking to understand the basics or a 5K veteran refining your craft, this guide will give you actionable knowledge to dominate the early game.
Table of Contents
- What Is Roaming in Dota 2
- Best Roaming Heroes for Position 4
- Gank Timing: When to Strike
- Rune Control Fundamentals
- Smoke Rotations: The Art of Coordinated Ganks
- Power Spike Windows for Roamers
- When to Roam vs. When to Lane
- Itemization for Roaming Supports
- Advanced Roaming Techniques
- Common Roaming Mistakes and How to Fix Them
- Frequently Asked Questions
What Is Roaming in Dota 2
Roaming refers to the practice of leaving your assigned lane — typically the offlane or safelane as a position 4 support — to create pressure on other lanes through ganks, securing runes, stacking camps, and generally being a disruptive presence across the map. Unlike a position 5 hard support who typically babysits the carry in the safelane, the position 4 roamer is expected to be proactive, creative, and aggressive in their early-game movements.
The concept of roaming has evolved significantly over Dota 2’s history. In the early days, dedicated roaming supports like the classic Bounty Hunter or Earth Spirit would leave base at level 1 and immediately head to another lane for a kill attempt. Modern Dota has shifted somewhat — pure level 1 roaming is riskier now due to changes in passive gold, experience formulas, and lane equilibrium mechanics — but the fundamental principles remain the same.
A successful roamer accomplishes several objectives simultaneously:
- Creates kill opportunities that wouldn’t exist without your presence
- Forces enemy reactions — even unsuccessful ganks force teleport scrolls, defensive wards, and cautious play
- Secures map resources like runes, stacks, and vision
- Enables your cores to have favorable lane matchups
- Gathers information about enemy positions, ward placements, and item timings
Understanding these objectives is crucial because roaming isn’t just about getting kills — it’s about creating space and tempo advantages that compound over the course of the game. Many players at lower MMR brackets think roaming failed if they didn’t get a kill, but forcing the enemy mid to use their salve, miss a last hit wave, or burn a TP scroll is often worth the time investment.
Best Roaming Heroes for Position 4
Not every hero can roam effectively. The best roaming heroes share common characteristics: reliable crowd control at low levels, high base movement speed, the ability to function on limited farm, and kill potential with minimal items. Here’s a comprehensive breakdown of the top roaming heroes, organized by tier.
S-Tier Roamers
| Hero | Key Strength | Level Power Spike | Ideal Target | Difficulty |
|---|---|---|---|---|
| Earth Spirit | Long-range initiation, silence, stun | Level 2-3 | Mid lane | Very High |
| Tusk | Snowball setup, burst damage | Level 2-3 | Any lane | Medium |
| Clockwerk | Battery Assault lockdown in trees | Level 2-3 | Mid lane, Offlane | Medium |
| Spirit Breaker | Global gank threat, through-BKB stun | Level 1+ | Any lane | Low |
| Marci | Burst combo, repositioning | Level 2-3 | Any lane | Medium |
A-Tier Roamers
| Hero | Key Strength | Level Power Spike | Ideal Target | Difficulty |
|---|---|---|---|---|
| Bounty Hunter | Track gold, scouting, lane harassment | Level 6 | Supports, Mid | Low |
| Mirana | Sacred Arrow pickoffs, Leap mobility | Level 2-4 | Mid lane | High |
| Rubick | Telekinesis setup, Fade Bolt harass | Level 2 | Mid lane | High |
| Nyx Assassin | Vendetta initiation, mana burn vs INT heroes | Level 6 | Int-heavy lanes | Medium |
| Hoodwink | Bushwhack tree stun, Acorn burst | Level 2-3 | Any lane with trees | Medium |
B-Tier Roamers (Situational Picks)
| Hero | Key Strength | Best When | Difficulty |
|---|---|---|---|
| Pudge | Hook displacement, dismember lockdown | Enemy mid is squishy with no escape | High |
| Techies | Mine placement, Blast Off burst | Enemy relies on aggressive positioning | High |
| Tiny | Toss combo burst, Avalanche stun | Paired with heroes that benefit from Toss | Medium |
| Elder Titan | Astral Spirit setup, Natural Order aura | Enemy has high base armor heroes | High |
| Treant Protector | Nature’s Guise invis, bash through trees | Maps with favorable tree lines | Low |
Earth Spirit: The King of Roaming
Earth Spirit deserves special attention because he is, without question, the single most effective roaming hero in Dota 2 history. His Boulder Smash provides a long-range, reliable stun at level 1. Rolling Boulder gives him unmatched gap-closing ability. Geomagnetic Grip offers a silence that prevents escapes. His entire kit is designed for early aggression, and professional players routinely demonstrate his game-breaking potential in the first five minutes.
The typical Earth Spirit roaming combo at level 2 is: place a Stone Remnant behind or beside the target, use Boulder Smash to kick it into them (stunning), then roll in with Rolling Boulder for the slow. This combo deals approximately 200 damage at level 2 and provides roughly 3 seconds of combined stun and slow — more than enough for any ally to contribute follow-up damage for a kill.
However, Earth Spirit has the highest mechanical skill floor of any roaming support. If you’re not comfortable with remnant placement and timing, you’ll waste remnants and miss kills. Practice in bot games or unranked before taking him into ranked. For players who want to improve their Earth Spirit mechanics quickly, our Dota 2 coaching service includes hero-specific sessions with 7K+ MMR support players.
Spirit Breaker: The Low-Risk, High-Reward Roamer
Spirit Breaker is the perfect roaming hero for players who are new to the position 4 role. Charge of Darkness provides a global-range initiation that requires zero mechanical skill — you click the enemy hero and your hero runs at them. Greater Bash provides through-BKB lockdown. His base stats are tanky enough to survive tower dives. And unlike Earth Spirit, there’s almost no way to “whiff” a Spirit Breaker gank.
The key to effective Spirit Breaker roaming is target selection and timing. You don’t charge every time it’s off cooldown — you charge when you see a vulnerable target who is overextended. Watch the minimap constantly. If the enemy mid pushes past the river, start charging. If the enemy carry is farming under their tower alone without supports nearby, charge from fog. Every successful charge either gets a kill or burns a TP from the enemy team, and both outcomes are valuable.
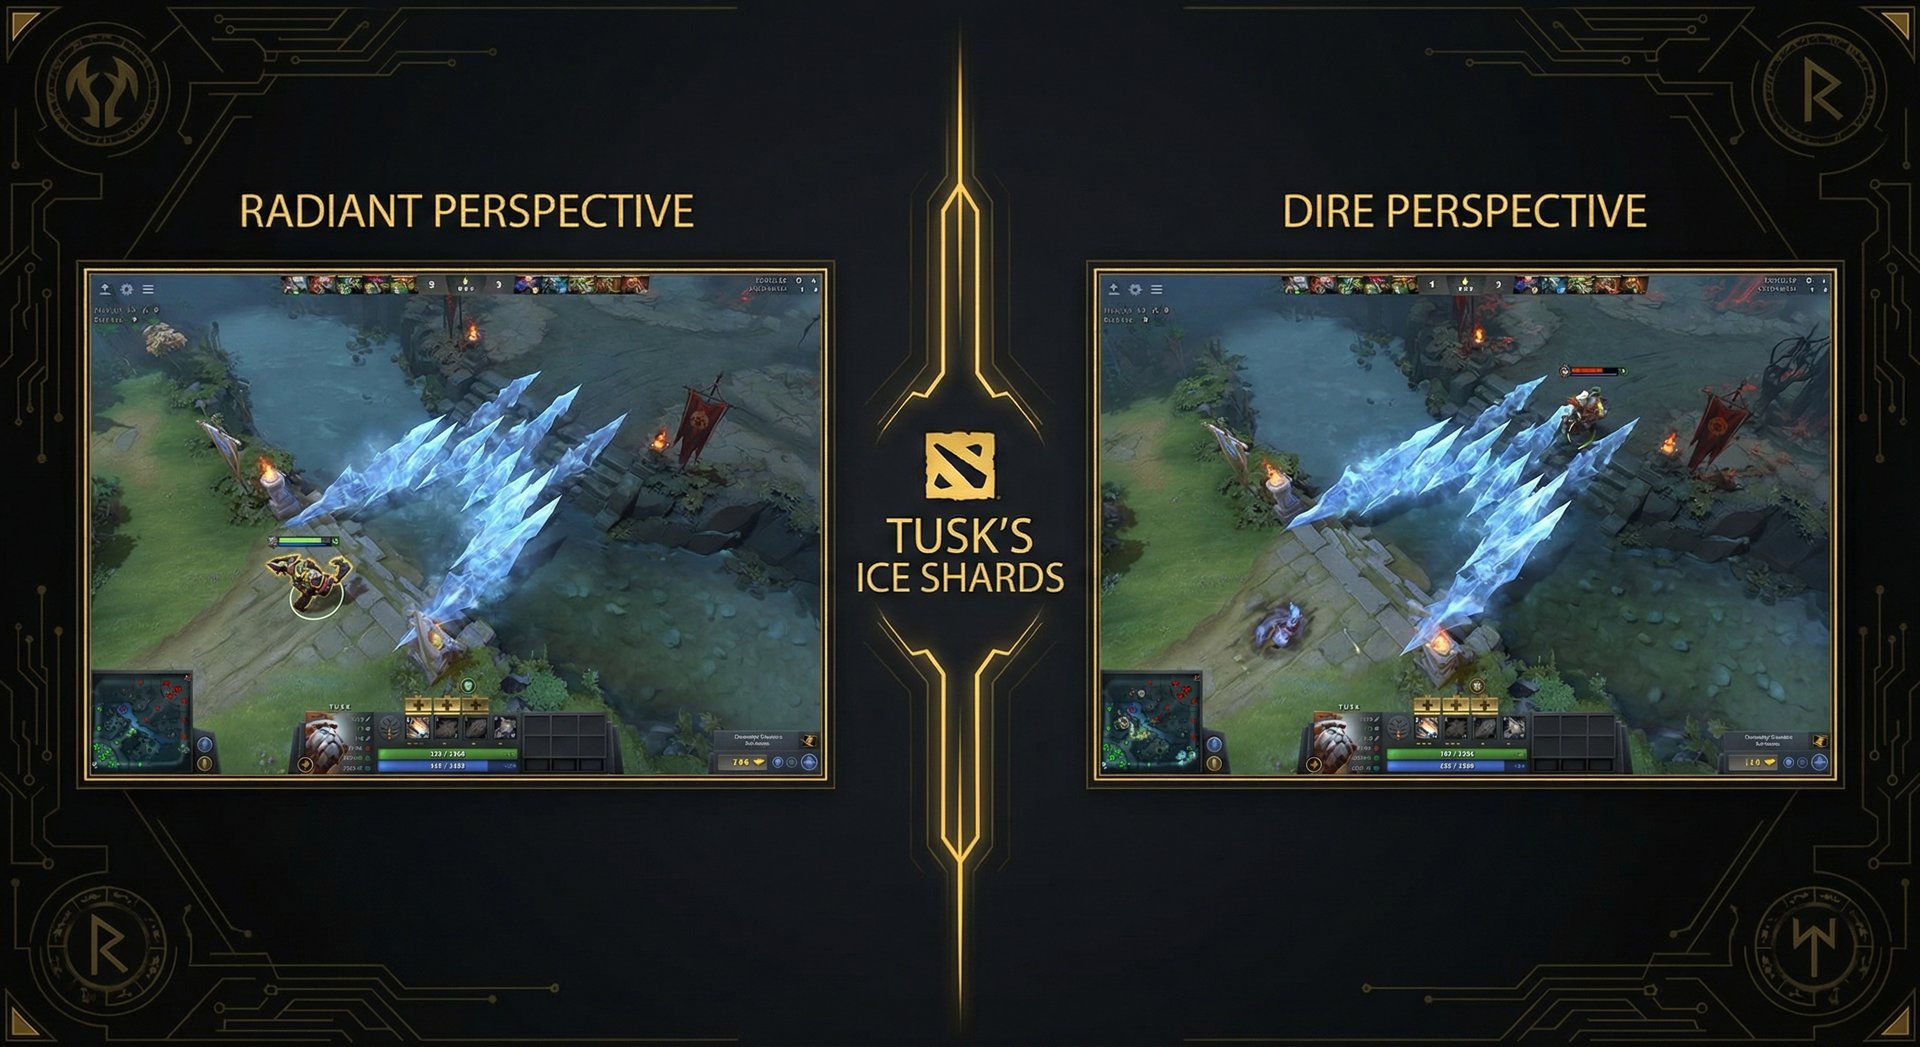
Tusk: The Versatile Brawler
Tusk combines reliable crowd control with exceptional burst damage and strong team fight utility. Ice Shards creates impassable terrain that can trap enemies against cliffs, trees, or walls. Snowball provides a save mechanism for allies or a gap-closing initiation that makes allies invulnerable during the animation. Tag Team amplifies physical damage from your entire team.
Tusk roaming typically focuses on mid lane ganks due to the narrow terrain. The classic play is to approach from behind the enemy mid, throw Ice Shards to cut off their retreat toward their tower, then Snowball in with your mid laner for a guaranteed kill. This combo is extremely effective against squishy mid heroes like Invoker, Sniper, Zeus, or Shadow Fiend who lack escape mechanisms at low levels.
Gank Timing: When to Strike
The difference between a gank that results in a kill and a gank that wastes 30 seconds of your time often comes down to timing. Knowing when to attempt a gank is as important as knowing how to execute one. Here are the key timing windows every roamer should understand.
The Level 2 Power Spike (1:30 – 2:30)
Most roaming heroes hit their first significant power spike at level 2, when they have access to two abilities. If you’ve been laning in the offlane, you’ll typically hit level 2 after the first creep wave and part of the second. This is your first opportunity to rotate.
The level 2 timing is particularly effective against mid lane because the enemy mid is likely still level 2 or just hitting level 3. They have limited HP, limited mana, and haven’t had time to purchase significant defensive items. A two-hero kill attempt on a lone mid laner at this timing is one of the highest-percentage plays in Dota 2.
However, the level 2 rotation has a cost: if it fails, you’ve lost experience in your primary lane, your offlaner is now solo at level 2 against a potentially aggressive safelane, and the enemy mid has gained confidence. This is why you should only commit to a level 2 rotation if at least one of the following conditions is met:
- The enemy mid is a squishy hero with no escape (Sniper, Zeus, Shadow Fiend)
- Your mid hero has reliable follow-up crowd control (Puck, Storm Spirit, Ember Spirit)
- You have vision confirming the enemy mid’s position
- You’re playing a hero with guaranteed lockdown (Earth Spirit stun, Tusk Snowball + Shards)
Rune Timings (2:00, 4:00, 6:00+)
Power runes spawn every two minutes starting at the 6:00 mark, with Bounty Runes spawning at 0:00 and then every 3 minutes. These are natural gank timing windows because:
- You’re already moving to the river to contest runes
- Power runes (Haste, Invis, Double Damage) can turn a marginal gank into a guaranteed kill
- Enemy mid heroes often push the wave before rune spawn to secure the rune, making them vulnerable near the river
Smart roamers plan their movements around rune timings. If it’s 5:30 and you’re in the offlane, start moving toward the mid river area. You can contest the rune, potentially secure it, and then decide whether to gank mid or rotate to another lane based on what you see.
Post-Catapult Timing (Every 5 Minutes)
Catapult creeps spawn at 5-minute intervals (5:00, 10:00, 15:00, etc.) and apply significant pressure to towers. Teams often group or play more aggressively during catapult waves. As a roamer, you can use catapult timings to your advantage — the enemy team may be focused on defending a tower under catapult pressure, making them vulnerable to flanking ganks. This ties directly into higher-level gameplay patterns that separate bracket climbers from stagnant players.
Enemy Cooldown Windows
One of the most overlooked gank timing concepts is tracking enemy ability cooldowns. If you see the enemy mid use their escape ability (Blink, Waveform, Pounce, etc.) to secure a ranged creep, that’s your window. At lower levels, these abilities have cooldowns of 10-15 seconds, giving you a clear window to initiate.
Similarly, if the enemy mid just used their nuke to push the wave, they have less kill potential on your mid during the gank attempt. Timing your rotation to coincide with enemy cooldown windows dramatically increases your success rate.
Timing Based on Enemy Item Purchases
Pay attention to the enemy’s items via the scoreboard. A mid hero with no Magic Stick or Wand is significantly more vulnerable to ganks than one who has it. Similarly, an enemy who just purchased Boots of Speed can kite you more effectively. Check items before committing to a gank.
Rune Control Fundamentals
Rune control is one of the most important responsibilities of a position 4 roaming support. Runes provide resources (bounty runes give gold), power-ups (power runes enhance abilities), and information (seeing which rune spawned tells you about enemy movements). Here’s how to approach rune control systematically.
Bounty Runes
Bounty runes spawn at 0:00 and every 3 minutes thereafter. They provide gold to your entire team, making them extremely efficient for supports who struggle with gold income. Securing all four bounty runes at a spawn is worth hundreds of gold across your team — essentially a free kill’s worth of gold without any risk.
As a roamer, your priority should be contesting at least one enemy bounty rune at every spawn. The optimal play is to secure your safe bounty rune first, then immediately move to contest the nearest enemy bounty rune. Communication with your team is key — ping the bounty runes 15-20 seconds before spawn so your teammates can help secure them.
Power Runes
Power runes (Haste, Double Damage, Regeneration, Arcane, Illusion, and Invisibility) spawn at the river at 6:00 and every 2 minutes afterward. For a roamer, certain power runes are game-changing:
| Rune | Value for Roaming | Best Use |
|---|---|---|
| Haste | Guaranteed gank on any lane — max movement speed makes escape impossible | |
| Invisibility | Walk past wards for surprise initiation on enemy mid or carry | |
| Double Damage | Tower dive potential, stronger right-click follow-up during ganks | |
| Arcane | Enables multiple ability rotations without returning to base | |
| Regeneration | Sustain after a fight, continue roaming without returning to base | |
| Illusion | Scouting, blocking camps, creating confusion |
If you pick up a Haste or Invisibility rune, immediately look for a gank opportunity — these runes are worth more than almost any other play you could be making. A Haste rune on Spirit Breaker, Earth Spirit, or Tusk virtually guarantees a kill on any hero without a built-in escape.
Rune Vision and Warding
Place Observer Wards that give vision of rune spawn points. The high ground wards overlooking both power rune spots are standard, but as a roamer, you should also consider placing aggressive wards that cover the enemy’s path to runes. If you can see the enemy mid walking to the rune, you can set up an ambush along their path.
Deward enemy rune wards aggressively. Carry a Sentry Ward specifically for rune spots. Denying the enemy team vision of rune spawns significantly increases your gank success rate and rune control.
Smoke Rotations: The Art of Coordinated Ganks
Smoke of Deceit is arguably the most impactful consumable item in Dota 2, and mastering smoke rotations is what separates good roamers from great ones. Smoke makes you and nearby allies invisible to wards and the minimap, allowing you to bypass vision and catch enemies completely off-guard.
When to Use Smoke
Smoke has a 6-minute restock time and costs 50 gold, making it a limited resource that shouldn’t be wasted. Use smoke when:
- You’ve identified a high-value target — The enemy mid has no escape and is farming aggressively
- You suspect your movement is being tracked — If the enemy has wards covering your rotation path
- You want to coordinate a multi-hero gank — Smoke’s area of effect allows you to move with 1-2 allies unseen
- You’re setting up for a Roshan attempt — Smoke hides movement to the Rosh pit
- You’re breaking high ground — Smoke helps you position before high ground pushes
How NOT to Use Smoke
Common smoke mistakes that waste this valuable resource:
- Smoking without a clear target — “Let’s smoke and see what happens” almost always results in a wasted smoke
- Smoking too close to the enemy — Smoke breaks within 1025 range of enemy heroes. If you smoke in a contested area, it might break before you’re in position
- Smoking 5 heroes when 2-3 would suffice — If you smoke all 5, your lanes are empty and the enemy can spot the missing heroes on the minimap
- Not having enough damage to kill — Smoke into a gank where you can’t actually secure the kill is a waste
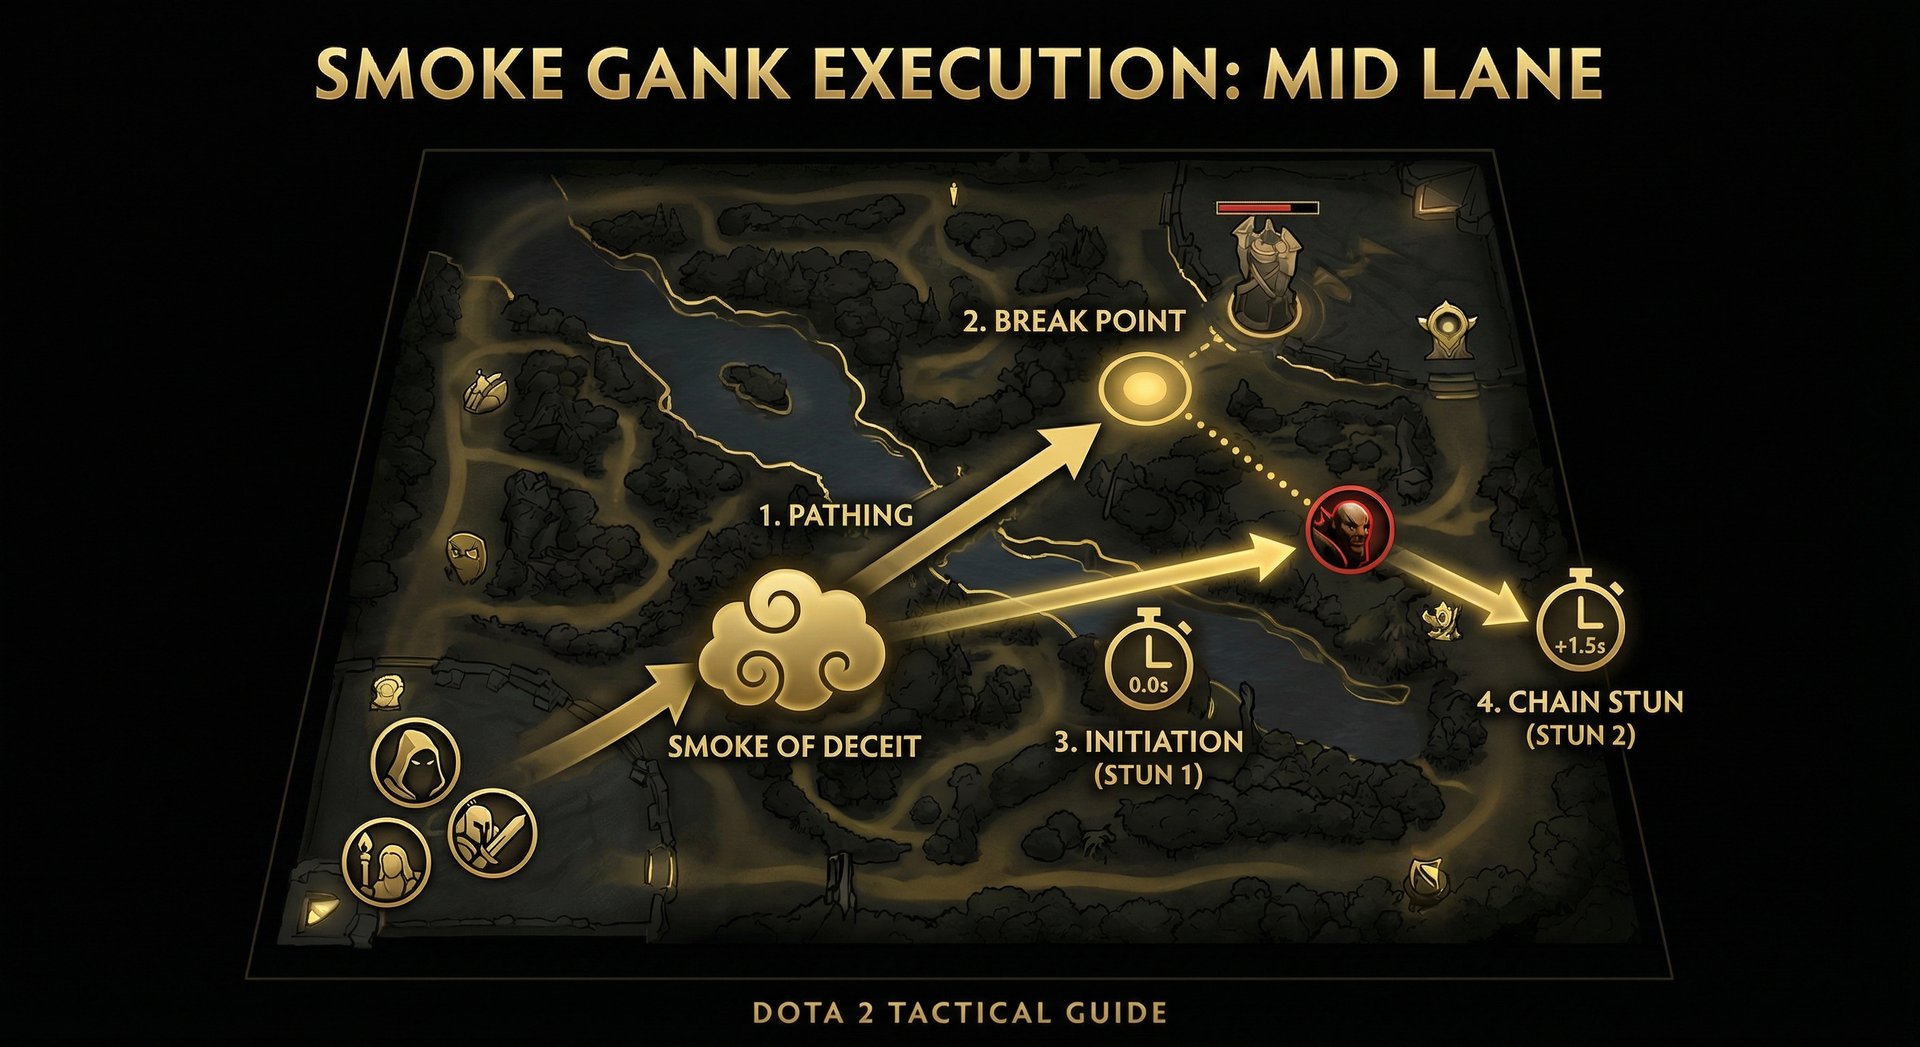
Smoke Gank Execution
The ideal smoke gank follows this sequence:
- Identify the target — Determine who you’re ganking and where they’re likely to be
- Gather participants — 2-3 heroes is optimal for most ganks. Include heroes with crowd control and burst damage
- Smoke up in a safe location — Behind your tower, in your jungle, or anywhere not visible to the enemy
- Move together — Stay within 1025 units of each other. The smoke cloud indicator at the bottom of your screen shows when you’re properly grouped
- Approach from unexpected angles — Don’t walk straight down a lane. Cut through trees, approach from behind, use high ground to your advantage
- Break smoke with initiation — The moment smoke breaks (you’re within 1025 range of an enemy hero), immediately initiate. Don’t hesitate
- Chain crowd control — Stagger your disables so the target is locked down for the maximum duration
- Secure the kill and retreat — Don’t overstay. Get the kill, get out, return to farming or set up for another play
Smoke Timing by Game Phase
The frequency and purpose of smoke ganks should change as the game progresses:
| Game Phase | Smoke Frequency | Primary Target | Participants |
|---|---|---|---|
| 0-10 min | 1-2 smokes | Enemy mid or carry | 2-3 heroes |
| 10-20 min | 2-3 smokes | Enemy carry, key supports | 3-4 heroes |
| 20-30 min | 2-3 smokes | Pickoffs before objectives | 3-5 heroes |
| 30+ min | Every restock | Teamfight initiation, Roshan | 4-5 heroes |
Power Spike Windows for Roamers
Understanding your hero’s power spikes — the levels and item timings where you’re strongest relative to the game state — is essential for maximizing your impact as a roamer. Here’s a breakdown of common power spikes by hero category.
Level Power Spikes
Level 2: Most roamers hit their first power spike here. Having two abilities gives you enough crowd control and damage to contribute to kills. Heroes like Earth Spirit (Smash + Roll), Tusk (Shards + Snowball), and Clockwerk (Battery Assault + Cogs) become kill threats the moment they reach level 2.
Level 3: A significant spike for heroes that need all three basic abilities to function. Mirana with Arrow + Leap + Starstorm, or Rubick with Telekinesis + Fade Bolt + a value point in Null Field, become substantially more threatening.
Level 6: The ultimate ability spike. Heroes like Nyx Assassin (Vendetta provides invisibility and huge burst), Bounty Hunter (Track provides bonus gold for your entire team), and Spirit Breaker (Nether Strike adds burst damage to your kit) transform at level 6. If you’re playing a hero with a game-changing ultimate, fast level 6 is your primary objective.
Item Power Spikes
Roamers don’t farm fast, so each item purchase represents a significant investment. These are the key item timings:
Boots of Speed (500 gold): Your first essential purchase. Movement speed is the most important stat for a roamer — it determines how quickly you can rotate between lanes, chase down fleeing enemies, and position for ganks. Rush Boots before almost anything else.
Magic Stick/Wand (200-450 gold): Provides burst sustain that can save your life or give you enough mana for one more ability during a gank. Essential against heroes who spam abilities.
Urn of Shadows (880 gold): The quintessential roaming item. Provides bonus damage to gank targets, healing for yourself and allies between fights, and stats that benefit a roaming playstyle. If your team doesn’t have an Urn carrier, rush this after Boots.
Spirit Vessel (2920 gold): The Urn upgrade that provides percentage-based damage — devastating against heroes with high HP pools or healing. This is your first major item timing and represents a significant power spike.
Blink Dagger (2250 gold): For heroes like Clockwerk, Tusk, or Earth Spirit, Blink Dagger dramatically increases your initiation range and reliability. A roamer with Blink is exponentially more dangerous than one without.
Timing Your Ganks Around Power Spikes
The most effective roamers synchronize their gank attempts with their power spikes while targeting enemies during their weak moments. For example:
- Gank the enemy mid at your level 2 when they’re still level 1
- Rotate to the safelane when you hit level 3 and the enemy offlaner has a key ability on cooldown
- Smoke gank immediately after purchasing Urn for the extra damage
- Set up aggressive plays the moment you complete Blink Dagger
This principle of timing aggression with power spikes is fundamental to climbing MMR. Our coaching sessions spend significant time on this concept because it’s often the single biggest improvement area for players in the 3K-5K range.
When to Roam vs. When to Lane
This is perhaps the most important section of this guide. Knowing when to roam and when to stay in lane is the skill that determines whether your roaming creates an advantage or actively hurts your team. Many position 4 players default to constant roaming when they’d create more value by staying in lane — and vice versa.
Stay in Lane When…
Your offlaner needs help: If your offlaner is getting zoned, killed, or denied experience by an aggressive enemy safelane (e.g., Juggernaut + Shadow Shaman), your offlaner needs you in lane. An offlaner who falls behind in levels becomes useless, and no amount of mid ganks will compensate for a completely shut-down offlane.
The enemy safelane is killable: If you and your offlaner have a kill threat on the enemy carry (for example, you’re playing Tusk + Underlord vs. a melee carry with no escape), staying in lane and securing kills is more valuable than rotating for a coin-flip mid gank.
You haven’t hit your power spike yet: If you’re level 1 on a hero that needs level 2 or 3 to be effective, don’t roam. Get your levels first. Leaving lane at level 1 as Rubick or Mirana is almost always wrong — you have no reliable crowd control yet.
All lanes are stable or winning: If every lane is doing fine, there’s no urgent reason to roam. Stay in lane, secure your experience, and wait for an opportunity. Don’t force ganks that aren’t there.
Roam When…
Your offlane is self-sufficient: If your offlaner can solo the lane comfortably (e.g., Tidehunter, Timbersaw, or any hero with strong sustain and wave clear), your presence in lane is redundant. You’re worth more creating pressure elsewhere.
The enemy mid is vulnerable: Squishy mid heroes without escape abilities (Shadow Fiend, Sniper, Zeus, Invoker) are prime gank targets. If your mid has any form of crowd control, a 2v1 mid gank is the highest-percentage play in the game.
You have a power spike advantage: If you just hit level 2 or 3 and the enemy mid is the same level or lower, you have a window of opportunity. Roam now before the window closes.
The enemy carry is diving your safelane: If the enemy offlaner is pressuring your safelane carry, a TP rotation to save your carry and potentially turn the fight is a high-value roaming play. Always carry a TP scroll for reactive rotations.
A rune timing is approaching: As discussed above, rune timings are natural rotation windows. Start moving toward the river 15-20 seconds before the rune spawn.
The Golden Rule of Roaming
Here’s the principle that ties everything together: roaming should create more value than the experience and lane presence you give up by leaving. If you roam mid and get a kill, that’s worth it. If you roam mid, fail to get a kill, and your offlaner dies twice while you’re gone, that’s a net loss. Always weigh the potential gain of roaming against the guaranteed cost of leaving your lane.
This decision-making framework is one of the hardest things to teach in Dota 2 because it requires game sense, map awareness, and matchup knowledge. If you’re struggling with this, consider our calibration service to get an accurate placement, and then work on refining your roaming decisions at the appropriate skill level.
Itemization for Roaming Supports
Roaming supports operate on extremely tight budgets. Every gold piece matters, and buying the wrong item can set you back several minutes. Here’s a comprehensive itemization guide for position 4 roamers.
Starting Items (600 gold)
Your starting items should reflect your plan for the first 3-5 minutes:
Standard Start: Tango (90g) + Observer Ward (0g) + Sentry Ward (50g) + Magic Stick (200g) + 2x Iron Branch (100g) + Smoke of Deceit (50g) = 490 gold. This leaves 110 gold for a Faerie Fire or saving toward Boots.
Aggressive Start: Orb of Venom (275g) + Tango (90g) + Observer Ward (0g) + 2x Iron Branch (100g) + Clarity (50g) = 515 gold. This is for heroes who benefit from the Orb of Venom slow, like Treant Protector, Ogre Magi, or Undying.
Sustain Start: Tango (90g) + 2x Clarity (100g) + Observer Ward (0g) + Sentry Ward (50g) + Magic Stick (200g) + Iron Branch (50g) = 490 gold. For mana-hungry roamers like Rubick or Earth Spirit who need multiple ability rotations.
Early Game Items (0-10 minutes)
- Boots of Speed — Priority #1. Always.
- Magic Wand — If you started Magic Stick, upgrade when you can.
- Urn of Shadows — If no one else is building it.
- Wind Lace — Cheap movement speed boost, builds into useful items later.
Mid Game Items (10-25 minutes)
Your mid-game items depend heavily on the game state and your hero:
- Spirit Vessel — If the enemy has healing-dependent heroes (Alchemist, Morphling, Huskar)
- Blink Dagger — If you need better initiation (Clockwerk, Tusk, Earthshaker)
- Force Staff — If your team needs saves or you need to escape (Rubick, Mirana)
- Glimmer Cape — If the enemy has heavy magic damage and your cores need protection
- Eul’s Scepter — For mana regeneration and setup (great on heroes with delayed abilities)
Advanced Roaming Techniques
Once you’ve mastered the fundamentals, these advanced techniques will take your roaming game to the next level.
Creep Aggro Manipulation for Lane Control
Before you leave your lane to roam, you can manipulate the creep equilibrium to help your offlaner. Right-click an enemy hero (even one in another lane) while near the creep wave to draw aggro. This pulls the enemy creeps toward your tower, making the lane safer for your offlaner while you’re gone.
Fog of War Abuse
Dota 2’s vision system is based on line of sight, and the map is full of vision gaps created by trees, elevation changes, and terrain. Expert roamers memorize these fog spots and use them to approach ganks without being seen — even without Smoke. The trees around the mid lane, for example, have specific pathways that allow you to approach from behind without ever being visible to the enemy mid.
Tower Diving Fundamentals
Tower dives are risky but sometimes necessary to secure kills. The rules for successful tower dives:
- Have more than enough damage to kill quickly — don’t make it a prolonged fight under tower
- The initiator (you, as the roamer) should take tower aggro first, then pass it to a tankier hero or creeps
- Have a TP scroll on your support to bail out if things go wrong
- Count enemy heroes on the minimap — diving when an enemy support is missing is suicidal
- Don’t dive tier 2 towers before 10 minutes unless you’re absolutely certain you can get out
Information Gathering as You Roam
As you move around the map, you’re gathering information even when you’re not ganking:
- Ward placement — Note where enemy wards are placed (you’ll see them reveal you if you walk into their vision)
- Item timings — Check enemy inventories to track power spikes
- Jungle patterns — Note which jungle camps are being farmed and by whom
- Ability usage — Track key ability cooldowns for upcoming ganks
This information should be communicated to your team via pings, chat wheel, or voice comms. Even a simple “enemy mid has no TP” call can lead to a game-winning play.
Counter-Roaming
Sometimes the best roaming play is to counter the enemy’s roamer. If you know the enemy has an aggressive position 4 (you can see Spirit Breaker charging, or you anticipate Earth Spirit rotating), positioning yourself to counter-gank can be devastating. Instead of looking for your own ganks, you shadow the enemy roamer and turn their plays into 2v2s or 3v3s that favor your team.
Common Roaming Mistakes and How to Fix Them
Even experienced players make roaming mistakes. Here are the most common ones and how to fix them.
Mistake #1: Roaming Without a Plan
Leaving your lane and wandering aimlessly is the cardinal sin of roaming. Every time you leave your lane, you should have a specific target, a route planned, and a backup plan if the primary gank fails.
Fix: Before leaving lane, ask yourself: “Who am I ganking How will I get there What’s my combo What do I do if it fails” If you can’t answer these questions, stay in lane.
Mistake #2: Forcing Ganks That Aren’t There
Some players feel pressured to roam constantly, leading to forced ganks against targets who aren’t actually vulnerable. Trying to gank a full-HP Anti-Mage with Blink ready is a waste of time.
Fix: Evaluate gank viability before committing. Does the target have an escape Are they full HP Are there enemy heroes missing who could counter-gank If the gank doesn’t look good, find something else to do — stack camps, place wards, or return to lane.
Mistake #3: Abandoning Your Offlaner Too Early
Leaving your offlaner alone at level 1 against a strong dual lane (like Juggernaut + Witch Doctor) is often a death sentence for them. Your offlaner needs the first 2-3 minutes of lane support to establish their lane equilibrium.
Fix: Help your offlaner for the first 1-2 creep waves. Pull the small camp at :15/:45 to control equilibrium. Once your offlaner is level 2-3 and stable, then look for roaming opportunities.
Mistake #4: Not Carrying TP Scrolls
A roamer without a TP scroll is only half as effective. TP scrolls allow you to make reactive plays — counter-ganking dives on your safelane, responding to tower pressure, or escaping after a successful gank.
Fix: Always carry at least one TP scroll. Budget 100 gold for TP in your item plan. After using a TP, buy a new one immediately.
Mistake #5: Showing on the Minimap Unnecessarily
Your threat as a roamer is partially based on the enemy not knowing where you are. Every time you show on the minimap (walking through a warded area, appearing in a lane), the enemy team can relax and play aggressively in their lanes.
Fix: Move through fog whenever possible. Take unconventional paths through trees and jungle. Use Smoke when you suspect you’re being tracked. The less the enemy sees you, the more threatening you are.
Mistake #6: Ignoring the Safelane
Many roamers focus exclusively on the mid lane and forget that their safelane carry also needs help. If the enemy offlaner is bullying your carry and your position 5 can’t handle it, a roaming TP to the safelane can result in an easy kill and a happier carry.
Fix: Watch all three lanes, not just mid. TP to help your safelane when the enemy offlaner overextends. Sometimes the best gank target is in your own safelane, not across the map.
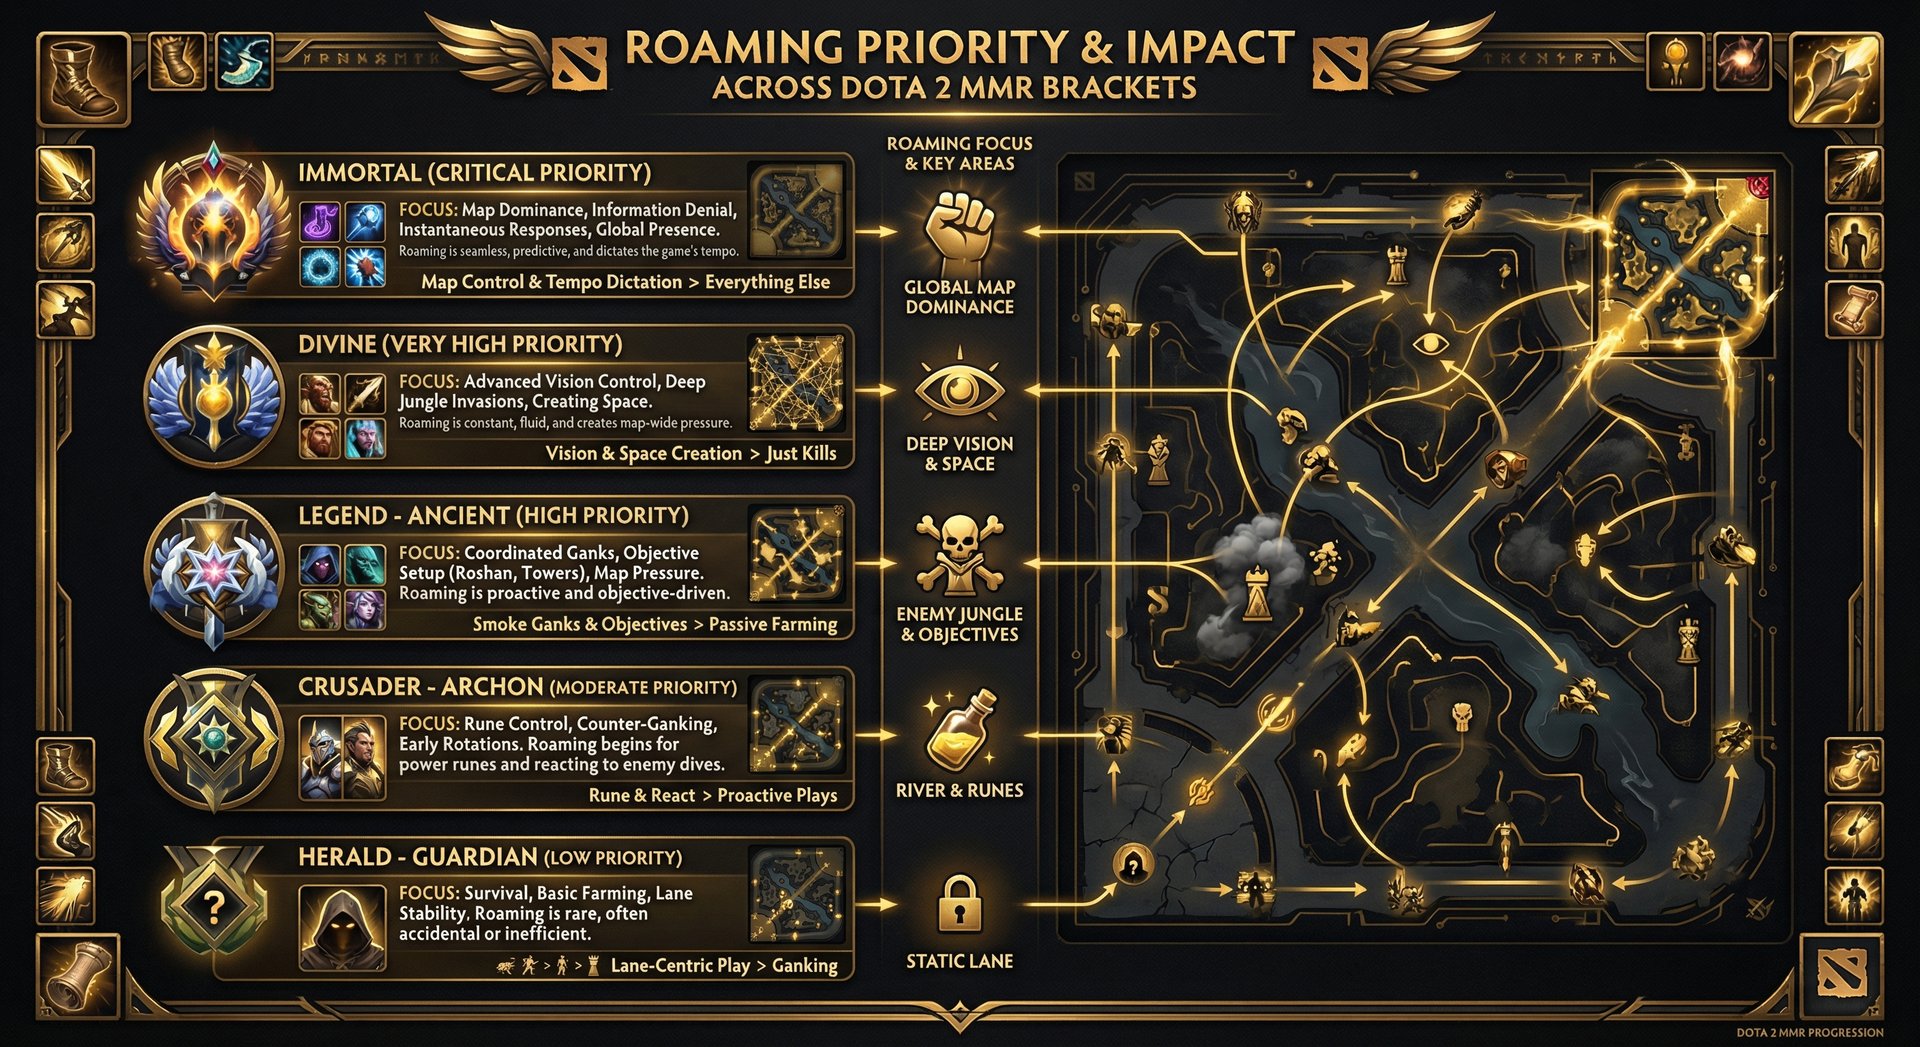
Roaming by MMR Bracket
Roaming looks very different depending on what bracket you’re playing in. Here’s how to adapt your approach based on your current MMR level.
Herald/Guardian (0-1500 MMR)
At this bracket, players have poor map awareness and rarely check the minimap. This means your ganks are more likely to succeed because enemies won’t see you coming — but it also means your team may not follow up on your initiation. Stick with simple, high-reliability roaming heroes like Spirit Breaker or Ogre Magi. Focus on killing the enemy mid and snowballing the game.
Crusader/Archon (1500-3000 MMR)
Players begin placing wards and checking the minimap occasionally. Smoke ganks become more important because enemies will sometimes spot your rotations. Your allies are more likely to follow up, but coordination is still inconsistent. Use voice chat or pings to signal your intentions clearly. This is the bracket where improving your roaming skills yields the highest MMR gains.
Legend/Ancient (3000-4500 MMR)
Players at this level understand roaming patterns and will adjust their play when they notice a roamer is missing. You need to be more creative with your gank approaches — use unconventional paths, smoke more frequently, and time your ganks with power spikes. Counter-roaming becomes important here because enemy position 4s will also be looking for ganks.
Divine/Immortal (4500+ MMR)
At the highest levels, roaming becomes a chess match. Both teams are tracking positions, using smokes, and counter-ganking. Your movements need to be efficient and purposeful — every second spent roaming without accomplishing something is a second of lost experience. High-MMR roaming is less about mechanics and more about decision-making, timing, and information. If you aspire to reach this level, our coaching services can pair you with Immortal-rank support players who specialize in the position 4 role.
Frequently Asked Questions
Conclusion: Master Roaming, Master the Early Game
The position 4 roaming support is the engine that drives early-game aggression in Dota 2. A skilled roamer creates kill opportunities that wouldn’t otherwise exist, secures map resources, gathers information, and sets the pace that the entire game follows. Whether you’re playing Earth Spirit at 6K MMR or Spirit Breaker at 2K, the principles remain the same: pick the right hero, time your ganks with power spikes, control runes, use smoke effectively, and always weigh the cost of roaming against the value it creates.
The difference between a good position 4 and a great one isn’t mechanics — it’s decision-making. Every time you leave your lane, you’re making a calculated bet that your presence somewhere else will create more value. Make those bets wisely, learn from the ones that don’t pay off, and you’ll climb the MMR ladder faster than you thought possible.
If you want to accelerate your improvement as a roaming support, consider our professional coaching service. Our Immortal-rank coaches can review your replays, identify specific mistakes in your roaming patterns, and provide personalized feedback that would take hundreds of games to figure out on your own. Sometimes the fastest way to climb isn’t grinding games — it’s learning from someone who’s already at the top.
Ready to Climb Start Your Boost Today
Team Smurf is the #1 rated Dota 2 boosting service. Immortal-rank boosters, maximum safety, competitive pricing, 24/7 support.
Written by Team Smurf’s Immortal-rank analysts — Last verified February 2026


