Best Support Heroes to Climb MMR in Dota 2: Pos 4 & 5 Complete Guide

Let’s get one thing straight: supports win games in Dota 2. If you’ve ever heard someone say “you can’t climb as a support,” they’re wrong — dead wrong. The truth is that support players control the first 15 minutes of every game, and those first 15 minutes determine the outcome of 70%+ of pub matches.
The problem isn’t the role — it’s that most support players don’t understand how supports actually win games. They buy wards, stand behind the carry in lane, and hope for the best. That’s not supporting. That’s being a creep with observer wards.
This complete guide to the best support heroes in Dota 2 covers both Position 4 (soft support) and Position 5 (hard support) separately, because these are fundamentally different roles with different hero pools, different responsibilities, and different win conditions. We’ll cover 10+ heroes for each position, warding strategy, itemization on a budget, and exactly how supports climb MMR.
Our boosters at TeamSmurf know these heroes inside and out — understanding support impact is crucial even for carry and mid players who want to know what their team should be doing.
Table of Contents
- Position 4 vs. Position 5: Understanding the Difference
- Best Position 5 Heroes (Hard Support)
- Best Position 4 Heroes (Soft Support)
- Warding: The Complete Guide to Vision Control
- How Supports Actually Win Games
- Support Itemization on a Budget
- Bracket-Specific Support Advice
- Top Support Mistakes That Lose Games
- FAQ
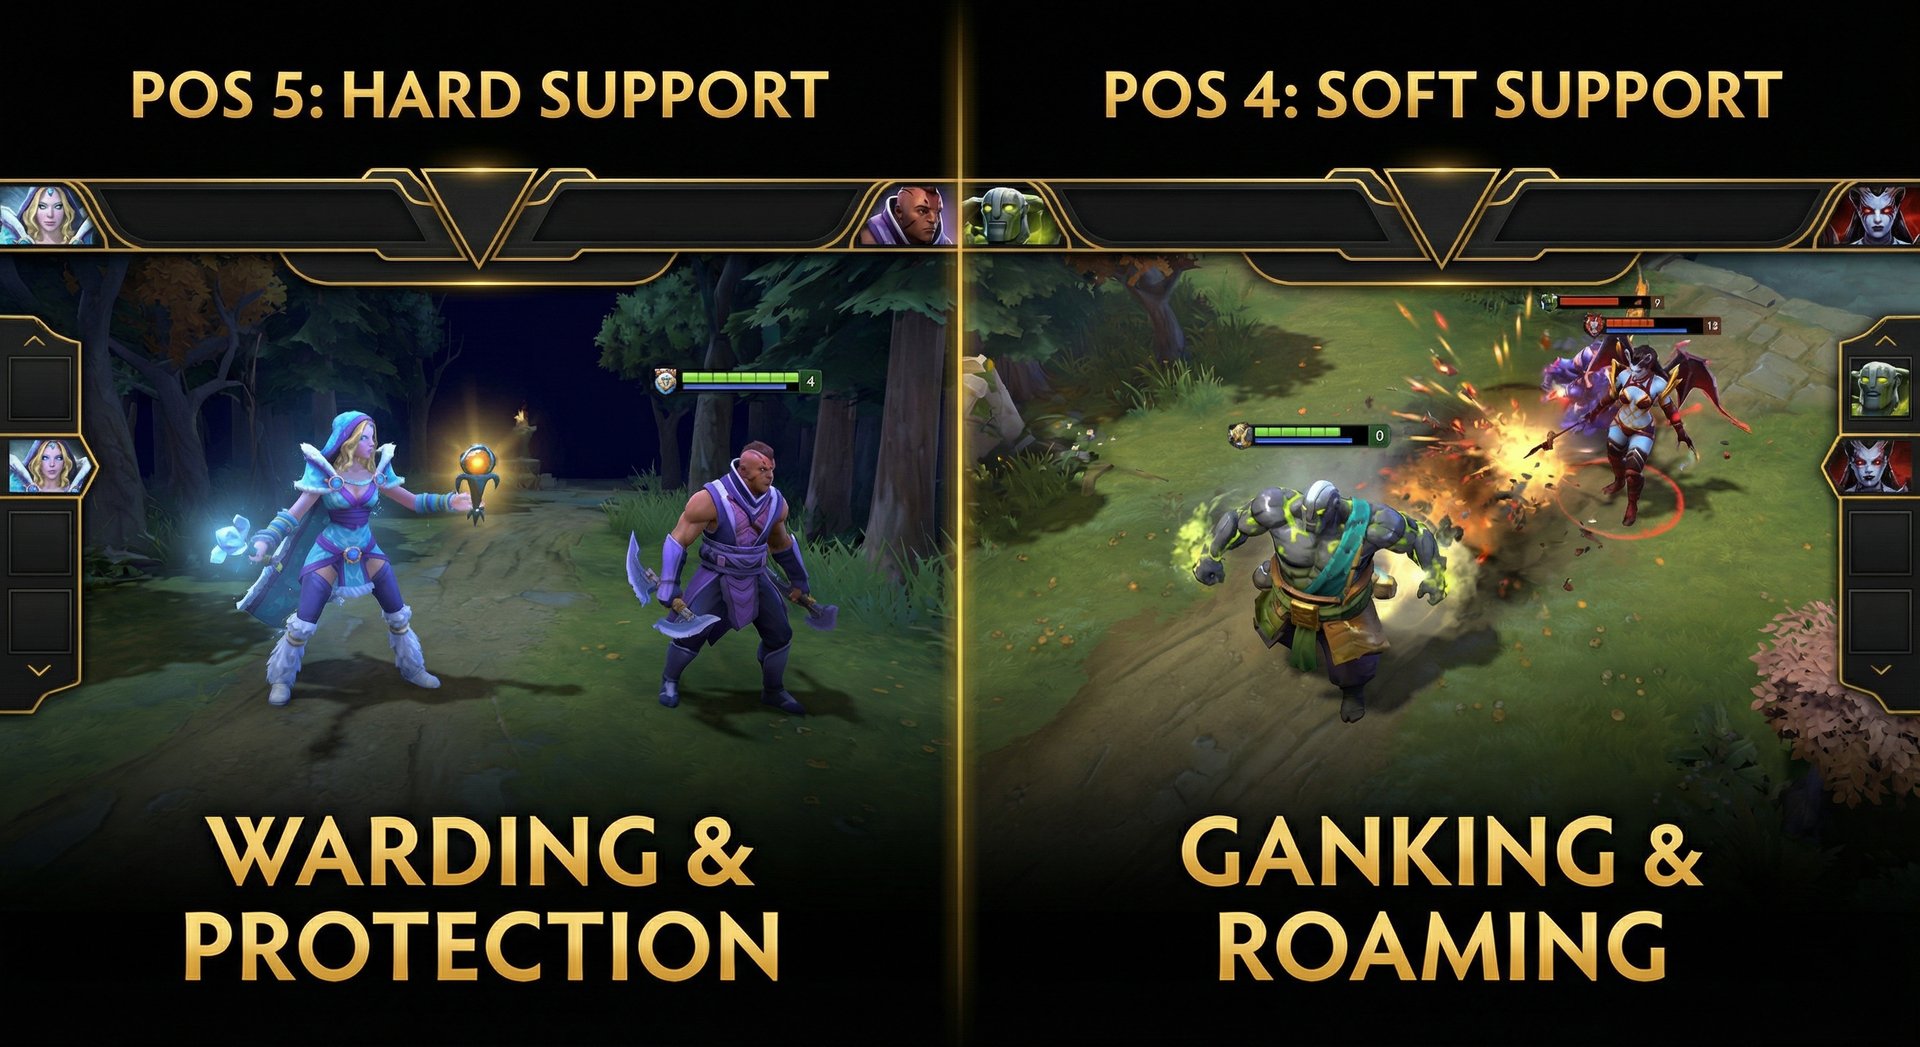
Position 4 vs. Position 5: Understanding the Difference
Before we get into hero picks, you need to understand that Pos 4 and Pos 5 are completely different roles. Picking a Pos 5 hero for Pos 4 (or vice versa) is one of the most common mistakes in lower brackets.
| Aspect | Position 5 (Hard Support) | Position 4 (Soft Support) |
|---|---|---|
| Lane | Safelane with carry | Offlane with offlaner |
| Primary role | Protect carry, secure farm, buy wards | Create chaos, gank, zone enemy carry |
| Farm priority | Lowest on team (Pos 5 = least gold) | 4th priority (gets some farm) |
| Playstyle | Defensive, protective, sacrificial | Aggressive, roaming, playmaking |
| Ward responsibility | Primary ward buyer | Secondary ward buyer, sentry focus |
| Itemization | Aura items, save items (Glimmer, Force) | Utility/damage items, initiation tools |
| Kill participation | Set up kills for cores, don’t take kills | Actively hunt for kills, can take kills early |
The golden rule: Position 5 makes sure the carry gets big. Position 4 makes sure the enemy carry stays small. Both are critical. Both can climb MMR effectively. Your choice should depend on your personality — do you prefer protecting and enabling, or do you prefer aggression and playmaking
Best Position 5 Heroes (Hard Support) — Tier List 2026
S-Tier Pos 5 Heroes
1. Crystal Maiden
Win rate: ~53% | Best brackets: All brackets | Difficulty: Low
Crystal Maiden has been a top-tier Pos 5 for years, and for good reason. Arcane Aura provides global mana regeneration to your entire team — this alone is worth the pick. In lower brackets where players constantly run out of mana, CM’s aura is game-changing. Frostbite is a reliable disable. Crystal Nova provides AoE slow and damage. And Freezing Field, while risky, can win entire team fights if positioned correctly.
Why CM is S-tier:
- Arcane Aura is globally impactful — your mid and offlane benefit from your pick
- Two disables (Frostbite root + Crystal Nova slow) give excellent kill potential
- Strong jungling capability — Frostbite one-shots large jungle creeps, providing income
- Freezing Field is a fight-winning ultimate when enemies don’t have stuns to cancel it
- Simple to execute — great for learning the Pos 5 role
Laning: In lane, CM wants to harass the enemy offlaner with right clicks and Crystal Nova. Use Frostbite to root enemies when your carry can follow up. Your goal in lane is to give your carry free farm for the first 5-7 minutes. After that, you can start rotating to help other lanes or farming jungle camps with Frostbite for extra gold.
Itemization: Tranquil Boots → Magic Wand → Glimmer Cape → Force Staff → BKB (if needed for Freezing Field). CM is dirt poor most games — prioritize Glimmer Cape as it’s the most impactful save item for its cost.
2. Shadow Shaman
Win rate: ~53% | Best brackets: Herald through Ancient | Difficulty: Low
Shadow Shaman is the best tower-pushing support in Dota 2. Mass Serpent Wards melt towers in seconds, and in pub games where teams struggle to push high ground, Shaman’s ult solves that problem single-handedly. He also has two disables — Hex (instant disable) and Shackles (channeled stun) — giving him the longest disable duration of any support.
Why Shadow Shaman is S-tier:
- Mass Serpent Wards destroy towers — this alone wins games in pubs
- Hex + Shackles = 7+ seconds of disable on a single target
- Can solo kill most heroes with full combo (Hex → Shackles → Wards → Ether Shock)
- Forces objective-based play, which is how games are actually won
- Excellent at catching out-of-position heroes
Laning: Shadow Shaman has surprisingly good right-click damage for a support. Use auto attacks aggressively to harass the enemy offlaner. Ether Shock is expensive mana-wise early on, so use it sparingly in lane. At level 6, you have kill potential on almost anyone with Hex + Shackles + Wards.
Itemization: Arcane Boots → Aether Lens → Blink Dagger → Aghanim’s Scepter → Refresher Orb. Blink is enormous on Shadow Shaman — it turns you from a “walk up and try to disable” hero into an instant-catch machine. Aether Lens extends your already good cast range, letting you initiate from fog.
Push strategy: After winning a team fight, immediately drop Mass Serpent Wards on the nearest tower. Don’t save them — towers are the most valuable objective in Dota 2, and each tower taken gives your entire team gold. In lower brackets, this alone can carry games. Enemies don’t know how to deal with Serpent Wards, and towers disappear.
3. Warlock
Win rate: ~54% | Best brackets: Herald through Legend | Difficulty: Low
Warlock is absurdly strong in lower brackets. Fatal Bonds amplifies damage across linked enemies — in chaotic team fights where AoE spells are flying everywhere, this amplification is devastating. Shadow Word provides consistent harass or healing. And Chaotic Offering (the Golem) is a massive AoE stun + summon that wins team fights.
Why Warlock is S-tier:
- Fatal Bonds is the most underrated ability in Dota 2 — it amplifies ALL damage by 25%
- Chaotic Offering provides huge AoE stun + a tanky golem that pushes towers
- Shadow Word is excellent lane sustain for your carry
- Upheaval is a massive AoE slow that controls team fights
- Extremely high win rate in brackets where team fights are messy and clumped
Laning: Use Shadow Word on the enemy offlaner for harass, or on your carry for healing. In tough lanes, maxing Shadow Word first gives your carry incredible sustain. Fatal Bonds can be used offensively in lane if you and your carry can trade aggressively — bonding 2-3 enemies and attacking one damages all of them.
Itemization: Arcane Boots → Holy Locket (amplifies Shadow Word) → Glimmer Cape → Aghanim’s Scepter (two golems!) → Refresher Orb (four golems!!!). Refresher Warlock with Aghanim’s is legitimately one of the scariest things in Dota 2 — four golems, each stunning on impact.
4. Jakiro
Win rate: ~53% | Best brackets: All brackets | Difficulty: Low
Jakiro is the complete package support. He has a stun (Ice Path), a slow (Dual Breath), tower damage (Liquid Fire), and a massive AoE zone control ultimate (Macropyre). He’s tanky for a support, deals respectable damage, and pushes towers with Liquid Fire.
Why Jakiro is S-tier:
- Ice Path is one of the best non-ultimate stuns in the game (AoE, long range)
- Liquid Fire damages towers — huge pushing power without spending mana
- Macropyre zones an enormous area, controlling choke point fights
- Extremely tanky for a support — 2.3 STR gain + high base HP
- All abilities are AoE — excellent in team fights at every stage
Laning: Jakiro dominates lanes. Liquid Fire harasses the enemy while also slowly chipping their tower. Dual Breath provides both a damage over time and a slow. Use Ice Path only when your carry can follow up — it has a delay and is easy to waste. The key to Jakiro laning: always be right-clicking with Liquid Fire. It costs zero mana and deals significant damage over time.
Itemization: Arcane Boots → Eul’s Scepter (guarantees Ice Path stun) → Force Staff → Aghanim’s Shard (piercing Macropyre!) → Aeon Disk. Eul’s is a game-changer on Jakiro — Eul’s an enemy, then Ice Path them during the Eul’s animation for a guaranteed 2+ second stun.
A-Tier Pos 5 Heroes
5. Dazzle
Win rate: ~52% | Best brackets: Archon through Divine | Difficulty: Medium
Dazzle is the ultimate save support. Shallow Grave makes an ally unkillable for 5 seconds, and in a game where dying is the biggest punishment, preventing deaths is incredibly powerful. Poison Touch provides lane harass, and Shadow Wave heals while dealing damage.
Key strengths:
- Shallow Grave prevents death for 5 seconds — insanely good in all brackets
- Poison Touch is one of the best level 1 harass abilities in the game
- Shadow Wave provides AoE heal AND damage
- Bad Juju reduces all cooldowns — more Graves, more heals, more everything
Itemization: Arcane Boots → Holy Locket → Glimmer Cape → Aeon Disk → Solar Crest. Every item you buy amplifies your save potential.
6. Witch Doctor
Win rate: ~52% | Best brackets: Herald through Ancient | Difficulty: Low
Witch Doctor is one of the highest damage-dealing supports in Dota 2. Paralyzing Cask provides a bouncing stun. Maledict is one of the most broken damage abilities in the game — it amplifies damage taken over time, meaning any burst damage during Maledict kills the target. And Death Ward is a channeled ultimate that shreds entire teams.
Key strengths:
- Maledict + Cask = guaranteed kill on most heroes at level 3
- Death Ward deals obscene damage in team fights if not interrupted
- Voodoo Restoration provides AoE healing
- Strong laning phase with Cask bouncing between two enemy heroes
Itemization: Arcane Boots → Glimmer Cape (use during Death Ward channel!) → Aghanim’s Scepter → BKB. The Glimmer Cape + Death Ward combo is disgusting — you channel Death Ward while invisible, making it extremely hard for enemies to cancel.
7. Lich
Win rate: ~52% | Best brackets: Herald through Legend | Difficulty: Very Low
Lich is the simplest Pos 5 to play effectively. Frost Blast provides reliable nuke + slow. Frost Shield makes your carry incredibly tanky. Sinister Gaze is a disable. And Chain Frost bouncing between enemies deals massive damage in team fights (especially in lower brackets where enemies clump together).
Key strengths:
- Frost Shield is incredibly impactful — 60% damage reduction on your carry
- Chain Frost bounces deal devastating damage when enemies group
- Extremely simple to play — just cast spells from the backline
- Strong lane presence with Frost Blast harass
Itemization: Tranquil Boots → Magic Wand → Glimmer Cape → Force Staff → Aeon Disk. Standard Pos 5 build — cheap items that keep you and your team alive.
8. Oracle
Win rate: ~51% | Best brackets: Ancient through Immortal | Difficulty: High
Oracle is the highest skill-ceiling Pos 5 in the game. Fortune’s End provides a purge. Fate’s Edict disarms enemies or protects allies from magic damage. Purifying Flames is a nuke/heal. And False Promise makes an ally invisible and delays all damage/healing for its duration — it’s the most complex save ultimate in Dota.
Why he’s A-tier (not S): Oracle requires understanding of his abilities’ interactions, which is complex. False Promise is incredibly powerful but needs precise timing. Below Ancient, most Oracle players don’t use the hero’s kit properly and would be better off on simpler heroes.
Itemization: Arcane Boots → Urn of Shadows (combos with False Promise) → Glimmer Cape → Aether Lens → Aeon Disk
9. Vengeful Spirit
Win rate: ~52% | Best brackets: All brackets | Difficulty: Low
Vengeful Spirit is versatile and effective at all skill levels. Magic Missile is a reliable single-target stun. Wave of Terror reduces armor. Vengeance Aura buffs your team’s damage. And Nether Swap is an incredibly powerful save/initiation tool — swapping your carry out of danger or an enemy hero into your team.
Key strengths:
- Magic Missile is one of the most reliable stuns in Dota 2
- Nether Swap saves allies OR initiates — incredibly versatile
- Vengeance Aura provides team-wide damage buff
- Even when dead, spawns a strong illusion that can fight and push
Itemization: Tranquil Boots → Magic Wand → Medallion of Courage → Force Staff → Glimmer Cape → Aghanim’s Shard
10. Bane
Win rate: ~51% | Best brackets: Legend through Immortal | Difficulty: Medium
Bane is the king of single-target lockdown. Nightmare provides a setup stun. Enfeeble reduces enemy damage. Brain Sap is a pure damage nuke + heal. And Fiend’s Grip is a 6-second BKB-piercing channeled disable that goes through almost everything.
Key strengths:
- Fiend’s Grip pierces BKB — one of only a few disables that does this
- Nightmare sets up kills and cancels enemy channels
- Brain Sap provides survivability (pure damage nuke + self-heal)
- Excellent against single-target reliant enemies
Itemization: Arcane Boots → Aether Lens → Blink Dagger → Glimmer Cape → Aghanim’s Scepter. Blink is transformative on Bane — Blink + Fiend’s Grip on the enemy carry wins team fights instantly.
Honorable Mentions (Pos 5)
- Ogre Magi — Tanky, simple, Bloodlust is a great buff for your carry. Multi-cast RNG can win games.
- Treant Protector — Global tree healing, Living Armor protects towers and allies, Overgrowth is a massive AoE root.
- Undying — Dominates lanes with Decay, Tombstone is fight-winning, falls off late game.
Best Position 4 Heroes (Soft Support) — Tier List 2026
Position 4 is the playmaker role. While Pos 5 protects, Pos 4 attacks. You’re the roamer, the ganker, the one who creates chaos across the map. Pos 4 heroes tend to have more damage, more mobility, and more solo-kill potential than Pos 5 heroes.
S-Tier Pos 4 Heroes
1. Pudge
Win rate: ~52% | Best brackets: All brackets | Difficulty: Medium
Pudge is the most popular hero in Dota 2 history, and for good reason — landing Meat Hooks is one of the most satisfying things in gaming. But beyond the fun factor, Pudge is genuinely effective as a Pos 4. Hook provides insane catch from 1300 range. Dismember is a BKB-piercing disable. Rot provides AoE slow and damage. And Flesh Heap makes him increasingly tanky as the game progresses.
Why Pudge is S-tier Pos 4:
- Hook catch range is unmatched — pick off enemies from fog
- Dismember pierces BKB — one of the strongest late-game disables
- Flesh Heap makes him scale into a tanky front-liner
- Psychological pressure — enemies play scared when Pudge is missing from the map
- Extremely high skill ceiling — a great Pudge wins games that should be lost
Laning: In the offlane, Pudge should focus on harassing the enemy support with Rot and threatening hooks. You don’t need to land every hook — the THREAT of a hook forces enemies to play behind creeps, giving your offlaner space. At level 3 (2-0-1 or 1-1-1), you can roam mid for a gank. Smoke up, walk behind the enemy mid, and Hook them back toward your tower.
Itemization: Tranquil Boots → Magic Wand → Blink Dagger → Aghanim’s Shard → BKB → Aghanim’s Scepter. Blink + Hook + Dismember is the classic combo. Aghanim’s Shard gives Rot a massive slow, making it impossible for enemies to run.
2. Earthshaker
Win rate: ~51% | Best brackets: Archon through Immortal | Difficulty: Medium-High
Earthshaker is the ultimate team fight support. Echo Slam’s damage scales with the number of nearby enemies — a 5-man Echo Slam can deal 3000+ total damage instantly. Fissure provides a long-range stun that also blocks pathways. Aftershock adds bonus stun to every spell. This hero single-handedly punishes clumping harder than any other hero in Dota 2.
Why Earthshaker is S-tier Pos 4:
- Echo Slam is potentially the highest-damage non-ultimate in team fights
- Fissure is one of the best stun/terrain creation abilities in the game
- Blink → Echo Slam is an iconic combo that wins team fights outright
- Excellent against illusion heroes (PL, CK, Naga) and summon heroes (NP, Brood)
- Aftershock means every spell has a mini-stun — chain CC machine
Itemization: Arcane Boots → Blink Dagger (CORE, non-negotiable) → Force Staff → Aghanim’s Scepter → Refresher Orb. Until you have Blink, you’re half a hero. Rush Blink as fast as possible.
3. Clockwerk
Win rate: ~52% | Best brackets: All brackets | Difficulty: Medium
Clockwerk is one of the most disruptive Pos 4 heroes in the game. Hookshot provides insane initiation range. Power Cogs trap enemies in a small area with you — in 1v1 situations, most supports and many cores simply die inside Cogs. Battery Assault deals continuous damage and mini-stuns, preventing enemies from channeling anything.
Why Clockwerk is S-tier:
- Hookshot provides 2000+ range initiation
- Power Cogs traps and isolates targets — devastating for pickoffs
- Battery Assault prevents channeling and deals significant damage
- Rocket Flare provides global vision and scouting
- Works in virtually every lineup and against every lineup
Itemization: Power Treads OR Tranquil Boots → Blade Mail → Force Staff → Aghanim’s Scepter → Lotus Orb
4. Mirana
Win rate: ~51% | Best brackets: Crusader through Divine | Difficulty: Medium
Mirana is the most versatile Pos 4 in Dota 2. Sacred Arrow is a skillshot stun that scales from 0.01 to 5 seconds based on distance traveled — max-range arrows are 5-second stuns that win any gank. Starstorm provides AoE damage. Leap gives mobility. And Moonlight Shadow makes your ENTIRE team invisible.
Why Mirana is S-tier:
- Sacred Arrow is the longest stun in Dota 2 (5 seconds at max range)
- Moonlight Shadow provides team-wide invisibility — insane for smoke-like ganks
- Strong laning in the offlane with Starstorm harass
- Can transition into a semi-core with farm
- Versatile — works in aggressive and defensive lineups
Itemization: Arcane Boots → Urn of Shadows → Eul’s Scepter → Aghanim’s Shard → Force Staff. Eul’s sets up guaranteed arrows — Eul’s the target, then fire a point-blank Arrow as they land.
A-Tier Pos 4 Heroes
5. Spirit Breaker
Win rate: ~52% | Best brackets: Herald through Legend | Difficulty: Very Low
Spirit Breaker is the simplest and most effective ganking support in lower brackets. Charge of Darkness is a global-range ability that charges toward an enemy, stunning them on impact. In brackets where map awareness is poor, SB gets free kills endlessly.
Key strengths:
- Global presence — can charge across the entire map to gank
- Greater Bash deals percentage-based damage
- Nether Strike provides a gap-closing stun + bash
- Creates constant pressure — enemies can never feel safe
- Extremely simple to execute
Itemization: Power Treads → Urn of Shadows → Blade Mail → BKB → Aghanim’s Scepter
Important tip: SB falls off at higher brackets because better players check the minimap and see you charging. He’s most effective in Herald through Legend where enemies don’t pay attention.
6. Rubick
Win rate: ~49% | Best brackets: Ancient through Immortal | Difficulty: Very High
Rubick is the highest skill-ceiling support in Dota 2. Spell Steal lets you copy enemy abilities — stealing a Ravage, Black Hole, or Chronosphere can single-handedly win a team fight. Telekinesis provides a reliable lift/stun. Fade Bolt reduces enemy damage.
Why he’s A-tier (not S): Rubick’s effectiveness scales directly with player skill. A bad Rubick steals useless spells and dies. A great Rubick steals game-changing ultimates and carries team fights. Below Ancient, you’re better off on simpler heroes.
Itemization: Arcane Boots → Aether Lens → Blink Dagger → Aghanim’s Scepter → Force Staff
7. Hoodwink
Win rate: ~51% | Best brackets: Archon through Divine | Difficulty: Medium
Hoodwink is a high-damage nuking Pos 4 that can also provide utility through Bushwhack’s stun and Scurry’s evasion. Sharpshooter deals massive single-target damage from long range, and Acorn Shot provides AoE damage and tree creation (which combos with Bushwhack).
Key strengths:
- Acorn Shot + Bushwhack combo provides reliable stun + damage
- Sharpshooter deals enormous single-target burst from safe range
- Scurry provides evasion and tree-walking — excellent survivability
- Can scale into late game with items
Itemization: Arcane Boots → Medallion of Courage → Gleipnir → Aghanim’s Scepter → Scythe of Vyse
8. Tusk
Win rate: ~50% | Best brackets: All brackets | Difficulty: Medium
Tusk is a brawling Pos 4 that excels at early-game aggression. Snowball provides a BKB-piercing disable that also protects allies inside it. Ice Shards creates impassable terrain. Tag Team amplifies your team’s physical damage. And Walrus Punch is a guaranteed crit + slow.
Key strengths:
- Snowball provides invulnerability for you and allies + disable on arrival
- Ice Shards traps enemies or blocks escape paths
- Tag Team turns any fight into a burst-damage bonanza
- Walrus Punch deals absurd burst for a support
- Excellent at early-game aggression and setting up kills
Itemization: Phase Boots → Urn of Shadows → Blink Dagger → Desolator (yes, even on Pos 4) → BKB
9. Earth Spirit
Win rate: ~48% | Best brackets: Ancient through Immortal | Difficulty: Very High
Earth Spirit is widely considered the hardest hero in Dota 2. His kit revolves around placing Stone Remnants and using Rolling Boulder, Boulder Smash, and Geomagnetic Grip to kick, pull, and roll over them. Magnetize is a devastating AoE DoT ultimate. In the hands of a master, Earth Spirit is the single most impactful Pos 4 in the game.
Why he’s A-tier (not S): Earth Spirit’s difficulty is extreme. Below Ancient, his win rate is abysmal because players can’t execute his combos consistently. Only pick ES if you’ve put in significant practice time.
Itemization: Tranquil Boots → Urn of Shadows (core — Magnetize spreads Urn damage!) → Spirit Vessel → Eul’s Scepter → Aghanim’s Scepter
10. Shadow Demon
Win rate: ~49% | Best brackets: Legend through Immortal | Difficulty: Medium-High
Shadow Demon is a counter-pick specialist that excels against illusion heroes and strong right-clickers. Disruption creates illusions of the target (enemy or ally). Shadow Poison stacks damage over time. Demonic Purge provides a strong slow and purge.
Key strengths:
- Disruption saves allies or creates strong enemy illusions to fight with
- Demonic Purge removes buffs and provides a massive slow
- Excellent against heroes that rely on buffs (Haste rune, BKB, etc.)
- Shadow Poison stacks deal surprising burst damage
Honorable Mentions (Pos 4)
- Bounty Hunter — Track gold accelerates your entire team. Great for aggressive playstyles.
- Dark Willow — High burst damage, good disable chain, strong team fight with Bedlam.
- Nyx Assassin — Excellent against intelligence heroes, Vendetta provides scouting and pickoffs.
- Sand King — Epicenter + Blink is a classic combo, Burrowstrike provides reliable stun.
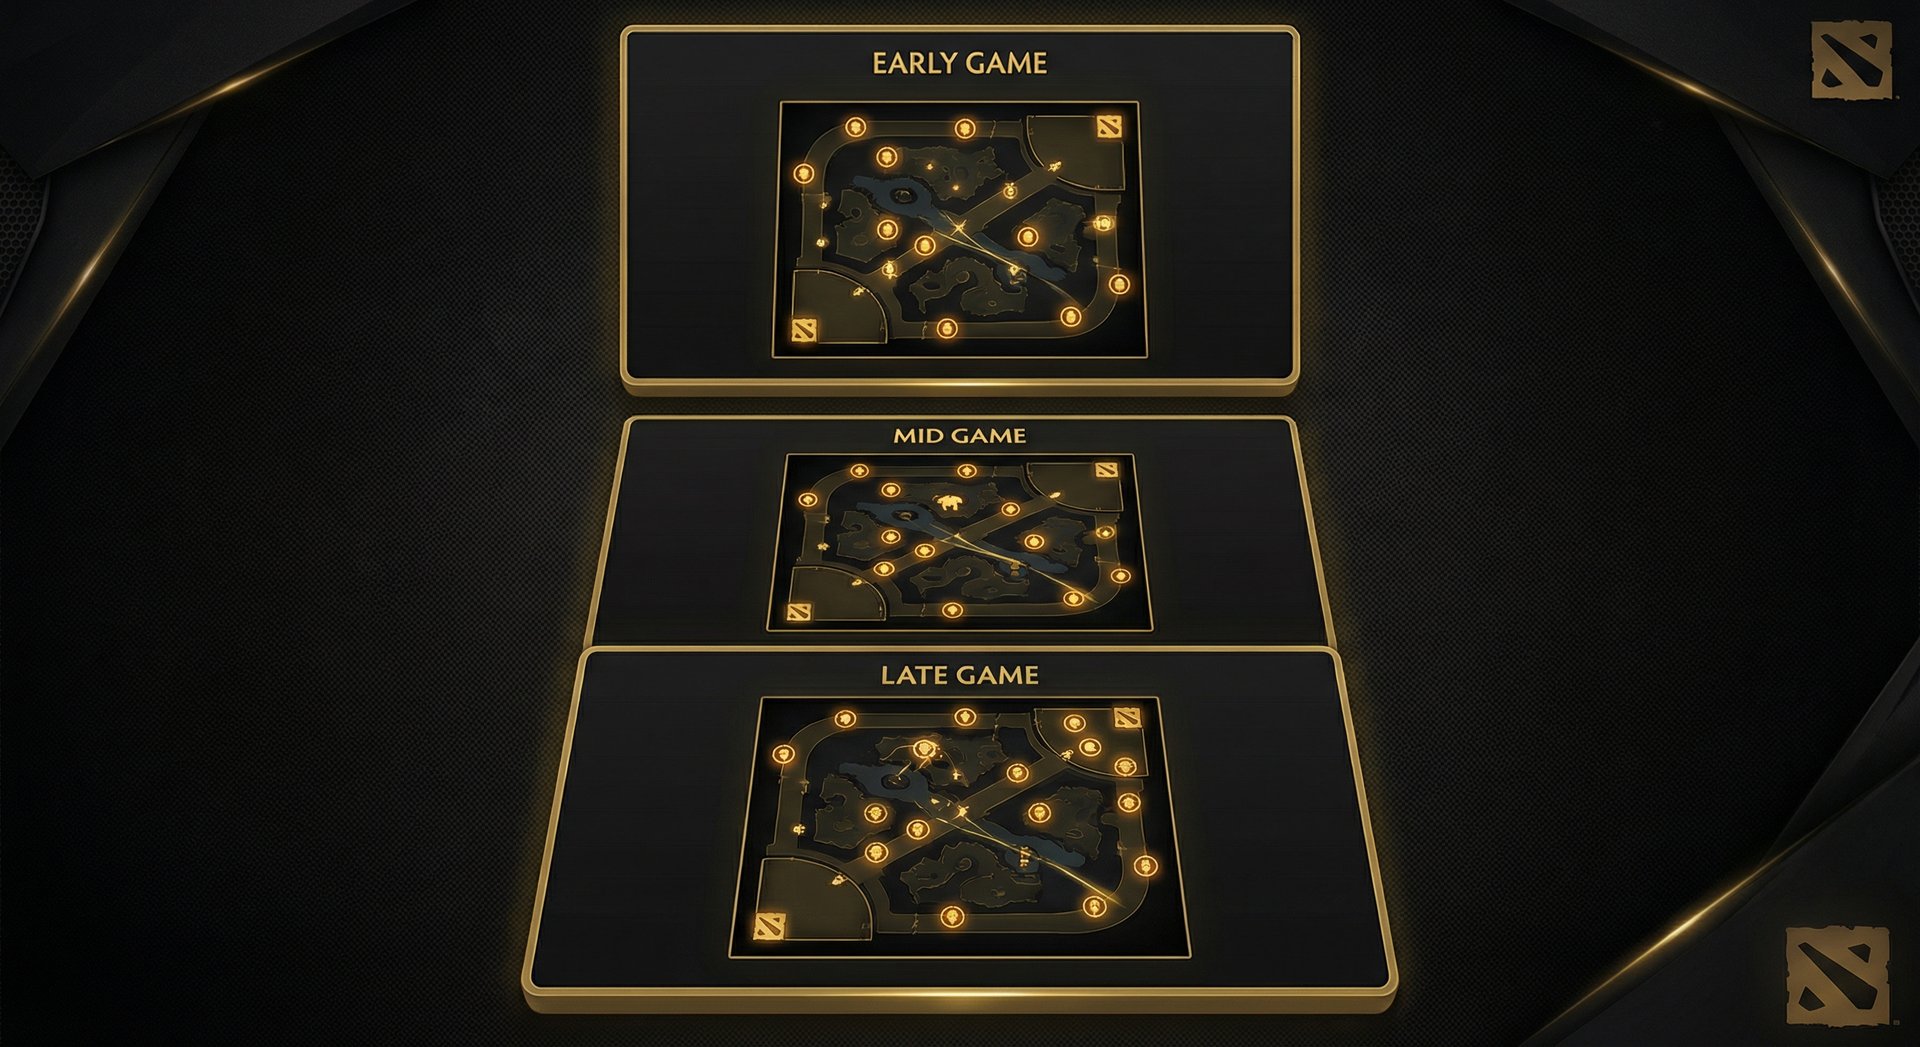
Warding: The Complete Guide to Vision Control
Warding is perhaps the most impactful thing a support does, yet most support players below Ancient don’t ward effectively. They place wards in default spots, don’t deward, and wonder why their team keeps getting ganked.
Warding Fundamentals
Observer Wards provide vision in a large radius for 6 minutes. You get 2 observer wards every 135 seconds (free). Sentry Wards reveal invisible units and enemy wards in a smaller radius for 8 minutes. They cost 50 gold each.
The #1 warding rule: Ward where the action is going to be, not where it currently is. If your team is about to push mid, ward the enemy jungle near mid BEFORE you push, so you can see rotations coming.
Early Game Wards (0-10 minutes)
| Ward Spot | Purpose | When to Use |
|---|---|---|
| Safelane river ward | Protect carry from mid/offlane rotations | Game start |
| Offlane pull camp block | Prevent enemy pull, deny carry farm | Game start (Pos 4) |
| Enemy jungle entrance | Track enemy support rotations | After winning lane |
| Mid high ground ward | Help your mid see rune and ganks | If mid is struggling |
Mid Game Wards (10-25 minutes)
| Ward Spot | Purpose | When to Use |
|---|---|---|
| Enemy triangle entrance | Track enemy carry farming patterns | When pressuring their side |
| Roshan pit | Essential for tracking Roshan attempts | Always after 15 minutes |
| Your triangle entrance | Protect your carry while farming | When playing defensively |
| Outpost vision | Control outpost area before contesting | Before outpost timings |
Late Game Wards (25+ minutes)
| Ward Spot | Purpose | When to Use |
|---|---|---|
| Enemy high ground approach | Vision for high ground siege | Before pushing base |
| Your high ground approaches | See enemy pushes coming | When defending base |
| Behind enemy T3 towers | Track enemy movements in base | Deep aggressive wards |
| Key choke points | Pickoff potential on rotating enemies | When looking for catches |
Dewarding
Dewarding is as important as warding. Every observer ward you destroy costs the enemy 6 minutes of vision AND gives your team 100 gold. Here’s how to deward effectively:
- Think about where YOU would ward and place sentries there
- Watch enemy movement patterns — if they seem to always know where you are, there’s a ward near you
- Sentry obvious spots like rune wards, Roshan vision, and cliff wards
- Use Gem of True Sight on tanky heroes for efficient mass dewarding
Good warding alone can win games. If you’re climbing through lower brackets, prioritize warding over almost everything else. Vision wins fights, and fights win games.
How Supports Actually Win Games
This is the section most support players need to read. Supporting isn’t about buying wards and following your carry around. Here’s how supports genuinely impact game outcomes:
1. Win the Laning Phase
The first 10 minutes determine 70%+ of games. As a support, you control the laning phase more than any other role. Your job:
- Zone the enemy offlaner (Pos 5): Stand between the offlaner and the creeps. Right-click them when they approach. Trade HP — you have regen, they often don’t.
- Harass the enemy carry (Pos 4): Pressure the enemy carry so they can’t last hit freely. Every last hit they miss is gold advantage for your offlaner.
- Secure ranged creep last hits: If your carry is under pressure, use your nuke to secure the ranged creep (worth the most gold/XP).
- Stack and pull: Pulling the hard camp into your creep wave controls lane equilibrium and denies the enemy offlaner XP.
2. Create Space Through Rotations
After the laning phase (around 8-12 minutes), supports should be creating pressure across the map:
- Rotate to gank the enemy mid if they’re pushed up
- Smoke gank the enemy jungle to catch their carry farming
- Stack camps for your carry (especially ancients)
- Secure runes for your mid player
- Push out lanes that nobody else is pushing
The key concept: every time you force an enemy to react to you, your cores are farming freely. Even if your gank attempt fails, if it forced two enemies to TP, your carry just got 30 seconds of uncontested farm.
3. Die Correctly
This sounds counterintuitive, but supports should die for their cores. A support death is worth 150-300 gold. A carry death is worth 400-800 gold PLUS 40-60 seconds of lost farm time. If you can trade your life for your carry’s life, that’s a WINNING trade.
- Use Glimmer Cape / Force Staff on your carry, even if it means you die
- Body-block enemies chasing your carry
- Use stuns to let your carry escape, even if you get caught
- NEVER run away and let your carry die if you could have saved them by dying instead
4. Control Team Fight Tempo
Supports control when and where team fights happen through:
- Smoke ganks: Buying Smoke of Deceit and leading your team into pickoffs
- Ward placement: Wards determine where fights happen (vision = initiation)
- Initiating: Many Pos 4 heroes (Earthshaker, Clockwerk) start fights
- Counter-initiating: Many Pos 5 heroes (Dazzle, Oracle) save allies after enemy initiation
If you want to see these concepts in action, TeamSmurf’s coaching service includes replay analysis that specifically covers support positioning and team fight contribution.
Support Itemization on a Budget
Supports don’t have money. That’s just reality. You’ll often finish a 40-minute game with only 3 completed items. This means every item purchase matters enormously. Here’s how to maximize impact with minimal gold:
Must-Buy Items (Every Game)
| Item | Cost | Why It’s Essential |
|---|---|---|
| Magic Wand | 450 | Burst heal/mana in fights. Literally saves your life 10+ times per game. |
| Boots (any type) | 500-1100 | Movement speed is survival. Tranquils for Pos 5, Arcane for mana-hungry heroes. |
| Wind Lace | 250 | Move speed on a budget. Builds into utility items later. |
Core Support Items (Buy 1-2 Per Game)
| Item | Cost | When to Buy |
|---|---|---|
| Glimmer Cape | 1950 | Against magic burst damage. Use on allies to save them. |
| Force Staff | 2200 | Against heroes with catch (Clockwerk Cogs, Slark Pounce). Saves yourself and allies. |
| Aether Lens | 2275 | On heroes that need cast range (Shadow Shaman, Bane). Stay safer in fights. |
| Eul’s Scepter | 2725 | Dispels silences on yourself. Sets up combos (Jakiro, Mirana, Lina). |
| Urn of Shadows | 840 | For aggressive Pos 4 heroes. Free healing between fights, damage during fights. |
| Medallion/Solar Crest | 1025/3900 | Against physical damage heroes. Amplifies your team’s damage on targets. |
Luxury Items (If the Game Goes Long)
| Item | Cost | Impact |
|---|---|---|
| Aeon Disk | 3000 | Prevents you from being instantly killed. Essential against burst lineups. |
| Aghanim’s Scepter | 4200 | Hero-dependent. Some heroes transform with Aghs (Shadow Shaman, Warlock). |
| Scythe of Vyse | 5675 | The best single-target disable item. Turns any hero into a pig for 3.5 seconds. |
| Lotus Orb | 3850 | Dispels debuffs and reflects spells. Great against single-target disables. |
Golden rule of support items: Buy items that save your carry first, items that help you second. Glimmer Cape on your carry is worth more than an Aghanim’s on yourself in most games.
Bracket-Specific Support Advice
Supporting looks completely different at different MMR levels. Here’s what to focus on at each bracket:
Herald-Guardian (0-1500 MMR)
In these brackets, pick damage-dealing supports (Witch Doctor, Shadow Shaman, Warlock). Why Because your carry may not carry effectively, so you need to be able to contribute damage yourself. Focus on:
- Learning to harass in lane (just right-click the enemy!)
- Placing ANY wards at all (most supports in Herald don’t ward)
- Not dying needlessly
- Using your spells in team fights (don’t save them for “the perfect moment”)
If you’re stuck in Herald, our complete Herald escape guide has detailed advice for every role, including support.
Crusader-Archon (1500-2900 MMR)
Games become more structured. Supports should start:
- Stacking camps for their carry
- Smoking for ganks
- Buying save items (Glimmer, Force Staff)
- Dewarding enemy wards
- Communicating with pings and text
Legend-Ancient (2900-4600 MMR)
At this level, support play becomes strategic:
- Pull timings matter — pulling at the wrong time pushes the wave for the enemy
- Ward placement becomes more nuanced (not just default spots)
- Positioning in team fights is critical — you need to stay alive to use items and spells
- You should be tracking enemy cooldowns and items
Divine-Immortal (4600+ MMR)
At the highest levels, supports are expected to:
- Play with near-perfect efficiency — every second matters
- Counter-ward aggressively
- Make lane-winning plays consistently
- Coordinate smoke ganks with power spike timings
- Sacrifice correctly — die so your cores live
Regardless of your bracket, if you want to see how high-MMR support players think about the game, coaching from experienced players is the fastest way to improve.
Top 10 Support Mistakes That Lose Games
- Standing behind the carry in lane doing nothing. You should be harassing, pulling, stacking, or roaming. Standing idle is the #1 mistake in lower brackets.
- Leeching XP. If you’re not actively doing something in lane, leave. Your carry gets more XP solo. Go stack, roam, or ward.
- Not buying wards at all. This sounds basic, but in Herald-Crusader, many supports don’t buy a single ward all game. Vision wins games.
- Only warding in default spots. If you always ward the rune spots, enemies always deward. Use creative ward spots that provide unexpected vision.
- Using all your mana before fights. Don’t spam spells on creeps. Save your mana for team fights where your stuns and saves matter.
- Positioning in front of your cores. You’re squishy. If you get caught, your team loses your spells AND your items (Glimmer, Force). Stay behind your cores in fights.
- Not buying save items. That Aghanim’s Scepter rush looks nice, but a 15-minute Glimmer Cape saves more lives and wins more games than a 30-minute Aghs.
- Ignoring Roshan. Supports should ward Rosh, smoke for Rosh, and control the pit. Aegis wins games.
- Never smoking. Smoke of Deceit is 50 gold. Most supports below Ancient use fewer than 5 smokes per game. Aim for 8-10+.
- Tilting and stealing farm. If you’re frustrated with your carry, don’t AFK jungle and steal their farm. Play YOUR game and create space elsewhere.
Frequently Asked Questions
Conclusion: Supports Are the Backbone of Every Winning Team
The best support heroes in Dota 2 for 2026 combine reliable disables, impactful teamfight abilities, and the ability to function on minimal gold. For Pos 5, Shadow Shaman, Crystal Maiden, Warlock, and Jakiro are your safest bets. For Pos 4, Pudge, Earthshaker, Clockwerk, and Mirana offer the most game impact.
But hero picks are only part of the equation. How you play the role — your laning, warding, rotations, and item choices — determines whether you climb or stagnate. Master the fundamentals outlined in this guide and you’ll see your MMR rise, regardless of what your carries do.
Ready to Climb Start Your Boost Today
Team Smurf is the #1 rated Dota 2 boosting service in 2026. Immortal-rank boosters, maximum safety, competitive pricing, 24/7 support.
Written by Team Smurf’s Immortal-rank analysts — Rankings last verified February 2026


