How to Increase Your MMR in Dota 2: 20+ Pro Tips That Actually Work

Everyone wants to gain MMR. Nobody wants generic advice like “practice more” or “don’t flame your teammates.” You’ve read those guides. They didn’t help.
This guide is different. These are 20+ specific, actionable, Immortal-level tips organized by category — from the mindset you need before you even queue to the late-game decisions that separate winners from losers. Every tip is backed by real experience from our Immortal-rank boosters at Team Smurf, who have gained tens of thousands of MMR across hundreds of accounts.
Whether you’re a Herald trying to reach Guardian or an Ancient grinding toward Divine, these tips apply. We’ve organized them from the most impactful (mindset and hero selection) to the most technical (late-game decision-making), so even if you only implement the first five, you’ll see results.
If you want to jump straight to a higher rank while learning, consider pairing our MMR boosting service with our coaching sessions — climb to your desired rank, then learn to maintain it.
Table of Contents
MINDSET
Mindset is the foundation of MMR gain. You can have perfect mechanics and game knowledge, but if your mental approach is wrong, you’ll lose games you should win. These tips alone can swing your win rate by 5-10%.
Tip 1: Stop Playing After Two Consecutive Losses
This is the single most impactful tip in this entire guide, and it costs you nothing. After two losses in a row, stop playing ranked. Period.
Here’s why: losses create tilt. Tilt is subtle — you might not feel angry, but your decision-making deteriorates after losses. You play more aggressively, take riskier fights, and make emotional decisions instead of logical ones. Studies of large MMR datasets consistently show that loss streaks are far more common than chance would predict, because tilt compounds losses into more losses.
The math is simple. If you play 10 games at 55% win rate, you gain about 25 MMR net. If you play 10 games where the first 2 are losses and you tilt for the next 4 (dropping to 30% win rate while tilted), you lose ~100 MMR instead. The 2-loss rule prevents this cascade.
What to do instead:
- Take a 30-60 minute break. Exercise, eat, do something non-gaming.
- If you want to keep playing Dota, play unranked or turbo
- Come back when you feel genuinely neutral — not “I want to win back my MMR”
- If it’s late at night after two losses, just go to sleep. Tomorrow is a fresh start.
Tip 2: Queue at Optimal Times
When you play matters more than most people realize. Game quality varies dramatically based on time of day.
Best times to queue (for most regions):
- Weekday evenings (6 PM — 10 PM local): Largest player pool means better matchmaking quality. More even games, fewer smurfs/boosters per capita.
- Weekend afternoons (12 PM — 6 PM): Good player pool, generally positive atmosphere.
Worst times to queue:
- Late night (12 AM — 6 AM): Small player pool means wider MMR spreads, longer queues, and more unbalanced games. Also, you’re tired — your performance is worse.
- Early morning weekdays: Very small player pool. Games are often one-sided.
- Right after a patch drops: Everyone is experimenting with new mechanics and heroes. Game quality drops significantly for the first 1-2 days.
Track your own performance by time. You might find that you consistently win more at certain hours — play more at those hours.
Tip 3: Adopt a “What Could I Have Done Differently” Mentality
After every loss, your brain will default to blaming teammates. The carry that never joined fights. The support that didn’t ward. The mid that fed. This is natural — and it’s useless.
Instead, ask yourself: “What could I have done differently to win this game”
There is always an answer. Always. Even in games where your teammates played terribly, there were moments where you could have:
- Rotated to gank the enemy mid instead of farming a jungle camp
- Bought a different item that countered the enemy’s win condition
- Positioned differently in a fight that would have changed the outcome
- Communicated a key piece of information (Roshan timing, enemy item, etc.)
- Recognized the game was unwinnable and focused on minimizing MMR loss through efficient play
You can’t control your teammates. You can control yourself. Every game you lose is a learning opportunity — but only if you look for the lesson instead of the blame.
Tip 4: Mute Aggressively
Toxic teammates are an MMR drain. Not because they play worse (they might), but because engaging with them makes you play worse. Reading flame in chat, arguing about whose fault a death was, or trying to reason with an angry person diverts mental bandwidth from the game.
The mute rule: At the first sign of toxicity — a passive-aggressive ping, a sarcastic “nice,” or outright flame — mute that player immediately. Don’t respond. Don’t explain. Don’t engage. Just mute.
This isn’t about being sensitive. It’s about optimizing your performance. Professional players mute liberally, and they’re the best in the world. You should too.
Pro tip: If you’re someone who tilts easily, consider muting all incoming chat at the start of every game. You lose some coordination, but you gain enormous mental clarity. The chat wheel provides enough communication for most purposes.
Tip 5: Track Your Stats and Set Micro-Goals
“Gain MMR” is a bad goal. It’s too vague and too dependent on outcomes you can’t control. Instead, set process-oriented micro-goals that are entirely within your control:
- This week: Average less than 5 deaths per game
- This week: Hit 60 CS at 10 minutes in every game I play carry
- Today: Buy and use Smoke of Deceit at least once every game
- This session: Check the minimap every 5 seconds
- This game: Take a tower within 2 minutes of winning a teamfight
Track these goals. Use a notebook, a spreadsheet, or a Dota 2 stats site. When you focus on improving specific metrics, the MMR follows naturally. The process creates the outcome.
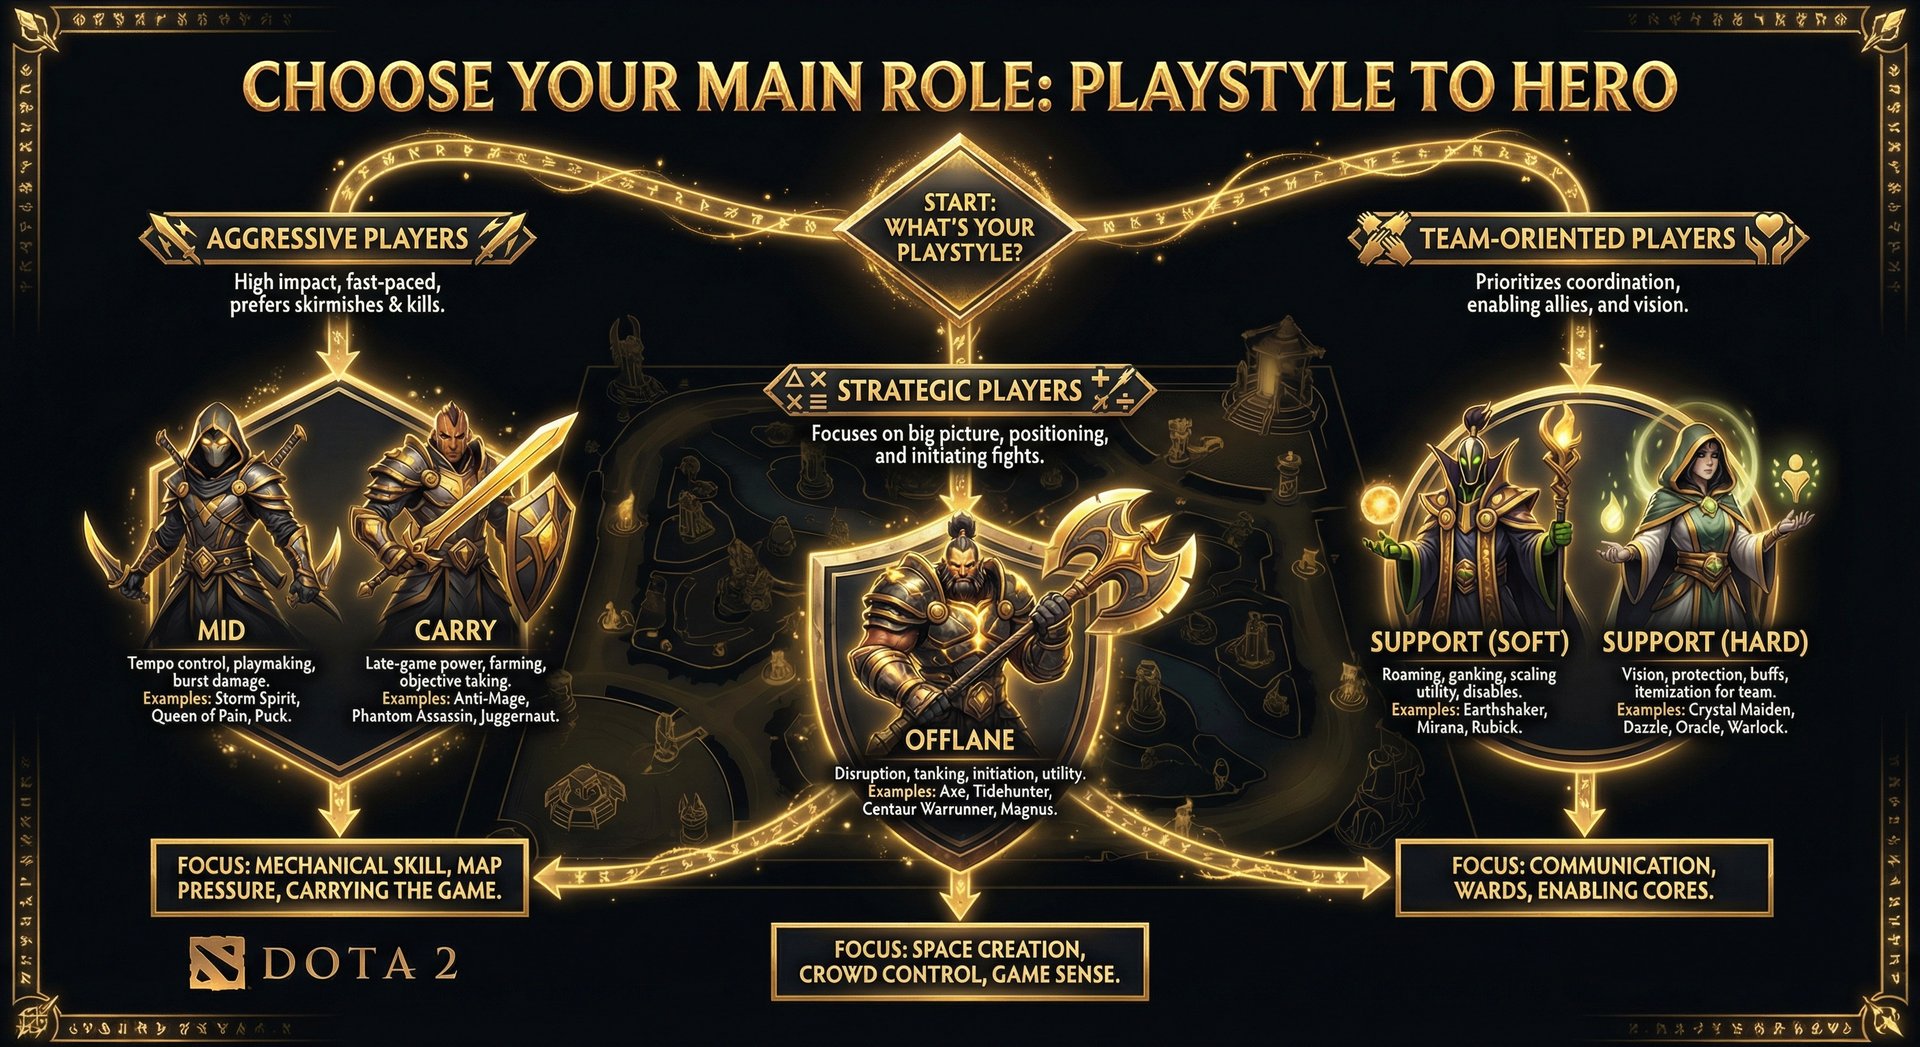
HERO SELECTION
Tip 6: Build a Hero Pool of 3-5 Heroes — No More
This goes against what most players think. They believe a wide hero pool makes them more versatile and therefore better. In reality, specialization wins games.
Here’s the math: If you play 20 heroes, you play each one roughly 5% of the time. You never develop true mastery of any of them. If you play 3 heroes, you play each one roughly 33% of the time. After 100 games, you have 33 games of experience on each hero instead of 5.
How to build your hero pool:
- Pick your main role (mid, carry, offlane, or support)
- Choose 2 “comfort” heroes that you love playing and feel strong on
- Choose 1 “counter-pick” hero that handles situations your comfort heroes can’t
- Choose 1 “backup” hero in case all your other picks are banned
- Play nothing else in ranked. Ever.
Recommended hero pools by role (for climbing):
- Carry: Faceless Void + Juggernaut + Phantom Lancer
- Mid: Templar Assassin + Storm Spirit + Viper
- Offlane: Mars + Axe + Beastmaster
- Support: Lion + Jakiro + Shadow Shaman
Tip 7: Pick Heroes That Can Solo Win Games
Not all heroes are equal for gaining MMR. A perfectly played Crystal Maiden has significantly less impact on game outcome than a perfectly played Storm Spirit. This isn’t because CM is a bad hero — it’s because her impact is dependent on teammate execution, while Storm’s impact is self-contained.
Characteristics of strong MMR-gaining heroes:
- Can farm independently and hit power spikes regardless of lane outcome
- Can take objectives (towers, Roshan) without relying on teammates
- Can create kills without team setup
- Scale well enough to carry late games
- Have some form of escape or survivability
For an in-depth breakdown of which heroes are most effective at each bracket, read our guide on the heroes our boosters use for MMR climbing.
Tip 8: Learn When to Pick — Draft Position Matters
Your pick order in the draft matters enormously. Making the wrong pick at the wrong time can lose you the game before it even starts.
Draft position strategy:
- First phase (picks 1-2): Pick flexible, hard-to-counter heroes. Examples: Marci, Invoker, Puck. These heroes work in many lineups and don’t get hard-countered easily.
- Second phase (picks 3-4): Pick based on what the enemy has shown. Counter their early picks or pick heroes that synergize with your team’s early picks.
- Last pick: The most powerful draft position. Use it for your carry or mid to guarantee a favorable lane matchup. A last-pick Huskar into a magic-heavy lineup or a last-pick Broodmother into a team with no AoE can single-handedly win the game.
Common draft mistakes:
- Revealing your mid hero in the first phase, allowing a counter-pick
- Picking heroes that need specific team compositions to work (Io without a carry partner)
- Not adapting your pick to what the enemy has already shown
- Picking five cores with no support, stuns, or team fight
Tip 9: Specialize in One Role
Queuing all five roles might give you faster queue times, but it actively hurts your MMR. Each role in Dota 2 requires a fundamentally different skill set:
- Carry: Farming efficiency, power spike awareness, fight/farm decisions
- Mid: Lane mechanics, rune control, tempo management, ganking
- Offlane: Trading patterns, space creation, team fight initiation
- Soft Support (4): Roaming, vision control, early-game aggression
- Hard Support (5): Lane support, vision, stacking, team coordination
Trying to master all five simultaneously is like trying to learn five different sports at once. You’ll be mediocre at everything instead of excellent at one thing.
Choose one role. Queue only that role. Master it. If you’re forced into an off-role, play your simplest hero and focus on not feeding. But your ranked games should be 90%+ on your primary role.
LANING PHASE
Tip 10: Win Your Lane (Or At Least Don’t Lose It)
The laning phase (first 10 minutes) determines the trajectory of the entire game. Data from millions of Dota 2 matches consistently shows that the team with the higher net worth at 10 minutes wins approximately 65-70% of the time. Winning lanes is the single most impactful thing you can do.
How to win your lane (by role):
Carry:
- Focus on last-hitting above all else. Every missed last hit is ~40 gold lost.
- Use creep aggro mechanics — right-click an enemy hero to draw creeps toward you, then deny them or use the aggro to keep the wave in a favorable position.
- Don’t trade HP for CS unless the trade is heavily in your favor.
- Communicate with your support about kill opportunities when the enemy overextends.
Mid:
- Control the runes. Every rune you secure is a resource denied to the enemy.
- Use high ground advantage — when the creep wave is on your side, the enemy has reduced vision.
- Harass between last hits. The best mids weave in harassment while maintaining perfect CS.
- Stack the small camp or large camp near mid between rune spawns (use HotD creep or ability).
Offlane:
- Your goal isn’t to get farm — it’s to deny farm to the enemy carry. Pull creep aggro to disrupt their last-hitting rhythm.
- If the lane is unwinnable, jungle. Don’t feed kills trying to force a losing lane.
- Level 6 is your key timing. Hit it, then start making plays around the map.
Support:
- Zone the enemy offlaner. Stand between the creep wave and the enemy and harass them when they try to approach.
- Pull the small camp at :15 and :45 to deny the enemy a wave of experience.
- Stack the large camp for your carry to clear later.
- Secure the first power rune for your mid (walk to the river at 5:45).
Tip 11: Master Creep Aggro Manipulation
Creep aggro is one of the most underused mechanics below Ancient rank, and it’s completely free advantage.
How it works: When you right-click an enemy hero within 500 units of enemy creeps, those creeps will aggro toward you. This has a 3-second cooldown. You can abuse this mechanic in several ways:
- Pull creeps toward you: Right-click the enemy hero, then walk back. The enemy creeps follow you, pulling the wave toward your tower. This gives you a safer farming position.
- Get last hits in tough lanes: When a ranged creep is about to die, aggro the wave so it walks toward you, bringing the ranged creep into easier last-hit range.
- De-aggro tower: If you’re diving a tower, right-click a friendly creep to drop tower aggro. Then right-click the enemy hero again. This lets you take tower dives without tanking tower damage.
- Harass without drawing aggro: Attack-move (A-click) the ground near an enemy hero to attack them without triggering creep aggro (this only works if you’re not directly right-clicking the hero).
Practice this in demo mode for 15 minutes and you’ll have an advantage over 90% of players below Divine.
Tip 12: Don’t Die in Lane — Dying is Never Worth It
In lower brackets, players chronically underestimate the cost of dying. A single death in the laning phase costs you:
- Gold: You lose unreliable gold (30 × your level). At level 5, that’s 150 gold.
- Time: 20-30 seconds of respawn + TP back to lane = 30-40 seconds of zero income.
- Opportunity cost: During that 30-40 seconds, you miss 4-6 last hits (~200+ gold) and a wave of experience.
- Enemy gain: The enemy gets kill gold (200+ gold split among killers) plus assist gold, plus uncontested lane farm while you’re dead.
Total cost of one death in lane: approximately 500-800 gold swing. That’s almost a full item component. Two deaths in lane can put you 1500+ gold behind — a deficit that takes 5+ minutes of perfect farming to recover from.
The takeaway: if there’s any chance you might die, don’t take the risk. Walk away. Use a TP. Pop a salve under tower. The farm you miss by playing safe is trivial compared to the cost of dying.
Tip 13: Secure Every Rune
Runes are free resources that most players below Legend don’t prioritize. Here’s what each rune is worth:
- Bounty runes: Gold for your entire team. Securing all 4 bounty runes at each spawn gives your team a significant gold advantage over time.
- Power runes (water, haste, DD, illusion, regen, arcane, invis): Each rune is worth approximately one kill’s worth of advantage. A Haste rune on a mid hero often translates directly into a kill on the side lane.
- Wisdom runes: Free experience that can accelerate your level 6 timing or maintain an XP lead.
Rune control habits:
- As mid, check both rune spots at every spawn (2:00, 4:00, 6:00, etc.)
- As support, help your mid secure power runes — walk to the rune spawn 15 seconds early
- Ping your team to collect bounty runes. Don’t let them expire.
- If you can’t get a rune, deny it by walking toward it and forcing the enemy to commit — even if you don’t get it, you made them waste time.
Tip 14: Know Your Hero’s Power Spike and Exploit It Immediately
Every hero in Dota 2 has specific moments where they’re disproportionately strong. Recognizing and exploiting these power spikes is what separates good players from great ones.
Types of power spikes:
Level spikes:
- Level 6: Ultimate ability online. Most impactful for heroes like Tidehunter, Enigma, Doom, Storm Spirit. The moment you hit 6, look for a fight or gank.
- Level 12: Second ultimate point. Many ultimates become dramatically stronger (Ravage damage, Black Hole duration).
- Level 15/20/25: Talent spikes. Some talents are game-changing (e.g., Spectre’s Haunt cooldown reduction at 25).
Item spikes:
- BKB: The single biggest power spike for most carry heroes. The first time your BKB is active, you have 10 seconds of magic immunity — that fight is almost always a win.
- Blink Dagger: For initiators (Axe, Tidehunter, Magnus), Blink Dagger transforms you from “hoping to catch people” to “guaranteed initiation.”
- Orchid Malevolence: On Storm Spirit, Queen of Pain, or Nature’s Prophet, Orchid turns you into a solo-kill machine. Use it within 30 seconds of completing it.
- Desolator: On Templar Assassin, Weaver, or Shadow Fiend, Deso completion means you can now burst any hero without armor items. Take a fight immediately.
The key principle: When you hit a power spike, DO SOMETHING WITH IT IMMEDIATELY. Don’t keep farming. Don’t wait for another item. Your power spike is at its maximum value the moment you achieve it and depreciates every minute as the enemy team catches up.
MID-GAME
Tip 15: Always Have a Plan After Winning a Fight
The single most common mistake at every rank below Immortal: winning a teamfight and then going back to farming. This wastes the advantage and gives the enemy time to respawn and stabilize.
The decision tree after winning a fight:
- Can we take Roshan If the enemy team has 3+ heroes dead with long respawn timers and Roshan is alive, take Roshan. Aegis is worth more than any tower.
- Can we take a tower If Roshan isn’t feasible, push the nearest tower. Don’t walk across the map to push a different tower — take what’s in front of you.
- Can we take barracks If you already have the outer towers, push for barracks with your number advantage.
- Can we invade their jungle If no objectives are accessible, take the enemy’s jungle farm. Deny them resources.
Never go back to your own jungle after winning a fight. That jungle was there before the fight and will be there after. The window of advantage from a won fight lasts 20-40 seconds. Use it.
Tip 16: Control the Map Through Lane Pressure
Most players below Divine think about the map in terms of “where fights happen.” Immortal players think about the map in terms of “where are the creep waves”
Creep waves pushed into enemy territory create several advantages:
- Vision: Creeps provide vision of the area they’re in. Pushed lanes give you free vision of enemy movements.
- Pressure: If a lane is pushed to the enemy tower, someone on their team must go defend it. This removes a hero from the map, creating number advantages elsewhere.
- Space: Pushed lanes give your team safe farm in the space between the lanes. If all three lanes are pushed, your team’s jungle is completely safe.
- Objective setup: Before taking Roshan or pushing high ground, push all three lanes. This forces the enemy to choose between defending lanes and contesting the objective.
The “3-lane pressure” principle: Before any major objective (Roshan, high ground siege), ensure all three lanes are pushed past the river. This takes 30-60 seconds of team coordination but makes the objective attempt dramatically more likely to succeed.
Tip 17: Learn When to Fight and When to Farm
This is one of the hardest skills in Dota 2, and it’s where our coaching service provides the most value. The fight-or-farm decision depends on multiple factors:
Fight when:
- You just completed a major item (BKB, Blink, key damage item)
- The enemy is out of position (split across the map, key hero farming alone)
- You have a number advantage (enemy heroes visible in other lanes)
- An objective is available (Roshan is alive, tower is low)
- Your ultimate(s) are off cooldown and the enemy’s are not
Farm when:
- You’re 500+ gold away from a key item and there’s no immediate objective
- Enemy is grouped as 5 and you can’t win a 5v5 yet
- Your key abilities are on cooldown
- It’s your hero’s weak timing (e.g., Anti-Mage before Manta Style)
- Taking a fight would risk losing a significant lead
The golden rule: If you’re not sure whether to fight or farm, look at the minimap. If you can see 4+ enemy heroes grouped, farm the opposite side of the map. If you can see fewer than 3 enemy heroes, play cautiously — they might be smoking toward you.
Tip 18: Use Smoke of Deceit — It’s the Most Overpowered Item in Dota
Smoke of Deceit costs 50 gold and wins games. Below Legend, almost nobody buys it. This means that any team that uses Smoke has a massive, unfair advantage — because the enemy isn’t expecting it.
When to smoke:
- When the enemy carry is farming alone and you know their approximate location
- Before Roshan (smoke to avoid vision and take Rosh without the enemy knowing)
- When the enemy has strong ward coverage and you need to move unseen
- After losing a teamfight — smoke to catch the enemy off-guard while they’re pushing with low HP
- When you need to break a stalemate and force a fight
Smoke execution tips:
- Group 3-5 heroes before smoking. Don’t smoke with 2 heroes — it’s not enough to guarantee a kill.
- Move quickly after smoking. Smoke reveals within 1025 range of an enemy hero.
- Target the enemy’s highest-impact hero. Killing the carry > killing the support.
- Ping your intended target’s last known location so your team knows where to go.
If you buy and use one Smoke per game in Herald-Archon, you will gain MMR. It’s that simple.
LATE-GAME
Tip 19: Always Hold Buyback Gold After Minute 30
After minute 30, dying without buyback money is often game-losing. A dead carry with no buyback means the enemy gets 60+ seconds of uncontested push — enough to take barracks or even end the game.
Buyback costs: 200 + (Net Worth / 13). For a carry with 20,000 net worth, buyback costs approximately 1,738 gold. You need to keep this amount unreliable at all times.
How to manage buyback:
- After minute 30, check your buyback status before every fight (the gold number turns yellow when you don’t have buyback)
- If you don’t have buyback, don’t take risky fights. Farm until you do.
- If your team wants to fight and you don’t have buyback, tell them. Type “no bb, can’t fight.”
- Consider buying cheaper items to maintain buyback rather than saving for an expensive item.
Tip 20: Understand High Ground Siege
More games are thrown at high ground than anywhere else. The defending team has massive advantages: uphill miss chance, tower damage, narrow choke points, and full vision. Attacking high ground without a plan is how teams throw 20,000 gold leads.
How to siege high ground effectively:
- Get Aegis first. Taking Roshan before pushing high ground gives your carry a second life, dramatically reducing the risk of a failed push.
- Push all three lanes first. Mega-pushed side lanes force defenders to split, weakening their defense.
- Wait for a pick. Don’t force a 5v5 fight into high ground. Wait for a defender to make a mistake — step too far forward, use a spell incorrectly, or get caught by a long-range initiation.
- Use summons/illusions. Heroes like Naga Siren, Phantom Lancer, and Nature’s Prophet can hit towers with illusions/treants without risking the real hero.
- Don’t chase into base. If you kill 2-3 heroes, push the tower/barracks. Don’t chase the remaining heroes into their fountain.
How to defend high ground:
- Don’t leave your base to fight. Make them come to you.
- Clear creep waves with AoE abilities before they reach your tower.
- Smoke out if the enemy backs off — catch them in their jungle while they’re split.
- Buyback only if it will save a barracks or the game. Don’t waste buyback to defend a tier 3 tower.
Tip 21: Track Enemy Key Cooldowns
In the late game, fights are decided by key ability usage. Knowing whether the enemy’s Black Hole, Ravage, or Chronosphere is available changes your entire approach to the game.
Cooldowns to track:
- BKB: Track how many charges the enemy carry has used. A 6-second BKB is dramatically weaker than a 10-second BKB.
- Game-winning ultimates: Black Hole (160s CD), Ravage (150s), Chronosphere (160s), Doom (145s). If the enemy Enigma just used Black Hole, you have a 2.5-minute window to force a fight.
- Buybacks: If the enemy carry just bought back, they can’t buyback again for 8 minutes. This is an enormous window of vulnerability.
- Aegis timer: Aegis expires 5 minutes after pickup. If the enemy got Aegis 4 minutes ago, wait 1 minute and they lose it.
Use the chat wheel or type in chat: “Enigma no ulti, 2 min.” “Carry BB on CD.” This information wins games.
Tip 22: Know When to Take Roshan (And When to Contest)
Roshan is the most important non-base objective in Dota 2. Aegis alone swings team fights dramatically, and Cheese (second Roshan) and Refresher Shard (third Roshan) are even more impactful.
When to take Roshan:
- After winning a teamfight where 2+ enemy heroes are dead
- When you have strong Roshan-killing heroes (Ursa, Troll Warlord, Templar Assassin)
- When you need Aegis to push high ground
- When you have vision showing the enemy team on the opposite side of the map
When to contest Roshan:
- If the enemy is taking Roshan and you have a strong teamfight ultimate (Ravage, Black Hole) — fight them in the pit while they’re damaged from Roshan
- If losing Roshan would mean losing the game (they push high ground with Aegis)
- If you have vision inside the pit and can time your initiation
When NOT to contest:
- If multiple teammates are dead
- If you have no vision and would be walking blind into the pit
- If the enemy is already finished and has Aegis — don’t fight into Aegis
TECHNICAL & ADVANCED
Tip 23: Review Your Replays (The Right Way)
Most players who “watch replays” do it wrong. They watch the whole game passively, confirming their existing beliefs (“see, my support didn’t ward”). Here’s how to review replays effectively:
The 5-minute method:
- Open the replay of your most recent loss
- Find the moment the game was lost. Usually it’s a single fight or objective that turned the game.
- Rewind 5 minutes before that moment
- Watch only your hero for those 5 minutes
- Ask: “What was I doing What should I have been doing instead”
Common findings:
- You were farming jungle while your team was fighting 4v5
- You were out of position when the fight started
- You used your BKB/ult too early or too late in the fight
- You didn’t have TP scroll to respond to a gank
- You pushed a dangerous lane without vision and got ganked
This takes 10 minutes per game. Do it after every loss. In two weeks, you’ll be a significantly better player.
Tip 24: Optimize Your Settings and Hotkeys
Technical settings matter more than most players think. Small optimizations compound over thousands of games:
Essential settings:
- Quick cast: Enable quick cast on all abilities and items. It removes one click from every spell cast, saving ~0.2 seconds per action. Over a 40-minute game with hundreds of ability uses, this adds up enormously.
- Camera speed: Set it to 4000-5000. Too slow and you can’t check the map efficiently. Too fast and you’ll overshoot.
- Minimap size: Increase it. A larger minimap makes it easier to click on and read at a glance.
- Minimap on left side: If you accidentally click the minimap during fights (moving your hero the wrong way), move the minimap to the left side.
- Auto-attack: Off or Standard. “Always” auto-attack pushes lanes unintentionally and breaks channeling.
Hotkey recommendations:
- Bind all 6 item slots to easily reachable keys. Don’t click items with your mouse — ever.
- Bind TP scroll to a dedicated key (many pros use T or F5)
- Use Tab for control group cycling if you play micro heroes
- Bind “select all units” and “select hero” for quick unit management
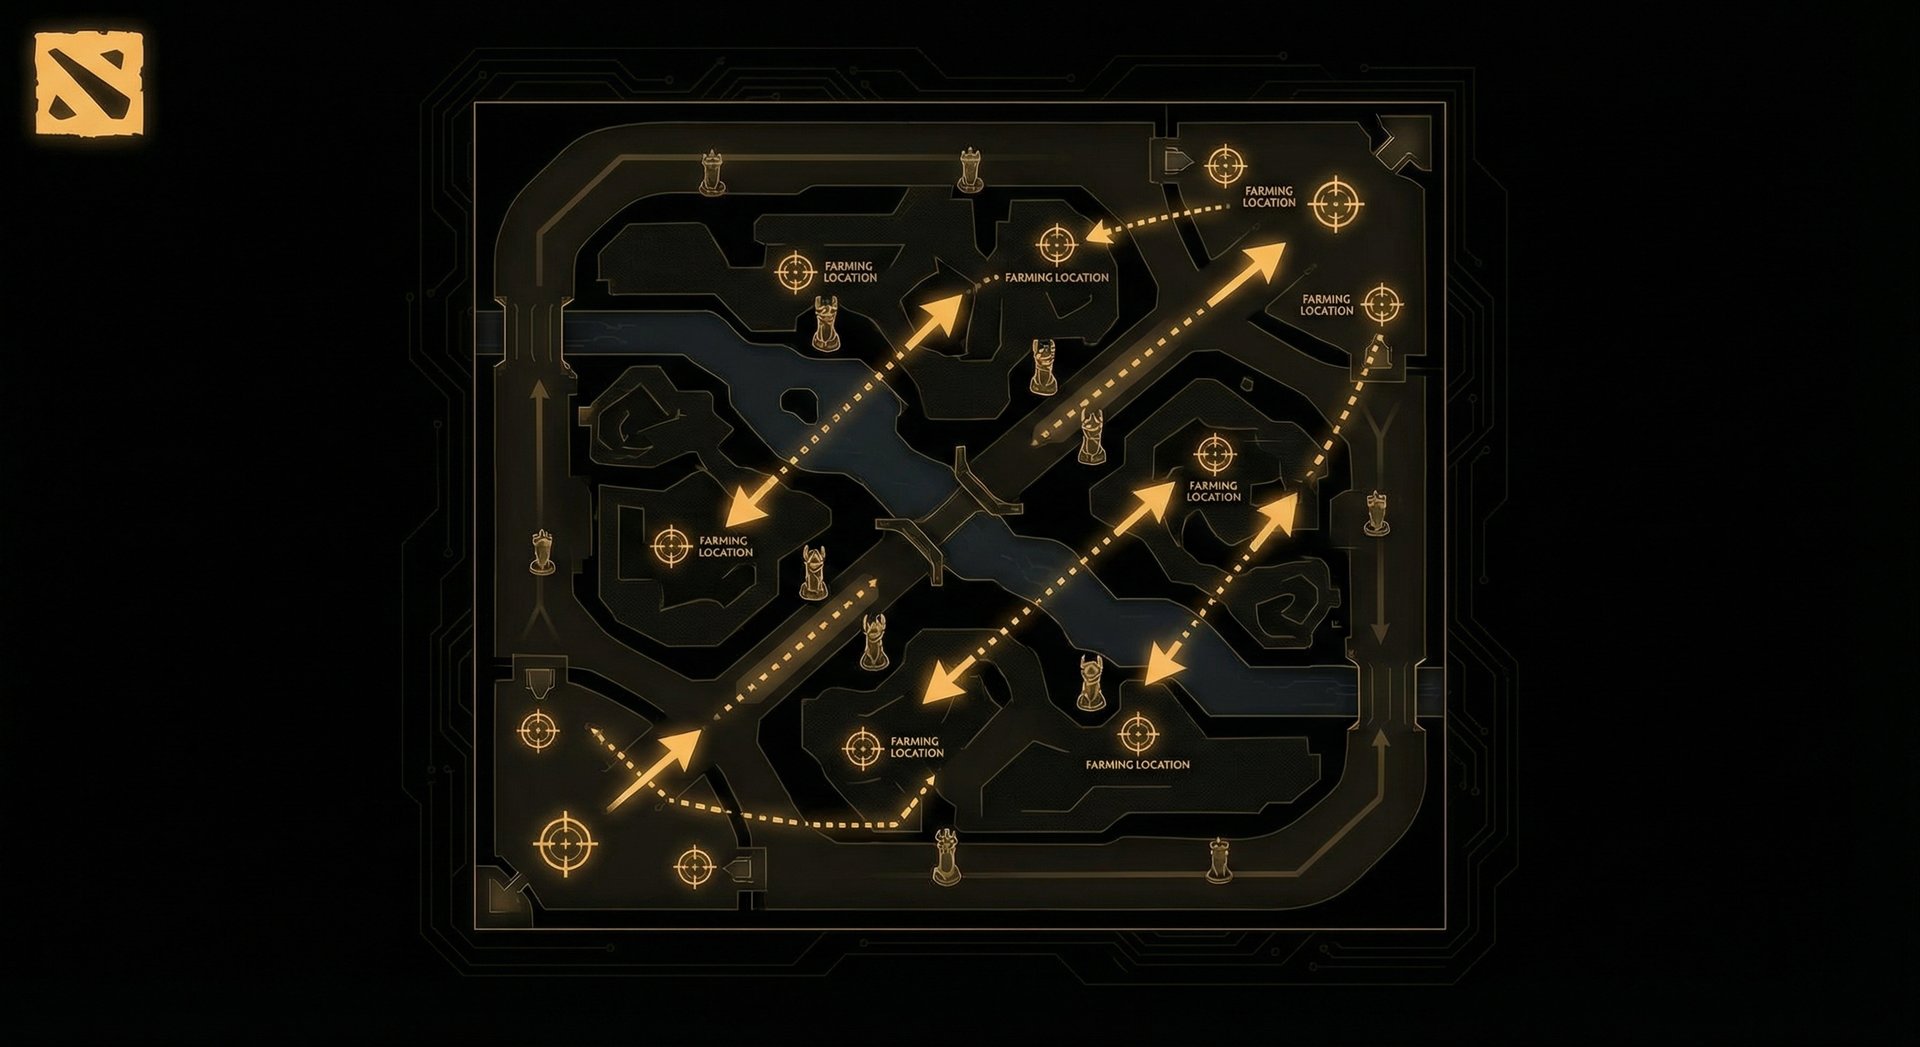
Tip 25: Master Efficient Farming Patterns
Gold wins games, and farming efficiency is the primary determinant of your gold income. Even small improvements in farming patterns compound into thousands of extra gold over a game.
The carry farming rotation:
- Push the lane to the enemy tower (hitting all creeps)
- Move to the nearest jungle camp and clear it
- Move to the next jungle camp
- Return to lane as the next creep wave arrives
- Repeat
Key principles:
- Never stand still. If you’re not last-hitting, you should be moving to the next camp or lane.
- Stack camps when passing by. A stacked camp is worth 2-3x a normal camp. Stack at :53-:55 when you happen to be nearby.
- Use abilities to farm. Spamming abilities on jungle camps dramatically increases farm speed. Don’t save your mana for fights that might not happen — use it to farm faster.
- Farm the dangerous areas when you’re strong, safe areas when you’re weak. If you just got a big item, push the enemy lane. If you just died, farm your own jungle.
- Carry a TP scroll always. When you finish farming one side of the map, TP to the other side instead of walking. Walking wastes 30+ seconds.
CS benchmarks by minute:
| Minute | Herald | Legend | Immortal |
|---|---|---|---|
| 10 | 30-40 | 60-70 | 80-95 |
| 20 | 80-120 | 150-180 | 200-250 |
| 30 | 150-200 | 250-300 | 350-400 |
Compare your CS numbers to these benchmarks. If you’re significantly below, focus entirely on farming efficiency before anything else.
Tip 26: Itemize Reactively, Not Automatically
Following the same item build every game is one of the most common mistakes at every rank. The enemy team composition, your team composition, and the game state should all influence your item choices.
Items you should buy more often:
- BKB: If the enemy has 2+ stuns or significant magic damage, BKB should be your first or second major item. Not third. Not fourth. FIRST or SECOND.
- Spirit Vessel: Against any healing-dependent hero (Huskar, Alchemist, Morphling, Lifestealer). One 2,920 gold item can neutralize a 20,000 net worth enemy carry.
- Blade Mail: Against burst damage heroes (Tinker, Lina, Lion). Especially effective on tanky heroes who get focused in fights.
- Force Staff: Saves you AND your teammates from initiations. Especially good against Clockwerk, Riki, and heroes that rely on close range.
- Glimmer Cape: As support, Glimmer Cape saves teammates from magic burst and provides a soft escape. Buy it every game as position 5.
Items you should buy less often:
- Midas: Unless you’re a specific hero that needs it (Invoker, Arc Warden, Void Spirit in some builds), Midas delays your power spike by 2100 gold. In most games, that gold is better spent on a fighting item.
- Aghanim’s Scepter (as first item): Many heroes have good Aghs upgrades, but it’s rarely the first item you should buy. A BKB or Blink usually has more immediate impact.
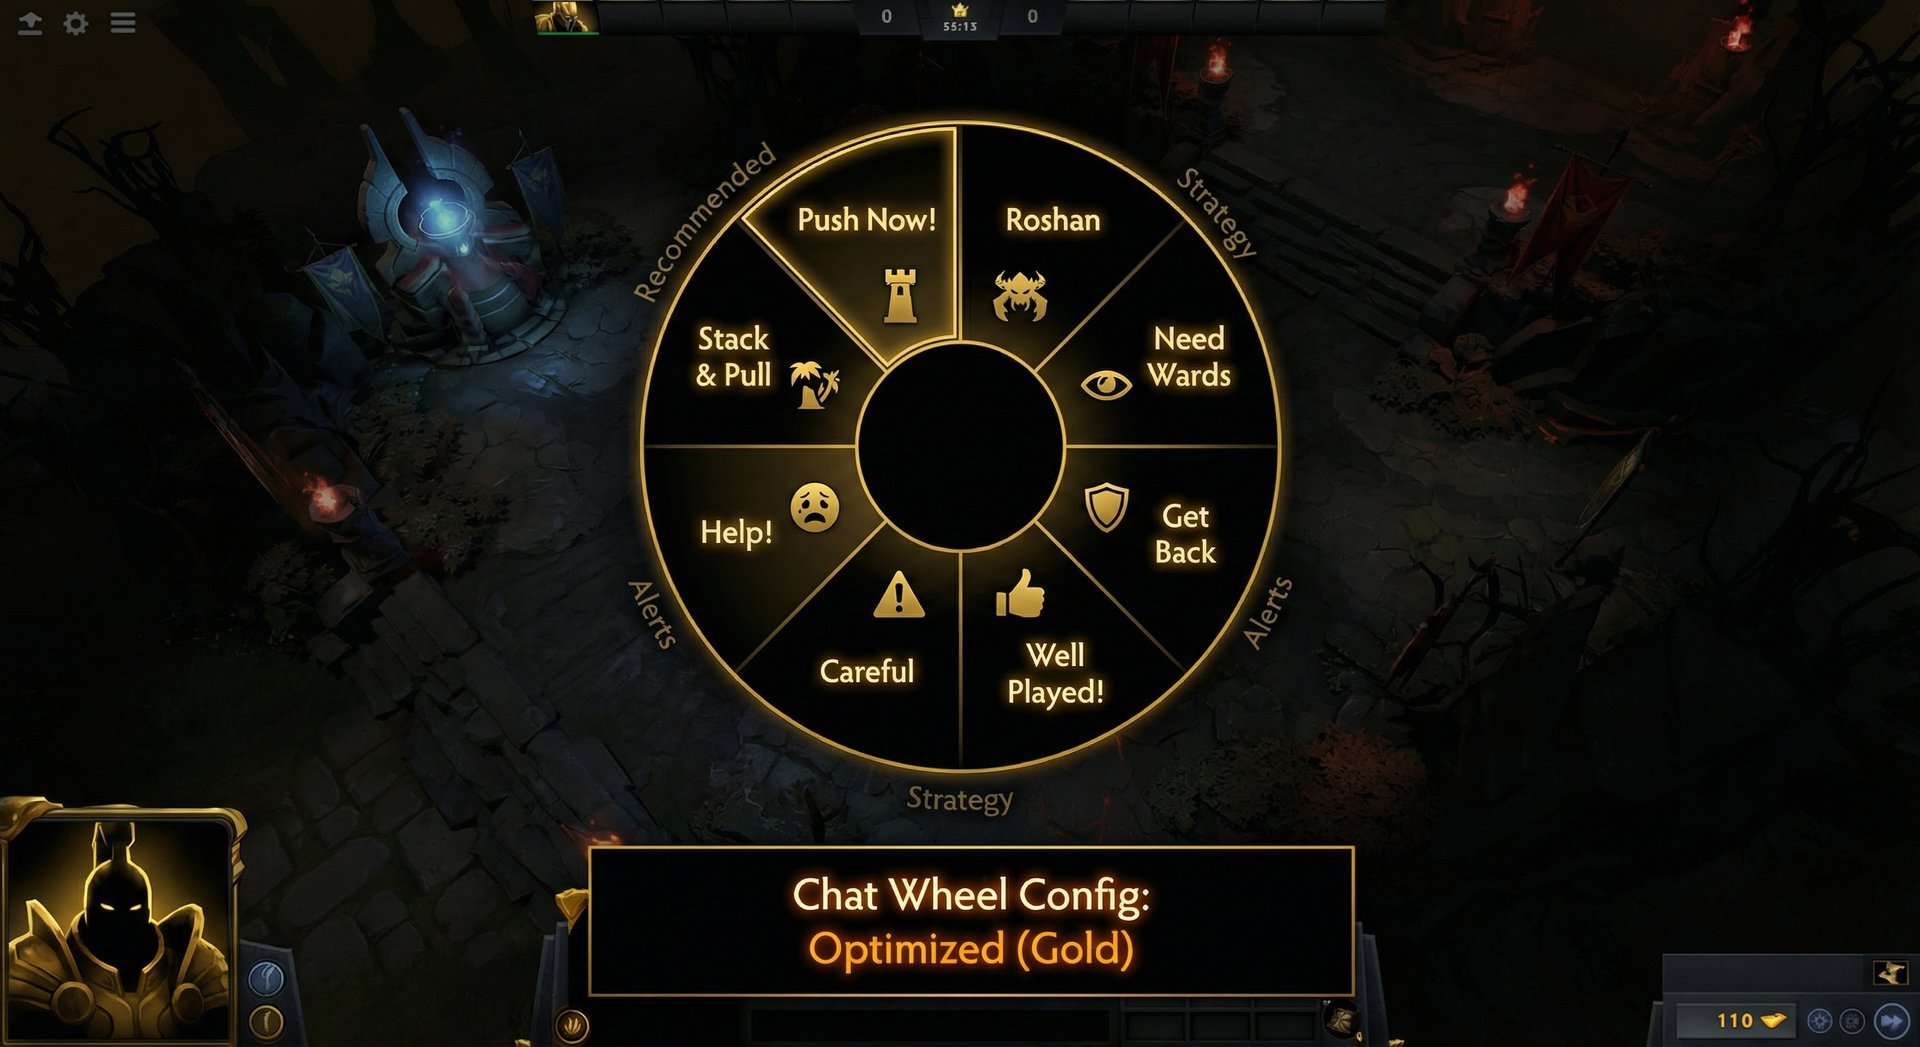
Tip 27: Communicate Efficiently
Communication wins games — but only if it’s efficient. Typing a paragraph in chat wastes time and attention. Use these shortcuts:
Essential communication tools:
- Chat wheel: Customize it with “Push now,” “Get back,” “Need wards,” “Roshan,” and “Smoke gank.” One click = instant communication.
- Alt-click: Alt-clicking your abilities shows cooldown status to your team. Alt-clicking items shows whether you have them. Alt-clicking enemy heroes shows their mana/HP.
- Pinging: Ping enemy heroes when they’re missing. Ping towers when you want to push. Ping Roshan when you want to take it. Don’t spam-ping — one clear ping is enough.
- Ctrl-alt-click: Shares information about enemy items (e.g., “Enemy Phantom Assassin has BKB”).
What to communicate:
- “Smoke” — Suggesting a smoke gank
- “Rosh in 60s” — Roshan timing
- “My ulti is ready” — Ready to fight
- “No bb” — Don’t fight, I can’t buyback
- “Push now” — Capitalize on advantage
What NOT to communicate:
- Blame (“Why did you…”)
- Sarcasm (“Nice ult…”)
- Giving up (“gg end”)
- Micromanaging teammate builds (“Why did you buy…”)
Quick-Reference Summary Table
| # | Tip | Category | Impact | Difficulty |
|---|---|---|---|---|
| 1 | Stop after 2 losses | Mindset | Easy | |
| 2 | Queue at optimal times | Mindset | Easy | |
| 3 | “What could I have done differently” | Mindset | Medium | |
| 4 | Mute aggressively | Mindset | Easy | |
| 5 | Track stats, set micro-goals | Mindset | Medium | |
| 6 | 3-5 hero pool only | Heroes | Easy | |
| 7 | Pick self-sufficient heroes | Heroes | Easy | |
| 8 | Draft position awareness | Heroes | Medium | |
| 9 | Specialize in one role | Heroes | Easy | |
| 10 | Win your lane | Laning | Hard | |
| 11 | Master creep aggro | Laning | Medium | |
| 12 | Don’t die in lane | Laning | Medium | |
| 13 | Secure every rune | Laning | Easy | |
| 14 | Exploit power spikes immediately | Laning | Hard | |
| 15 | Plan after every won fight | Mid-Game | Medium | |
| 16 | Control map with lane pressure | Mid-Game | Hard | |
| 17 | Fight vs farm decisions | Mid-Game | Hard | |
| 18 | Use Smoke of Deceit | Mid-Game | Easy | |
| 19 | Hold buyback after min 30 | Late-Game | Medium | |
| 20 | High ground siege/defense | Late-Game | Hard | |
| 21 | Track enemy cooldowns | Late-Game | Hard | |
| 22 | Roshan timing and control | Late-Game | Medium | |
| 23 | Review replays (5-min method) | Technical | Medium | |
| 24 | Optimize settings/hotkeys | Technical | Easy | |
| 25 | Efficient farming patterns | Technical | Hard | |
| 26 | Reactive itemization | Technical | Hard | |
| 27 | Communicate efficiently | Technical | Easy |
Frequently Asked Questions
Ready to Climb Start Your Boost Today
Team Smurf is the #1 rated Dota 2 boosting service in 2026. Immortal-rank boosters, maximum safety, competitive pricing, 24/7 support.
Get MMR Boost
Calibration Service
Pro Coaching
Final Thoughts
Gaining MMR in Dota 2 isn’t about finding a secret trick or a broken hero. It’s about consistent execution of fundamentals, disciplined mental management, and deliberate practice. The 27 tips in this guide are ordered by importance — if you only implement the first five (stop after 2 losses, queue at optimal times, adopt the self-improvement mentality, mute toxic players, and track your progress), you’ll see measurable results within a week.
For those who want to combine self-improvement with professional help, Team Smurf offers the complete package:
- MMR Boosting — Reach your desired rank while you focus on learning
- Calibration Services — Maximize your seasonal calibration for the best possible starting point
- Coaching — Personalized guidance from Immortal-rank analysts who identify your specific weaknesses
- Low Priority Removal — Stop wasting time in penalty queue and get back to gaining MMR
The climb starts now. Pick one tip, implement it today, and build from there.
Written by Team Smurf’s Immortal-rank analysts — Rankings last verified February 2026


