What Heroes Do Dota 2 Boosters Use The Top 10+ Booster Hero Picks Revealed

If you’ve ever played a ranked Dota 2 match and watched a single enemy hero systematically dismantle your entire team — going 25-0, pushing objectives at lightning speed, and ending the game before your team even hits their power spikes — there’s a good chance you just played against a booster. And there’s an even better chance they were playing one of the heroes on this list.
At Team Smurf, our Immortal-rank boosters have collectively played tens of thousands of ranked games across every bracket from Herald to Divine. We’ve compiled our internal data, combined it with years of professional experience, and put together the definitive guide to what heroes Dota 2 boosters use — and more importantly, why they use them.
Whether you’re trying to boost your MMR, learn to play like an Immortal, or simply understand how to counter that suspiciously good Meepo on the enemy team, this guide covers everything you need to know.
Table of Contents
- Common Traits of Booster Heroes
- Why These Heroes Dominate Lower Brackets
- 1. Meepo — The Quintessential Booster Hero
- 2. Huskar — The Bracket Terrorist
- 3. Broodmother — The Lane Dominator
- 4. Arc Warden — The Economy Breaker
- 5. Visage — The Underrated Menace
- 6. Storm Spirit — The Snowball King
- 7. Tinker — The Map Controller
- 8. Lone Druid — The Split-Push Specialist
- 9. Lycan — The Objective Speed Demon
- 10. Templar Assassin — The Tempo Controller
- 11. Invoker — The Versatile Virtuoso
- 12. Shadow Fiend — The Farming Machine
- Booster Hero Quick-Reference Table
- How to Play Against a Booster
- How Team Smurf Handles Hero Selection
- FAQ
Common Traits of Booster Heroes
Before diving into individual heroes, it’s critical to understand why boosters gravitate toward specific picks. Not every strong hero is a good boosting hero. The difference comes down to a few key traits that all top booster picks share:
1. Low Reliance on Teammates
This is the single most important trait. Boosters are playing in brackets far below their skill level, which means their teammates are significantly worse than they are. A hero that requires coordinated team play — like Io, Oracle, or Winter Wyvern — is almost useless for boosting, no matter how “broken” it might be in professional play.
Booster heroes can solo kill, solo push, and solo win fights. They don’t need their team to set up combos, follow up on initiations, or coordinate rotations. They generate advantages independently.
2. Snowball Potential
Booster heroes convert small early advantages into massive leads. A kill at minute 3 turns into a tower at minute 5 turns into complete map control by minute 10. Heroes with strong snowball mechanics — like Huskar’s Berserker’s Blood scaling or Storm Spirit’s mana-fueled aggression — let skilled players accelerate the game beyond what lower-ranked opponents can handle.
3. High Skill Ceiling
The best booster heroes have an enormous gap between average play and optimal play. This is precisely why they work: at Herald through Legend, opponents have never seen what a truly skilled Meepo or Invoker looks like. The hero’s potential is completely untapped at those brackets, so when an Immortal player unlocks it, the result is devastating.
4. Fast Game-Ending Capability
Boosters want to end games quickly — ideally under 25 minutes. Extended games increase the chance of throws, give enemies time to farm defensive items, and simply waste time when efficiency matters. Heroes that can take Roshan early, push high ground fast, or delete the entire enemy team in seconds are preferred.
5. Strong Laning Phase
Most booster heroes dominate their lane. A booster wants to establish a lead from minute 1. Heroes with strong kill potential in lane (Huskar, Broodmother), or heroes that can farm efficiently and hit power spikes early (Templar Assassin, Shadow Fiend), give the booster the head start they need to snowball.
Why These Heroes Work in Lower Brackets
Understanding why these heroes are so devastating in lower-ranked games is just as important as knowing which heroes they are. Several factors make lower brackets uniquely vulnerable:
- Lack of coordinated responses: Lower-ranked teams almost never smoke gank together, stack disables, or coordinate 5-man pushes to punish a snowballing hero. This gives booster heroes free reign to pick off isolated targets.
- Poor itemization: Herald through Archon players rarely buy Spirit Vessel against Huskar, don’t build Silver Edge against Broodmother’s passive, and never consider Nullifier against evasion heroes. The counters exist — they just aren’t used.
- No vision game: Lower-ranked supports buy minimal wards and almost never deward. This lets heroes like Tinker, Storm Spirit, and Arc Warden move freely across the map without fear of detection.
- Inability to close games: Even when a team has an advantage against a booster, lower-ranked players don’t know how to close out games. They’ll farm jungle instead of pushing high ground, giving the booster time to recover.
- Micro-hero ignorance: Meepo, Arc Warden, Visage, and Lone Druid are rarely seen in lower brackets. Players have almost no experience playing against them and make fundamental errors in how they approach fights.
If you’re struggling in your bracket and want expert help climbing, our Dota 2 coaching service can teach you exactly how to exploit these same weaknesses — or how to shore up your own gameplay to rank up naturally.
1. Meepo — The Quintessential Booster Hero
Why Boosters Pick Meepo
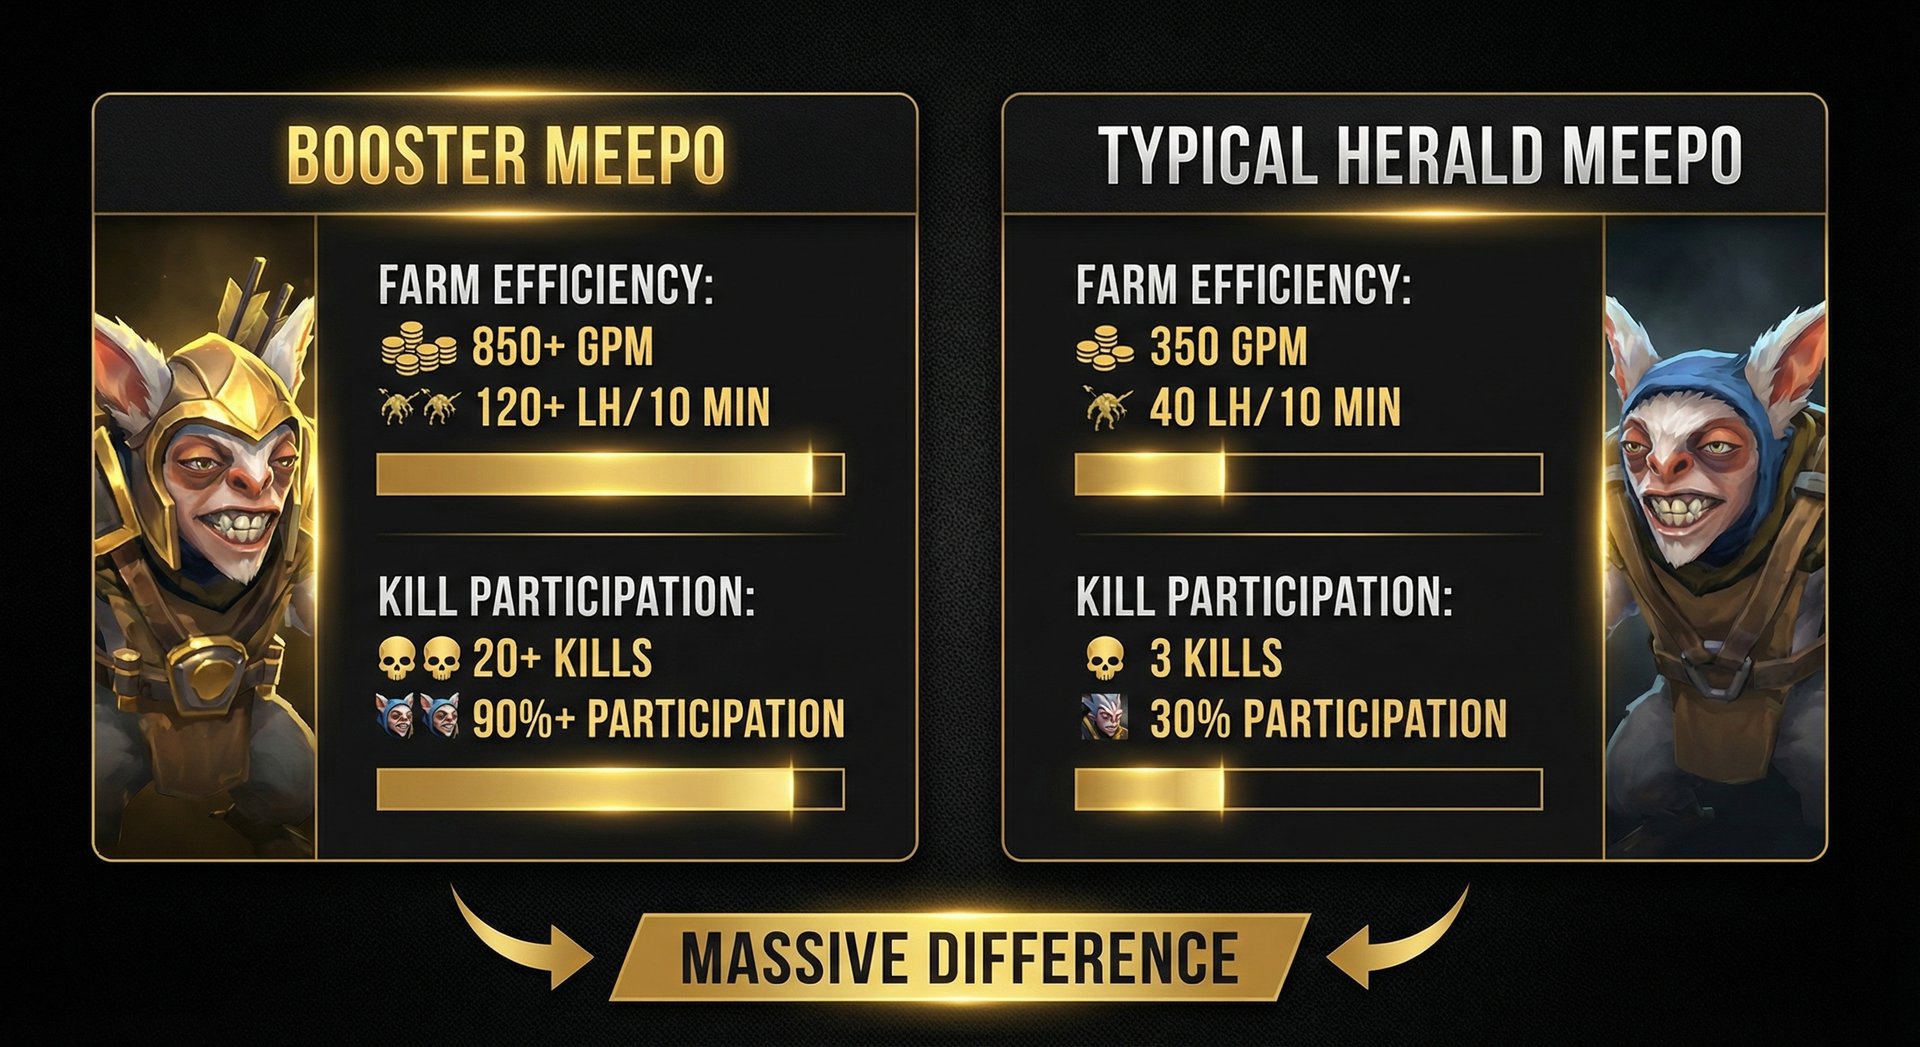
Meepo is, without question, the most iconic booster hero in Dota 2’s history. When people think “smurf hero,” Meepo is the first name that comes to mind — and for good reason. In the hands of an Immortal-rank player, Meepo can end games in 15-20 minutes with a level and networth advantage so obscene that the enemy team literally cannot fight.
Meepo’s power comes from his clones. Each Meepo clone can independently farm jungle camps, push lanes, and contribute to fights. An expert Meepo player can farm the entire map simultaneously, hitting power spikes 5-10 minutes before any other hero in the game. By the time the enemy carry has Battlefury, Meepo has Ethereal Blade, Scythe of Vyse, and is three-shotting supports.
Brackets Meepo Dominates
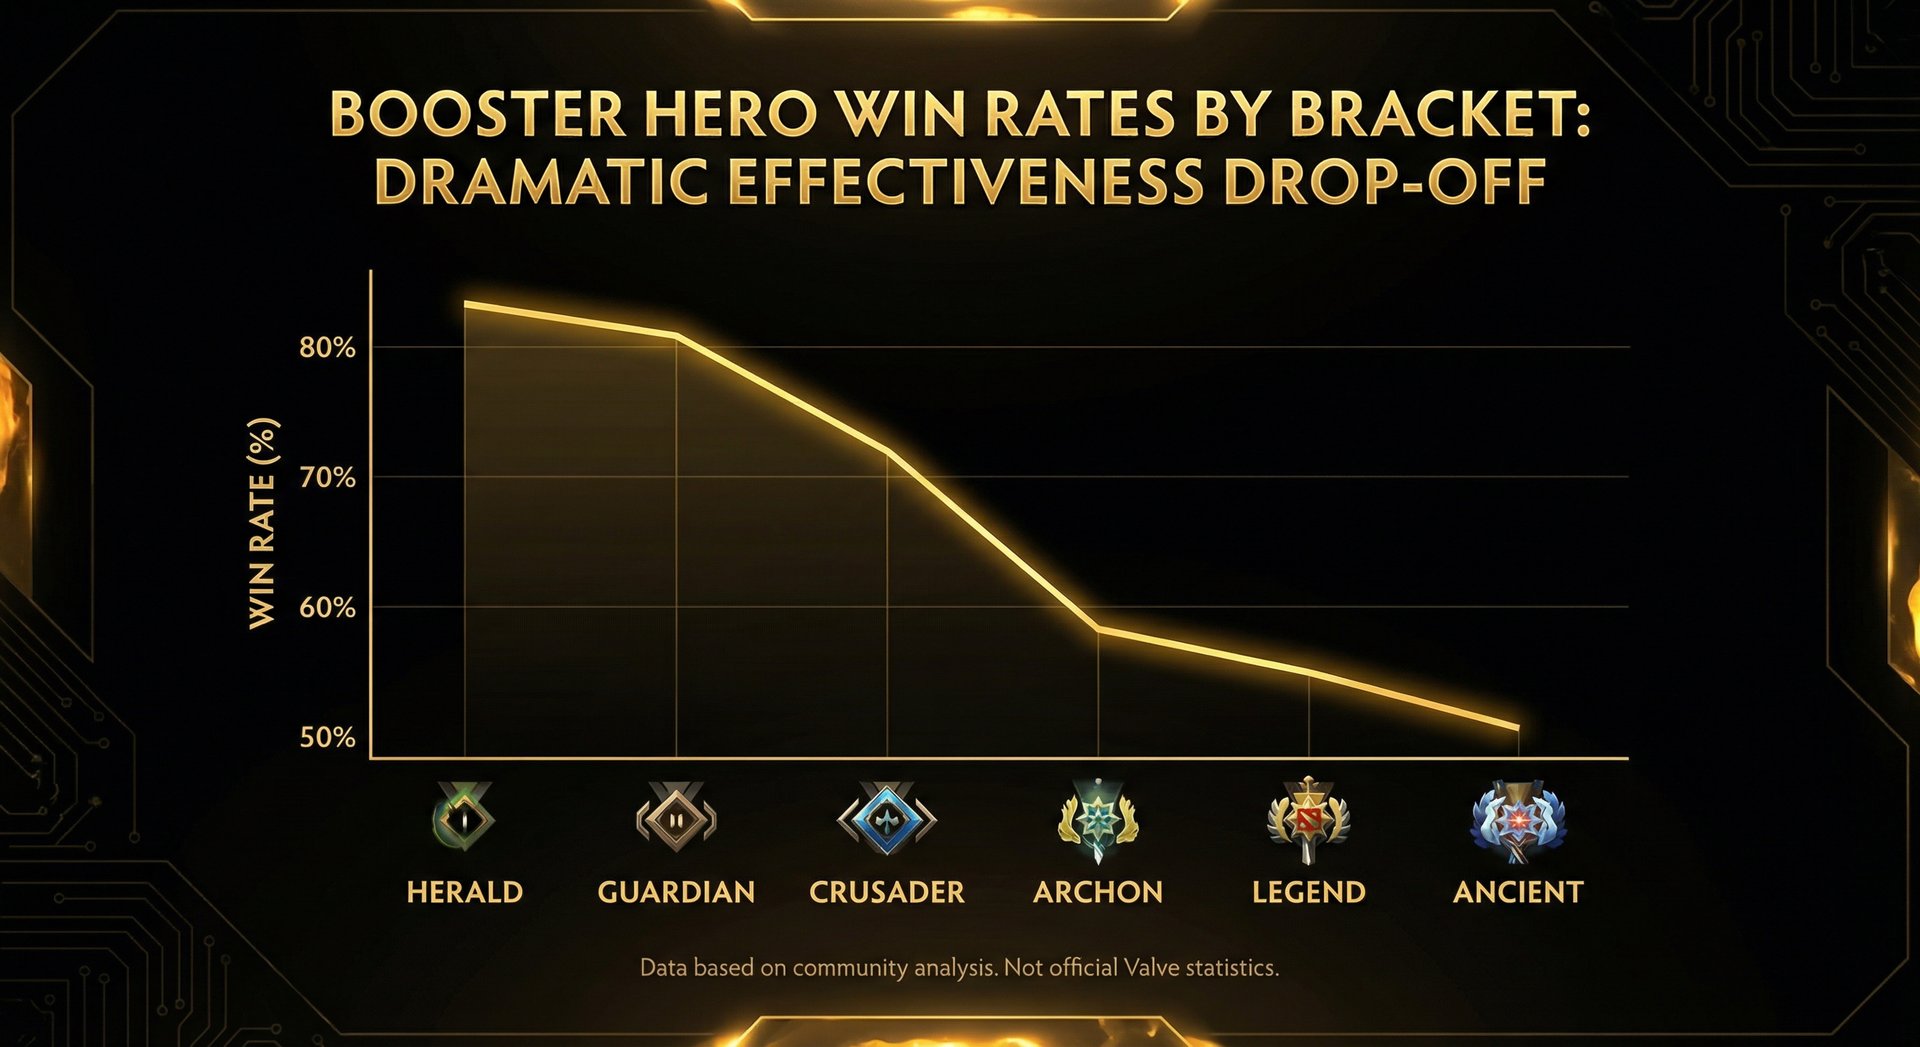
Herald through Legend (0-3850 MMR) — Meepo is almost unbeatable in these brackets when piloted by a booster. Win rates exceed 85% in most cases. The effectiveness starts to decline in Ancient and above, where players understand Meepo’s weaknesses and can draft appropriately.
Win Conditions
- Hit level 4 by minute 3-4 and start stacking/farming jungle with clones
- Achieve Ethereal Blade timing by minute 14-16
- Take Roshan at 15-18 minutes with clone tank
- End the game before enemies hit level 20+ and get their talents/items online
- Net poof combos on isolated heroes for instant kills
Weaknesses
Meepo has clear, exploitable weaknesses — the problem is that lower-bracket players don’t exploit them:
- AoE damage: Earthshaker’s Echo Slam, Elder Titan’s Earth Splitter, and Winter Wyvern’s Winter’s Curse are devastating against clumped Meepo clones
- Shared damage: All Meepos share the same health pool mechanic — kill one, kill them all. Burst damage on an isolated clone can end the hero
- Late game: Meepo falls off hard after 40 minutes. His stat gains don’t scale with late-game items as well as traditional carries
- Specific counters: Ember Spirit (Sleight of Fist + Chains), Sven (Cleave), and Lina (burst damage) are all strong against Meepo
How to Counter Meepo
Draft AoE heroes in the picking phase. Buy Spirit Vessel — the heal reduction is crippling for a hero that relies on Poof healing. Ward aggressively to spot Meepo farming jungle so you can gank the most vulnerable clone. Most importantly, group up early. Meepo thrives against scattered teams. Force 5v5 fights before Meepo is online and you can slow his snowball significantly.
Skill Ceiling Analysis
Skill ceiling: 10/10. Meepo has arguably the highest mechanical ceiling in Dota 2. Tab-poofing, blink-poof combos, net-cancel animations, farming patterns with 4-5 clones across the entire map — the gap between a good Meepo and a great Meepo is astronomical. This is exactly why he’s such an effective booster hero: the potential is enormous, but it takes thousands of hours to unlock.
2. Huskar — The Bracket Terrorist
Why Boosters Pick Huskar
Huskar is the ultimate “cheese” hero for boosting. His Berserker’s Blood passive gives him massive attack speed and magic resistance the lower his HP gets, creating a counterintuitive dynamic where he becomes more dangerous as he takes damage. In lower brackets, players instinctively try to burst Huskar down, not realizing they’re making him stronger.
Huskar’s strength lies in his ability to dominate the laning phase against almost any mid matchup, then immediately translate that into kills and towers. With Armlet of Mordiggian — typically completed by minute 8-10 — Huskar can dive towers and kill almost any hero in the game 1v1.
Brackets Huskar Dominates
Herald through Ancient (0-4620 MMR). Huskar remains effective at higher brackets than most booster heroes because his laning dominance doesn’t require micro skills — it requires game knowledge about when to be aggressive, which boosters have in abundance. However, he drops off in Divine+ where players know to buy Spirit Vessel, draft physical damage, and burst him through BKB.
Win Conditions
- Win mid with Burning Spears harassment
- Rush Armlet (8-10 minutes) and immediately start killing
- Take Roshan at 12-15 minutes with Armlet toggle
- Push high ground with Aegis before 20 minutes
- End the game before physical damage carries come online
Weaknesses
- Physical damage: Berserker’s Blood gives magic resistance, not armor. Physical burst from heroes like Phantom Assassin, Ursa, and Troll Warlord shreds Huskar
- Spirit Vessel: This single item essentially removes Huskar from the game by preventing his healing and dealing percentage-based damage
- Break mechanics: Silver Edge and Viper’s Nethertoxin disable Berserker’s Blood, making Huskar a squishy, low-HP hero with no survivability
- Ancient Apparition: Ice Blast prevents all healing, which is Huskar’s primary survivability mechanic. A single well-timed ult can kill Huskar from across the map
How to Counter Huskar
The single most impactful thing you can do is buy Spirit Vessel. Even one Spirit Vessel on a support changes the entire game dynamic. Beyond itemization, draft at least two sources of physical damage and avoid pure magic damage lineups. Ancient Apparition is the definitive Huskar counter — if you see Huskar picked, last-pick AA and watch the Huskar crumble.
Skill Ceiling Analysis
Skill ceiling: 6/10. Huskar is mechanically simpler than most booster heroes. The skill isn’t in complex combos — it’s in Armlet toggling, knowing your damage thresholds, and understanding when you can and can’t dive. This lower mechanical requirement makes Huskar a popular choice for boosters who prioritize efficiency over flashy plays.
3. Broodmother — The Lane Dominator
Why Boosters Pick Broodmother
Broodmother is a nightmare in lower brackets because she creates a “game within a game.” While the main 4v4 (or even 4v5) fight happens across the map, Broodmother is systematically dismantling a lane, taking towers, and creating map pressure that lower-ranked teams simply cannot handle. They either send heroes to deal with Brood (weakening their team elsewhere) or ignore her (losing towers and map control).
A skilled Broodmother player can take the offlane tier 1 tower by minute 5, the tier 2 by minute 10, and start threatening the base by minute 15 — all while the enemy team is still trying to figure out how to deal with the spiderlings.
Brackets Broodmother Dominates
Herald through Archon (0-3080 MMR). Broodmother’s effectiveness drops significantly in Legend+ where players start to understand how to counter-pick and itemize against her. In these higher brackets, enemies will draft AoE (Axe, Legion Commander, Earthshaker) and buy Crimson Guard to neutralize the spiderlings.
Win Conditions
- Dominate lane with Spawn Spiderlings — kill or zone the enemy out completely
- Take tier 1 tower by minute 5-6
- Build Orchid Malevolence for solo kill potential on any hero
- Create so much map pressure that the enemy team is forced to rotate, opening space for your team
- End the game by minute 20-25 by taking all outer towers and forcing high ground
Weaknesses
- AoE clear: Earthshaker, Axe, Legion Commander, and Timbersaw can wipe spiderlings instantly, removing Brood’s primary damage source and gold income
- Coordinated ganks: 3+ heroes rotating to Brood’s lane with disables can shut her down completely
- Late game: Broodmother falls off significantly past 35 minutes as heroes get enough AoE and armor to deal with spiderlings
- Specific counters: Axe (Counter Helix), Earthshaker (Echo Slam), Kunkka (Tidebringer), Sand King (Sand Storm + Epicenter)
How to Counter Broodmother
The best counter is at the draft stage. If you see a Broodmother pick, grab Axe, Earthshaker, or Legion Commander. In-game, buy Crimson Guard on your tanky offlaner to neutralize spiderling damage. Most importantly, don’t ignore her. Broodmother thrives when left alone. Send a rotation with two stuns to her lane every few minutes, and she’ll quickly fall behind.
Skill Ceiling Analysis
Skill ceiling: 7/10. Broodmother requires strong micro skills for spiderling management, excellent map awareness to avoid ganks, and deep knowledge of lane matchups to know when to be aggressive versus when to play safe. The difference between a good and great Brood is in spiderling micro — hiding them in trees, body-blocking with them, and using them to scout.
4. Arc Warden — The Economy Breaker
Why Boosters Pick Arc Warden
Arc Warden is one of the most terrifying booster heroes because he breaks the fundamental economy of Dota 2. His Tempest Double creates a perfect copy of himself with all items and abilities — essentially giving the player two heroes worth of impact. In the hands of an Immortal-rank player, this means two heroes’ worth of damage, two heroes’ worth of pushing power, and two heroes’ worth of map pressure.
Arc Warden can simultaneously farm two lanes, push two lanes, or send his Tempest Double to fight while keeping his real hero safe. Lower-ranked players are completely overwhelmed by this dual-threat playstyle.
Brackets Arc Warden Dominates
Herald through Legend (0-3850 MMR). Arc Warden is extremely effective in these brackets because players don’t understand how to focus the real hero, don’t pressure him in lane, and don’t end games before he hits his power spikes. In Ancient+, players understand Arc Warden’s timing windows and will push aggressively to end before he’s online.
Win Conditions
- Survive laning phase and farm Midas + Maelstrom by minute 16-18
- Use Tempest Double to push side lanes while real hero farms jungle
- Hit Gleipnir + Bloodthorn timing for devastating combo burst
- Take Roshan with Tempest Double tanking
- Siege high ground by sending Tempest Double forward while real hero stays safe
Weaknesses
- Weak laning: Arc Warden has one of the weakest early games of any mid hero. Aggressive laners like Huskar, Viper, and Razor can zone him out completely
- Timing dependent: If Arc Warden doesn’t hit his item timings, he becomes a liability. Aggressive push lineups can end the game before he’s relevant
- High complexity: Even for boosters, Arc Warden requires constant attention to Tempest Double cooldowns, item usage, and positioning
- Gap closers: Spirit Breaker, Spectre, and Storm Spirit can jump the real Arc Warden, bypassing the Tempest Double safety net
How to Counter Arc Warden
Punish Arc Warden’s weak early game with aggressive mid heroes. Smoke gank him before his first item timing. Draft gap-closers who can reach the real Arc Warden in fights. Most importantly, end the game early. Every minute past 30 makes Arc Warden exponentially more dangerous.
Skill Ceiling Analysis
Skill ceiling: 9/10. Arc Warden requires managing two heroes simultaneously, each with a full complement of active items. The mechanical demands are immense — using Tempest Double items on separate cooldowns, positioning two heroes in fights, and maintaining farm efficiency across the entire map.
5. Visage — The Underrated Menace
Why Boosters Pick Visage
Visage is perhaps the most underrated booster hero in Dota 2. He’s rarely seen in pubs, which means lower-ranked players have almost zero experience playing against him. This unfamiliarity is itself a massive advantage — players don’t know Visage’s damage, don’t respect his Familiars, and don’t understand his power spikes.
Visage’s Familiars are incredibly powerful in the early-to-mid game. They deal massive burst damage, can stun in an AoE, and can tank tower shots for pushes. A skilled Visage player can kill any hero in the game at level 6 with a simple combo: drop both Familiars’ damage charges, Soul Assumption for the nuke, and auto-attack to finish.
Brackets Visage Dominates
Herald through Ancient (0-4620 MMR). Visage maintains effectiveness at higher brackets than most booster heroes because of his sheer unfamiliarity. Even Ancient players rarely encounter Visage and don’t intuitively understand his damage output.
Win Conditions
- Hit level 6 and immediately start killing with Familiars
- Rush Helm of the Overlord for additional micro unit and aura stacking
- Take towers rapidly with Familiar tanking and damage
- Build Solar Crest for amplified burst on priority targets
- End the game before enemies get enough AoE to wipe Familiars efficiently
Weaknesses
- AoE damage kills Familiars: Heroes with reliable AoE like Lina, Leshrac, and Dragon Knight can destroy Familiars quickly, removing Visage’s primary damage source
- Familiar management: Familiars that die give significant gold bounty. Losing them repeatedly can actually feed the enemy team
- Late game falloff: Visage’s burst becomes less impactful as enemies build BKBs and HP items
- Micro intensive: Requires managing 2+ additional units with separate abilities
How to Counter Visage
Focus on killing Familiars — they give good gold and have a long cooldown. Draft heroes with reliable AoE damage. Build Crimson Guard to reduce Familiar physical damage. In lane, harass Visage aggressively before level 6; he’s relatively weak without his ultimate.
Skill Ceiling Analysis
Skill ceiling: 8/10. Visage requires precise Familiar micro — stunning at the right time, resummoning before they die, positioning them for maximum damage. The difference between an average Visage and an expert is the speed and precision of their Familiar management.
6. Storm Spirit — The Snowball King
Why Boosters Pick Storm Spirit
Storm Spirit is the definition of a snowball hero. Once he hits level 6 and gets his Ball Lightning ultimate, Storm Spirit can zip across the map at will, picking off isolated heroes, dodging abilities, and creating chaos that lower-ranked teams simply cannot respond to. His mobility is unparalleled — no other hero in Dota 2 can move as freely and as quickly as a farmed Storm Spirit.
Boosters love Storm because he converts small advantages into enormous ones. A single kill in the laning phase leads to a faster Orchid Malevolence, which leads to solo kills on any hero without an escape, which leads to more items, which leads to complete map domination. The snowball is relentless.
Brackets Storm Spirit Dominates
Crusader through Divine (1540-5420 MMR). Storm Spirit is unique among booster heroes because he’s effective across a wider range of brackets. His mobility and playmaking potential remain relevant even at higher MMR, though his effectiveness in Herald/Guardian is slightly lower because the games tend to be chaotic enough that Storm’s map control advantage matters less.
Win Conditions
- Win or go even in the mid lane — Storm doesn’t need to dominate, just farm
- Hit level 6 and start ganking side lanes immediately
- Rush Orchid Malevolence (or Kaya into Orchid) for solo kill potential
- Transition into Bloodthorn + Aghanim’s Scepter for late-game scaling
- Control the map by zipping to key fights and objectives
Weaknesses
- Mana-dependent: Storm Spirit without mana is a melee creep. Silences, mana burns, and Anti-Mage’s Mana Break completely shut him down
- Anti-Mage: The hardest counter. Mana Break drains Storm’s mana pool, Counterspell reflects Orchid, and Mana Void deals massive damage to Storm’s large mana pool
- Instant disables: Lion’s Hex, Shadow Shaman’s Hex, and Doom’s Doom can catch Storm before he can zip away
- Silences: Orchid, Global Silence, and Last Word all prevent Storm from using Ball Lightning
- Needs farm: Storm requires consistent gold income. If he falls behind, his zip range becomes too short to be effective
How to Counter Storm Spirit
Draft Anti-Mage if possible — it’s the most one-sided counter in Dota 2. Alternatively, pick heroes with instant disables (Hex effects, Doom) or silences. Buy Orchid Malevolence on a support or offlaner. Ward aggressively around mid to spot Storm’s ganking rotations. Stick together after Storm hits 6 — he preys on isolated heroes.
Skill Ceiling Analysis
Skill ceiling: 9/10. Storm Spirit’s Ball Lightning requires incredible game sense — knowing exactly how far you can zip with your current mana, when you can commit for a kill versus when you need to retreat, and managing your mana pool across extended fights. The difference between an average Storm and an Immortal Storm is night and day.
7. Tinker — The Map Controller
Why Boosters Pick Tinker
Tinker is one of the most frustrating heroes to play against, and that frustration factor is precisely why boosters pick him. Tinker’s Rearm allows him to reset all his item and ability cooldowns infinitely, which means he can teleport to any lane, push it out with March of the Machines and Laser/Rockets, then immediately teleport to another lane and repeat.
Against a skilled Tinker, lower-ranked teams feel like they’re playing against five heroes. Every lane is pushed, every fight has rockets raining down, and no objective feels safe. The psychological pressure alone causes lower-ranked teams to tilt, make mistakes, and lose games they should win.
Brackets Tinker Dominates
Herald through Legend (0-3850 MMR). Tinker is extremely effective in lower brackets where players don’t buy Blade Mail, don’t smoke gank him in trees, and don’t push as 5 to force objectives. In Ancient+, Tinker’s effectiveness drops as players understand how to punish his predictable teleport patterns.
Win Conditions
- Farm Boots of Travel as quickly as possible (typically 8-12 minutes)
- Maintain constant map pressure by teleporting to every lane
- Build Blink Dagger for aggressive Laser/Rocket combos
- Stack camps with March of the Machines for accelerated farming
- Transition into Overwhelming Blink + Shiva’s Guard for team fight dominance
- Never let enemies push — always keep lanes pushed out
Weaknesses
- Gap closers: Spirit Breaker, Spectre, and Clockwerk can reach Tinker regardless of his positioning
- Blade Mail: Tinker’s burst damage is largely reflected back, and his low HP pool means he can kill himself with Laser/Rockets
- BKB-piercing disables: Black Hole, Chronosphere, and Berserker’s Call all catch Tinker through BKB
- Predictable patterns: Tinker always teleports to specific tree spots. Warding these spots reveals his location
- Zeus: Lightning Bolt and Nimbus provide true sight, revealing Tinker when he blinks into trees
How to Counter Tinker
Buy Blade Mail — it’s the single most cost-effective counter. Draft Spirit Breaker for guaranteed initiation. Ward the common Tinker teleport spots (the trees next to mid lane, ancient camp spots). Smoke gank him when you know his Blink Dagger is on cooldown. And most importantly, push aggressively as 5. Tinker struggles to defend high ground against a coordinated push.
Skill Ceiling Analysis
Skill ceiling: 8/10. Tinker requires rapid item usage (Rearm resets mean you’re constantly using 4-6 active items), precise Blink positioning, and excellent map awareness. The APM (actions per minute) requirement is among the highest in Dota 2.
8. Lone Druid — The Split-Push Specialist
Why Boosters Pick Lone Druid
Lone Druid is effectively two heroes in one — the Druid himself and his Spirit Bear. The Bear can carry items, hit towers, and fight independently, which gives Lone Druid unparalleled split-push capability. A skilled LD player can push a lane with the Bear while keeping the Druid safe in the jungle or at a different objective.
The hero’s versatility is another draw. Lone Druid can be played as a right-click carry, a pushing specialist, or even a tanky frontliner depending on the game. This flexibility makes him difficult to counter-pick, especially in lower brackets where players don’t understand his various builds.
Brackets Lone Druid Dominates
Herald through Archon (0-3080 MMR). Lone Druid’s effectiveness is tied to how well the enemy team can punish split-pushing. In lower brackets, teams rarely coordinate to kill the Bear or gank the Druid, making split-push strategies extremely effective.
Win Conditions
- Win lane with Bear harassment and early Orb of Venom
- Rush Assault Cuirass on Bear for tower-melting attack speed
- Take towers systematically across the map
- Use Bear to scout, push, and create map pressure
- End the game with Roshan and a final push by minute 25-30
Weaknesses
- Bear death: When the Spirit Bear dies, it has a long cooldown and the Druid loses his primary damage source
- Burst on Bear: Heroes that can focus and kill the Bear quickly (Ursa, Troll Warlord) neutralize LD
- Kiting: Lone Druid is melee and can be kited by ranged heroes with slows and disables
- Late game: While LD can scale, he’s often outcarried by traditional hard carries past 45 minutes
How to Counter Lone Druid
Focus the Bear in fights — killing it significantly reduces LD’s impact. Draft heroes with strong burst damage that can delete the Bear quickly. Use crowd control to kite both the Druid and the Bear. In the laning phase, contest LD’s farm aggressively to delay his item timings.
Skill Ceiling Analysis
Skill ceiling: 8/10. Requires constant micro of two units, managing separate item sets, and understanding when to commit the Druid versus keeping him safe. Expert LD players can fight with both units independently, creating two threats simultaneously.
9. Lycan — The Objective Speed Demon
Why Boosters Pick Lycan
Lycan’s identity is speed. He takes towers faster than almost any other hero in the game, kills Roshan at absurdly early timings, and ends games before the enemy team realizes what’s happening. Lycan’s Shapeshift gives him maximum movement speed and critical strikes, making him impossible to run from and deadly in short engagements.
Boosters pick Lycan when they want to end games in under 20 minutes. His wolves provide scouting, his Howl buff affects all allied units, and his Shapeshift ultimate makes him one of the fastest pushers in Dota 2. The entire gameplan is simple: farm efficiently, take Roshan early, and push down towers before the enemy can respond.
Brackets Lycan Dominates
Herald through Legend (0-3850 MMR). Lycan thrives in brackets where teams don’t punish his greedy jungle farming, don’t contest Roshan, and don’t coordinate defenses against his pushes. In higher brackets, teams will smoke gank Lycan in jungle and contest every Roshan attempt.
Win Conditions
- Farm jungle efficiently with wolves from level 1
- Rush Helm of the Overlord for additional creep and pushing power
- Take Roshan at minute 14-16 with summons tanking
- Push down towers with Aegis, wolves, and Helm creep
- End the game before 25 minutes
Weaknesses
- Countered by control: Hex, stuns, and roots during Shapeshift neutralize Lycan’s speed advantage
- Weak without Shapeshift: Lycan without his ultimate is a mediocre right-clicker. Teams that bait out Shapeshift can fight him during the cooldown window
- Falls off hard: Lycan’s pushing power becomes less relevant once both teams are six-slotted
- Predictable gameplan: Lycan always wants to push. Teams that understand this can set up defenses and traps
How to Counter Lycan
Contest Roshan — ward the pit and be ready to fight when Lycan inevitably attempts it. Draft heroes with reliable lockdown (Beastmaster, Bane, Lion). Buy Ghost Scepter on supports to survive Shapeshift dives. Push your own lanes to force Lycan to defend instead of attack.
Skill Ceiling Analysis
Skill ceiling: 5/10. Lycan is one of the mechanically simpler booster heroes. The skill is in macro-level decision making — when to push, when to Roshan, when to fight versus farm. His micro requirements are minimal compared to Meepo or Arc Warden.
10. Templar Assassin — The Tempo Controller
Why Boosters Pick Templar Assassin
Templar Assassin (TA) is the quintessential tempo mid hero. She dominates most mid matchups with Refraction and Psi Blades, hits a devastating power spike with Desolator + Blink Dagger, and can take Roshan earlier and faster than almost any other hero. Boosters pick TA because she’s a reliable, consistent hero that wins games through superior farm efficiency and mid-game dominance.
TA’s strength is in her timing window. With Desolator at minute 12-14 and Blink Dagger at minute 16-18, TA can one-shot supports with a single Meld Strike and delete carries with a two-hit combo. This window, when combined with a Roshan kill and Aegis, is almost impossible for lower-ranked teams to handle.
Brackets TA Dominates
Crusader through Divine (1540-5420 MMR). TA is one of the few booster heroes that remains effective at higher brackets because her laning and farming efficiency don’t depend on opponent ignorance — they depend on the booster’s own skill. However, she’s less effective in Herald/Guardian where games are too chaotic and long for her timing-based gameplan.
Win Conditions
- Dominate mid with Refraction damage block and Psi Blades harass
- Stack and clear ancient camps with Psi Blades splash for accelerated farming
- Rush Desolator for massive armor reduction and burst damage
- Add Blink Dagger for initiation and escape
- Take Roshan at minute 15-18 with Refraction charges tanking
- End the game during the 20-30 minute power spike
Weaknesses
- Refraction removal: DoT effects (Venomancer, Viper, Jakiro) strip Refraction charges quickly, removing both her offense and defense
- Armor: TA deals physical damage. Heroes that build armor or have natural armor (Dragon Knight, Timbersaw) are hard to burst
- Late game: TA falls off significantly past 40 minutes as enemies build armor and HP that she can’t burst through
- Burst through Refraction: Heroes that can deal damage in large chunks (Lina’s Laguna Blade, Lion’s Finger of Death) can remove Refraction instances efficiently
How to Counter Templar Assassin
Draft DoT heroes to strip Refraction. Viper is the classic TA counter — Nethertoxin removes Refraction, Corrosive Skin deals damage over time, and Viper Strike slows TA’s mobility. In general, any hero that can apply damage in small, frequent instances counters TA’s Refraction. Also consider warding TA’s ancient stack spots to deny her accelerated farming.
Skill Ceiling Analysis
Skill ceiling: 7/10. TA requires precise Psi Blades positioning for splash harass, efficient ancient stacking/clearing, and excellent timing awareness to know when to fight versus farm. Her trap placement and meld strike positioning add additional layers of skill expression.
11. Invoker — The Versatile Virtuoso
Why Boosters Pick Invoker
Invoker is Dota 2’s most complex hero, with 10 different spells available through his unique Quas-Wex-Exort invocation system. In the hands of an Immortal player, Invoker can fill any role — burst damage dealer, crowd controller, push specialist, or teamfight disruptor. This versatility makes him impossible to counter-pick because he can adapt his spell usage to any situation.
The reason Invoker is so effective for boosting is simple: lower-ranked players have never seen an Invoker use all 10 spells in rapid succession. When a skilled Invoker drops Tornado, EMP, Chaos Meteor, Deafening Blast, Cold Snap, and Sun Strike in a single fight, the enemy team is completely overwhelmed. They’ve never encountered that level of spell sequencing and have no idea how to respond.
Brackets Invoker Dominates
Herald through Ancient (0-4620 MMR). Invoker’s effectiveness scales directly with the booster’s skill. An exceptional Invoker player can dominate in any bracket, but the hero truly shines in brackets where enemies don’t understand his spell interactions and don’t respect his kill potential.
Win Conditions
- Quas-Exort build: Win mid with Forge Spirits and Cold Snap harass, farm efficiently, and burst heroes with Sun Strike + Meteor + Deafening Blast combo
- Quas-Wex build: Create chaos with Tornado + EMP, draining enemy mana pools and rendering them useless in fights
- Transition into Aghanim’s Scepter for reduced invoke cooldown and devastating teamfight combos
- Use Sun Strike for global kill potential — securing kills across the map without leaving lane
- Scale into late game as one of the few mid heroes that remains relevant past 45 minutes
Weaknesses
- Weak early levels: Invoker has limited spells available before level 4-5, making him vulnerable to aggressive mid heroes
- BKB: Black King Bar blocks most of Invoker’s spells, significantly reducing his teamfight impact
- Gap closers: Heroes that can jump Invoker before he gets his combo off (Spirit Breaker, Phantom Assassin, Storm Spirit) are problematic
- Silence: Invoker relies entirely on spell casting. A well-timed silence removes him from fights completely
How to Counter Invoker
Pressure Invoker in the laning phase before he gets his spell toolkit online. Draft heroes with BKB-piercing disables. Buy BKB early to negate his combo damage. Orchid Malevolence is devastating against Invoker — a silenced Invoker is a useless Invoker. Anti-Mage and Nyx Assassin are strong natural counters due to mana burn and Spiked Carapace reflecting spells.
Skill Ceiling Analysis
Skill ceiling: 10/10. Invoker has the highest skill ceiling of any hero in Dota 2 alongside Meepo. Mastering all 10 spells, knowing the optimal combo sequences for every situation, and executing them under pressure requires thousands of hours of practice. The mechanical demands are extreme — rapid Quas/Wex/Exort switching, Invoke cooldown management, and precise targeting across 6+ spells per fight.
12. Shadow Fiend — The Farming Machine
Why Boosters Pick Shadow Fiend
Shadow Fiend (SF) is the classic mid-lane farmer. His Shadowraze ability gives him unparalleled wave clear and harassment in lane, while Necromastery ensures his damage scales with every last hit. SF can flash-farm the entire map faster than almost any other hero, hitting item timings 5+ minutes before the enemy carry.
Boosters pick SF because he’s a reliable, flexible carry that can be built for physical damage (Desolator, Daedalus) or magical damage (Eul’s Scepter + Blink Dagger combo). His farming speed is his primary weapon — by outfarming the entire enemy team, SF creates an item advantage that lower-ranked players simply cannot overcome.
Brackets Shadow Fiend Dominates
Crusader through Ancient (1540-4620 MMR). SF requires a certain level of game quality to be effective — games need to be structured enough that his farming advantage translates into map control. In Herald, games are too chaotic. In Divine+, players know how to punish SF’s squishy early game.
Win Conditions
- Dominate mid with triple Shadowraze wave clear and harassment
- Stack and clear jungle camps rapidly for accelerated farming
- Hit BKB + damage item timing by minute 20-22
- Use Requiem of Souls for devastating teamfight damage
- Take towers with high physical damage from Necromastery stacks
Weaknesses
- Squishy: SF has terrible base stats and armor. He dies quickly to burst damage and ganks
- Loses souls on death: Dying as SF is doubly punishing because you lose Necromastery stacks, significantly reducing your damage
- Gank vulnerable: SF has no escape mechanism. He relies entirely on positioning and BKB
- Aggressive mids: Heroes like Huskar, Viper, and Queen of Pain can bully SF in lane and prevent his farm
How to Counter Shadow Fiend
Gank SF early and often. Every death costs him Necromastery stacks and delays his item timings. Draft aggressive mid heroes that can bully him in lane (Huskar, Viper, QoP). Buy Spirit Vessel to reduce his sustain from Shadowraze lifesteal. In teamfights, focus SF first — he’s squishy and deals disproportionate damage.
Skill Ceiling Analysis
Skill ceiling: 7/10. SF requires precise Shadowraze aiming (each raze hits at a different distance), excellent last-hit mechanics for Necromastery stacking, and strong positioning in teamfights. The Eul’s combo (Eul’s + Requiem + Shadowraze) requires specific timing that separates good SF players from great ones.
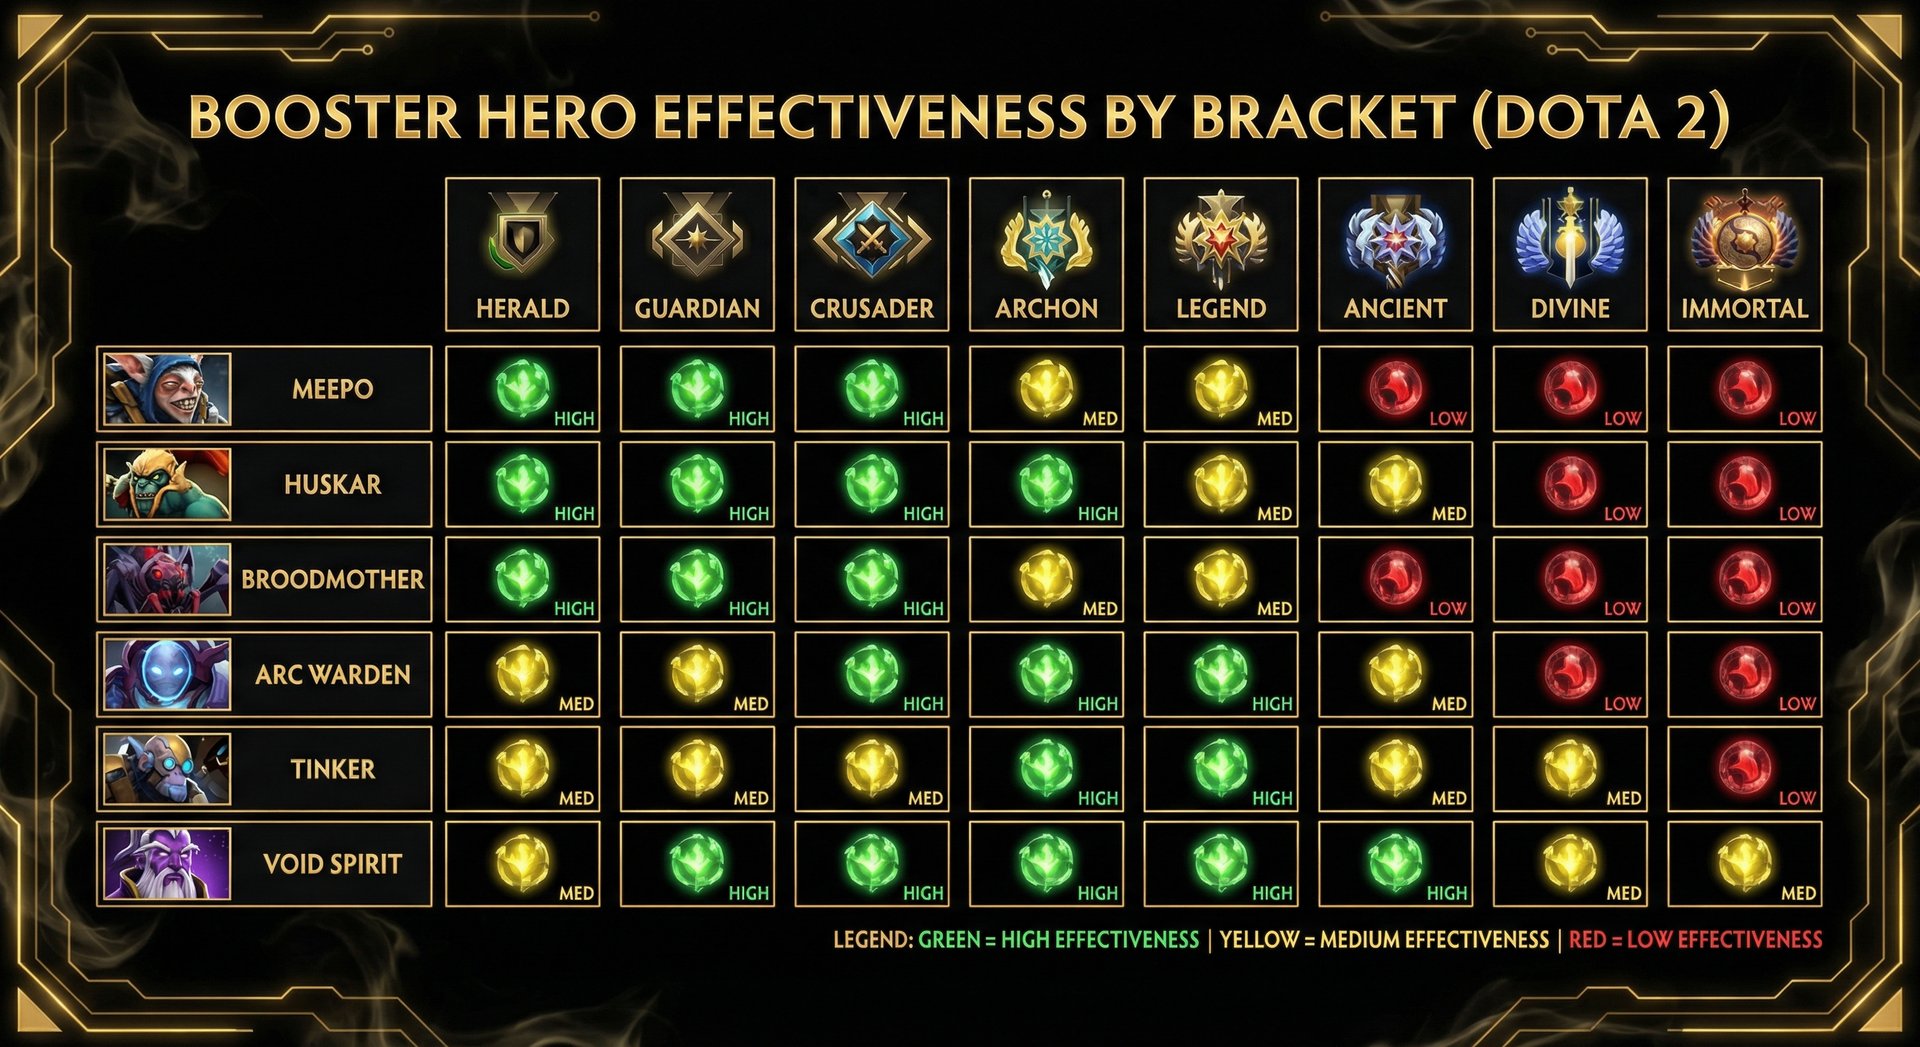
Booster Hero Quick-Reference Table
| Hero | Role | Effective Brackets | Skill Ceiling | Game Length | Primary Strength | Hardest Counter |
|---|---|---|---|---|---|---|
| Meepo | Mid/Carry | Herald–Legend | 10/10 | 15–25 min | Farm speed, XP advantage | Earthshaker, Winter Wyvern |
| Huskar | Mid | Herald–Ancient | 6/10 | 18–28 min | Lane dominance, tower dives | Ancient Apparition, Spirit Vessel |
| Broodmother | Offlane/Mid | Herald–Archon | 7/10 | 20–30 min | Lane pressure, split push | Axe, Earthshaker |
| Arc Warden | Mid/Carry | Herald–Legend | 9/10 | 25–40 min | Economy doubling, siege | Spirit Breaker, aggressive push |
| Visage | Mid/Support | Herald–Ancient | 8/10 | 20–30 min | Unfamiliarity, early burst | AoE damage (Lina, Leshrac) |
| Storm Spirit | Mid | Crusader–Divine | 9/10 | 25–35 min | Mobility, pickoffs | Anti-Mage, Silences |
| Tinker | Mid | Herald–Legend | 8/10 | 30–40 min | Map pressure, wave clear | Spirit Breaker, Blade Mail |
| Lone Druid | Carry/Offlane | Herald–Archon | 8/10 | 25–35 min | Split push, early towers | Bear burst, kiting |
| Lycan | Carry/Offlane | Herald–Legend | 5/10 | 18–25 min | Push speed, early Roshan | Hex, Ghost Scepter |
| Templar Assassin | Mid | Crusader–Divine | 7/10 | 20–30 min | Burst damage, Roshan | Viper, DoT heroes |
| Invoker | Mid | Herald–Ancient | 10/10 | 25–40 min | Versatility, combo potential | Silence, BKB, Anti-Mage |
| Shadow Fiend | Mid | Crusader–Ancient | 7/10 | 22–32 min | Farm speed, wave clear | Ganks, aggressive mids |
How to Play Against a Booster on the Enemy Team
So you’ve identified a booster in your game — they’re going 10-0, their CS is double everyone else’s, and they’re playing one of the heroes on this list. What do you do
Step 1: Identify Them Early
Look for telltale signs in the first 5 minutes:
- Perfect last-hit timing with zero misses
- Unusual hero picks for the bracket (Meepo, Visage, Arc Warden in Guardian)
- Aggressive lane plays that show deep game knowledge
- Efficient jungle stacking and clearing patterns
- Low account level or private profile
Step 2: Adapt Your Gameplan
Don’t try to outplay them individually. You can’t. The skill gap is too large. Instead, focus on team coordination:
- Group up: Boosters thrive on picking off isolated heroes. Stay together as 4-5 after the laning phase
- Buy counters: Spirit Vessel for Huskar, Blade Mail for Tinker, Silver Edge for Broodmother. One item can change the game
- Ward defensively: Don’t try to play aggressively. Ward your own jungle entrances and play safe
- Extend the game: Most booster heroes want to end fast. The longer the game goes, the more equal the teams become
Step 3: Focus Your Resources
In fights, focus all your disables and damage on the booster’s hero. Yes, this means the rest of their team gets free reign — but the booster IS the team. Remove them and you remove 80% of the threat.
Step 4: Communicate
Ping the booster’s movements, call out missing, and coordinate ganks. Lower-ranked teams that communicate well can overcome a significant skill gap from a single booster.
If you’re tired of dealing with boosters and want to climb ranks efficiently, consider our MMR boosting service or coaching sessions where our Immortal analysts teach you to play at a higher level yourself.
How Team Smurf Handles Hero Selection
At Team Smurf, our boosters don’t just blindly spam one hero every game. Our approach to hero selection is strategic, adaptive, and designed to maximize win rate while minimizing game time — which means faster completion of your MMR boost order.
Bracket-Specific Hero Pools
Our boosters use different hero pools depending on the target bracket:
- Herald to Crusader (0-2310 MMR): High-impact snowball heroes like Meepo, Huskar, and Broodmother. Games end in under 20 minutes.
- Archon to Legend (2310-3850 MMR): Versatile mid heroes like Storm Spirit, Templar Assassin, and Invoker. Games require more strategic play.
- Ancient to Divine (3850-5420 MMR): Meta-relevant heroes that aren’t easily countered. Storm Spirit, TA, and SF with adaptive itemization. Games require near-Immortal-level play.
Counter-Pick Awareness
Our boosters are always aware of the enemy draft. If the enemy picks Earthshaker and Winter Wyvern, our booster won’t pick Meepo — they’ll adapt to a hero that’s harder to counter in that specific game. This flexibility is why our win rates remain consistently above 85% across all brackets.
Account Safety First
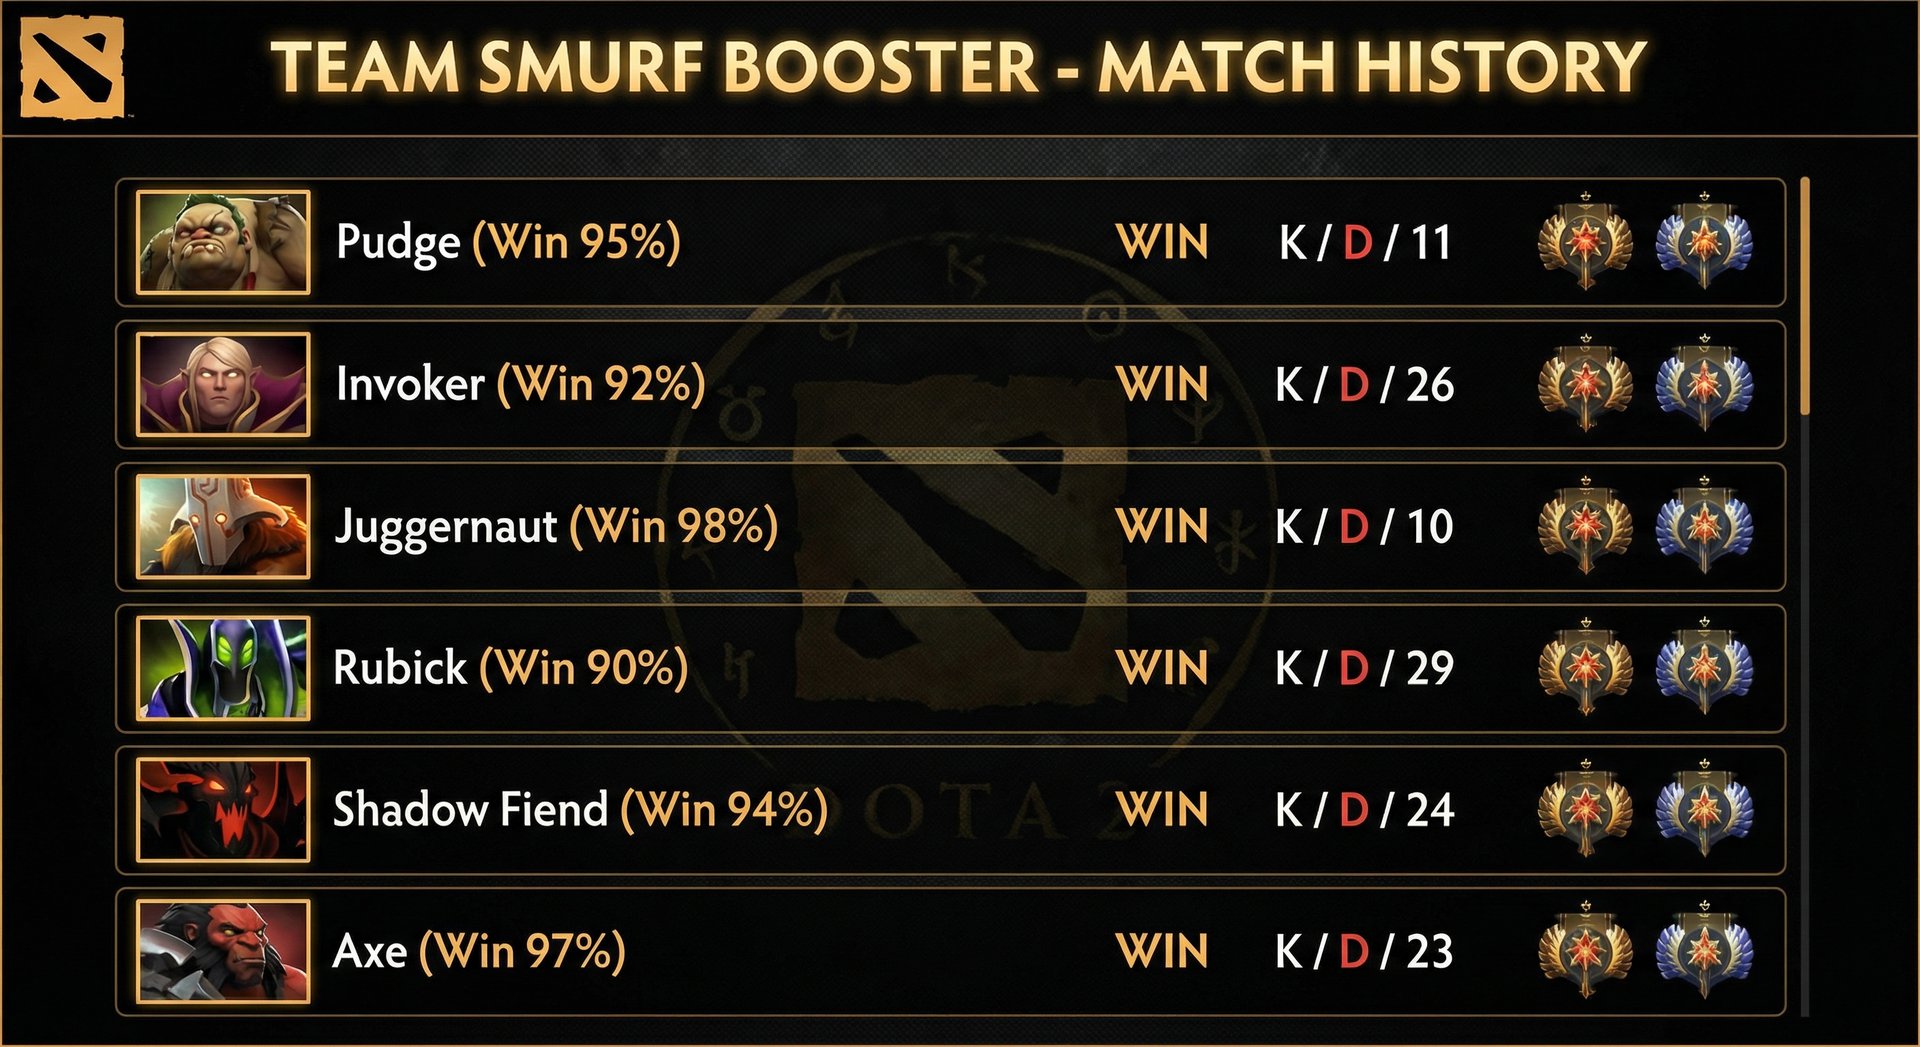
We rotate hero picks to avoid detection. Playing the same hero 50 games in a row with a 95% win rate raises flags. Our boosters vary their picks, play different roles when appropriate, and maintain natural-looking match histories.
Communication with Clients
If you have hero preferences or restrictions, we accommodate them. Some clients don’t want their account associated with certain “smurf heroes.” Our boosters can play a wide range of heroes effectively, so restrictions rarely impact our performance. Contact us through our homepage to discuss your preferences before we begin.
Frequently Asked Questions
Ready to Climb Start Your Boost Today
Team Smurf is the #1 rated Dota 2 boosting service in 2026. Immortal-rank boosters, maximum safety, competitive pricing, 24/7 support.
Get MMR Boost
Calibration Service
Pro Coaching
Final Thoughts
Understanding what heroes Dota 2 boosters use gives you a massive advantage — whether you’re trying to counter them in your ranked games, learn from their playstyle, or simply understand why certain heroes dominate lower brackets. The common thread across all booster hero picks is self-sufficiency, snowball potential, and high skill ceilings that reward expert play disproportionately.
If you’re struggling to climb and want professional help, Team Smurf offers a range of services to suit your needs:
- MMR Boosting — Let our Immortal boosters handle the climb for you
- Calibration Services — Start your ranked journey at the right MMR
- Coaching — Learn to play like a booster yourself
- Low Priority Removal — Get back to ranked faster
Written by Team Smurf’s Immortal-rank analysts — Rankings last verified February 2026


